X3-01 Hardware Manual
Page 6
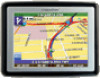
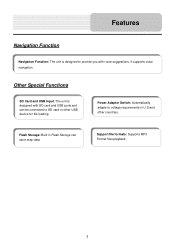
Power Adaptor Switch: Automatically adapts to SD card or other countries. Support file formats: Supports MP3 Format files playback. 5 Other Special Functions SD Card and USB Input: The unit is designed to provide you with SD card and USB ports and can be connected to voltage requirements in Flash Storage can store map data. Features Navigation Function Navigation Function: The unit is designed with route suggestions. Flash Storage: Built in U.S and other USB device for file loading. It supports voice navigation.
Power Adaptor Switch: Automatically adapts to SD card or other countries. Support file formats: Supports MP3 Format files playback. 5 Other Special Functions SD Card and USB Input: The unit is designed to provide you with SD card and USB ports and can be connected to voltage requirements in Flash Storage can store map data. Features Navigation Function Navigation Function: The unit is designed with route suggestions. Flash Storage: Built in U.S and other USB device for file loading. It supports voice navigation.

X3-01 Hardware Manual
Page 7
Accessories Accessories List ITEM NAME Instruction Manual AC Adaptor Car Adaptor USB Cable QTY 2 1 1 1 Windshield Mount Bracket 1 Mount Cradle 1 Dashboard Mount Disk 1 Stylus 1 1GB SD card with maps 1 Pouch 1 NOTE Accessories and their part number are subject to modification without prior notice due to improvements. 6
Accessories Accessories List ITEM NAME Instruction Manual AC Adaptor Car Adaptor USB Cable QTY 2 1 1 1 Windshield Mount Bracket 1 Mount Cradle 1 Dashboard Mount Disk 1 Stylus 1 1GB SD card with maps 1 Pouch 1 NOTE Accessories and their part number are subject to modification without prior notice due to improvements. 6
X3-01 Hardware Manual
Page 17
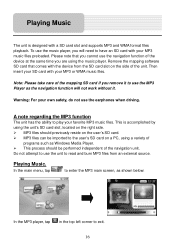
... and burn MP3 files from the SD card slot on a PC, using the music player. In the main menu, tap to enter the MP3 main screen, as shown below: In the MP3 player, tap in the top left corner to play your own safety, do not use the MP3 Player as... the navigation function will need to the user's SD card on the side of the mapping SD card if you are using a variety of programs such as Windows Media Player. This process...
... and burn MP3 files from the SD card slot on a PC, using the music player. In the main menu, tap to enter the MP3 main screen, as shown below: In the MP3 player, tap in the top left corner to play your own safety, do not use the MP3 Player as... the navigation function will need to the user's SD card on the side of the mapping SD card if you are using a variety of programs such as Windows Media Player. This process...
X3-01 Software Manual- English
Page 1
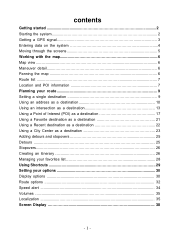
contents Getting started 2 Starting the system 2 Getting a GPS signal 3 Entering data on the system 4 Moving through the screens 5 Working with the map 6 Map view ...6 Maneuver detail 6 Panning the map 6 Route list ...7 Location and POI information 7 Planning your route 9 Setting a single destination 9 Using an address as a destination 10 Using an intersection as a destination 13 Using a ... Managing your favorites list 28 Using Shortcuts 29 Setting your options 30 Display options ...30 Route options ...32 Speed alert ...34 Volumes ...35 Localization ...35 Screen Display 38 - 1 -
contents Getting started 2 Starting the system 2 Getting a GPS signal 3 Entering data on the system 4 Moving through the screens 5 Working with the map 6 Map view ...6 Maneuver detail 6 Panning the map 6 Route list ...7 Location and POI information 7 Planning your route 9 Setting a single destination 9 Using an address as a destination 10 Using an intersection as a destination 13 Using a ... Managing your favorites list 28 Using Shortcuts 29 Setting your options 30 Display options ...30 Route options ...32 Speed alert ...34 Volumes ...35 Localization ...35 Screen Display 38 - 1 -
X3-01 Software Manual- English
Page 3
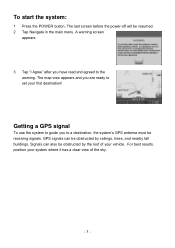
...will be obstructed by the roof of the sky. - 3 - Getting a GPS signal To use the system to guide you to the warning. A warning screen appears. 3 Tap "I Agree" after you are ready to set your system where it has a clear view of your vehicle. GPS signals can also be ...receiving signals. For best results, position your first destination! To start the system: 1 Press the POWER button. The map view appears and you have read and agreed to a destination, the system's GPS antenna must be obstructed by ceilings, trees, and nearby tall buildings....
...will be obstructed by the roof of the sky. - 3 - Getting a GPS signal To use the system to guide you to the warning. A warning screen appears. 3 Tap "I Agree" after you are ready to set your system where it has a clear view of your vehicle. GPS signals can also be ...receiving signals. For best results, position your first destination! To start the system: 1 Press the POWER button. The map view appears and you have read and agreed to a destination, the system's GPS antenna must be obstructed by ceilings, trees, and nearby tall buildings....
X3-01 Software Manual- English
Page 6
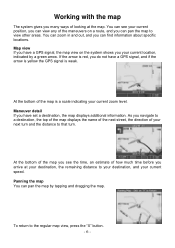
As you navigate to that turn. If the arrow is red, you have set a destination, the map displays additional information. Panning the map You can pan the map by a green arrow. Map view If you do not have a GPS signal, and if the arrow is yellow the GPS signal is a scale indicating your current zoom... level. Maneuver detail If you have a GPS signal, the map view on the system shows you your current position, you can view any of your current speed. At the bottom of looking at your destination...
As you navigate to that turn. If the arrow is red, you have set a destination, the map displays additional information. Panning the map You can pan the map by a green arrow. Map view If you do not have a GPS signal, and if the arrow is yellow the GPS signal is a scale indicating your current zoom... level. Maneuver detail If you have a GPS signal, the map view on the system shows you your current position, you can view any of your current speed. At the bottom of looking at your destination...
X3-01 Software Manual- English
Page 7
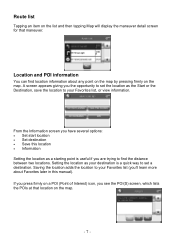
Route list Tapping an item on the list and then tapping Map will display the maneuver detail screen for that location on the map. - 7 - A screen appears giving you the opportunity to set a destination. Location and POI information You can find location information about Favorites later in this ... Setting the location as a starting point is a quick way to find the distance between two locations. From the Information screen you 'll learn more about any point on the map by pressing firmly on a POI (Point of Interest) icon, you are trying to set the location as your Favorites ...
Route list Tapping an item on the list and then tapping Map will display the maneuver detail screen for that location on the map. - 7 - A screen appears giving you the opportunity to set a destination. Location and POI information You can find location information about Favorites later in this ... Setting the location as a starting point is a quick way to find the distance between two locations. From the Information screen you 'll learn more about any point on the map by pressing firmly on a POI (Point of Interest) icon, you are trying to set the location as your Favorites ...

X3-01 Software Manual- English
Page 8
To view information about the location, including latitude and longitude. - 8 - To view POI information: 1. Tap Information. The Information screen appears, giving you block information about a location on the map, press firmly on the map. The address information screen appears. 2. To view information about the location, including latitude and longitude. The Information screen appears, giving you block information about a POI on the map, press firmly on the icon on the map. The POI(S) screen appears. 2. To view location information: 1. Tap Information.
To view information about the location, including latitude and longitude. - 8 - To view POI information: 1. Tap Information. The Information screen appears, giving you block information about a location on the map, press firmly on the map. The address information screen appears. 2. To view information about the location, including latitude and longitude. The Information screen appears, giving you block information about a POI on the map, press firmly on the icon on the map. The POI(S) screen appears. 2. To view location information: 1. Tap Information.

X3-01 Software Manual- English
Page 9
...then tap OK 8. Planning your route You can add destinations to. Tap Set Home 4. Tap Change State enter state; Map displays the location on the panning map without calculating a route. - 9 - Tap Shortcuts 3. Tap "Save as a starting point) to the destination. ...You can add a detour or a stopover. Tap Menu 2. Tap change City First enter city name, tap OK 6. Confirm by tap OK Setting a single destination You can enter up to 50 destinations and use the Itinerary screen...
...then tap OK 8. Planning your route You can add destinations to. Tap Set Home 4. Tap Change State enter state; Map displays the location on the panning map without calculating a route. - 9 - Tap Shortcuts 3. Tap "Save as a starting point) to the destination. ...You can add a detour or a stopover. Tap Menu 2. Tap change City First enter city name, tap OK 6. Confirm by tap OK Setting a single destination You can enter up to 50 destinations and use the Itinerary screen...
X3-01 Software Manual- English
Page 11
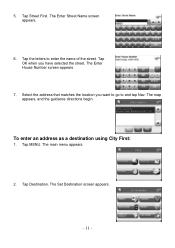
Tap Street First. The main menu appears. 2. The Enter House Number screen appears. 7. To enter an address as a destination using City First: 1. 5. Tap OK when you want to go to enter the name of the street. The map appears, and the guidance directions begin. Select the address that matches the location you have selected the street. Tap Destination. The Enter Street Name screen appears. 6. Tap MENU. The Set Destination screen appears. - 11 - Tap the letters to and tap Nav.
Tap Street First. The main menu appears. 2. The Enter House Number screen appears. 7. To enter an address as a destination using City First: 1. 5. Tap OK when you want to go to enter the name of the street. The map appears, and the guidance directions begin. Select the address that matches the location you have selected the street. Tap Destination. The Enter Street Name screen appears. 6. Tap MENU. The Set Destination screen appears. - 11 - Tap the letters to and tap Nav.

X3-01 Software Manual- English
Page 13
Tap the numbers to and tap Nav. The map appears, and the guidance directions begin. The Set Destination screen appears. 3. Tap Intersection. Select the address that have finished. If there are two ways to use City First. Using an intersection as a destination using ... asked to enter the intersection: by selecting the street first, or be asked to select the city first. Tap Destination. The Select Address screen appears. 9. The Input Method screen appears. - 13 - Tap MENU. 8. Tap OK when you have streets with the first name you enter you want to go to enter...
Tap the numbers to and tap Nav. The map appears, and the guidance directions begin. The Set Destination screen appears. 3. Tap Intersection. Select the address that have finished. If there are two ways to use City First. Using an intersection as a destination using ... asked to enter the intersection: by selecting the street first, or be asked to select the city first. Tap Destination. The Select Address screen appears. 9. The Input Method screen appears. - 13 - Tap MENU. 8. Tap OK when you have streets with the first name you enter you want to go to enter...

X3-01 Software Manual- English
Page 14
.... Tap OK when you have selected the street. If you have selected the region. Tap Street First. The Enter 2nd Street Name screen appears. 7. The Select Address screen appears. 8. The map appears, and the guidance directions begin. - 14 - Tap OK when you need to enter the name of the region, or tap the.... Tap the letters to enter the name of the street. Select the intersection that matches the location you want to go to the Input Method screen. 5. Tap the letters to enter the name of the second street. 4. You return to and tap Nav. The Enter Street Name...
.... Tap OK when you have selected the street. If you have selected the region. Tap Street First. The Enter 2nd Street Name screen appears. 7. The Select Address screen appears. 8. The map appears, and the guidance directions begin. - 14 - Tap OK when you need to enter the name of the region, or tap the.... Tap the letters to enter the name of the street. Select the intersection that matches the location you want to go to the Input Method screen. 5. Tap the letters to enter the name of the second street. 4. You return to and tap Nav. The Enter Street Name...

X3-01 Software Manual- English
Page 16
The Enter Street screen appears. 7. The Select Address screen appears. 9. Select the intersection that matches the location you have selected the street. Tap OK when you have selected the street. The map appears, and the guidance directions begin. - 16 - Tap OK when you have selected the city. The Enter 2nd Street Name screen appears. 8. Tap the letters to enter the name of the city. Tap the letters to enter the name of the second street. 6. Tap the letters to and tap Nav. Tap OK when you want to go to enter the name of the street.
The Enter Street screen appears. 7. The Select Address screen appears. 9. Select the intersection that matches the location you have selected the street. Tap OK when you have selected the street. The map appears, and the guidance directions begin. - 16 - Tap OK when you have selected the city. The Enter 2nd Street Name screen appears. 8. Tap the letters to enter the name of the city. Tap the letters to enter the name of the second street. 6. Tap the letters to and tap Nav. Tap OK when you want to go to enter the name of the street.
X3-01 Software Manual- English
Page 18
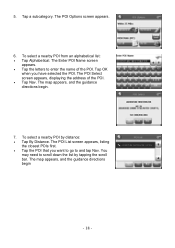
...to scroll down the list by distance: • Tap By Distance. The map appears, and the guidance directions begin . 7. Tap OK when you want to go to enter the name of the POI. • Tap Nav. The POI Select screen appears, displaying the address of the POI. The Enter POI Name... screen appears. • Tap the letters to and tap Nav. The map appears, and the guidance directions begin - 18 - The POI List screen appears, listing the closest POIs first. • Tap the...
...to scroll down the list by distance: • Tap By Distance. The map appears, and the guidance directions begin . 7. Tap OK when you want to go to enter the name of the POI. • Tap Nav. The POI Select screen appears, displaying the address of the POI. The Enter POI Name... screen appears. • Tap the letters to and tap Nav. The map appears, and the guidance directions begin - 18 - The POI List screen appears, listing the closest POIs first. • Tap the...

X3-01 Software Manual- English
Page 20
The map appears, and the guidance directions begin . - 20 - The POI Select screen appears. • Tap Nav. The POI Select screen appears. • Tap Nav. To select a POI from an alphabetical list: • Tap List All. Tap OK when you have selected the POI. The Enter POI Name screen appears. • Tap .... • Tap the letters to enter the name of the city and tap OK. The map appears, and the guidance directions begin . 7. The Enter City Name screen appears. • Tap the letters to enter the name of the POI and tap OK. 6. To select a POI by city: • ...
The map appears, and the guidance directions begin . - 20 - The POI Select screen appears. • Tap Nav. The POI Select screen appears. • Tap Nav. To select a POI from an alphabetical list: • Tap List All. Tap OK when you have selected the POI. The Enter POI Name screen appears. • Tap .... • Tap the letters to enter the name of the city and tap OK. The map appears, and the guidance directions begin . 7. The Enter City Name screen appears. • Tap the letters to enter the name of the POI and tap OK. 6. To select a POI by city: • ...

X3-01 Software Manual- English
Page 21
The Set Destination screen appears. 3. To select a favorite as a destination. The map appears, and the guidance directions begin. - 21 - Tap Favorites. The main menu appears. 2. Tap Destination. Tap on the favorite you want to a list on the ...system. Tap MENU. You can add locations to your Favorites list as you set a destination, from the POI(S) screen, and from the Location...
The Set Destination screen appears. 3. To select a favorite as a destination. The map appears, and the guidance directions begin. - 21 - Tap Favorites. The main menu appears. 2. Tap Destination. Tap on the favorite you want to a list on the ...system. Tap MENU. You can add locations to your Favorites list as you set a destination, from the POI(S) screen, and from the Location...

X3-01 Software Manual- English
Page 22
Tap Recent. Using a Recent destination as a destination. To select a destination from your recent destinations list is covered later in this section. Tap on the recent destination you have navigated to and tap Nav. You can easily select one of recent destinations: 1. The map appears, and the guidance directions begin. - 22 - The Recent screen appears. 4. Tap MENU. The Set Destination screen appears. 3. Managing your list of these locations as a destination Recent destinations are locations you want to go to recently. The main menu appears. 2. Tap Destination.
Tap Recent. Using a Recent destination as a destination. To select a destination from your recent destinations list is covered later in this section. Tap on the recent destination you have navigated to and tap Nav. You can easily select one of recent destinations: 1. The map appears, and the guidance directions begin. - 22 - The Recent screen appears. 4. Tap MENU. The Set Destination screen appears. 3. Managing your list of these locations as a destination Recent destinations are locations you want to go to recently. The main menu appears. 2. Tap Destination.

X3-01 Software Manual- English
Page 23
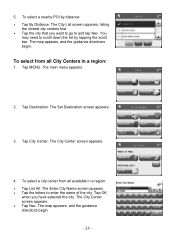
To select a nearby City Center as a destination. Tap MENU. The Set Destination screen appears. 3. Tap OK when you may want to use the system to get to a city, but not to enter the name of selecting a city center: ... city centers in a region. The main menu appears. 2. Tap Destination. The City Center screen appears. • Tap Nav. The map appears, and the guidance directions begin. - 23 - The City Center screen appears. 4. Tap City Center. The Enter City Name screen appears. • Tap the letters to a specific location within the city. As with selecting...
To select a nearby City Center as a destination. Tap MENU. The Set Destination screen appears. 3. Tap OK when you may want to use the system to get to a city, but not to enter the name of selecting a city center: ... city centers in a region. The main menu appears. 2. Tap Destination. The City Center screen appears. • Tap Nav. The map appears, and the guidance directions begin. - 23 - The City Center screen appears. 4. Tap City Center. The Enter City Name screen appears. • Tap the letters to a specific location within the city. As with selecting...
X3-01 Software Manual- English
Page 24
The City List screen appears, listing the closest city centers first. • Tap the city that you have selected the city. The main menu appears. 2. Tap Destination. To select a city center from all available in a region: 1. The map appears, and the guidance directions begin . The map appears, and the guidance directions begin . - 24 - To...
The City List screen appears, listing the closest city centers first. • Tap the city that you have selected the city. The main menu appears. 2. Tap Destination. To select a city center from all available in a region: 1. The map appears, and the guidance directions begin . The map appears, and the guidance directions begin . - 24 - To...
X3-01 Software Manual- English
Page 25
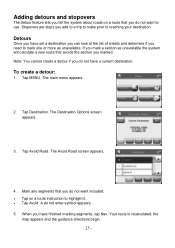
...route that avoids the section you marked. Your route is recalculated, the map appears and the guidance directions begin. - 25 - If you mark a section as unavailable. The main menu appears. 2. The Destination Options screen appears. 3. Detours Once you have a current destination. Tap MENU.... When you have finished marking segments, tap Nav. The Avoid Road screen appears. 4. Adding detours and stopovers The detour feature lets you tell the...
...route that avoids the section you marked. Your route is recalculated, the map appears and the guidance directions begin. - 25 - If you mark a section as unavailable. The main menu appears. 2. The Destination Options screen appears. 3. Detours Once you have a current destination. Tap MENU.... When you have finished marking segments, tap Nav. The Avoid Road screen appears. 4. Adding detours and stopovers The detour feature lets you tell the...


