WNR1000 Setup Manual
Page 3
Contents N50 Wireless Router WNR1000 Setup Manual Getting to Know Your Wireless Router 1 Unpacking Your New Router 1 Hardware Features ...2 Front Panel ...3 Back Panel ...4 Router Label ...5 Positioning Your Wireless Router 5 Installing Your Wireless Router 6 Updating Your Router Firmware 7 Installing Your Router Using the Smart Wizard 9 Using the Smart Wizard ...9 Accessing Your Router After Installation 11 Manually Installing Your Router 13 Connecting Your Wireless Router 14 Verifying Your Connection 17...
Contents N50 Wireless Router WNR1000 Setup Manual Getting to Know Your Wireless Router 1 Unpacking Your New Router 1 Hardware Features ...2 Front Panel ...3 Back Panel ...4 Router Label ...5 Positioning Your Wireless Router 5 Installing Your Wireless Router 6 Updating Your Router Firmware 7 Installing Your Router Using the Smart Wizard 9 Using the Smart Wizard ...9 Accessing Your Router After Installation 11 Manually Installing Your Router 13 Connecting Your Wireless Router 14 Verifying Your Connection 17...
WNR1000 Setup Manual
Page 5
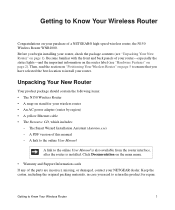
A PDF version of a NETGEAR® high-speed wireless router, the N150 Wireless Router WNR1000. A link to the online User Manual A link to Know Your Wireless Router 1 Become familiar with the front and back panels of your router-especially the status lights-and the important information on the router label (see "Unpacking Your New Router" on page 5 to ensure that you need to...
A PDF version of a NETGEAR® high-speed wireless router, the N150 Wireless Router WNR1000. A link to the online User Manual A link to Know Your Wireless Router 1 Become familiar with the front and back panels of your router-especially the status lights-and the important information on the router label (see "Unpacking Your New Router" on page 5 to ensure that you need to...

WNR1000 Setup Manual
Page 6
... for installation (near an AC power outlet and accessible to Know Your Wireless Router Hardware Features Before you install and connect your wired computers). Carefully peel off the protective film covering the sides of the router-especially the status lights on the front panel. 2 Getting to the... Ethernet cables for installation: 1. Set up your wireless router by inserting the router into the stand supplied with the front and back panels of ...
... for installation (near an AC power outlet and accessible to Know Your Wireless Router Hardware Features Before you install and connect your wired computers). Carefully peel off the protective film covering the sides of the router-especially the status lights on the front panel. 2 Getting to the... Ethernet cables for installation: 1. Set up your wireless router by inserting the router into the stand supplied with the front and back panels of ...
WNR1000 Setup Manual
Page 7
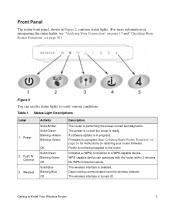
... 2 minutes. WPS-capable device can use the status lights to verify various conditions. The wireless interface is ready. A software update is being supplied to the router Indicates a (WPS) connection to Know Your Wireless Router 3 Firmware is enabled. No WPS connection exists. Data is in Figure 2, contains status lights. (For more information on interpreting the...
... 2 minutes. WPS-capable device can use the status lights to verify various conditions. The wireless interface is ready. A software update is being supplied to the router Indicates a (WPS) connection to Know Your Wireless Router 3 Firmware is enabled. No WPS connection exists. Data is in Figure 2, contains status lights. (For more information on interpreting the...
WNR1000 Setup Manual
Page 8
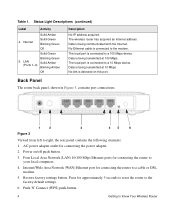
...Off Description No IP address acquired. No link is connected to Know Your Wireless Router Four Local Area Network (LAN) 10/100 Mbps Ethernet ports for connecting the power adapter. 2. Back Panel The router back panel, shown in Figure 3, contains port connections. 1 2 3... 45 6 Figure 3 Viewed from left to your local computers. 4. The wireless router has acquired an Internet address. Status Light Descriptions (continued) Label...
...Off Description No IP address acquired. No link is connected to Know Your Wireless Router Four Local Area Network (LAN) 10/100 Mbps Ethernet ports for connecting the power adapter. 2. Back Panel The router back panel, shown in Figure 3, contains port connections. 1 2 3... 45 6 Figure 3 Viewed from left to your local computers. 4. The wireless router has acquired an Internet address. Status Light Descriptions (continued) Label...

WNR1000 Setup Manual
Page 9
...Network (LAN). For example, the thickness and number of the wireless router shows the router's MAC address, serial number, security PIN, and factory default login information. Figure 4 Positioning Your Wireless Router The wireless router lets you access your network from the other devices to a ...minimum. Getting to the wired computer(s) on your wireless network. The ports on the router are color-coded to distinguish your Internet port...
...Network (LAN). For example, the thickness and number of the wireless router shows the router's MAC address, serial number, security PIN, and factory default login information. Figure 4 Positioning Your Wireless Router The wireless router lets you access your network from the other devices to a ...minimum. Getting to the wired computer(s) on your wireless network. The ports on the router are color-coded to distinguish your Internet port...

WNR1000 Setup Manual
Page 10
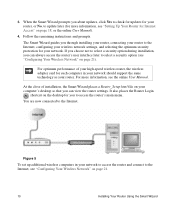
... help you through the setup process. Installing Your Wireless Router NETGEAR does not recommend or support adding a NETGEAR router behind another router, or replacing a gateway with a a NETGEAR router. The Installation Assistant walks you set up your Resource CD. For example, if you cannot or prefer not to Know Your Wireless Router configure your router, modem, and PC(s); Smart Wizard requires a PC...
... help you through the setup process. Installing Your Wireless Router NETGEAR does not recommend or support adding a NETGEAR router behind another router, or replacing a gateway with a a NETGEAR router. The Installation Assistant walks you set up your Resource CD. For example, if you cannot or prefer not to Know Your Wireless Router configure your router, modem, and PC(s); Smart Wizard requires a PC...

WNR1000 Setup Manual
Page 11
... page 18). 3. You must log in to the router to -date features of your router, NETGEAR provides a variety of the setup activity (see "Setting Up Your Router for Internet Access" on page 14). 2. Updating Your Router Firmware NETGEAR is always improving the operability and features included with your wireless router for Internet access (see "Using the Smart Wizard...
... page 18). 3. You must log in to the router to -date features of your router, NETGEAR provides a variety of the setup activity (see "Setting Up Your Router for Internet Access" on page 14). 2. Updating Your Router Firmware NETGEAR is always improving the operability and features included with your wireless router for Internet access (see "Using the Smart Wizard...

WNR1000 Setup Manual
Page 12
8 Getting to Know Your Wireless Router
8 Getting to Know Your Wireless Router
WNR1000 Setup Manual
Page 14
... page 21). For more information, see "Configuring Your Wireless Network" on the desktop for more information, see "Configuring Your Wireless Network" on page 18, or the online User Manual). 4. At the close of your high-speed wireless router, the wireless adapter card for each computer in your router to update later (for you can view the...
... page 21). For more information, see "Configuring Your Wireless Network" on the desktop for more information, see "Configuring Your Wireless Network" on page 18, or the online User Manual). 4. At the close of your high-speed wireless router, the wireless adapter card for each computer in your router to update later (for you can view the...
WNR1000 Setup Manual
Page 17
... to connect to the Internet. Use the procedures in "Positioning Your Wireless Router" on page 5." Manually Installing Your Router 13 Domain Name Server (DNS) addresses - Depending on how your Internet account was set up your wireless router and access the Internet: - If you have cable modem service, ..., review the list below and make sure that it is complete (see "Unpacking Your New Router" on page 1"). • Select an optimum location for your wireless router after reviewing the guidelines presented in this information, ask your ISP. • If you have not already done so:...
... to connect to the Internet. Use the procedures in "Positioning Your Wireless Router" on page 5." Manually Installing Your Router 13 Domain Name Server (DNS) addresses - Depending on how your Internet account was set up your wireless router and access the Internet: - If you have cable modem service, ..., review the list below and make sure that it is complete (see "Unpacking Your New Router" on page 1"). • Select an optimum location for your wireless router after reviewing the guidelines presented in this information, ask your ISP. • If you have not already done so:...

WNR1000 Setup Manual
Page 18
... TCP/IP Addressing in the following procedure NETGEAR does not recommend or support adding a NETGEAR router behind another router, or replacing a gateway with a NETGEAR router. Then, skip to step 5 in "Related Documents" on your computer are accessible through the Control Panel of your computer. Connecting Your Wireless Router Before you install your wireless router, make sure that connects your computer...
... TCP/IP Addressing in the following procedure NETGEAR does not recommend or support adding a NETGEAR router behind another router, or replacing a gateway with a NETGEAR router. Then, skip to step 5 in "Related Documents" on your computer are accessible through the Control Panel of your computer. Connecting Your Wireless Router Before you install your wireless router, make sure that connects your computer...

WNR1000 Setup Manual
Page 19
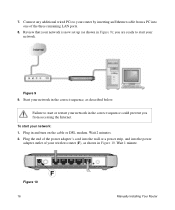
Securely insert that cable into the Internet port of the Ethernet cable into your modem (C) and the other end into a port on the router, such as port 1 (E), as shown in Figure 8. Locate the Ethernet cable that is still attached to your NETGEAR product. Locate the cable (A) that came with your computer (see step 4). Securely insert one end of the wireless router (D). (The cable and the Internet port label are color coded.) D C Figure 7 6. A E Figure 8 1 234 Manually Installing Your Router 15 5.
Securely insert that cable into the Internet port of the Ethernet cable into your modem (C) and the other end into a port on the router, such as port 1 (E), as shown in Figure 8. Locate the Ethernet cable that is still attached to your NETGEAR product. Locate the cable (A) that came with your computer (see step 4). Securely insert one end of the wireless router (D). (The cable and the Internet port label are color coded.) D C Figure 7 6. A E Figure 8 1 234 Manually Installing Your Router 15 5.
WNR1000 Setup Manual
Page 20
you from a PC into the power adapter outlet of the three remaining LAN ports. 8. Start your wireless router (F), as described below. Plug in Figure 9); Wait 1 minute. F Figure 10 16 Manually Installing Your Router Plug the end of the power adapter's cord into the wall or a power strip, and into one of ...set up (as shown in and turn on the cable or DSL modem. 7. Figure 9 9. To start your network: 1. Wait 2 minutes. 2. Review that your router by inserting an Ethernet cable from accessing the Internet. Connect any additional wired PCs to start your network.
you from a PC into the power adapter outlet of the three remaining LAN ports. 8. Start your wireless router (F), as described below. Plug in Figure 9); Wait 1 minute. F Figure 10 16 Manually Installing Your Router Plug the end of the power adapter's cord into the wall or a power strip, and into one of ...set up (as shown in and turn on the cable or DSL modem. 7. Figure 9 9. To start your network: 1. Wait 2 minutes. 2. Review that your router by inserting an Ethernet cable from accessing the Internet. Connect any additional wired PCs to start your network.
WNR1000 Setup Manual
Page 21
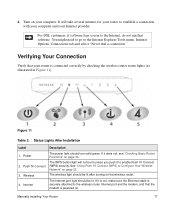
...The power light should be lit. If it to the wireless router Internet port and the modem, and that the modem is connected correctly by checking the wireless router status lights (as illustrated in to Configure Your Wireless Network" on your Internet provider. If it is not,... Table 2. See "Using Push 'N' Connect (WPS) to the Internet, do not run that your router is powered on the wireless router. Status Lights After Installation Label Description 1. Wireless 4. The Internet port light should be lit after turning on . Verifying Your Connection Verify that software....
...The power light should be lit. If it to the wireless router Internet port and the modem, and that the modem is connected correctly by checking the wireless router status lights (as illustrated in to Configure Your Wireless Network" on your Internet provider. If it is not,... Table 2. See "Using Push 'N' Connect (WPS) to the Internet, do not run that your router is powered on the wireless router. Status Lights After Installation Label Description 1. Wireless 4. The Internet port light should be lit after turning on . Verifying Your Connection Verify that software....

WNR1000 Setup Manual
Page 22
... at both ends, and that your browser, and then click Enter. Setting Up Your Router for Internet Access When configuring your wireless router manually, you must log in to your wireless router to set it up initially and to make sure that the Ethernet cable from the computer...12 displays. LAN (Ports 1-4) Description A LAN light should be lit for more information. You can use the wireless router Restore Factory Settings button to return the wireless router to the router is turned on. amber indicates communication at 100 Mbps; If a LAN light is communicating at 10 Mbps. You...
... at both ends, and that your browser, and then click Enter. Setting Up Your Router for Internet Access When configuring your wireless router manually, you must log in to your wireless router to set it up initially and to make sure that the Ethernet cable from the computer...12 displays. LAN (Ports 1-4) Description A LAN light should be lit for more information. You can use the wireless router Restore Factory Settings button to return the wireless router to the router is turned on. amber indicates communication at 100 Mbps; If a LAN light is communicating at 10 Mbps. You...

WNR1000 Setup Manual
Page 23
...When prompted, click Next. When the Ready light stops blinking, wait a few seconds more before using the router. 5. The router will automatically upgrade itself with configuring your wireless router to your Internet connection. Select one of the following options: • Select Yes to allow the Setup Wizard... name and password.) The router user name and password are not the same as any user name or password you with the latest firmware. If no new firmware version is available, click Yes, and the router will automatically check the NETGEAR database for new firmware (...
...When prompted, click Next. When the Ready light stops blinking, wait a few seconds more before using the router. 5. The router will automatically upgrade itself with configuring your wireless router to your Internet connection. Select one of the following options: • Select Yes to allow the Setup Wizard... name and password.) The router user name and password are not the same as any user name or password you with the latest firmware. If no new firmware version is available, click Yes, and the router will automatically check the NETGEAR database for new firmware (...

WNR1000 Setup Manual
Page 24
... wireless router. Click Apply to verify that you need assistance, follow the Basic Settings Help screens on the router interface or see "Configuring Your Wireless Network" on page 29. If you have selected the correct options and typed everything correctly. • Contact your ISP to save your settings and complete your NETGEAR product and contact NETGEAR...
... wireless router. Click Apply to verify that you need assistance, follow the Basic Settings Help screens on the router interface or see "Configuring Your Wireless Network" on page 29. If you have selected the correct options and typed everything correctly. • Contact your ISP to save your settings and complete your NETGEAR product and contact NETGEAR...
WNR1000 Setup Manual
Page 25
... have performed basic installation of several hundred feet. NETGEAR strongly recommends that is NETGEAR. • The wireless mode (802.11g/b, or 802.11n) that can use wireless security. To avoid this router, see "Using Push 'N' Connect (WPS) to match the router's new settings. If you configure the router from a wireless computer and you change your network. Setting Your...
... have performed basic installation of several hundred feet. NETGEAR strongly recommends that is NETGEAR. • The wireless mode (802.11g/b, or 802.11n) that can use wireless security. To avoid this router, see "Using Push 'N' Connect (WPS) to match the router's new settings. If you configure the router from a wireless computer and you change your network. Setting Your...

WNR1000 Setup Manual
Page 26
.... 4. Select the region where the router is NETGEAR. Set the Region. Log in to the wireless router. • Type http://www.routerlogin.net in the wireless router. Click Apply to display the Wireless Settings screen. • Wireless security option. Leave the wireless mode at its default setting. 5. The SSID of the router. Program the wireless settings of your changes. To set...
.... 4. Select the region where the router is NETGEAR. Set the Region. Log in to the wireless router. • Type http://www.routerlogin.net in the wireless router. Click Apply to display the Wireless Settings screen. • Wireless security option. Leave the wireless mode at its default setting. 5. The SSID of the router. Program the wireless settings of your changes. To set...


