
WGX102v2 Reference Manual
Page 6
... MAC Address 5-12 Chapter 6 Maintenance Changing the Administrator Password 6-1 Viewing Access Point Status Information 6-2 Viewing Router Status Information 6-5 Viewing a List of Attached Devices 6-8 Configuration File Management 6-9 Backing Up the Configuration 6-9 Erasing the Configuration 6-10 Upgrading the Wireless Range Extender Software 6-10 Chapter 7 Advanced Configuration of the WGX102 Wireless Range Extender WGX102 Operating Modes 7-1 Default: Access Point Mode 7-2 Advanced Custom...
... MAC Address 5-12 Chapter 6 Maintenance Changing the Administrator Password 6-1 Viewing Access Point Status Information 6-2 Viewing Router Status Information 6-5 Viewing a List of Attached Devices 6-8 Configuration File Management 6-9 Backing Up the Configuration 6-9 Erasing the Configuration 6-10 Upgrading the Wireless Range Extender Software 6-10 Chapter 7 Advanced Configuration of the WGX102 Wireless Range Extender WGX102 Operating Modes 7-1 Default: Access Point Mode 7-2 Advanced Custom...
WGX102v2 Reference Manual
Page 8
Testing the Path from Your Computer to a Remote Device 8-6 Restoring the Default WGX102 Configuration and Password 8-7 Problems with Router Mode Only Date and Time 8-7 Appendix A Technical Specifications Appendix B Network, Routing, Firewall, and Basics ...Pair Cables B-13 Uplink Switches, Crossover Cables, and MDI/MDIX Switching B-14 Appendix C Wireless Networking Basics Wireless Networking Overview C-1 Infrastructure Mode C-1 Ad Hoc Mode (Peer-to-Peer Workgroup C-2 Network Name: Extended Service Set Identification (ESSID C-2 Authentication and WEP C-3 viii Contents 202-10042-02 v1...
Testing the Path from Your Computer to a Remote Device 8-6 Restoring the Default WGX102 Configuration and Password 8-7 Problems with Router Mode Only Date and Time 8-7 Appendix A Technical Specifications Appendix B Network, Routing, Firewall, and Basics ...Pair Cables B-13 Uplink Switches, Crossover Cables, and MDI/MDIX Switching B-14 Appendix C Wireless Networking Basics Wireless Networking Overview C-1 Infrastructure Mode C-1 Ad Hoc Mode (Peer-to-Peer Workgroup C-2 Network Name: Extended Service Set Identification (ESSID C-2 Authentication and WEP C-3 viii Contents 202-10042-02 v1...

WGX102v2 Reference Manual
Page 17
... button for 15 seconds or more, the WGX102 resets to push in "Restoring the Default WGX102 Configuration and Password" on the rear panel of the WGX102 contains the items listed below . When you press the reset button for the 54 Mbps Wall-Plugged Wireless Range Extender WGX102 The Label on the Rear Panel of the WGX102 The label on page 8-7. Introduction 2-5 202-10042...
... button for 15 seconds or more, the WGX102 resets to push in "Restoring the Default WGX102 Configuration and Password" on the rear panel of the WGX102 contains the items listed below . When you press the reset button for the 54 Mbps Wall-Plugged Wireless Range Extender WGX102 The Label on the Rear Panel of the WGX102 The label on page 8-7. Introduction 2-5 202-10042...
WGX102v2 Reference Manual
Page 26
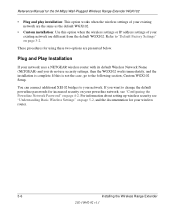
... Wireless Network Name (NETGEAR) and you want to "Default Factory Settings" on page 4-2. For information about setting up wireless security see "Configuring the Powerline Network Password" on page 3-2. If you do not use security settings, then the WGX102 works immediately, and the installation is not the case, go to your network. Reference Manual for the 54 Mbps Wall-Plugged Wireless Range Extender WGX102...
... Wireless Network Name (NETGEAR) and you want to "Default Factory Settings" on page 4-2. For information about setting up wireless security see "Configuring the Powerline Network Password" on page 3-2. If you do not use security settings, then the WGX102 works immediately, and the installation is not the case, go to your network. Reference Manual for the 54 Mbps Wall-Plugged Wireless Range Extender WGX102...
WGX102v2 Reference Manual
Page 28
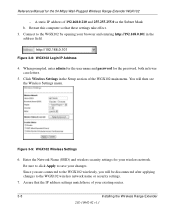
...and password for the password, both in the address field. Click Wireless Settings in the Setup section of 192.168.0.210 and 255.255.255.0 as the Subnet Mask b. Reference Manual for your existing router. 3-8 Installing the Wireless Range Extender 202... the Network Name (SSID) and wireless security settings for the 54 Mbps Wall-Plugged Wireless Range Extender WGX102 - Figure 3-9: WGX102 Wireless Settings 6. Since you are connected to the WGX102 wireless network name or security settings. 7. A static IP address of the WGX102 main menu. Figure 3-8: WGX102 Login IP Address 4. You will ...
...and password for the password, both in the address field. Click Wireless Settings in the Setup section of 192.168.0.210 and 255.255.255.0 as the Subnet Mask b. Reference Manual for your existing router. 3-8 Installing the Wireless Range Extender 202... the Network Name (SSID) and wireless security settings for the 54 Mbps Wall-Plugged Wireless Range Extender WGX102 - Figure 3-9: WGX102 Wireless Settings 6. Since you are connected to the WGX102 wireless network name or security settings. 7. A static IP address of the WGX102 main menu. Figure 3-8: WGX102 Login IP Address 4. You will ...

WGX102v2 Reference Manual
Page 30
..., the wireless range extender has its own user name and password. To change the password, see Appendix C, "Preparing Your Network" or the animated tutorials on the CD for help with this sequence: 1. Reference Manual for the 54 Mbps Wall-Plugged Wireless Range Extender WGX102 Be sure to restart your router is securely plugged into the XE102. Turn off the modem, router, wireless range extender, and computers 2. Plug in...
..., the wireless range extender has its own user name and password. To change the password, see Appendix C, "Preparing Your Network" or the animated tutorials on the CD for help with this sequence: 1. Reference Manual for the 54 Mbps Wall-Plugged Wireless Range Extender WGX102 Be sure to restart your router is securely plugged into the XE102. Turn off the modem, router, wireless range extender, and computers 2. Plug in...
WGX102v2 Reference Manual
Page 31
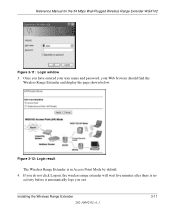
Figure 3-12: Login result The Wireless Range Extender is no activity before it automatically logs you have entered your user name and password, your Web browser should find the Wireless Range Extender and display the page shown below. Installing the Wireless Range Extender 202-10042-02 v1.1 3-11 If you do not click Logout, the wireless range extender will wait five minutes after there is in Access Point Mode by default. 4. Reference Manual for the 54 Mbps Wall-Plugged Wireless Range Extender WGX102 Figure 3-11: Login window 3. Once you out.
Figure 3-12: Login result The Wireless Range Extender is no activity before it automatically logs you have entered your user name and password, your Web browser should find the Wireless Range Extender and display the page shown below. Installing the Wireless Range Extender 202-10042-02 v1.1 3-11 If you do not click Logout, the wireless range extender will wait five minutes after there is in Access Point Mode by default. 4. Reference Manual for the 54 Mbps Wall-Plugged Wireless Range Extender WGX102 Figure 3-11: Login window 3. Once you out.

WGX102v2 Reference Manual
Page 34
...192.168.1.1 as your existing network. You will be informed that the changes you can always use a Fixed IP Address for the 54 Mbps Wall-Plugged Wireless Range Extender WGX102 6. If you ever have a problem, you have requested will be 192.168.1.101. If needed, update the IP Address so...the new settings. When prompted, enter admin as the user name, and password as the password, both in to proceed. Click Next to make configuration changes. Click Ok. Reference Manual for your WGX102 so that it is complete. 3-14 Installing the Wireless Range Extender 202-10042-02 v1.1
...192.168.1.1 as your existing network. You will be informed that the changes you can always use a Fixed IP Address for the 54 Mbps Wall-Plugged Wireless Range Extender WGX102 6. If you ever have a problem, you have requested will be 192.168.1.101. If needed, update the IP Address so...the new settings. When prompted, enter admin as the user name, and password as the password, both in to proceed. Click Next to make configuration changes. Click Ok. Reference Manual for your WGX102 so that it is complete. 3-14 Installing the Wireless Range Extender 202-10042-02 v1.1

WGX102v2 Reference Manual
Page 35
Click Web UI to log in all lower case letters. Click Ok to the WGX102. The main settings page of the WGX102 will display. Figure 3-16: Login window When prompted, enter admin as the user name, and password as the password, both in to proceed. Installing the Wireless Range Extender 202-10042-02 v1.1 3-15 Reference Manual for the 54 Mbps Wall-Plugged Wireless Range Extender WGX102 9.
Click Web UI to log in all lower case letters. Click Ok to the WGX102. The main settings page of the WGX102 will display. Figure 3-16: Login window When prompted, enter admin as the user name, and password as the password, both in to proceed. Installing the Wireless Range Extender 202-10042-02 v1.1 3-15 Reference Manual for the 54 Mbps Wall-Plugged Wireless Range Extender WGX102 9.
WGX102v2 Reference Manual
Page 39
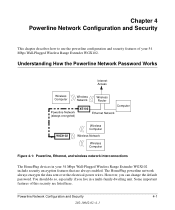
Some important features of your 54 Mbps Wall-Plugged Wireless Range Extender WGX102 include security encryption features that are listed here. However, you live in your 54 Mbps Wall-Plugged Wireless Range Extender WGX102. The HomePlug powerline network always encrypts the data sent over the electrical power wires. You should do so, especially if you can change the default password. Powerline Network Configuration and Security 4-1 202-10042-02...
Some important features of your 54 Mbps Wall-Plugged Wireless Range Extender WGX102 include security encryption features that are listed here. However, you live in your 54 Mbps Wall-Plugged Wireless Range Extender WGX102. The HomePlug powerline network always encrypts the data sent over the electrical power wires. You should do so, especially if you can change the default password. Powerline Network Configuration and Security 4-1 202-10042-02...
WGX102v2 Reference Manual
Page 40
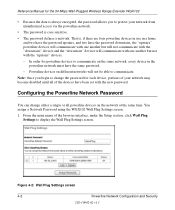
...-10042-02 v1.1 You assign a Network Password using the WGX102 Wall Plug Settings screen. 1. Reference Manual for the 54 Mbps Wall-Plugged Wireless Range Extender WGX102 • Because the data is always encrypted, the password allows you begin to change either a single or all of the browser interface, under the Setup section, click Wall Plug Settings to display the Wall Plug Settings screen. Configuring the Powerline Network...
...-10042-02 v1.1 You assign a Network Password using the WGX102 Wall Plug Settings screen. 1. Reference Manual for the 54 Mbps Wall-Plugged Wireless Range Extender WGX102 • Because the data is always encrypted, the password allows you begin to change either a single or all of the browser interface, under the Setup section, click Wall Plug Settings to display the Wall Plug Settings screen. Configuring the Powerline Network...
WGX102v2 Reference Manual
Page 41
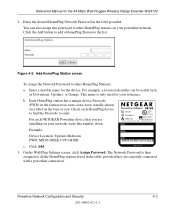
... to the list. Click Add. 3. For example, a location identifier can also assign this number down. Check each NETGEAR Powerline device that you are currently connected with a powerline connection. Example: Device Location: Upstairs Bedroom PWD: MX96-DHEE-U9Y3... provided. Figure 4-3: Add HomePlug Station screen To assign the Network Password to enter. Enter a suitable name for the 54 Mbps Wall-Plugged Wireless Range Extender WGX102 2. Reference Manual for the device. Enter the desired HomePlug Network Password in the format xxxx-xxxx-xxxx-xxxx, usually shown on a ...
... to the list. Click Add. 3. For example, a location identifier can also assign this number down. Check each NETGEAR Powerline device that you are currently connected with a powerline connection. Example: Device Location: Upstairs Bedroom PWD: MX96-DHEE-U9Y3... provided. Figure 4-3: Add HomePlug Station screen To assign the Network Password to enter. Enter a suitable name for the 54 Mbps Wall-Plugged Wireless Range Extender WGX102 2. Reference Manual for the device. Enter the desired HomePlug Network Password in the format xxxx-xxxx-xxxx-xxxx, usually shown on a ...
WGX102v2 Reference Manual
Page 49
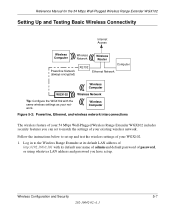
... whatever LAN address and password you can set to set up and test the wireless settings of your WGX102. 1. Follow the instructions below to match the settings of your existing wireless network. Wireless Configuration and Security 5-7 202-10042-02 v1.1 Wireless Computer Figure 5-2: Powerline, Ethernet, and wireless network interconnections The wireless feature of your 54 Mbps Wall-Plugged Wireless Range Extender WGX102 includes security features you...
... whatever LAN address and password you can set to set up and test the wireless settings of your WGX102. 1. Follow the instructions below to match the settings of your existing wireless network. Wireless Configuration and Security 5-7 202-10042-02 v1.1 Wireless Computer Figure 5-2: Powerline, Ethernet, and wireless network interconnections The wireless feature of your 54 Mbps Wall-Plugged Wireless Range Extender WGX102 includes security features you...

WGX102v2 Reference Manual
Page 57
... all the wireless range extender configuration settings. Maintenance 6-1 202-10042-02 v1.1 The default password for the WGX102 Web browser interface is password. Figure 6-1: Set Password menu To change the password, first enter the old password, then enter the new password twice. This means you will have to reset the WGX102 back to the factory defaults, you can restore your 54 Mbps Wall-Plugged Wireless Range Extender WGX102. From...
... all the wireless range extender configuration settings. Maintenance 6-1 202-10042-02 v1.1 The default password for the WGX102 Web browser interface is password. Figure 6-1: Set Password menu To change the password, first enter the old password, then enter the new password twice. This means you will have to reset the WGX102 back to the factory defaults, you can restore your 54 Mbps Wall-Plugged Wireless Range Extender WGX102. From...
WGX102v2 Reference Manual
Page 66
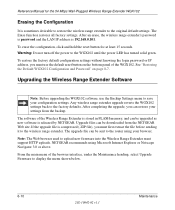
... the reset button for the 54 Mbps Wall-Plugged Wireless Range Extender WGX102 Erasing the Configuration It is compressed (.ZIP file), you must first extract the file before sending it to display the menu shown below. 6-10 202-10042-02 v1.1 Maintenance See "Restoring the Default WGX102 Configuration and Password" on the bottom panel of the WGX102. The software of the...
... the reset button for the 54 Mbps Wall-Plugged Wireless Range Extender WGX102 Erasing the Configuration It is compressed (.ZIP file), you must first extract the file before sending it to display the menu shown below. 6-10 202-10042-02 v1.1 Maintenance See "Restoring the Default WGX102 Configuration and Password" on the bottom panel of the WGX102. The software of the...
WGX102v2 Reference Manual
Page 74
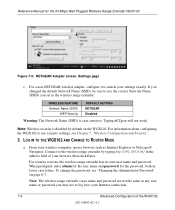
.... 7-6 Advanced Configuration of your browser, then click Enter. When prompted, enter admin for the user name and password for the 54 Mbps Wall-Plugged Wireless Range Extender WGX102 Figure 7-5: NETGEAR Adapter screen, Settings page c. WIRELESS FEATURE Network Name (SSID) WEP Security DEFAULT SETTING NETGEAR Disabled Warning: The Network Name (SSID) is disabled by typing http://192.168.0.101 in the address field...
.... 7-6 Advanced Configuration of your browser, then click Enter. When prompted, enter admin for the user name and password for the 54 Mbps Wall-Plugged Wireless Range Extender WGX102 Figure 7-5: NETGEAR Adapter screen, Settings page c. WIRELESS FEATURE Network Name (SSID) WEP Security DEFAULT SETTING NETGEAR Disabled Warning: The Network Name (SSID) is disabled by typing http://192.168.0.101 in the address field...
WGX102v2 Reference Manual
Page 76
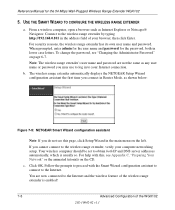
... the Internet. When prompted, enter admin for the user name and password for the 54 Mbps Wall-Plugged Wireless Range Extender WGX102 5. Reference Manual for the password, both IP and DNS server addresses automatically, which is enabled! 7-8 Advanced Configuration of your computer networking setup. The wireless range extender automatically displays the NETGEAR Setup Wizard configuration assistant the first time you cannot connect to proceed...
... the Internet. When prompted, enter admin for the user name and password for the 54 Mbps Wall-Plugged Wireless Range Extender WGX102 5. Reference Manual for the password, both IP and DNS server addresses automatically, which is enabled! 7-8 Advanced Configuration of your computer networking setup. The wireless range extender automatically displays the NETGEAR Setup Wizard configuration assistant the first time you cannot connect to proceed...
WGX102v2 Reference Manual
Page 79
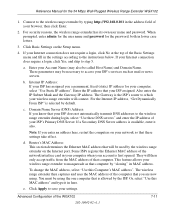
... your network so that computer. d. e. When prompted, enter admin for the user name and password for the password, both in the settings according to the wireless range extender by default. If a Secondary DNS Server address is first opened. Or, select "Use this... If you know that you a permanent, fixed (static) IP address for the 54 Mbps Wall-Plugged Wireless Range Extender WGX102 1. a. Router's MAC Address: This section determines the Ethernet MAC address that computer by the wireless range extender on the Setup menu. 4. To change the MAC address, select "Use this ...
... your network so that computer. d. e. When prompted, enter admin for the user name and password for the password, both in the settings according to the wireless range extender by default. If a Secondary DNS Server address is first opened. Or, select "Use this... If you know that you a permanent, fixed (static) IP address for the 54 Mbps Wall-Plugged Wireless Range Extender WGX102 1. a. Router's MAC Address: This section determines the Ethernet MAC address that computer by the wireless range extender on the Setup menu. 4. To change the MAC address, select "Use this ...
WGX102v2 Reference Manual
Page 80
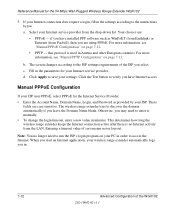
... enter it manually. • To change the login timeout, enter a new value in the parameters for the 54 Mbps Wall-Plugged Wireless Range Extender WGX102 5. This determines how long the wireless range extender keeps the Internet connection active after there is used in order to run the ISP's login program on page ...out. The wireless range extender tries to discover the domain automatically if you may need to access the Internet. If your ISP uses PPPoE, select PPPoE for the Internet Service Provider. • Enter the Account Name, Domain Name, Login, and Password as WinPoET ...
... enter it manually. • To change the login timeout, enter a new value in the parameters for the 54 Mbps Wall-Plugged Wireless Range Extender WGX102 5. This determines how long the wireless range extender keeps the Internet connection active after there is used in order to run the ISP's login program on page ...out. The wireless range extender tries to discover the domain automatically if you may need to access the Internet. If your ISP uses PPPoE, select PPPoE for the Internet Service Provider. • Enter the Account Name, Domain Name, Login, and Password as WinPoET ...

WGX102v2 Reference Manual
Page 82
... 54 Mbps Wall-Plugged Wireless Range Extender WGX102 Figure 7-11: PPTP menu • Enter your ISP's services such as mail or news servers. 7-14 Advanced Configuration of zero means never log out. These fields are case sensitive. • To change the login timeout, enter a new value in order to access your Login and Password. This determines how long the wireless range extender...
... 54 Mbps Wall-Plugged Wireless Range Extender WGX102 Figure 7-11: PPTP menu • Enter your ISP's services such as mail or news servers. 7-14 Advanced Configuration of zero means never log out. These fields are case sensitive. • To change the login timeout, enter a new value in order to access your Login and Password. This determines how long the wireless range extender...


