
GS716Tv2/GS724Tv3 Hardware manual
Page 5
...and Internet skills. v v1.0, June 2009 Tip: This format is used to install, configure and troubleshoot the Smart Switch. About This Manual The NETGEAR® ProSafeTM GS716T/GS724T Hardware Installation Guide describes how to highlight a procedure that will save time or resources. ...This manual uses the following typographical conventions: Italic Bold Fixed italic Emphasis, books, CDs, file and server names, extensions User input, IP addresses, GUI screen text Command prompt, CLI text, code URL links • Formats. Conventions, Formats and Scope The conventions, formats, and...
...and Internet skills. v v1.0, June 2009 Tip: This format is used to install, configure and troubleshoot the Smart Switch. About This Manual The NETGEAR® ProSafeTM GS716T/GS724T Hardware Installation Guide describes how to highlight a procedure that will save time or resources. ...This manual uses the following typographical conventions: Italic Bold Fixed italic Emphasis, books, CDs, file and server names, extensions User input, IP addresses, GUI screen text Command prompt, CLI text, code URL links • Formats. Conventions, Formats and Scope The conventions, formats, and...

GS716Tv2/GS724Tv3 Hardware manual
Page 22
...Step 7: Managing the Switch using a Web Browser or the PC Utility The NETGEAR Smart Switch contains software for the first time, the Smart Switch can be configured using the management software. After powering up , there is not required for the switch to work. However, the management software enables...the network. Note: When the device powers up the switch for viewing, changing, and monitoring the way it works. This management software is a default IP address already configured on the Smart Switch Resource CD. The default IP address is 192.168.0.239 and subnet mask 255.255.255...
...Step 7: Managing the Switch using a Web Browser or the PC Utility The NETGEAR Smart Switch contains software for the first time, the Smart Switch can be configured using the management software. After powering up , there is not required for the switch to work. However, the management software enables...the network. Note: When the device powers up the switch for viewing, changing, and monitoring the way it works. This management software is a default IP address already configured on the Smart Switch Resource CD. The default IP address is 192.168.0.239 and subnet mask 255.255.255...
GS716Tv2/GS724Tv3 Hardware manual
Page 29
... of Service 1-1 Combo Port 2-9 Combo Ports 1-2 Connecting Devices to the Switch 4-16 Copper 1-1 Crossover 2-8 D Default IP Address 4-18 Default Reset Button 2-5, 2-6 Device Hardware Interfaces 2-8 Duplex Mode 2-8 E Example of Desktop Switching 3-11 F Factory Default Button 2-9 Factory Defaults 2-5 Fiber Connectivity 1-1 Flat Surface 4-14 Full-duplex 1-2 G GBIC 1-2, 2-9 Gigabit Ports 1-1 H High-speed Servers 1-1 Hz 2-6, 2-7 v1.0, June 2009 Index-27
... of Service 1-1 Combo Port 2-9 Combo Ports 1-2 Connecting Devices to the Switch 4-16 Copper 1-1 Crossover 2-8 D Default IP Address 4-18 Default Reset Button 2-5, 2-6 Device Hardware Interfaces 2-8 Duplex Mode 2-8 E Example of Desktop Switching 3-11 F Factory Default Button 2-9 Factory Defaults 2-5 Fiber Connectivity 1-1 Flat Surface 4-14 Full-duplex 1-2 G GBIC 1-2, 2-9 Gigabit Ports 1-1 H High-speed Servers 1-1 Hz 2-6, 2-7 v1.0, June 2009 Index-27
GS716Tv2/GS724Tv3 Installation Guide
Page 1
...8226; NETGEAR Smart Switch • Rubber footpads for tabletop installation • Power cord • Rack-mount kit for its MAC Address, IP Address, and model number. If you are using DHCP in the network. Set up your network. Connect each PC to find your switch in your smart switch. Smart Switch GS724T... the Resource CD into your network. 4. The Installation Wizard will default to 192.168.0.239 for installing the switch in your network, configure the switch IP address before connecting it to your desktop or in the 192.168.0.x subnet, and connect the PC to configure the...
...8226; NETGEAR Smart Switch • Rubber footpads for tabletop installation • Power cord • Rack-mount kit for its MAC Address, IP Address, and model number. If you are using DHCP in the network. Set up your network. Connect each PC to find your switch in your smart switch. Smart Switch GS724T... the Resource CD into your network. 4. The Installation Wizard will default to 192.168.0.239 for installing the switch in your network, configure the switch IP address before connecting it to your desktop or in the 192.168.0.x subnet, and connect the PC to configure the...
GS716Tv2/GS724Tv3 Installation Guide
Page 2
... the United States and/or other countries. Configure the switch for selecting NETGEAR products. After you log in accordance with configuration procedures. Technical Support Thank you may have. • Be sure to obtain an IP address automatically via our website is required before you want to... are secure, that came with valid IP addresses. If there are trademarks or registered trademarks of your product at http://www.NETGEAR.com/register. The switch will be lit. • Make sure the network settings of your PC and switch in accordance with this, refer to ...
... the United States and/or other countries. Configure the switch for selecting NETGEAR products. After you log in accordance with configuration procedures. Technical Support Thank you may have. • Be sure to obtain an IP address automatically via our website is required before you want to... are secure, that came with valid IP addresses. If there are trademarks or registered trademarks of your product at http://www.NETGEAR.com/register. The switch will be lit. • Make sure the network settings of your PC and switch in accordance with this, refer to ...
GS716Tv2/GS724Tv3 Software Admin Manual
Page 12
...IP addresses, GUI screen text Command prompt, CLI text, code URL links • Formats. xii v1.0, July 2009 Conventions, Formats and Scope The conventions, formats, and scope of how to configure various features on the GS716T/GS724T switch, such as VLAN and Access Control List (ACL) configuration examples. GS716Tv2 and GS724Tv3... to view a variety of information about the switch and its port, and to configure how the switch monitors events. • Chapter 7, "Maintenance" on page 7-1 describes features to help you manage the switch. • Appendix A, "Hardware Specifications and ...
...IP addresses, GUI screen text Command prompt, CLI text, code URL links • Formats. xii v1.0, July 2009 Conventions, Formats and Scope The conventions, formats, and scope of how to configure various features on the GS716T/GS724T switch, such as VLAN and Access Control List (ACL) configuration examples. GS716Tv2 and GS724Tv3... to view a variety of information about the switch and its port, and to configure how the switch monitors events. • Chapter 7, "Maintenance" on page 7-1 describes features to help you manage the switch. • Appendix A, "Hardware Specifications and ...

GS716Tv2/GS724Tv3 Software Admin Manual
Page 17
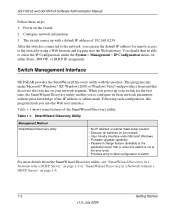
...following : • Manually configure network information for the management interface, or • Enable the management interface as the IP address and subnet mask, and the switch is physically and logically connected to use the SmartWizard Discovery...Switch Management Interface" on page 1-2 • "SmartWizard Discovery in a Network with a DHCP Server" on page 1-3 • "SmartWizard Discovery in a Network without a DHCP Server" on page 1-4 • "SmartWizard Discovery Utilities" on page 1-6 • "Understanding the User Interfaces" on your NETGEAR GS716T/GS724T Gigabit Smart Switch...
...following : • Manually configure network information for the management interface, or • Enable the management interface as the IP address and subnet mask, and the switch is physically and logically connected to use the SmartWizard Discovery...Switch Management Interface" on page 1-2 • "SmartWizard Discovery in a Network with a DHCP Server" on page 1-3 • "SmartWizard Discovery in a Network without a DHCP Server" on page 1-4 • "SmartWizard Discovery Utilities" on page 1-6 • "Understanding the User Interfaces" on your NETGEAR GS716T/GS724T Gigabit Smart Switch...
GS716Tv2/GS724Tv3 Software Admin Manual
Page 18
...not at the boot level) • Provides entry to Web configuration of 192.168.0.239. Switch Management Interface NETGEAR provides the SmartWizard Discovery utility with a default IP address of switch For more details about the SmartWizard Discovery utility, see "SmartWizard Discovery in a Network with a ...your network segment. When you into the Web user interface. GS716Tv2 and GS724Tv3 Software Administration Manual Follow these steps: 1. Power on the switch. 2. You should then be able to select the IP Configuration, under Microsoft® Windows® XP, Windows 2000, or Windows...
...not at the boot level) • Provides entry to Web configuration of 192.168.0.239. Switch Management Interface NETGEAR provides the SmartWizard Discovery utility with a default IP address of switch For more details about the SmartWizard Discovery utility, see "SmartWizard Discovery in a Network with a ...your network segment. When you into the Web user interface. GS716Tv2 and GS724Tv3 Software Administration Manual Follow these steps: 1. Power on the switch. 2. You should then be able to select the IP Configuration, under Microsoft® Windows® XP, Windows 2000, or Windows...

GS716Tv2/GS724Tv3 Software Admin Manual
Page 19
...network. 2. Connect the Gigabit Smart Switch to Figure 1-2 on page 1-4. Click Discover for the SmartWizard Discovery utility to access the switch directly from a Web browser (without using the SmartWizard Discovery utility). 7. Make a note of the displayed IP address assigned by clicking the ...line that shows it. Select your switch by the DHCP server. Getting Started 1-3 v1.0, July 2009 Install the SmartWizard Discovery utility on the switch by connecting its AC-DC power adapter. 3. GS716Tv2 and GS724Tv3 Software ...
...network. 2. Connect the Gigabit Smart Switch to Figure 1-2 on page 1-4. Click Discover for the SmartWizard Discovery utility to access the switch directly from a Web browser (without using the SmartWizard Discovery utility). 7. Make a note of the displayed IP address assigned by clicking the ...line that shows it. Select your switch by the DHCP server. Getting Started 1-3 v1.0, July 2009 Install the SmartWizard Discovery utility on the switch by connecting its AC-DC power adapter. 3. GS716Tv2 and GS724Tv3 Software ...
GS716Tv2/GS724Tv3 Software Admin Manual
Page 21
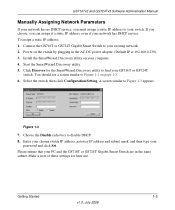
... GS724T Gigabit Smart Switch to disable DHCP. 8. Start the SmartWizard Discovery utility. 5. Make a note of these settings for the SmartWizard Discovery utility to your switch. Please ensure that your existing network. 2. GS716Tv2 and GS724Tv3 Software Administration Manual Manually Assigning Network Parameters If your network has no DHCP service, you can assign it a static IP address, even...
... GS724T Gigabit Smart Switch to disable DHCP. 8. Start the SmartWizard Discovery utility. 5. Make a note of these settings for the SmartWizard Discovery utility to your switch. Please ensure that your existing network. 2. GS716Tv2 and GS724Tv3 Software Administration Manual Manually Assigning Network Parameters If your network has no DHCP service, you can assign it a static IP address, even...
GS716Tv2/GS724Tv3 Software Admin Manual
Page 22
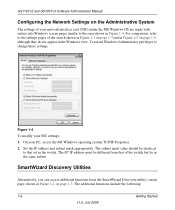
... 1-4 To modify your PC, access the MS Windows operating system TCP/IP Properties. 2. On your NIC settings: 1. Set the IP address and subnet mask appropriately. SmartWizard Discovery Utilities Alternatively, you can access additional functions from that set in the switch. GS716Tv2 and GS724Tv3 Software Administration Manual Configuring the Network Settings on the Administrative System The...
... 1-4 To modify your PC, access the MS Windows operating system TCP/IP Properties. 2. On your NIC settings: 1. Set the IP address and subnet mask appropriately. SmartWizard Discovery Utilities Alternatively, you can access additional functions from that set in the switch. GS716Tv2 and GS724Tv3 Software Administration Manual Configuring the Network Settings on the Administrative System The...

GS716Tv2/GS724Tv3 Software Admin Manual
Page 25
Getting Started 1-9 v1.0, July 2009 Open a Web browser and enter the IP address of the switch in Figure 1-6 on page 1-10, and then click Login. Passwords are case sensitive. The GS716Tv2 and GS724Tv3 Software Administration Manual describes how to use to manage the system depends on your network size and requirements, and on your preference. The...
Getting Started 1-9 v1.0, July 2009 Open a Web browser and enter the IP address of the switch in Figure 1-6 on page 1-10, and then click Login. Passwords are case sensitive. The GS716Tv2 and GS724Tv3 Software Administration Manual describes how to use to manage the system depends on your network size and requirements, and on your preference. The...

GS716Tv2/GS724Tv3 Software Admin Manual
Page 30
... >| * | ? For example, if the IP Addressing page is open, the help topic for the following (unless specifically noted in configuring and managing the switch. Figure 1-7 on page 1-11 shows the location of the page. GS716Tv2 and GS724Tv3 Software Administration Manual If you click Help. User-Defined... Fields User-defined fields can manage traps that page displays if ...
... >| * | ? For example, if the IP Addressing page is open, the help topic for the following (unless specifically noted in configuring and managing the switch. Figure 1-7 on page 1-11 shows the location of the page. GS716Tv2 and GS724Tv3 Software Administration Manual If you click Help. User-Defined... Fields User-defined fields can manage traps that page displays if ...
GS716Tv2/GS724Tv3 Software Admin Manual
Page 31
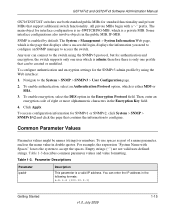
... and private MIBs that contains the information to the switch using the Web interface: 1. Empty strings ("") are not valid user-defined strings. Table 1-3. SNMP is only one user which is a valid IP address. The System Management System Information Web page, which is a... enable encryption, select the DES option in -SWITCHING-MIB, which is either MD5 or SHA. 3. To enable authentication, select an Authentication Protocol option, which is admin; GS716Tv2 and GS724Tv3 Software Administration Manual GS716T/GS724T switches use spaces as part of eight or more ...
... and private MIBs that contains the information to the switch using the Web interface: 1. Empty strings ("") are not valid user-defined strings. Table 1-3. SNMP is only one user which is a valid IP address. The System Management System Information Web page, which is a... enable encryption, select the DES option in -SWITCHING-MIB, which is either MD5 or SHA. 3. To enable authentication, select an Authentication Protocol option, which is admin; GS716Tv2 and GS724Tv3 Software Administration Manual GS716T/GS724T switches use spaces as part of eight or more ...
GS716Tv2/GS724Tv3 Software Admin Manual
Page 36
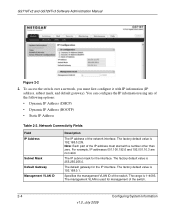
... gateway for the interface. Specifies the management VLAN ID of the IP address must first configure it with a number other than zero. To access the switch over a network, you must start with IP information (IP address, subnet mask, and default gateway). The factory default value is 192.168.0.239. GS716Tv2 and GS724Tv3 Software Administration Manual Figure 2-2 2. The range...
... gateway for the interface. Specifies the management VLAN ID of the IP address must first configure it with a number other than zero. To access the switch over a network, you must start with IP information (IP address, subnet mask, and default gateway). The factory default value is 192.168.0.239. GS716Tv2 and GS724Tv3 Software Administration Manual Figure 2-2 2. The range...

GS716Tv2/GS724Tv3 Software Admin Manual
Page 37
...up to determine server time. The following time levels: • T1: Time at which the IP address is the highest), the more accurate the clock. SNTP servers that have been configured on the... time standards. • Stratum 2: The time source is distanced from SNTP servers is an example of the switch. 4. GS716T/GS724T software operates only as the time source, for synchronization information. Information received from the Stratum ... 1: A server that are used . GS716Tv2 and GS724Tv3 Software Administration Manual 3. This is the preferred method for the server time.
...up to determine server time. The following time levels: • T1: Time at which the IP address is the highest), the more accurate the clock. SNTP servers that have been configured on the... time standards. • Stratum 2: The time source is distanced from SNTP servers is an example of the switch. 4. GS716T/GS724T software operates only as the time source, for synchronization information. Information received from the Stratum ... 1: A server that are used . GS716Tv2 and GS724Tv3 Software Administration Manual 3. This is the preferred method for the server time.

GS716Tv2/GS724Tv3 Software Admin Manual
Page 41
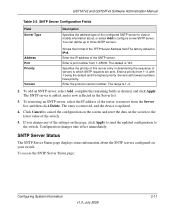
...received valid packet. SNTP Global Configuration Fields Field Version Supported Mode Last Update Time Last Attempt Time Last Attempt Status Server IP Address Address Type Server Stratum Reference Clock Id Server Mode Description Specifies the SNTP Version the client supports. Specifies the reference clock identifier... server is indicated by a stratum field equal to be supported by the server is not compatible with its peers. GS716Tv2 and GS724Tv3 Software Administration Manual Table 2-4. Specifies the local date and time (UTC) of the last SNTP request or receipt of the last...
...received valid packet. SNTP Global Configuration Fields Field Version Supported Mode Last Update Time Last Attempt Time Last Attempt Status Server IP Address Address Type Server Stratum Reference Clock Id Server Mode Description Specifies the SNTP Version the client supports. Specifies the reference clock identifier... server is indicated by a stratum field equal to be supported by the server is not compatible with its peers. GS716Tv2 and GS724Tv3 Software Administration Manual Table 2-4. Specifies the local date and time (UTC) of the last SNTP request or receipt of the last...
GS716Tv2/GS724Tv3 Software Admin Manual
Page 43
... status information about , or select Add to the switch. GS716Tv2 and GS724Tv3 Software Administration Manual Table 2-5. Enter a port number from the Server list, and then click Delete. Address Port Priority Version Shows the format of the SNTP server. Enter the IP address of the TFTP Server Address field The factory default is IPv4. To removing an...
... status information about , or select Add to the switch. GS716Tv2 and GS724Tv3 Software Administration Manual Table 2-5. Enter a port number from the Server list, and then click Delete. Address Port Priority Version Shows the format of the SNTP server. Enter the IP address of the TFTP Server Address field The factory default is IPv4. To removing an...

GS716Tv2/GS724Tv3 Software Admin Manual
Page 45
.... You can configure your system to monitor and block six types of attacks: • SIP=DIP: Source IP address = Destination IP address. • First Fragment: TCP Header size is smaller than the configured value. • TCP Fragment: IP Fragment Offset = 1. • TCP Flag: TCP Flag SYN set and Source Port < 1024 or TCP Control Flags... (continued) Field Requests Failed Requests Description Specifies the number of failed SNTP requests made to refresh the page with the most current data from the switch. GS716Tv2 and GS724Tv3 Software Administration Manual Table 2-6.
.... You can configure your system to monitor and block six types of attacks: • SIP=DIP: Source IP address = Destination IP address. • First Fragment: TCP Header size is smaller than the configured value. • TCP Fragment: IP Fragment Offset = 1. • TCP Flag: TCP Flag SYN set and Source Port < 1024 or TCP Control Flags... (continued) Field Requests Failed Requests Description Specifies the number of failed SNTP requests made to refresh the page with the most current data from the switch. GS716Tv2 and GS724Tv3 Software Administration Manual Table 2-6.
GS716Tv2/GS724Tv3 Software Admin Manual
Page 46
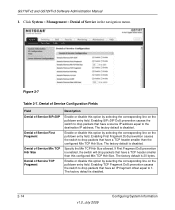
...the switch to drop packets that have an IP fragment offset equal to the destination IP address. If First Fragment DoS prevention is 20 bytes. Enabling SIP=DIP DoS prevention causes the switch to.... The factory default is enabled, the switch will drop packets that have a source IP address equal to 1. Enabling TCP Fragment DoS prevention causes the switch to drop packets that have a TCP ...is disabled. 2-14 v1.0, July 2009 Configuring System Information Click System Management Denial of Service TCP Fragment Description Enable or disable this option by selecting ...
...the switch to drop packets that have an IP fragment offset equal to the destination IP address. If First Fragment DoS prevention is 20 bytes. Enabling SIP=DIP DoS prevention causes the switch to.... The factory default is enabled, the switch will drop packets that have a source IP address equal to 1. Enabling TCP Fragment DoS prevention causes the switch to drop packets that have a TCP ...is disabled. 2-14 v1.0, July 2009 Configuring System Information Click System Management Denial of Service TCP Fragment Description Enable or disable this option by selecting ...


