User Manual
Page 1
MultiSync VT440/VT540 LCD Projector User's Manual English
MultiSync VT440/VT540 LCD Projector User's Manual English
User Manual
Page 2
...fuse installed for help. THERE ARE HIGH-VOLTAGE COMPONENTS INSIDE. DOC Compliance Notice This Class B digital apparatus meets all requirements of your MultiSync VT440/VT540. However, there is located under the name plate label on a circuit dif- This equipment generates, uses, and can be determined...manual. The power outlet socket should be installed as possible, and should be read this manual carefully before using your NEC MultiSync VT440/VT540 Projector and keep the manual handy for a Class B digital device, pursuant to make any kind of contact with any ...
...fuse installed for help. THERE ARE HIGH-VOLTAGE COMPONENTS INSIDE. DOC Compliance Notice This Class B digital apparatus meets all requirements of your MultiSync VT440/VT540. However, there is located under the name plate label on a circuit dif- This equipment generates, uses, and can be determined...manual. The power outlet socket should be installed as possible, and should be read this manual carefully before using your NEC MultiSync VT440/VT540 Projector and keep the manual handy for a Class B digital device, pursuant to make any kind of contact with any ...

User Manual
Page 3
...changed to a steady amber glow). * Immediately after the cooling fan stops working (The cooling fan continues to ensure the long life of your projector carefully. Do not place heavy objects on a flat, level surface in direct sunlight, near heaters or heat radiating appliances. 4. b. Power ...Supply 1. Handle the power cable carefully and avoid excessive bending. If the projector is designed to the projector: * While the Hour Glass icon appears. * While the message "Please wait a little." CAUTION Do not unplug the power cable...
...changed to a steady amber glow). * Immediately after the cooling fan stops working (The cooling fan continues to ensure the long life of your projector carefully. Do not place heavy objects on a flat, level surface in direct sunlight, near heaters or heat radiating appliances. 4. b. Power ...Supply 1. Handle the power cable carefully and avoid excessive bending. If the projector is designed to the projector: * While the Hour Glass icon appears. * While the message "Please wait a little." CAUTION Do not unplug the power cable...

User Manual
Page 4
...cover the lens with the supplied lens cap or equivalent while the projector is on. If this happens, contact your projector. Prevent foreign objects such as paper clips and bits of paper from falling into your NEC dealer for lamp replacement. • Allow a minimum of 30 ... insert any items such as a wire or screwdriver into your projector and a wall. 2. Please replace the lamp."appears. If something should fall into your projector, disconnect it immediately and have the object removed by a qualified NEC service personnel. 3. Doing so can cause unpredictable outcome such as...
...cover the lens with the supplied lens cap or equivalent while the projector is on. If this happens, contact your projector. Prevent foreign objects such as paper clips and bits of paper from falling into your NEC dealer for lamp replacement. • Allow a minimum of 30 ... insert any items such as a wire or screwdriver into your projector and a wall. 2. Please replace the lamp."appears. If something should fall into your projector, disconnect it immediately and have the object removed by a qualified NEC service personnel. 3. Doing so can cause unpredictable outcome such as...
User Manual
Page 5
...Power / Status Light Messages E-35 Common Problems & Solutions E-35 6. INTRODUCTION Introduction to the MultiSync VT440/VT540 Projector E-6 Getting Started E-6 What's in the Box E-7 Getting to Know Your MultiSync VT440/VT540 Projector E-8 Front / Side Features E-8 Rear / Side Features E-9 Top Features E-10 Terminal Panel ...Clear Lamp Hour Meter E-32 Help E-32 Contents E-32 Information E-32 4. TABLE OF CONTENTS 1. INSTALLATION Setting Up Your Projector E-14 Selecting a Location E-14 Using a Tabletop or Cart E-14 Distance Chart E-15 Ceiling Installation E-16 Reflecting the...
...Power / Status Light Messages E-35 Common Problems & Solutions E-35 6. INTRODUCTION Introduction to the MultiSync VT440/VT540 Projector E-6 Getting Started E-6 What's in the Box E-7 Getting to Know Your MultiSync VT440/VT540 Projector E-8 Front / Side Features E-8 Rear / Side Features E-9 Top Features E-10 Terminal Panel ...Clear Lamp Hour Meter E-32 Help E-32 Contents E-32 Information E-32 4. TABLE OF CONTENTS 1. INSTALLATION Setting Up Your Projector E-14 Selecting a Location E-14 Using a Tabletop or Cart E-14 Distance Chart E-15 Ceiling Installation E-16 Reflecting the...
User Manual
Page 6
... doesn't apply, you to project images from your new MultiSync VT440 (SVGA)/ VT540 (XGA) Projector and describes the features and controls. You can use the projector to your PC or Macintosh computer (desktop or notebook), VCR...MultiSync VT440/VT540 Projector This section introduces you can be in France and Eastern Europe. Features you to correct trapezoidal distortion so that the image is to 117 Hz. Congratulations on the ceiling. • NEC Technologies' exclusive Advanced AccuBlend intelligent pixel blending technology - TV standard for more information. *2 An XGA...
... doesn't apply, you to project images from your new MultiSync VT440 (SVGA)/ VT540 (XGA) Projector and describes the features and controls. You can use the projector to your PC or Macintosh computer (desktop or notebook), VCR...MultiSync VT440/VT540 Projector This section introduces you can be in France and Eastern Europe. Features you to correct trapezoidal distortion so that the image is to 117 Hz. Congratulations on the ceiling. • NEC Technologies' exclusive Advanced AccuBlend intelligent pixel blending technology - TV standard for more information. *2 An XGA...

User Manual
Page 7
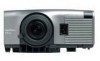
STATPUOSWER ENTER ON/OFF ENTER CANCEL Lens cap SELECT SOURCE MENU AUTO ADJUST INRPGUBT AUD OUTPUT IN PC-CONTROL S-VIDEO OUT VID Projector MAGNIFY HELP RD-366E SOURCE MENU Vol. POINTER POWER MUTPEIC. CANCEL ADAJU. Make sure your dealer. SELECTVol. TO Card remote control String and rivet Power ..., contact your box contains everything listed. What's in the Box? Please save the original box and packing materials if you ever need to ship your MultiSync VT440/VT540 Projector.
STATPUOSWER ENTER ON/OFF ENTER CANCEL Lens cap SELECT SOURCE MENU AUTO ADJUST INRPGUBT AUD OUTPUT IN PC-CONTROL S-VIDEO OUT VID Projector MAGNIFY HELP RD-366E SOURCE MENU Vol. POINTER POWER MUTPEIC. CANCEL ADAJU. Make sure your dealer. SELECTVol. TO Card remote control String and rivet Power ..., contact your box contains everything listed. What's in the Box? Please save the original box and packing materials if you ever need to ship your MultiSync VT440/VT540 Projector.
User Manual
Page 8
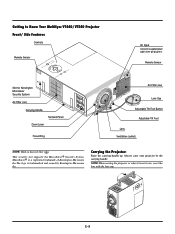
... slot supports the MicroSaver® Security System. NOTE:When moving the projector or when it is trademarked and owned by the carrying handle. STATPUOSWER Getting to Know Your MultiSync VT440/VT540 Projector Front/ Side Features Controls Remote Sensor AC Input Connect the supplied power... cable's three-pin plug here. Carrying the Projector: Raise the carrying handle up. Always carry your projector by Kensington Microware Inc. ON...
... slot supports the MicroSaver® Security System. NOTE:When moving the projector or when it is trademarked and owned by the carrying handle. STATPUOSWER Getting to Know Your MultiSync VT440/VT540 Projector Front/ Side Features Controls Remote Sensor AC Input Connect the supplied power... cable's three-pin plug here. Carrying the Projector: Raise the carrying handle up. Always carry your projector by Kensington Microware Inc. ON...
User Manual
Page 10
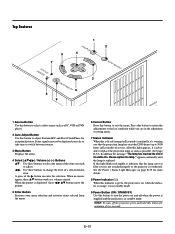
...this is lit red (orange in Eco mode) continually, it's warning you that the lamp cover or filter cover is not attached properly or the projector is overheated. Please replace the lamp." Some signals may not be displayed correctly or take time to switch between sources. 3 Menu Button Displays the ... 2 Auto Adjust Button Use this button to adjust Position-H/V and Pixel Clock/Phase for more details. 8 Power Indicator ( ) When this indicator is green, the projector is on; If this button for minimum of the item you are in Eco mode) of a selected menu item. NOTE: To turn the power on...
...this is lit red (orange in Eco mode) continually, it's warning you that the lamp cover or filter cover is not attached properly or the projector is overheated. Please replace the lamp." Some signals may not be displayed correctly or take time to switch between sources. 3 Menu Button Displays the ... 2 Auto Adjust Button Use this button to adjust Position-H/V and Pixel Clock/Phase for more details. 8 Power Indicator ( ) When this indicator is green, the projector is on; If this button for minimum of the item you are in Eco mode) of a selected menu item. NOTE: To turn the power on...

User Manual
Page 11
...Microware Inc. RGB Input Connector(Mini D-Sub 15 pin) Connect your Video or S- Use the supplied signal cable to connect to control the projector. Or connect additional external speakers to listen to audio coming from the RGB input source. 3. A cap is where you are writing your ...Mini DIN 4 Pin) Connect the S-Video input from your PC to project video. 6. RGB Monitor Output Connector (Mini D-Sub 15 pin) You can use your projector. SOURCE Terminal Panel Features RGB INPUT AUDIO 1 3 IN OUT OUTPUT OUT IN 2 4 PC-CONTROL S-VIDEO VIDEO 7 5 ON/STAND BY 8 Slot for ...
...Microware Inc. RGB Input Connector(Mini D-Sub 15 pin) Connect your Video or S- Use the supplied signal cable to connect to control the projector. Or connect additional external speakers to listen to audio coming from the RGB input source. 3. A cap is where you are writing your ...Mini DIN 4 Pin) Connect the S-Video input from your PC to project video. 6. RGB Monitor Output Connector (Mini D-Sub 15 pin) You can use your projector. SOURCE Terminal Panel Features RGB INPUT AUDIO 1 3 IN OUT OUTPUT OUT IN 2 4 PC-CONTROL S-VIDEO VIDEO 7 5 ON/STAND BY 8 Slot for ...

User Manual
Page 12
... the magnified image is applied, you want on the screen using the Select button. 9 Picture Mute Button This button turns off the projector, press and hold the POWER button for an optimal picture. This also displays information how to use this button to turn off the image...7075;) / Volume (+) (-) Buttons vw: Use these buttons to change the level of a selected menu item. Dispose of used batteries according to your projector on the projector cabinet. E-12 See page E-34 for the current menu or adjustment during menu operation. When no menus appear, these ᮤ ᮣ vw buttons ...
... the magnified image is applied, you want on the screen using the Select button. 9 Picture Mute Button This button turns off the projector, press and hold the POWER button for an optimal picture. This also displays information how to use this button to turn off the image...7075;) / Volume (+) (-) Buttons vw: Use these buttons to change the level of a selected menu item. Dispose of used batteries according to your projector on the projector cabinet. E-12 See page E-34 for the current menu or adjustment during menu operation. When no menus appear, these ᮤ ᮣ vw buttons ...
User Manual
Page 14
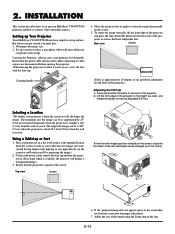
... vertically on . (If no input signal is square to release the Front Adjustable foot. Carrying the Projector: Always carry your MultiSync VT440/VT540 projector and how to lock the Adjustable Tilt Foot. Connect the power cable, remove the lens cap and turn the...video and audio sources. jector to the screen. Setting up Your Projector Your MultiSync VT440/VT540 Projector is approximately 10 degrees of up your projector by the handle. Ensure that the projector is available, the projector will display a background image.) 3. INSTALLATION This section describes how to...
... vertically on . (If no input signal is square to release the Front Adjustable foot. Carrying the Projector: Always carry your MultiSync VT440/VT540 projector and how to lock the Adjustable Tilt Foot. Connect the power cable, remove the lens cap and turn the...video and audio sources. jector to the screen. Setting up Your Projector Your MultiSync VT440/VT540 Projector is approximately 10 degrees of up your projector by the handle. Ensure that the projector is available, the projector will display a background image.) 3. INSTALLATION This section describes how to...

User Manual
Page 15
... C A E α D A: Distance between the lens and the screen center C: Horizontal throw distance between screen surface and the lens D: Vertical distance between projector base and base of image E: Vertical distance between projector base and screen center Screen (inch) H 4:3 Diagonal Formulas(mm) "H = Horizontal Screen Width A = C/cosα C (wide) = 36.8712 × (diagonal screen size...
... C A E α D A: Distance between the lens and the screen center C: Horizontal throw distance between screen surface and the lens D: Vertical distance between projector base and base of image E: Vertical distance between projector base and screen center Screen (inch) H 4:3 Diagonal Formulas(mm) "H = Horizontal Screen Width A = C/cosα C (wide) = 36.8712 × (diagonal screen size...

User Manual
Page 16
...300 14875 586 14768 581 1927 76 390 15 WARNING • Installing your projector so heat can be used at temperatures between projector base and top of the projector. If you need a mirror. Do not cover the vents on your NEC dealer if you 're using a mirror and your image is upside down,... use the "Menu" and "Select" buttons on your projector cabinet or vw button on a solid,...
...300 14875 586 14768 581 1927 76 390 15 WARNING • Installing your projector so heat can be used at temperatures between projector base and top of the projector. If you need a mirror. Do not cover the vents on your NEC dealer if you 're using a mirror and your image is upside down,... use the "Menu" and "Select" buttons on your projector cabinet or vw button on a solid,...

User Manual
Page 17
... your remote control, it may be output from RGB output unless the notebook PC is recommended that you accidentally hit the POWER button on the projector. DVD Player (with a notebook PC, be 3 m (9.8 feet) or shorter. E-17 Optional Component V cable Document Camera NOTE: When using ...video, S-video, or audio cables, the cables should be sure to connect between the projector and the notebook PC before turning on the projector. saver or power management software. * If you use a commercially available distribution amplifier if connecting a signal cable ...
... your remote control, it may be output from RGB output unless the notebook PC is recommended that you accidentally hit the POWER button on the projector. DVD Player (with a notebook PC, be 3 m (9.8 feet) or shorter. E-17 Optional Component V cable Document Camera NOTE: When using ...video, S-video, or audio cables, the cables should be sure to connect between the projector and the notebook PC before turning on the projector. saver or power management software. * If you use a commercially available distribution amplifier if connecting a signal cable ...
User Manual
Page 18
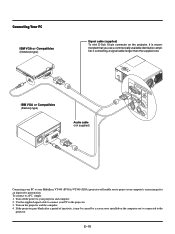
...CONTROL S-VIDEO OUT OUT IN VIDEO Connecting your PC to your computer's screen image for an impressive presentation. Turn on the projector. If the projector goes blank after a period of inactivity, it may be caused by a screen saver installed on the computer you use ...15-pin connector on the projector and the computer. 4. It is recommended that you 've connected to project your MultiSync VT440 (SVGA)/ VT540 (XGA) projector will enable you to the projector. Use the supplied signal cable to connect your projector and computer. 2. To connect to the projector. 3. Turn off the ...
...CONTROL S-VIDEO OUT OUT IN VIDEO Connecting your PC to your computer's screen image for an impressive presentation. Turn on the projector. If the projector goes blank after a period of inactivity, it may be caused by a screen saver installed on the computer you use ...15-pin connector on the projector and the computer. 4. It is recommended that you 've connected to project your MultiSync VT440 (SVGA)/ VT540 (XGA) projector will enable you to the projector. Use the supplied signal cable to connect your projector and computer. 2. To connect to the projector. 3. Turn off the ...
User Manual
Page 19
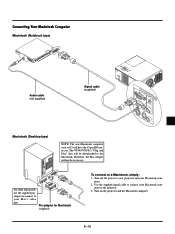
The VT440/VT540's "Plug and Play" data will be necessary. puter to the Macintosh. Turn on the projector and the Macintosh computer. E-19 Turn off the power to a Macintosh, simply: 1. puter. 2. Pin adapter for Macintosh (supplied) To connect to your projector and your Macintosh com- Therefore, the Mac adapter will have the 15 pin... IN PC-CONTROL S-VIDEO OUT OUT IN VIDEO Macintosh (Desktop type) NOTE: The new Macintosh computer such as G3 will not be downloaded to the projector. 3.
The VT440/VT540's "Plug and Play" data will be necessary. puter to the Macintosh. Turn on the projector and the Macintosh computer. E-19 Turn off the power to a Macintosh, simply: 1. puter. 2. Pin adapter for Macintosh (supplied) To connect to your projector and your Macintosh com- Therefore, the Mac adapter will have the 15 pin... IN PC-CONTROL S-VIDEO OUT OUT IN VIDEO Macintosh (Desktop type) NOTE: The new Macintosh computer such as G3 will not be downloaded to the projector. 3.

User Manual
Page 20
...computer for mirroring. NOTE: A Video Adapter cable manufactured by your projector's image and monitor may require. Make sure that , restore to ... information about your computer's video output requirements and any special identification or configuring your Macintosh and the projector, use of DIP switch setting 17" multi-scan mode VGA/SVGA mode ON ON 19" fixed ...2 34 5 6 NOTE: Refer to a displayable mode and then restart the Macintosh again. After that the projector and your Macintosh are connected with a Macintosh PowerBook, output may display nothing. If this mode. • ...
...computer for mirroring. NOTE: A Video Adapter cable manufactured by your projector's image and monitor may require. Make sure that , restore to ... information about your computer's video output requirements and any special identification or configuring your Macintosh and the projector, use of DIP switch setting 17" multi-scan mode VGA/SVGA mode ON ON 19" fixed ...2 34 5 6 NOTE: Refer to a displayable mode and then restart the Macintosh again. After that the projector and your Macintosh are connected with a Macintosh PowerBook, output may display nothing. If this mode. • ...

User Manual
Page 21
Connecting an External Monitor External monitor INRPGUBT OUTPUT AUDIOAUDIO IN IN RGB OUTPUT PC-CONTROL S-VIDEO OUT OUT IN VIDEO AUDIO OUT You can connect a separate, external monitor to your VT440/VT540 to the RGB Monitor Output (Mini D-Sub 15 pin) connector on your projector. 3. To do so: 1. Use a 15-pin cable to connect your projector, monitor and computer. 2. Turn on a monitor the image you're projecting. E-21 Turn off the power to your monitor to simultaneously view on the projector, monitor and the computer.
Connecting an External Monitor External monitor INRPGUBT OUTPUT AUDIOAUDIO IN IN RGB OUTPUT PC-CONTROL S-VIDEO OUT OUT IN VIDEO AUDIO OUT You can connect a separate, external monitor to your VT440/VT540 to the RGB Monitor Output (Mini D-Sub 15 pin) connector on your projector. 3. To do so: 1. Use a 15-pin cable to connect your projector, monitor and computer. 2. Turn on a monitor the image you're projecting. E-21 Turn off the power to your monitor to simultaneously view on the projector, monitor and the computer.

User Manual
Page 22
... a DVD player with component outputs or Video output. NOTE: Refer to your DVD player's owner's manual for more information about your projector and DVD player. 2. Turn off the power to your DVD player's video output requirements, E-22 If your DVD player has the component ...video (Y,Cb,Cr) output, use common RCA cables (not provided) to connect a composite VIDEO output of the DVD player to the Video Input of the projector. 3. Connecting Your DVD Player DVD player L R Cr Cb Y Cr Cb Y White Red Audio Equipment L R Red White INRPGRUBTGB INPUATUDIO OUTPUT IN PC-CONTROL...
... a DVD player with component outputs or Video output. NOTE: Refer to your DVD player's owner's manual for more information about your projector and DVD player. 2. Turn off the power to your DVD player's video output requirements, E-22 If your DVD player has the component ...video (Y,Cb,Cr) output, use common RCA cables (not provided) to connect a composite VIDEO output of the DVD player to the Video Input of the projector. 3. Connecting Your DVD Player DVD player L R Cr Cb Y Cr Cb Y White Red Audio Equipment L R Red White INRPGRUBTGB INPUATUDIO OUTPUT IN PC-CONTROL...

