
User Manual
Page 4
...possible, and should be easily accessible. riod of the LCD panel. Installation 1. Do not place your right to the equipment as near heaters or heat radiating appliances. 4. c. In UK, a BS approved power cable with any local building codes. Please read them carefully ...temporarily sustained on a flat, level surface in a particular installation. Place the projector on the surface of time. Please consult your projector and to ensure the long life of your NEC VT660K/VT560/ VT465 Projector and keep the manual handy for a prolonged pe- CAUTION • Avoid ...
...possible, and should be easily accessible. riod of the LCD panel. Installation 1. Do not place your right to the equipment as near heaters or heat radiating appliances. 4. c. In UK, a BS approved power cable with any local building codes. Please read them carefully ...temporarily sustained on a flat, level surface in a particular installation. Place the projector on the surface of time. Please consult your projector and to ensure the long life of your NEC VT660K/VT560/ VT465 Projector and keep the manual handy for a prolonged pe- CAUTION • Avoid ...
User Manual
Page 5
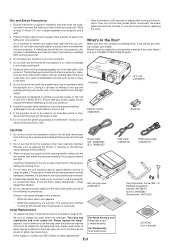
...Power cable (US: 7N080206) (EU: 7N080005) USB cable (7N520013) RGB signal cable (7N520012) 3. Do not send the soft carrying case by a qualified NEC service personnel. 3. Fire and Shock Precautions 1. Ensure that there is sufficient ventilation and that attach the carrying handle to the projector cabinet... policy CD-ROM User's manual If this requirement before replacing the lamp. Do not look into your VT660K/VT560/VT465 Projector. Projector VOLUME PJ PICTURE HELP FREEZE ASPECT MAGNIFY PIC-MUTE SELECT OFF VIDEO S-VIDEO POWER RGB ON AUTO ADJ. Insufficient ...
...Power cable (US: 7N080206) (EU: 7N080005) USB cable (7N520013) RGB signal cable (7N520012) 3. Do not send the soft carrying case by a qualified NEC service personnel. 3. Fire and Shock Precautions 1. Ensure that there is sufficient ventilation and that attach the carrying handle to the projector cabinet... policy CD-ROM User's manual If this requirement before replacing the lamp. Do not look into your VT660K/VT560/VT465 Projector. Projector VOLUME PJ PICTURE HELP FREEZE ASPECT MAGNIFY PIC-MUTE SELECT OFF VIDEO S-VIDEO POWER RGB ON AUTO ADJ. Insufficient ...

User Manual
Page 6
...only) ....... TABLE OF CONTENTS Important Information E-2 Safety Cautions ...E-2 What's in the Box? ...E-3 INTRODUCTION E-5 Introduction to the Projector E-5 Part Names of the Projector E-6 Attaching the supplied carrying handle E-6 Top Features ...E-7 Terminal Panel Features E-8 Part Names of the Remote Control E-9 Battery ...Player E-15 Connecting Your VCR or Laser Disc Player E-16 Connecting the Supplied Power Cable E-16 PROJECTING AN IMAGE (BASIC OPERATION E-17 Turning on the Projector E-17 Selecting a Source ...E-18 Adjusting the Picture Size and Position E-18 Correcting ...
...only) ....... TABLE OF CONTENTS Important Information E-2 Safety Cautions ...E-2 What's in the Box? ...E-3 INTRODUCTION E-5 Introduction to the Projector E-5 Part Names of the Projector E-6 Attaching the supplied carrying handle E-6 Top Features ...E-7 Terminal Panel Features E-8 Part Names of the Remote Control E-9 Battery ...Player E-15 Connecting Your VCR or Laser Disc Player E-16 Connecting the Supplied Power Cable E-16 PROJECTING AN IMAGE (BASIC OPERATION E-17 Turning on the Projector E-17 Selecting a Source ...E-18 Adjusting the Picture Size and Position E-18 Correcting ...

User Manual
Page 7
...find an overview. Please consult your dealer for video in accordance with NEC's Advanced AccuBlend on VT465. and other RGB signals within a horizontal frequency range of 24 to ...SVGA, XGA , SXGA/UXGA(with the built-in remote mouse function. • You can be used in Brazil. and Canada. At the beginning of each section of the manual you time later on Your Purchase of the very best projectors...VT660K/ VT560/VT465 Projector The VT660K/VT560/VT465 is light, compact, easy to carry, and complements any office, boardroom or auditorium. PAL-M: TV standard used without a cable, and ...
...find an overview. Please consult your dealer for video in accordance with NEC's Advanced AccuBlend on VT465. and other RGB signals within a horizontal frequency range of 24 to ...SVGA, XGA , SXGA/UXGA(with the built-in remote mouse function. • You can be used in Brazil. and Canada. At the beginning of each section of the manual you time later on Your Purchase of the very best projectors...VT660K/ VT560/VT465 Projector The VT660K/VT560/VT465 is light, compact, easy to carry, and complements any office, boardroom or auditorium. PAL-M: TV standard used without a cable, and ...

User Manual
Page 8
...See page E-10) Built-in Security Slot ( )* Main Power Switch When you plug the supplied power cable into an active wall outlet and turn on the working surface before turning the projector over to prevent scratching the top cover. To attach the supplied carrying handle, use the supplied flathead screwdriver...Kensington Microware Inc. Place a soft cloth on the Main Power switch, the POWER indicator turns orange and the projector is in standby mode. (See page E-17) AC Input Connect the supplied power cable's twopin plug here, and plug the other end into an active wall outlet. (See page E-16) *...
...See page E-10) Built-in Security Slot ( )* Main Power Switch When you plug the supplied power cable into an active wall outlet and turn on the working surface before turning the projector over to prevent scratching the top cover. To attach the supplied carrying handle, use the supplied flathead screwdriver...Kensington Microware Inc. Place a soft cloth on the Main Power switch, the POWER indicator turns orange and the projector is in standby mode. (See page E-17) AC Input Connect the supplied power cable's twopin plug here, and plug the other end into an active wall outlet. (See page E-16) *...

User Manual
Page 10
...serial communication protocol to an external monitor from the remote control. 8. This also serves as a DVD player. A commercially available audio cable is inserted into the left AUDIO IN jack only, only left and right channel audio inputs for stereo sound from an external source like...computer or other analog RGB equipment such as a headphone jack. (When audio equipment is connected, the projector speaker is disabled.) When a cable mini-plug is required. 3. Use the supplied RGB cable to connect to the USB port (type A) of your computer's mouse functions from the RGB input...
...serial communication protocol to an external monitor from the remote control. 8. This also serves as a DVD player. A commercially available audio cable is inserted into the left AUDIO IN jack only, only left and right channel audio inputs for stereo sound from an external source like...computer or other analog RGB equipment such as a headphone jack. (When audio equipment is connected, the projector speaker is disabled.) When a cable mini-plug is required. 3. Use the supplied RGB cable to connect to the USB port (type A) of your computer's mouse functions from the RGB input...

User Manual
Page 13
See page E-16. 2 NOTE: Ensure that the power cable and any other cables are disconnected before you get started, you must first: 1 Set up a screen and the projector. 2 Connect your computer or video equipment to the projector. INSTALLATION AND CONNECTIONS This section describes how to set up and use , cover the lens with the lens...
See page E-16. 2 NOTE: Ensure that the power cable and any other cables are disconnected before you get started, you must first: 1 Set up a screen and the projector. 2 Connect your computer or video equipment to the projector. INSTALLATION AND CONNECTIONS This section describes how to set up and use , cover the lens with the lens...
User Manual
Page 15
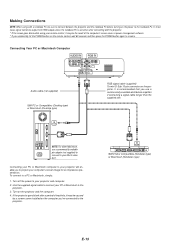
...be sure to connect between the projector and the notebook PC before turning on the power to the projector. To connect to your projector and computer. 2. Turn on the computer you've connected to the notebook PC. Use the supplied signal cable to the projector. 3. PHONE IBM VGA or ...Compatibles (Notebook type) or Macintosh (Notebook type) E-13 Connecting your PC or Macintosh computer to your projector will enable you use a commercially available pin adapter (not supplied...
...be sure to connect between the projector and the notebook PC before turning on the power to the projector. To connect to your projector and computer. 2. Turn on the computer you've connected to the notebook PC. Use the supplied signal cable to the projector. 3. PHONE IBM VGA or ...Compatibles (Notebook type) or Macintosh (Notebook type) E-13 Connecting your PC or Macintosh computer to your projector will enable you use a commercially available pin adapter (not supplied...
User Manual
Page 16
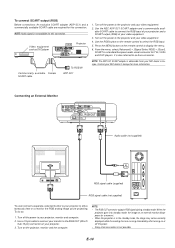
...button on or off the power. • Daisy chain connection is also referred to as DVD player RGB IN Projector 1. To do so: 1. Use a 15-pin cable to connect your NEC dealer in Europe for more information. SCART is not available for a moment. • When the...the RGB input. 5. NOTE: Audio signal is a standard European audio-visual connector for this connection. Use the NEC ADP-SC1 SCART adapter and a commercially available SCART cable to the projector and your projector. 3. Turn on a monitor the RGB analog image you're projecting. From the menu, select [Advanced] ...
...button on or off the power. • Daisy chain connection is also referred to as DVD player RGB IN Projector 1. To do so: 1. Use a 15-pin cable to connect your NEC dealer in Europe for more information. SCART is not available for a moment. • When the...the RGB input. 5. NOTE: Audio signal is a standard European audio-visual connector for this connection. Use the NEC ADP-SC1 SCART adapter and a commercially available SCART cable to the projector and your projector. 3. Turn on a monitor the RGB analog image you're projecting. From the menu, select [Advanced] ...

User Manual
Page 17
... optional 15-pin-to-RCA (female)ן3 cable to connect your DVD player to your DVD player has the component video (Y,Cb,Cr) output, use common RCA cables (not provided) to connect a composite VIDEO output of the projector. 3. NOTE: Refer to the Video Input of the DVD... player to your DVD player's owner's manual for more information about your projector to a DVD player with component output or Video ...
... optional 15-pin-to-RCA (female)ן3 cable to connect your DVD player to your DVD player has the component video (Y,Cb,Cr) output, use common RCA cables (not provided) to connect a composite VIDEO output of the projector. 3. NOTE: Refer to the Video Input of the DVD... player to your DVD player's owner's manual for more information about your projector to a DVD player with component output or Video ...
User Manual
Page 18
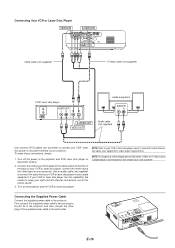
... NOTE: Refer to your VCR or laser disc player, connect the other plug of the projector, and then connect the other end to your audio equipment (if your projector. Use an audio cable (not supplied) to connect the audio from your VCR or laser disc player to the ...right and left channel connections correct for more information about your projector. E-16 Connecting the Supplied Power Cable Connect the supplied power cable to the projector and VCR, laser disc player or document camera. 2. Turn off the power to the projector. To make these connections, simply: 1. Be careful to the...
... NOTE: Refer to your VCR or laser disc player, connect the other plug of the projector, and then connect the other end to your audio equipment (if your projector. Use an audio cable (not supplied) to connect the audio from your VCR or laser disc player to the ...right and left channel connections correct for more information about your projector. E-16 Connecting the Supplied Power Cable Connect the supplied power cable to the projector and VCR, laser disc player or document camera. 2. Turn off the power to the projector. To make these connections, simply: 1. Be careful to the...
User Manual
Page 19
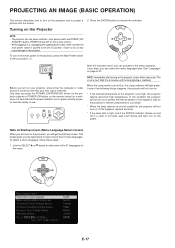
...light, and if the STATUS indicator flashes on and off in a cycle of the projector is not a fault. Before you first turn on the remote control). • When plugging in or unplugging the supplied power cable, make sure that the computer or video source is removed. Note on Startup screen... (Menu Language Select screen) When you turn on your lens cap is turned on the projector, you press the POWER (ON/STAND BY) button on...
...light, and if the STATUS indicator flashes on and off in a cycle of the projector is not a fault. Before you first turn on the remote control). • When plugging in or unplugging the supplied power cable, make sure that the computer or video source is removed. Note on Startup screen... (Menu Language Select screen) When you turn on your lens cap is turned on the projector, you press the POWER (ON/STAND BY) button on...

User Manual
Page 22
...-tune the computer image or to remove any one of the following circumstances. See page E-29. Optimizing RGB Picture Automatically Turning off the Projector Adjusting the Image Using Auto Adjust Optimizing RGB image automatically Press the Auto Adjust button to optimize an RGB image automatically. [Poor picture] ...or Down Volume Sound level from the wall outlet or do not turn off time). message will glow orange. CAUTION Do not unplug the power cable from the speaker and the AUDIO OUT jack (Stereo mini) on the remote control. AUTO ADJ. [Normal picture] Secondly, press the ENTER...
...-tune the computer image or to remove any one of the following circumstances. See page E-29. Optimizing RGB Picture Automatically Turning off the Projector Adjusting the Image Using Auto Adjust Optimizing RGB image automatically Press the Auto Adjust button to optimize an RGB image automatically. [Poor picture] ...or Down Volume Sound level from the wall outlet or do not turn off time). message will glow orange. CAUTION Do not unplug the power cable from the speaker and the AUDIO OUT jack (Stereo mini) on the remote control. AUTO ADJ. [Normal picture] Secondly, press the ENTER...

User Manual
Page 23
... Function The built-in the Computer mode. Works as the SELECT button on the projector. Lit red • When the MENU button is repeatedly connected and disconnected in the Computer mode. E-21 USB cable (supplied) USB port (Type A) NOTE: Wait at least 5 seconds after disconnecting... the USB cable before reconnecting it is pressed, the PJ button lights red to indicate that you are in the Projector mode, which allows the projector menu operation using the USB Port The remote mouse function can be used with...
... Function The built-in the Computer mode. Works as the SELECT button on the projector. Lit red • When the MENU button is repeatedly connected and disconnected in the Computer mode. E-21 USB cable (supplied) USB port (Type A) NOTE: Wait at least 5 seconds after disconnecting... the USB cable before reconnecting it is pressed, the PJ button lights red to indicate that you are in the Projector mode, which allows the projector menu operation using the USB Port The remote mouse function can be used with...
User Manual
Page 30
...source such as a DVD player. The Security function has been enabled. This feature enables you continue to select composite video standards manually. The projector will be done for the European Scart. NOTE: * This Control Panel Key Lock does not affect the remote control and the PC Control.... NOTE: The lower the Noise Reduction level, the better the image quality by setting the main power switch to "O" or unplugging the power cable). * If you to enable. * Key symbol indicates the Control Panel Key Lock is a request code. E-28 The [Confirm Keyword] screen...
...source such as a DVD player. The Security function has been enabled. This feature enables you continue to select composite video standards manually. The projector will be done for the European Scart. NOTE: * This Control Panel Key Lock does not affect the remote control and the PC Control.... NOTE: The lower the Noise Reduction level, the better the image quality by setting the main power switch to "O" or unplugging the power cable). * If you to enable. * Key symbol indicates the Control Panel Key Lock is a request code. E-28 The [Confirm Keyword] screen...
User Manual
Page 31
...Pin). The default is 19200 bps. Reset all the adjustments and settings for the current RGB input signal to project an image using NEC's Advanced AccuBlend Intelligent Pixel Blending Technology. Resetting the Filter Usage Hours [Clear Filter Usage] Resets the filter usage back to zero.... Language, Security, Communication Speed, Remaining Lamp Time, Lamp Hour Meter, Filter Usage and Projector Usage. Select the appropriate baud rate for a confirmation. The items can be automatically adjusted for long cable runs). Enabling Auto Adjust [Auto Adjust] When "Auto Adjust" is set to Normal or...
...Pin). The default is 19200 bps. Reset all the adjustments and settings for the current RGB input signal to project an image using NEC's Advanced AccuBlend Intelligent Pixel Blending Technology. Resetting the Filter Usage Hours [Clear Filter Usage] Resets the filter usage back to zero.... Language, Security, Communication Speed, Remaining Lamp Time, Lamp Hour Meter, Filter Usage and Projector Usage. Select the appropriate baud rate for a confirmation. The items can be automatically adjusted for long cable runs). Enabling Auto Adjust [Auto Adjust] When "Auto Adjust" is set to Normal or...
User Manual
Page 32
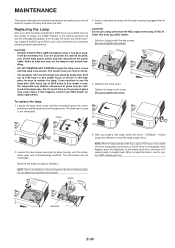
...Eco mode) of 10 seconds while in Eco mode) hours to maintain optimal projector performance. Catch 5. The two screws are not removable. socket. It will turn off the main power switch and then disconnect the power cable. Reattach the lamp cover. NOTE: There is not removable. Be sure ...pieces of service. Catch Interlock E-30 Replacing the Lamp After your lamp has been operating for a minimum of use a lamp other than the NEC replacement lamp (VT60LP). Do not attempt to circumvent this happens, press the Help button on this happens, be scattered in the cabinet will ...
...Eco mode) of 10 seconds while in Eco mode) hours to maintain optimal projector performance. Catch 5. The two screws are not removable. socket. It will turn off the main power switch and then disconnect the power cable. Reattach the lamp cover. NOTE: There is not removable. Be sure ...pieces of service. Catch Interlock E-30 Replacing the Lamp After your lamp has been operating for a minimum of use a lamp other than the NEC replacement lamp (VT60LP). Do not attempt to circumvent this happens, press the Help button on this happens, be scattered in the cabinet will ...
User Manual
Page 35
... or adjust the image manually with Horizontal / Vertical / Clock / Phase in the mode Advanced menu. See page E-18. • Ensure your cables are in the Projector mode and the PJ button lights in the menu. See page E-18. • Ensure that the lamp cover or lamp housing is enabled. Image... sure that the power button on the projector cabinet or the remote control is scrolling vertically, horizontally or both • Use the RGB, VIDEO or S-VIDEO button on page E-32. Indicator is off, turn on Check These Items • Check that the power cable is plugged in RGB • If ...
... or adjust the image manually with Horizontal / Vertical / Clock / Phase in the mode Advanced menu. See page E-18. • Ensure your cables are in the Projector mode and the PJ button lights in the menu. See page E-18. • Ensure that the lamp cover or lamp housing is enabled. Image... sure that the power button on the projector cabinet or the remote control is scrolling vertically, horizontally or both • Use the RGB, VIDEO or S-VIDEO button on page E-32. Indicator is off, turn on Check These Items • Check that the power cable is plugged in RGB • If ...

User Manual
Page 39
... 13H 02H 10H 00H 00H 00H 12H 02H 11H 00H 00H 00H 13H 02H 12H 00H 00H 00H 14H 02H 13H 00H 00H 00H 15H Cable Connection Communication Protocol Baud rate: 19200 bps Data length: 8 bits Parity: No parity Stop bit: One bit X on/off: None Communications procedure: Full duplex PC... TxD of PC NOTE: Contact your local dealer for a full list of the PC Control Codes if needed. NOTE: Pins 2, 3, 5, 6 and 8 are used inside the projector.
... 13H 02H 10H 00H 00H 00H 12H 02H 11H 00H 00H 00H 13H 02H 12H 00H 00H 00H 14H 02H 13H 00H 00H 00H 15H Cable Connection Communication Protocol Baud rate: 19200 bps Data length: 8 bits Parity: No parity Stop bit: One bit X on/off: None Communications procedure: Full duplex PC... TxD of PC NOTE: Contact your local dealer for a full list of the PC Control Codes if needed. NOTE: Pins 2, 3, 5, 6 and 8 are used inside the projector.
User Manual
Page 40
...3) Problems or damage caused by improper usage or unwarrantable alterations or repairs by the customer. 4) Problems or damage caused by using a power cable suited for the standards and power source voltage of maintenance parts, labor costs for repairs and shipping costs within 12 days, the customer will ... For details on the warranty or the normal term of warranty for business or pleasure. The replacement product will be paid at the NEC and NEC-designated service stations in cash or credit card. a service for international travelers This product is still in : Valid for 12 days ...
...3) Problems or damage caused by improper usage or unwarrantable alterations or repairs by the customer. 4) Problems or damage caused by using a power cable suited for the standards and power source voltage of maintenance parts, labor costs for repairs and shipping costs within 12 days, the customer will ... For details on the warranty or the normal term of warranty for business or pleasure. The replacement product will be paid at the NEC and NEC-designated service stations in cash or credit card. a service for international travelers This product is still in : Valid for 12 days ...

