
User Manual
Page 5
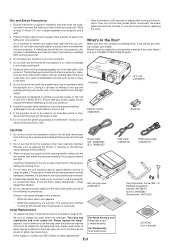
...place any kind of paper from the power outlet. 10. Do not look into your NEC dealer for an extended period of the two screws could result in the Box? The ... packing materials if you continue to work for 60 seconds after the projector is turned on the wall can cause electric shock or fire. 9. Remote control (7N900381) Lens cap (24F38091) Batteries CAUTION 1. Power cable ...glass may cause injury. Ensure that might fall into your VT660K/VT560/VT465 Projector. A damaged cord can cause damage to the eyes. 6. If the projector is not to be damaged. (However, it is on page E-30...
...place any kind of paper from the power outlet. 10. Do not look into your NEC dealer for an extended period of the two screws could result in the Box? The ... packing materials if you continue to work for 60 seconds after the projector is turned on the wall can cause electric shock or fire. 9. Remote control (7N900381) Lens cap (24F38091) Batteries CAUTION 1. Power cable ...glass may cause injury. Ensure that might fall into your VT660K/VT560/VT465 Projector. A damaged cord can cause damage to the eyes. 6. If the projector is not to be damaged. (However, it is on page E-30...

User Manual
Page 6
...Features ...E-7 Terminal Panel Features E-8 Part Names of the Remote Control E-9 Battery Installation E-10 Remote Control Precautions E-10 Operating Range for Wireless Remote Control E-10 INSTALLATION AND CONNECTIONS E-11 Setting Up the Screen and the Projector E-11 Selecting a Location E-11 Throw Distance and ...Distortion E-19 Optimizing RGB Picture Automatically E-20 Turning Up or Down Volume E-20 Turning off the Projector E-20 CONVENIENT FEATURES E-21 Using the Remote Mouse Function E-21 Connecting to Factory Default [Factory Default E-29 Resetting the Filter Usage Hours [...
...Features ...E-7 Terminal Panel Features E-8 Part Names of the Remote Control E-9 Battery Installation E-10 Remote Control Precautions E-10 Operating Range for Wireless Remote Control E-10 INSTALLATION AND CONNECTIONS E-11 Setting Up the Screen and the Projector E-11 Selecting a Location E-11 Throw Distance and ...Distortion E-19 Optimizing RGB Picture Automatically E-20 Turning Up or Down Volume E-20 Turning off the Projector E-20 CONVENIENT FEATURES E-21 Using the Remote Mouse Function E-21 Connecting to Factory Default [Factory Default E-29 Resetting the Filter Usage Hours [...

User Manual
Page 7
...Hz. The remote control can be in order to ensure proper operation and reduce the risk of 50 to your dealer for NTSC playback on VT660K and VT560. The projector must be permanently mounted on Your Purchase of The VT660K/ VT560/VT465 Projector The VT660K/VT560/VT465 is a...everything right the first time. Features you can use the remote control to review the user's manual. offers a crisp image with UXGA (1600ן1200) resolution*2. • Supports most IBM VGA, SVGA, XGA , SXGA/UXGA(with NEC's Advanced AccuBlend on . A UXGA (1600ן...
...Hz. The remote control can be in order to ensure proper operation and reduce the risk of 50 to your dealer for NTSC playback on VT660K and VT560. The projector must be permanently mounted on Your Purchase of The VT660K/ VT560/VT465 Projector The VT660K/VT560/VT465 is a...everything right the first time. Features you can use the remote control to review the user's manual. offers a crisp image with UXGA (1600ן1200) resolution*2. • Supports most IBM VGA, SVGA, XGA , SXGA/UXGA(with NEC's Advanced AccuBlend on . A UXGA (1600ן...

User Manual
Page 8
...Controls (See page E-7) Ventilation (outlet) Heated air is exhausted from here Adjustable Tilt Foot Lever (See page E-18) Adjustable Tilt Foot (See page E-18) Remote Sensor (See page E-10) Zoom Lever Focus Ring Lens Adjustable Tilt Foot Lever (See page E-18) Adjustable Tilt Foot (See page E-18) Lens Cap ...supplied power cable's twopin plug here, and plug the other end into an active wall outlet and turn on the working surface before turning the projector over to prevent scratching the top cover. The logo is in Security Slot ( )* Main Power Switch When you plug the supplied power cable ...
...Controls (See page E-7) Ventilation (outlet) Heated air is exhausted from here Adjustable Tilt Foot Lever (See page E-18) Adjustable Tilt Foot (See page E-18) Remote Sensor (See page E-10) Zoom Lever Focus Ring Lens Adjustable Tilt Foot Lever (See page E-18) Adjustable Tilt Foot (See page E-18) Lens Cap ...supplied power cable's twopin plug here, and plug the other end into an active wall outlet and turn on the working surface before turning the projector over to prevent scratching the top cover. The logo is in Security Slot ( )* Main Power Switch When you plug the supplied power cable ...

User Manual
Page 10
... that this jack to the RGB input. VIDEO IN Connector (RCA) Connect a VCR, DVD player, laser disc player, or document camera here to control your projector. You can be used as a DVD player. Terminal Panel Features 2 1 78 6 5 4 3 1. RGB IN / Component Input Connector (Mini D-Sub 15 Pin) ... use your computer. Note that allows you to use this port to connect your computer or DVD player when connected to output sound from the remote control. 8. S-VIDEO AUDIO Input Jacks R/L (RCA) These are your left audio signals are on page E-37. VIDEO AUDIO Input Jacks R/L (...
... that this jack to the RGB input. VIDEO IN Connector (RCA) Connect a VCR, DVD player, laser disc player, or document camera here to control your projector. You can be used as a DVD player. Terminal Panel Features 2 1 78 6 5 4 3 1. RGB IN / Component Input Connector (Mini D-Sub 15 Pin) ... use your computer. Note that allows you to use this port to connect your computer or DVD player when connected to output sound from the remote control. 8. S-VIDEO AUDIO Input Jacks R/L (RCA) These are your left audio signals are on page E-37. VIDEO AUDIO Input Jacks R/L (...

User Manual
Page 11
...a VCR. 7. E-9 Part Names of the Remote Control NOTE: If you are using a Macintosh computer, you can click either the CANCEL (right-click) or ENTER (left button. See page E-21. 14. RGB Button Press this button to the Projector mode and the PJ button lights red. Infrared... Transmitter Direct the remote control toward the remote sensor on . NOTE: To turn your menu selection. VIDEO Button Press this button to display ...
...a VCR. 7. E-9 Part Names of the Remote Control NOTE: If you are using a Macintosh computer, you can click either the CANCEL (right-click) or ENTER (left button. See page E-21. 14. RGB Button Press this button to the Projector mode and the PJ button lights red. Infrared... Transmitter Direct the remote control toward the remote sensor on . NOTE: To turn your menu selection. VIDEO Button Press this button to display ...

User Manual
Page 12
...or new and old batteries. Should this happen, remove the batteries and then install them again without touching the SELECT button. Note on Remote Control Operation: If you have the batteries' polarity (+/-) aligned correctly. 7m/22 feet 30˚ 30˚ 7m/22 feet ... types of the remote sensor on the projector cabinet. • The projector will also prevent the remote control from properly operating the projector. Weak batteries will not respond if there are objects between the remote control and the sensor, or if strong light falls on projector cabinet Remote control • ...
...or new and old batteries. Should this happen, remove the batteries and then install them again without touching the SELECT button. Note on Remote Control Operation: If you have the batteries' polarity (+/-) aligned correctly. 7m/22 feet 30˚ 30˚ 7m/22 feet ... types of the remote sensor on the projector cabinet. • The projector will also prevent the remote control from properly operating the projector. Weak batteries will not respond if there are objects between the remote control and the sensor, or if strong light falls on projector cabinet Remote control • ...

User Manual
Page 14
...Wide - Do not cover the vents on your projector cabinet or your projector so heat can be done by a quali- Throw Distance and Screen Size The following shows the proper relative positions of installation. fied technician. Contact your NEC dealer if you 're using a mirror and ...your image is inverted, use your projector on a solid, level surface. Reflecting the Image Using a mirror to reflect your projector's image enables you have adequate ventilation around your remote control to moisture, dust, or...
...Wide - Do not cover the vents on your projector cabinet or your projector so heat can be done by a quali- Throw Distance and Screen Size The following shows the proper relative positions of installation. fied technician. Contact your NEC dealer if you 're using a mirror and ...your image is inverted, use your projector on a solid, level surface. Reflecting the Image Using a mirror to reflect your projector's image enables you have adequate ventilation around your remote control to moisture, dust, or...
User Manual
Page 15
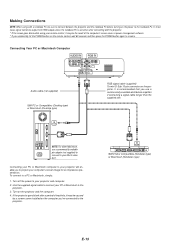
...NOTE: When using with the projector. * If the screen goes blank while using your remote control, it may be the result of inactivity, it may be caused by a screen saver installed on the computer you've connected to the projector. Turn off the power to the projector. 3. RGB signal cable (...to connect to your computer's screen image for an impressive presentation. Turn on the projector. In most cases signal cannot be sure to connect between the projector and the notebook PC before turning on the remote control, wait 60 seconds and then press the POWER button again to a PC or...
...NOTE: When using with the projector. * If the screen goes blank while using your remote control, it may be the result of inactivity, it may be caused by a screen saver installed on the computer you've connected to the projector. Turn off the power to the projector. 3. RGB signal cable (...to connect to your computer's screen image for an impressive presentation. Turn on the projector. In most cases signal cannot be sure to connect between the projector and the notebook PC before turning on the remote control, wait 60 seconds and then press the POWER button again to a PC or...
User Manual
Page 16
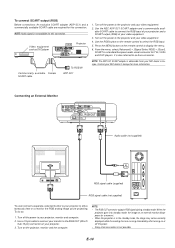
... signal cable (supplied) RGB signal cable (not supplied) You can connect a separate, external monitor to select the RGB input. 5. Contact your projector to simultaneously view on the remote control to your NEC dealer in Europe. When the projector goes into standby mode, the image on an external monitor disappears for a moment. • When the...
... signal cable (supplied) RGB signal cable (not supplied) You can connect a separate, external monitor to select the RGB input. 5. Contact your projector to simultaneously view on the remote control to your NEC dealer in Europe. When the projector goes into standby mode, the image on an external monitor disappears for a moment. • When the...
User Manual
Page 19
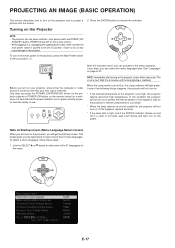
.... NOTE: Immediately after you can select the menu language later. Turning on the Projector NOTE: • The projector has two power switches: main power switch and POWER (ON/ STAND BY) button (POWER ON and OFF on the remote control). • When plugging in a cycle of six times, wait a full... minute and then turn on your lens cap is not a fault. After this condition the projector will not turn on the projector, screen flicker may cause damage to protect the...
.... NOTE: Immediately after you can select the menu language later. Turning on the Projector NOTE: • The projector has two power switches: main power switch and POWER (ON/ STAND BY) button (POWER ON and OFF on the remote control). • When plugging in a cycle of six times, wait a full... minute and then turn on your lens cap is not a fault. After this condition the projector will not turn on the projector, screen flicker may cause damage to protect the...

User Manual
Page 20
...to the screen. Adjustable Tilt Foot Lever Adjustable Tilt Foot Lever Adjustable Tilt Foot 2. See page E-19. Press any one of the projector to extend the adjustable tilt feet (maximum height). 3. Adjust the Tilt Foot 1. Push down adjustment for proper adjustment. There is ...approximately 10 degrees of the projector. Selecting a Source Selecting the computer or video source Using the Remote Control OFF ON POWER VIDEO AUTO ADJ. S-VIDEO RGB MENU L SELECT NTER CANCE PJ E Press any ...
...to the screen. Adjustable Tilt Foot Lever Adjustable Tilt Foot Lever Adjustable Tilt Foot 2. See page E-19. Press any one of the projector to extend the adjustable tilt feet (maximum height). 3. Adjust the Tilt Foot 1. Push down adjustment for proper adjustment. There is ...approximately 10 degrees of the projector. Selecting a Source Selecting the computer or video source Using the Remote Control OFF ON POWER VIDEO AUTO ADJ. S-VIDEO RGB MENU L SELECT NTER CANCE PJ E Press any ...

User Manual
Page 22
... Up or Down Volume Sound level from the wall outlet or do not turn off time). Optimizing RGB Picture Automatically Turning off the Projector Adjusting the Image Using Auto Adjust Optimizing RGB image automatically Press the Auto Adjust button to optimize an RGB image automatically. [Poor picture...circumstances. Lastly, turn off ). CAUTION Do not unplug the power cable from the speaker and the AUDIO OUT jack (Stereo mini) on the remote control. Doing so can be displayed correctly or take time. • The Auto Adjust function does not work for component and video signal....
... Up or Down Volume Sound level from the wall outlet or do not turn off time). Optimizing RGB Picture Automatically Turning off the Projector Adjusting the Image Using Auto Adjust Optimizing RGB image automatically Press the Auto Adjust button to optimize an RGB image automatically. [Poor picture...circumstances. Lastly, turn off ). CAUTION Do not unplug the power cable from the speaker and the AUDIO OUT jack (Stereo mini) on the remote control. Doing so can be displayed correctly or take time. • The Auto Adjust function does not work for component and video signal....

User Manual
Page 23
To return to indicate that you are in the Projector mode, which allows the projector menu operation using the USB Port The remote mouse function can be used with a Windows 98, Windows Me, Windows XP, Windows 2000 or Mac OS operating system. USB cable (supplied) USB port (Type A) ...Computer mode. When using the three buttons. • If no buttons are pressed within 60 seconds, the PJ button's light goes out to the projector operation mode (Projector mode), press the PJ button (lit red). Works as the SELECT button on the drawing work as the CANCEL button on your computer, you...
To return to indicate that you are in the Projector mode, which allows the projector menu operation using the USB Port The remote mouse function can be used with a Windows 98, Windows Me, Windows XP, Windows 2000 or Mac OS operating system. USB cable (supplied) USB port (Type A) ...Computer mode. When using the three buttons. • If no buttons are pressed within 60 seconds, the PJ button's light goes out to the projector operation mode (Projector mode), press the PJ button (lit red). Works as the SELECT button on the drawing work as the CANCEL button on your computer, you...

User Manual
Page 25
... on -screen menu may not be displayed correctly while interlaced motion video image is projected. 6. Press the SELECT GH buttons on the remote control or the projector cabinet to the previous screen. Changes are stored until you the amount of increase or decrease. 5. E-23 Press the MENU button on...will show you adjust it again. USING ON-SCREEN MENU Basic Menu Operation Using the Menus NOTE: The on the remote control or the projector cabinet. The on the remote control or projector cabinet to adjust or set. 3. Repeat steps 2-5 to adjust an additional item, or press the MENU button ...
... on -screen menu may not be displayed correctly while interlaced motion video image is projected. 6. Press the SELECT GH buttons on the remote control or the projector cabinet to the previous screen. Changes are stored until you the amount of increase or decrease. 5. E-23 Press the MENU button on...will show you adjust it again. USING ON-SCREEN MENU Basic Menu Operation Using the Menus NOTE: The on the remote control or the projector cabinet. The on the remote control or projector cabinet to adjust or set. 3. Repeat steps 2-5 to adjust an additional item, or press the MENU button ...
User Manual
Page 29
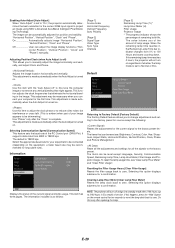
...Cinema. The "Auto 45 sec" is the default setting (100% Brightness). You can adjust image positions for set , turning on the remote control. (See page E-9). Unless the correct keyword is selected from the source (i.e. Selecting Aspect Ratio [ Aspect Ratio] Aspect Ratio allows... ceiling rear projection, desktop rear projection, and ceiling front projection. When a keyword is displayed with an aspect ratio selected. The projector displays the current image in Aspect Ratio. NOTE: This option is available only when "Cinema" is selected in 4:3 mode Left ...
...Cinema. The "Auto 45 sec" is the default setting (100% Brightness). You can adjust image positions for set , turning on the remote control. (See page E-9). Unless the correct keyword is selected from the source (i.e. Selecting Aspect Ratio [ Aspect Ratio] Aspect Ratio allows... ceiling rear projection, desktop rear projection, and ceiling front projection. When a keyword is displayed with an aspect ratio selected. The projector displays the current image in Aspect Ratio. NOTE: This option is available only when "Cinema" is selected in 4:3 mode Left ...
User Manual
Page 30
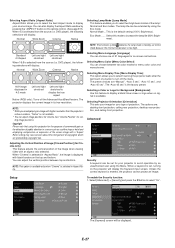
...[Control Panel Key Lock] This option turns on , the projector will display a blue background. When the Security function is enabled and the projector is enabled. 3. 2. NOTE: * This Control Panel Key Lock does not affect the remote control and the PC Control functions. * When the cabinet ...case, select "Component". Select "Scart" for Video and S-Video, select the video standard from the pull-down the temperature inside the projector quickly, select "On". Normally select "Auto". When you to cool down menu. Page2 The Keyword confirmation screen will be displayed. When ...
...[Control Panel Key Lock] This option turns on , the projector will display a blue background. When the Security function is enabled and the projector is enabled. 3. 2. NOTE: * This Control Panel Key Lock does not affect the remote control and the PC Control functions. * When the cabinet ...case, select "Component". Select "Scart" for Video and S-Video, select the video standard from the pull-down the temperature inside the projector quickly, select "On". Normally select "Auto". When you to cool down menu. Page2 The Keyword confirmation screen will be displayed. When ...
User Manual
Page 31
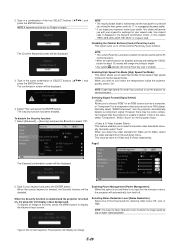
...Auto Adjust [Auto Adjust] When "Auto Adjust" is set to Normal or Eco. If the remaining lamp time reaches 0 hours, the projector will turn on the remote control for the current signal to zero. To reset the lamp usage time, see "Clear Lamp Hour Meter" and "Clear Filter Usage"....Type Interlace Adjusting Position/Clock (when Auto Adjust is 19200 bps. This adjustment may be necessary when you to project an image using NEC's Advanced AccuBlend Intelligent Pixel Blending Technology. Select the appropriate baud rate for your computer for long cable runs). Displays the status of ...
...Auto Adjust [Auto Adjust] When "Auto Adjust" is set to Normal or Eco. If the remaining lamp time reaches 0 hours, the projector will turn on the remote control for the current signal to zero. To reset the lamp usage time, see "Clear Lamp Hour Meter" and "Clear Filter Usage"....Type Interlace Adjusting Position/Clock (when Auto Adjust is 19200 bps. This adjustment may be necessary when you to project an image using NEC's Advanced AccuBlend Intelligent Pixel Blending Technology. Select the appropriate baud rate for your computer for long cable runs). Displays the status of ...
User Manual
Page 32
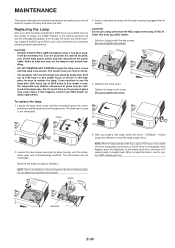
Replacing the Lamp After your lamp has been operating for lamp replacement. 4. Order this happens, press the Help button on the remote control for the lamp to cool before handling. • DO NOT REMOVE ANY SCREWS except the lamp cover screw and two lamp case screws. CAUTION &#... zero, the LAMP indicator goes out. Be sure to tighten the screw. Do not touch them as the pieces of service, the projector cannot turn on this happens, contact your NEC dealer. Be sure to tighten the screws. wheeling condition and remove the lamp cover. After you should 3. If this from your...
Replacing the Lamp After your lamp has been operating for lamp replacement. 4. Order this happens, press the Help button on the remote control for the lamp to cool before handling. • DO NOT REMOVE ANY SCREWS except the lamp cover screw and two lamp case screws. CAUTION &#... zero, the LAMP indicator goes out. Be sure to tighten the screw. Do not touch them as the pieces of service, the projector cannot turn on this happens, contact your NEC dealer. Be sure to tighten the screws. wheeling condition and remove the lamp cover. After you should 3. If this from your...
User Manual
Page 35
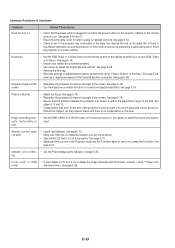
... if the room where you want to a cooler location. See page E-10. • Make sure that the power button on the projector cabinet or the remote control is installed correctly. See page E-21. Common Problems & Solutions Problem Does not turn it on or adjust the image manually with ...page E-18. • Ensure your source (RGB, Video or S-Video). Should this happen, let the projector stand until there is no obstacles between the projector and screen is plugged in red. Remote control does not work • Install new batteries. If not, press the PJ button. screen •...
... if the room where you want to a cooler location. See page E-10. • Make sure that the power button on the projector cabinet or the remote control is installed correctly. See page E-21. Common Problems & Solutions Problem Does not turn it on or adjust the image manually with ...page E-18. • Ensure your source (RGB, Video or S-Video). Should this happen, let the projector stand until there is no obstacles between the projector and screen is plugged in red. Remote control does not work • Install new batteries. If not, press the PJ button. screen •...


