
42XR3, 50XR4, 61XR3 spec sheet
Page 2
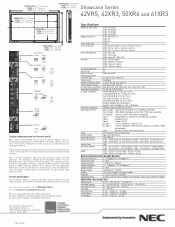
... our professional studio reference monitor." PX-PL1U Fixed Wall Mount 42"/50" - This standard is validated by NEC's industry leading service and support programs. They come with 5BNC Y/Pb/Pr input,selectable) Audio 3 sets RCA stereo + external speaker jacks Audio Internal amplifier, 8W x 2 ... computer and video applications. Showcase Series 42VR5, 42XR3, 50XR4 and 61XR3 Specifications Model and Order Codes 42VR5: PX-42VR5A 42XR3: PX-42XR3A 50XR4: PX-50XR4A 61XR3: PX-61XR3A Diagonal Screen Size 42VR5 and 42XR3: 42" 50XR4: 50" 61XR3: 61" Screen Aspect Ratio 16 to...
... our professional studio reference monitor." PX-PL1U Fixed Wall Mount 42"/50" - This standard is validated by NEC's industry leading service and support programs. They come with 5BNC Y/Pb/Pr input,selectable) Audio 3 sets RCA stereo + external speaker jacks Audio Internal amplifier, 8W x 2 ... computer and video applications. Showcase Series 42VR5, 42XR3, 50XR4 and 61XR3 Specifications Model and Order Codes 42VR5: PX-42VR5A 42XR3: PX-42XR3A 50XR4: PX-50XR4A 61XR3: PX-61XR3A Diagonal Screen Size 42VR5 and 42XR3: 42" 50XR4: 50" 61XR3: 61" Screen Aspect Ratio 16 to...
61XR3 UM
Page 6
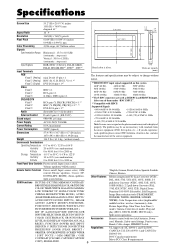
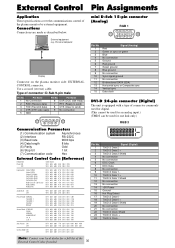
... , DTV*1 Bezel color is silver. (119) Units are used as RGB/PC2 and HD/DVD2 input. If you do experience such a problem please contact NEC Solutions (America), Inc. W I G H T / H - and also the manufacturer of them under "BNC INPUT". *3 Compatible with HDCP. Supported Signals ...mm) RGB Visual 1 (Analog) Visual 2 (Analog) Visual 3 (Digital) Video Visual 1 Visual 2 Visual 3 DVD/HD/DTV Visual 1 Visual 2 Visual 3 Audio External Control mini D-sub 15-pinן1 BNC (R, G, B, H/CS, V)ן1*2 DVI-D 24-pinן1*3 BNCן...
... , DTV*1 Bezel color is silver. (119) Units are used as RGB/PC2 and HD/DVD2 input. If you do experience such a problem please contact NEC Solutions (America), Inc. W I G H T / H - and also the manufacturer of them under "BNC INPUT". *3 Compatible with HDCP. Supported Signals ...mm) RGB Visual 1 (Analog) Visual 2 (Analog) Visual 3 (Digital) Video Visual 1 Visual 2 Visual 3 DVD/HD/DTV Visual 1 Visual 2 Visual 3 Audio External Control mini D-sub 15-pinן1 BNC (R, G, B, H/CS, V)ן1*2 DVI-D 24-pinן1*3 BNCן...

50XR4/61XR3 UM
Page 5
... Operations 11 POWER 11 To turn the unit ON and OFF 11 VOLUME 11 To adjust the sound volume 11 MUTE 11 To mute the audio 11 DISPLAY 11 To check the settings 11 DIGITAL ZOOM 11 OFF TIMER 11 To set the off timer 11 To check the remaining time... the movie 21 Setting the picture mode according to the brightness of the room 21 Audio Settings Menu 22 Adjusting the treble, bass and left/right balance and audio input select 22 Setting the allocation of the audio connectors 22 Image Adjust Settings Menu 22 Adjusting the Position, Size, Fine Picture, Picture Adj...
... Operations 11 POWER 11 To turn the unit ON and OFF 11 VOLUME 11 To adjust the sound volume 11 MUTE 11 To mute the audio 11 DISPLAY 11 To check the settings 11 DIGITAL ZOOM 11 OFF TIMER 11 To set the off timer 11 To check the remaining time... the movie 21 Setting the picture mode according to the brightness of the room 21 Audio Settings Menu 22 Adjusting the treble, bass and left/right balance and audio input select 22 Setting the allocation of the audio connectors 22 Image Adjust Settings Menu 22 Adjusting the Position, Size, Fine Picture, Picture Adj...

50XR4/61XR3 UM
Page 7
... according to set them into a fire. 2. from the front of the monitor's remote control sensor and at the back of the unit the signal and audio cables connected to the display. To attach 1. 2. clamp mounting hole To detach cables Approx. 7m /23ft How to direct sunlight or strong artificial light, or...
... according to set them into a fire. 2. from the front of the monitor's remote control sensor and at the back of the unit the signal and audio cables connected to the display. To attach 1. 2. clamp mounting hole To detach cables Approx. 7m /23ft How to direct sunlight or strong artificial light, or...

50XR4/61XR3 UM
Page 9
...DVD2/ HD2, RGB2 DVD2/ HD2: You can connect an analog RGB signal and the syncronization signal. here. here. D AUDIO1, AUDIO2, AUDIO3 These are audio input terminals. This input can be set for use with an RGB or component source. (see page 24) I AB A AC IN Connect the included power... cord here. Connect the (positive) speaker wire to the EXT SPEAKER terminal and the (negative) speaker wire to allot them from the audio menu screen. Please refer to your speaker's owner's manual. C VIDEO1, 2, 3 (BNC, RCA, S-Video) Connect VCR's, DVD's or Video Cameras, etc. here...
...DVD2/ HD2, RGB2 DVD2/ HD2: You can connect an analog RGB signal and the syncronization signal. here. here. D AUDIO1, AUDIO2, AUDIO3 These are audio input terminals. This input can be set for use with an RGB or component source. (see page 24) I AB A AC IN Connect the included power... cord here. Connect the (positive) speaker wire to the EXT SPEAKER terminal and the (negative) speaker wire to allot them from the audio menu screen. Please refer to your speaker's owner's manual. C VIDEO1, 2, 3 (BNC, RCA, S-Video) Connect VCR's, DVD's or Video Cameras, etc. here...
50XR4/61XR3 UM
Page 10
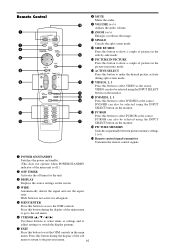
... the INPUT SELECT button on the monitor. !7 PC/RGB Press this button to 6. !9 Remote control signal transmitter Transmits the remote control signals. o VOLUME (+ /-) Adjusts the audio volume. !0 ZOOM (+ /-) Enlarges or reduces the image. !1 SINGLE Cancels the split screen mode. !2 SIDE BY SIDE Press this button to show a couple of pictures in...
... the INPUT SELECT button on the monitor. !7 PC/RGB Press this button to 6. !9 Remote control signal transmitter Transmits the remote control signals. o VOLUME (+ /-) Adjusts the audio volume. !0 ZOOM (+ /-) Enlarges or reduces the image. !1 SINGLE Cancels the split screen mode. !2 SIDE BY SIDE Press this button to show a couple of pictures in...
50XR4/61XR3 UM
Page 11
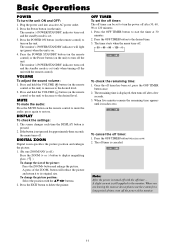
... outlet. 2. The monitor's POWER/STANDBY indicator will reduce the picture and return it reaches zero. VOLUME To adjust the sound volume: 1. MUTE To mute the audio: Press the MUTE button on the unit. The screen changes each time the DISPLAY button is still supplied to the monitor. A press of the picture... five minutes remain the remaining time appears until it to its original size. Basic Operations POWER To turn on the remote control to mute the audio; Press the POWER STANDBY button (on the remote control) or the Power button (on the remote control or the unit) to increase to use the...
... outlet. 2. The monitor's POWER/STANDBY indicator will reduce the picture and return it reaches zero. VOLUME To adjust the sound volume: 1. MUTE To mute the audio: Press the MUTE button on the unit. The screen changes each time the DISPLAY button is still supplied to the monitor. A press of the picture... five minutes remain the remaining time appears until it to its original size. Basic Operations POWER To turn on the remote control to mute the audio; Press the POWER STANDBY button (on the remote control) or the Power button (on the remote control or the unit) to increase to use the...
50XR4/61XR3 UM
Page 16
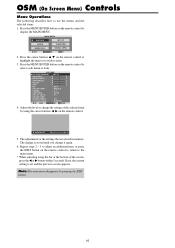
.... Repeat steps 2 - 5 to adjust an additional item, or press the EXIT button on the remote control. The change it again. 6. MAIN MENU PICTURE SET UP AUDIO FUNCTION IMAGE ADJ. The adjustments or the settings that are stored in memory. ADJ.
.... Repeat steps 2 - 5 to adjust an additional item, or press the EXIT button on the remote control. The change it again. 6. MAIN MENU PICTURE SET UP AUDIO FUNCTION IMAGE ADJ. The adjustments or the settings that are stored in memory. ADJ.

50XR4/61XR3 UM
Page 17
...←→BTM LEFT←→BTM CENTER←→BTM RIGHT YES ON←→OFF - Main menu PICTURE Main menu AUDIO Sub menu PICTURE MEMORY CONTRAST BRIGHTNESS SHARPNESS COLOR TINT NR COLOR TEMP. WHITE BALANCE GAMMA LOW TONE SET UP LEVEL COLOR TUNE CINEMA... B←→G 0←→64 RESET OFF←→ON ON←→OFF DEFAULT/THEATER1/THEATER2/NORMAL/BRIGHT Sub menu BASS TREBLE BALANCE AUDIO INPUT1 AUDIO INPUT2 AUDIO INPUT3 Sub menu 2 Sub menu 3 0←13→26 0←13→26 L←→R -22←0→+22 VIDEO 1-3 / HD/DVD ...
...←→BTM LEFT←→BTM CENTER←→BTM RIGHT YES ON←→OFF - Main menu PICTURE Main menu AUDIO Sub menu PICTURE MEMORY CONTRAST BRIGHTNESS SHARPNESS COLOR TINT NR COLOR TEMP. WHITE BALANCE GAMMA LOW TONE SET UP LEVEL COLOR TUNE CINEMA... B←→G 0←→64 RESET OFF←→ON ON←→OFF DEFAULT/THEATER1/THEATER2/NORMAL/BRIGHT Sub menu BASS TREBLE BALANCE AUDIO INPUT1 AUDIO INPUT2 AUDIO INPUT3 Sub menu 2 Sub menu 3 0←13→26 0←13→26 L←→R -22←0→+22 VIDEO 1-3 / HD/DVD ...
50XR4/61XR3 UM
Page 22
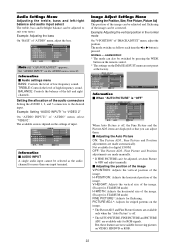
...PICTURE, FINE PICTURE and PICTURE ADJ. EXIT RETURN When Auto Picture is "OFF" IMAGE ADJUST ASPECT MODE : ANAMORPHIC V- BASS TREBLE BALANCE AUDIO INPUT1 AUDIO INPUT2 AUDIO INPUT3 AUDIO : VIDEO2 : HD/DVD1 : RGB1 SEL. V- IMAGE ADJUST ASPECT MODE : NORMAL V- H E I O N -30 SEL. ...the desired input. P O S I T I O N H-POSITION V- BASS TREBLE BALANCE AUDIO INPUT1 AUDIO INPUT2 AUDIO INPUT3 AUDIO : VIDEO1 : HD/DVD1 : RGB1 SEL. Information Ⅵ Audio settings menu BASS: Controls the level of the image can be switched by pressing the WIDE ...
...PICTURE, FINE PICTURE and PICTURE ADJ. EXIT RETURN When Auto Picture is "OFF" IMAGE ADJUST ASPECT MODE : ANAMORPHIC V- BASS TREBLE BALANCE AUDIO INPUT1 AUDIO INPUT2 AUDIO INPUT3 AUDIO : VIDEO2 : HD/DVD1 : RGB1 SEL. V- IMAGE ADJUST ASPECT MODE : NORMAL V- H E I O N -30 SEL. ...the desired input. P O S I T I O N H-POSITION V- BASS TREBLE BALANCE AUDIO INPUT1 AUDIO INPUT2 AUDIO INPUT3 AUDIO : VIDEO1 : HD/DVD1 : RGB1 SEL. Information Ⅵ Audio settings menu BASS: Controls the level of the image can be switched by pressing the WIDE ...

50XR4/61XR3 UM
Page 25
..." to the factory default values. of the screen. EXIT RETURN ALL RESET SETTING NOW When the "SETTING NOW" screen disappears, then all the settings (PICTURE, AUDIO, IMAGE ADJUST, SET UP, etc) to "5" On "GRAY LEVEL" of "SET UP" menu, select "ON", then press the MENU/ENTER button. EXIT RETURN 25 ADJ...
..." to the factory default values. of the screen. EXIT RETURN ALL RESET SETTING NOW When the "SETTING NOW" screen disappears, then all the settings (PICTURE, AUDIO, IMAGE ADJUST, SET UP, etc) to "5" On "GRAY LEVEL" of "SET UP" menu, select "ON", then press the MENU/ENTER button. EXIT RETURN 25 ADJ...
50XR4/61XR3 UM
Page 30
... 47H 01H 0EH 15H DFH 80H 60H 47H 01H 07H 0EH DFH 80H 60H 47H 01H 08H 0FH DFH 80H 60H 47H 01H 0CH 13H Audio Mute ON OFF 9FH 80H 60H 3EH 00H BDH 9FH 80H 60H 3FH 00H BEH Picture Mode NORMAL THEATER 1 THEATER 2 DEFAULT BRIGHT DFH 80H 60H...
... 47H 01H 0EH 15H DFH 80H 60H 47H 01H 07H 0EH DFH 80H 60H 47H 01H 08H 0FH DFH 80H 60H 47H 01H 0CH 13H Audio Mute ON OFF 9FH 80H 60H 3EH 00H BDH 9FH 80H 60H 3FH 00H BEH Picture Mode NORMAL THEATER 1 THEATER 2 DEFAULT BRIGHT DFH 80H 60H...
50XR4/61XR3 UM
Page 31
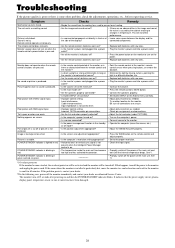
...Point the remote control at the minimum? • Is the mute mode set? • Are the speakers properly connected? • Is AUDIO INPUT set correctly? • Improper control setting. If the problem persists, contact your dealer or authorized Service Center. The monitor turns off ...etc., before requesting service. Check pin assignments and connections. • Adjust the tint and color (under PICTURE). • Turn on the AUDIO menu correctly. • Adjust picture control as needed . Troubleshooting If the picture quality is poor or there is produced. Symptom Mechanical sound ...
...Point the remote control at the minimum? • Is the mute mode set? • Are the speakers properly connected? • Is AUDIO INPUT set correctly? • Improper control setting. If the problem persists, contact your dealer or authorized Service Center. The monitor turns off ...etc., before requesting service. Check pin assignments and connections. • Adjust the tint and color (under PICTURE). • Turn on the AUDIO menu correctly. • Adjust picture control as needed . Troubleshooting If the picture quality is poor or there is produced. Symptom Mechanical sound ...
61XR3 IG
Page 10
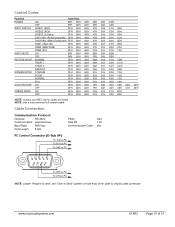
... 80H 60H 47H 01H 07H 0EH RGB2 (5BNC/RGB) DFH 80H 60H 47H 01H 08H 0FH RGB3 (DVI) DFH 80H 60H 47H 01H 0CH 13H AUDIO MUTE ON 9FH 80H 60H 3EH 00H BDH OFF 9FH 80H 60H 3FH 00H BEH PICTURE MODE NORMAL DFH 80H 60H 0AH 01H 01H CBH... 03H 09H 01H 4EH CINEMA MODE ON DFH 80H 60H C1H 01H 01H 82H OFF DFH 80H 60H C1H 01H 02H 83H NOTE: Contact your NEC rep for codes not listed. NOTE: Use a cross/reverse/null modem cable.
... 80H 60H 47H 01H 07H 0EH RGB2 (5BNC/RGB) DFH 80H 60H 47H 01H 08H 0FH RGB3 (DVI) DFH 80H 60H 47H 01H 0CH 13H AUDIO MUTE ON 9FH 80H 60H 3EH 00H BDH OFF 9FH 80H 60H 3FH 00H BEH PICTURE MODE NORMAL DFH 80H 60H 0AH 01H 01H CBH... 03H 09H 01H 4EH CINEMA MODE ON DFH 80H 60H C1H 01H 01H 82H OFF DFH 80H 60H C1H 01H 02H 83H NOTE: Contact your NEC rep for codes not listed. NOTE: Use a cross/reverse/null modem cable.