
61MP1
Page 6
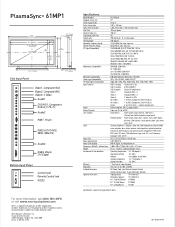
... ft. without base Weight Environmental Considerations Warranty Regulatory Included Accessories Optional Accessories PX-61XM1A 61" 16 to 9 1351 x 760 mm 1365 vertical dots x ... 95 degrees F Operating Humidity 20 - 80% Altitude 0 to 2800m, 0 to change without notice. NEC 020219 10K NEC Solutions (America), Inc. Visual Systems Division 1250 Arlington Heights Rd., Suite 500 Itasca, IL 60143-1248 ... RGB select, BNC select, HD select, OSM adjustment, gray level, PLE, reset, frequency, language, color system DDC1, DDC2B (RGB3 is a registered trademark of their respective owners. All ...
... ft. without base Weight Environmental Considerations Warranty Regulatory Included Accessories Optional Accessories PX-61XM1A 61" 16 to 9 1351 x 760 mm 1365 vertical dots x ... 95 degrees F Operating Humidity 20 - 80% Altitude 0 to 2800m, 0 to change without notice. NEC 020219 10K NEC Solutions (America), Inc. Visual Systems Division 1250 Arlington Heights Rd., Suite 500 Itasca, IL 60143-1248 ... RGB select, BNC select, HD select, OSM adjustment, gray level, PLE, reset, frequency, language, color system DDC1, DDC2B (RGB3 is a registered trademark of their respective owners. All ...
61MP1
Page 7
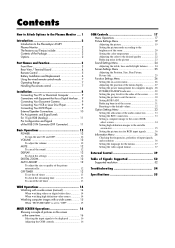
... the sides of the screen ......... 30 Setting the picture to suit the movie 30 Setting RGB3 ADJ 31 Reducing burn-in of the screen 31 Resetting to the default values 32 Option Settings Menu 33 Setting the allocation of the audio connectors 33 Setting the BNC connectors 33 Setting a computer image...
... the sides of the screen ......... 30 Setting the picture to suit the movie 30 Setting RGB3 ADJ 31 Reducing burn-in of the screen 31 Resetting to the default values 32 Option Settings Menu 33 Setting the allocation of the audio connectors 33 Setting the BNC connectors 33 Setting a computer image...
61MP1
Page 25
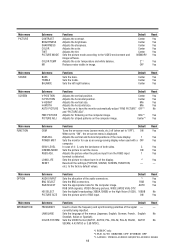
...BASS TREBLE BALANCE Functions Sets the bass. Functions Default Adjusts the vertical position. In case of 4 : 3, sets the luminance of the display. *2 Resets all the settings (PICTURE, SOUND, SCREEN, FUNCTION, - Sets the picture to suit the movie. RGB Sets the appropriate mode for RGB input. AUTO... the menus (Japanese, English, German, French, English Swedish, Italian or Spanish). Sets the language of the signal - currently being inputted. Reset Yes Yes Yes Yes Yes Yes Yes - etc.) to the VIDEO environment and image software. Main menu PICTURE Main menu SOUND Main menu ...
...BASS TREBLE BALANCE Functions Sets the bass. Functions Default Adjusts the vertical position. In case of 4 : 3, sets the luminance of the display. *2 Resets all the settings (PICTURE, SOUND, SCREEN, FUNCTION, - Sets the picture to suit the movie. RGB Sets the appropriate mode for RGB input. AUTO... the menus (Japanese, English, German, French, English Swedish, Italian or Spanish). Sets the language of the signal - currently being inputted. Reset Yes Yes Yes Yes Yes Yes Yes - etc.) to the VIDEO environment and image software. Main menu PICTURE Main menu SOUND Main menu ...
61MP1
Page 26
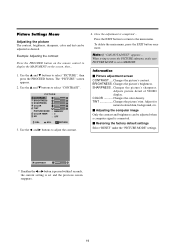
.... Ⅵ Adjusting the computer image Only the contrast and brightness can be adjusted when a computer signal is connected. Ⅵ Restoring the factory default settings Select "RESET" under the "PICTURE MODE" settings. ADJ. The "PICTURE" screen appears. 2. Once the adjustment is set to select "CONTRAST".
.... Ⅵ Adjusting the computer image Only the contrast and brightness can be adjusted when a computer signal is connected. Ⅵ Restoring the factory default settings Select "RESET" under the "PICTURE MODE" settings. ADJ. The "PICTURE" screen appears. 2. Once the adjustment is set to select "CONTRAST".
61MP1
Page 27
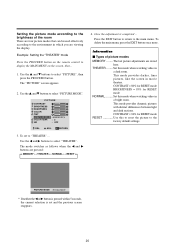
...3. The last picture adjustments are pressed: → MEMORY ↔ THEATER ↔ NORMAL ↔ RESET ← 4. CONTRAST = 80% for RESET mode BRIGHTNESS = 95% for RESET mode RESET Use this to reset the picture to the main menu. To set and the previous screen reappears. 20 ADJ. The mode...when watching video in a dark room. Press the EXIT button to return to the factory default settings. CONTRAST = 96% for RESET mode NORMAL ......... Example: Setting the "THEATER" mode Press the PROCEED button on the screen, then... 1. Information Ⅵ Types ...
...3. The last picture adjustments are pressed: → MEMORY ↔ THEATER ↔ NORMAL ↔ RESET ← 4. CONTRAST = 80% for RESET mode BRIGHTNESS = 95% for RESET mode RESET Use this to reset the picture to the main menu. To set and the previous screen reappears. 20 ADJ. The mode...when watching video in a dark room. Press the EXIT button to return to the factory default settings. CONTRAST = 96% for RESET mode NORMAL ......... Example: Setting the "THEATER" mode Press the PROCEED button on the screen, then... 1. Information Ⅵ Types ...
61MP1
Page 28
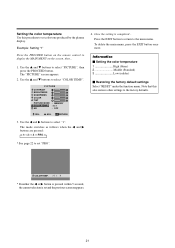
...: → 1↔ 2 ↔ 3 ↔ PRO ← 4. Information Ⅵ Setting the color temperature 1 High (bluer) 2 Middle (Standard) 3 Low (redder) Ⅵ Restoring the factory default settings Select "RESET" under the function menu. PICTURE CONTRAST BRIGHTNESS SHARPNESS COLOR TINT R G PICTURE MODE : MEMORY COLOR TEMP. : 2 NR : OFF SEL. Once the setting is set and the...
...: → 1↔ 2 ↔ 3 ↔ PRO ← 4. Information Ⅵ Setting the color temperature 1 High (bluer) 2 Middle (Standard) 3 Low (redder) Ⅵ Restoring the factory default settings Select "RESET" under the function menu. PICTURE CONTRAST BRIGHTNESS SHARPNESS COLOR TINT R G PICTURE MODE : MEMORY COLOR TEMP. : 2 NR : OFF SEL. Once the setting is set and the...
61MP1
Page 29
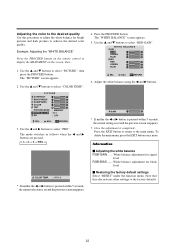
... screen, then... 1. Once the adjustment is set and the previous screen reappears. 7. White balance adjustment for black level Ⅵ Restoring the factory default settings Select "RESET" under the function menu. PICTURE CONTRAST BRIGHTNESS SHARPNESS COLOR TINT R G PICTURE MODE : MEMORY COLOR TEMP. : 2 NR : OFF SEL. ADJ. EXIT RETURN 6. Press the EXIT button...
... screen, then... 1. Once the adjustment is set and the previous screen reappears. 7. White balance adjustment for black level Ⅵ Restoring the factory default settings Select "RESET" under the function menu. PICTURE CONTRAST BRIGHTNESS SHARPNESS COLOR TINT R G PICTURE MODE : MEMORY COLOR TEMP. : 2 NR : OFF SEL. ADJ. EXIT RETURN 6. Press the EXIT button...
61MP1
Page 31
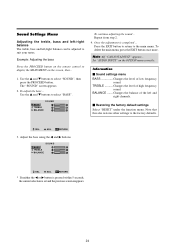
... Settings Menu Adjusting the treble, bass and left/right balance The treble, bass and left and right channels. Ⅵ Restoring the factory default settings Select "RESET" under the function menu. The "SOUND" screen appears. 2. BALANCE ....... Use the L and M buttons to select "BASS". Repeat from step 2. 4. TREBLE .......... Use the L and M buttons to...
... Settings Menu Adjusting the treble, bass and left/right balance The treble, bass and left and right channels. Ⅵ Restoring the factory default settings Select "RESET" under the function menu. The "SOUND" screen appears. 2. BALANCE ....... Use the L and M buttons to select "BASS". Repeat from step 2. 4. TREBLE .......... Use the L and M buttons to...
61MP1
Page 33
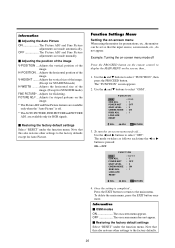
...Picture. PICTURE ADJ* .... Function Settings Menu Setting the on -screen menu does not appear. Ⅵ Restoring the factory default settings Select "RESET" under the function menu. Use the L and M buttons to select "OFF". Use the ᮤ and ᮣ buttons to select ".... Adjusts the vertical position of the image. Adjusts the horizontal position of the image. POWER MGT GRAY LEVEL CINEMA MODE RGB3 ADJ. ADJ. LONG LIFE RESET : OFF :1 : OFF :3 : ON :1 SEL. V-HEIGHT ....... Adjusts for STADIUM mode) H-WIDTH ......... The "FUNCTION" screen appears. 2. Adjusts ...
...Picture. PICTURE ADJ* .... Function Settings Menu Setting the on -screen menu does not appear. Ⅵ Restoring the factory default settings Select "RESET" under the function menu. Use the L and M buttons to select "OFF". Use the ᮤ and ᮣ buttons to select ".... Adjusts the vertical position of the image. Adjusts the horizontal position of the image. POWER MGT GRAY LEVEL CINEMA MODE RGB3 ADJ. ADJ. LONG LIFE RESET : OFF :1 : OFF :3 : ON :1 SEL. V-HEIGHT ....... Adjusts for STADIUM mode) H-WIDTH ......... The "FUNCTION" screen appears. 2. Adjusts ...

61MP1
Page 34
...RGB3 ADJ. Information Ⅵ Adjusting the position of the menu display Press the PROCEED button on the screen, then... 1. ADJ. EXIT RETURN 4. LONG LIFE RESET : ON :1 : OFF :3 : ON :1 SEL. To adjust the position... EXIT RETURN FUNCTION OSM OSM ADJ. POWER MGT GRAY LEVEL CINEMA MODE RGB3 ADJ...the position of the menu display 123 The position can be set between 1 and 9. 456 789 Ⅵ Restoring the factory default settings Select "RESET" under the function menu. Use the L and M buttons to display the MAIN MENU on the remote control to select "FUNCTION", then press the...
...RGB3 ADJ. Information Ⅵ Adjusting the position of the menu display Press the PROCEED button on the screen, then... 1. ADJ. EXIT RETURN 4. LONG LIFE RESET : ON :1 : OFF :3 : ON :1 SEL. To adjust the position... EXIT RETURN FUNCTION OSM OSM ADJ. POWER MGT GRAY LEVEL CINEMA MODE RGB3 ADJ...the position of the menu display 123 The position can be set between 1 and 9. 456 789 Ⅵ Restoring the factory default settings Select "RESET" under the function menu. Use the L and M buttons to display the MAIN MENU on the remote control to select "FUNCTION", then press the...

61MP1
Page 35
...FUNCTION", then press the PROCEED button. OFF In this mode the power management function is completed ... FUNCTION OSM OSM ADJ. EXIT RETURN 3. LONG LIFE RESET : ON :1 : ON :3 : ON :1 SEL. ADJ. To delete the main menu, press the EXIT button once more. Use the L and... mode the power management function is not operated for indicator status and description. Ⅵ Restoring the factory default settings Select "RESET" under the function menu. LONG LIFE RESET : ON :1 : OFF :3 : ON :1 SEL. ADJ. Information Ⅵ Power management function * The power management ...
...FUNCTION", then press the PROCEED button. OFF In this mode the power management function is completed ... FUNCTION OSM OSM ADJ. EXIT RETURN 3. LONG LIFE RESET : ON :1 : ON :3 : ON :1 SEL. ADJ. To delete the main menu, press the EXIT button once more. Use the L and... mode the power management function is not operated for indicator status and description. Ⅵ Restoring the factory default settings Select "RESET" under the function menu. LONG LIFE RESET : ON :1 : OFF :3 : ON :1 SEL. ADJ. Information Ⅵ Power management function * The power management ...
61MP1
Page 37
...adjust the GRAY LEVEL. ADJ. EXIT RETURN 3. Use the ᮤ and ᮣ buttons to select "FUNCTION", then press the PROCEED button. LONG LIFE RESET : ON :1 : OFF :9 : ON :1 SEL. ADJ. The level can be adjusted from 0 to select "CINEMA MODE". Note that this also ..."OFF". EXIT RETURN 3. OFF Cinema mode does not function. Ⅵ Restoring the factory default settings Select "RESET" under the function menu. LONG LIFE RESET : ON :1 : OFF :3 : ON :1 SEL. LONG LIFE RESET : ON :1 : OFF :3 : OFF :1 SEL. Note that this also restores other settings to the factory...
...adjust the GRAY LEVEL. ADJ. EXIT RETURN 3. Use the ᮤ and ᮣ buttons to select "FUNCTION", then press the PROCEED button. LONG LIFE RESET : ON :1 : OFF :9 : ON :1 SEL. ADJ. The level can be adjusted from 0 to select "CINEMA MODE". Note that this also ..."OFF". EXIT RETURN 3. OFF Cinema mode does not function. Ⅵ Restoring the factory default settings Select "RESET" under the function menu. LONG LIFE RESET : ON :1 : OFF :3 : ON :1 SEL. LONG LIFE RESET : ON :1 : OFF :3 : OFF :1 SEL. Note that this also restores other settings to the factory...

61MP1
Page 38
...to select "PLE", then use the ᮤ and ᮣ buttons to adjust the position. Ⅵ Restoring the factory default settings Select "RESET" under the function menu. EXIT RETURN 4. Once the setting is pressed: → 1 ↔ 2 ↔ 3 ← FUNCTION OSM OSM ADJ. ...is distorted, select the most appropriate setting from among "1", "2", and "3". Use the ᮤ and ᮣ buttons to select "RGB3 ADJ.". ADJ. LONG LIFE RESET : ON :1 : OFF :3 : ON :1 SEL. Use the L and M buttons to select "2". ADJ. Press the EXIT button to return to display MAIN...
...to select "PLE", then use the ᮤ and ᮣ buttons to adjust the position. Ⅵ Restoring the factory default settings Select "RESET" under the function menu. EXIT RETURN 4. Once the setting is pressed: → 1 ↔ 2 ↔ 3 ← FUNCTION OSM OSM ADJ. ...is distorted, select the most appropriate setting from among "1", "2", and "3". Use the ᮤ and ᮣ buttons to select "RGB3 ADJ.". ADJ. LONG LIFE RESET : ON :1 : OFF :3 : ON :1 SEL. Use the L and M buttons to select "2". ADJ. Press the EXIT button to return to display MAIN...
61MP1
Page 39
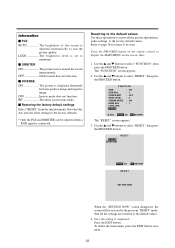
... Ⅵ PLE AUTO The brightness of the screen is completed ... WT The entire screen turns white. Ⅵ Restoring the factory default settings Select "RESET" from the function menu. Use the L and M buttons to select "FUNCTION", then press the PROCEED button. LOCK The brightness level is connected. ...page 18 for items to be adjusted when a RGB signal is set to the default values. 4. OFF Inverse mode does not function. Resetting to the default values Use these operations to restore all the settings are restored to minimum. Ⅵ ORBITER ON The picture moves around ...
... Ⅵ PLE AUTO The brightness of the screen is completed ... WT The entire screen turns white. Ⅵ Restoring the factory default settings Select "RESET" from the function menu. Use the L and M buttons to select "FUNCTION", then press the PROCEED button. LOCK The brightness level is connected. ...page 18 for items to be adjusted when a RGB signal is set to the default values. 4. OFF Inverse mode does not function. Resetting to the default values Use these operations to restore all the settings are restored to minimum. Ⅵ ORBITER ON The picture moves around ...
61MP1
Page 40
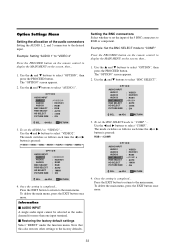
... ᮣ buttons to select "COMP.". The mode switches as the audio channel for more than one input terminal. Ⅵ Restoring the factory default settings Select "RESET" under the function menu. Once the setting is pressed: → VIDEO1 ↔ VIDEO2 ↔ VIDEO3 ↔ HD/DVD1 ↔ RGB/PC1 ↔ RGB/PC2 ↔...
... ᮣ buttons to select "COMP.". The mode switches as the audio channel for more than one input terminal. Ⅵ Restoring the factory default settings Select "RESET" under the function menu. Once the setting is pressed: → VIDEO1 ↔ VIDEO2 ↔ VIDEO3 ↔ HD/DVD1 ↔ RGB/PC1 ↔ RGB/PC2 ↔...
61MP1
Page 41
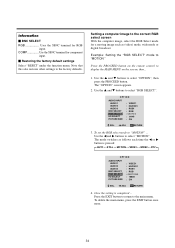
... the EXIT button once more. 34 Information Ⅵ BNC SELECT RGB Uses the 5BNC terminal for component input. Ⅵ Restoring the factory default settings Select "RESET" under the function menu. COMP Use the 3BNC terminal for RGB input. Use the L and M buttons to the main menu. OPTION AUDIO INPUT AUDIO1 AUDIO2...
... the EXIT button once more. 34 Information Ⅵ BNC SELECT RGB Uses the 5BNC terminal for component input. Ⅵ Restoring the factory default settings Select "RESET" under the function menu. COMP Use the 3BNC terminal for RGB input. Use the L and M buttons to the main menu. OPTION AUDIO INPUT AUDIO1 AUDIO2...
61MP1
Page 42
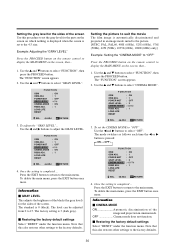
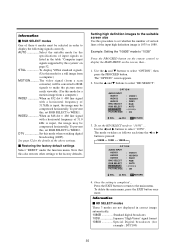
... broadcasts 1035I Japanese "High Vision" signal format 1080A Special Digital broadcasts (for the details of the above settings. Ⅵ Restoring the factory default settings Select "RESET" under the function menu. Example: Setting the "1080B" mode to "1035I" Press the PROCEED button on the remote control to WIDE2. Use the ᮤ and...
... broadcasts 1035I Japanese "High Vision" signal format 1080A Special Digital broadcasts (for the details of the above settings. Ⅵ Restoring the factory default settings Select "RESET" under the function menu. Example: Setting the "1080B" mode to "1035I" Press the PROCEED button on the remote control to WIDE2. Use the ᮤ and...
61MP1
Page 43
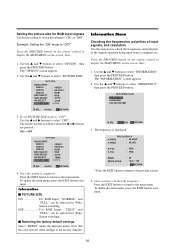
... control to select "FREQUENCY", then press the PROCEED button. FREQUENCY H. POL V. Setting the picture size for WideScreen switching. Ⅵ Restoring the factory default settings Select "RESET" under the function menu. Use the L and M buttons to select "OPTION", then press the PROCEED button. ADJ. Information Ⅵ PICTURE SIZE ON For RGB Input...
... control to select "FREQUENCY", then press the PROCEED button. FREQUENCY H. POL V. Setting the picture size for WideScreen switching. Ⅵ Restoring the factory default settings Select "RESET" under the function menu. Use the L and M buttons to select "OPTION", then press the PROCEED button. ADJ. Information Ⅵ PICTURE SIZE ON For RGB Input...
61MP1
Page 47
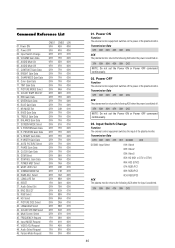
... Switch Change 04. CONTRAST Gain Data 08. Color Gain Data 11. RED Gain Data 15. V. H-WIDTH Gain Data 26. PHASE Gain Data 28. OSM ADJ. RESET 37. Power OFF 03. TINT Gain Data 12. TREBLE Gain Data 20. AUTO PICTURE Select 27. CLOCK Gain Data 29. PICTURE SIZE Select 42. FREQUENCY...
... Switch Change 04. CONTRAST Gain Data 08. Color Gain Data 11. RED Gain Data 15. V. H-WIDTH Gain Data 26. PHASE Gain Data 28. OSM ADJ. RESET 37. Power OFF 03. TINT Gain Data 12. TREBLE Gain Data 20. AUTO PICTURE Select 27. CLOCK Gain Data 29. PICTURE SIZE Select 42. FREQUENCY...

61MP1
Page 49
... Flag 01H DFH 80H 60H 0AH 01H DATA00 CKS DATA00: 01H: MEMORY 02H: THEATER 03H: NORMAL 04H: RESET ACK 7FH 60H 80H 0AH 01H DATA00 CKS DATA00: 01H: MEMORY 02H: THEATER 03H: NORMAL 04H: RESET 42 Transmission Data DFH 80H 60H 7FH 04H DATA00 to +22 (16H) only during video. 01H 04H...
... Flag 01H DFH 80H 60H 0AH 01H DATA00 CKS DATA00: 01H: MEMORY 02H: THEATER 03H: NORMAL 04H: RESET ACK 7FH 60H 80H 0AH 01H DATA00 CKS DATA00: 01H: MEMORY 02H: THEATER 03H: NORMAL 04H: RESET 42 Transmission Data DFH 80H 60H 7FH 04H DATA00 to +22 (16H) only during video. 01H 04H...
