

NP115 : RS232 codes- Projectors
Page 27
... termination character string) DATA50 .. 82 : Reserved DATA83 .. 86 : Lamp Hour Meter (second) (!) DATA87 .. 90 : Filter Usage (second) DATA91 .. 94 : Panel Usage (second) DATA95 .. 98 : Projector Usage (second) Response: At the time of Normal mode values. Command: 03H 8CH 00H 00H 00H 8FH Response: At the... 00H 00H 8DH Response: At the time of a success 23H 8CH 01H xxH 10H DATA01 .. INFORMATION REQUEST Function: This command acquires the projector information. Lamp Timer Acquisition Examples DATA83 DATA84 DATA85 DATA86 : Lamp Timer 00H 00H 00H 00H : Total 0 seconds C0H 65H 52H 00H ...
... termination character string) DATA50 .. 82 : Reserved DATA83 .. 86 : Lamp Hour Meter (second) (!) DATA87 .. 90 : Filter Usage (second) DATA91 .. 94 : Panel Usage (second) DATA95 .. 98 : Projector Usage (second) Response: At the time of Normal mode values. Command: 03H 8CH 00H 00H 00H 8FH Response: At the... 00H 00H 8DH Response: At the time of a success 23H 8CH 01H xxH 10H DATA01 .. INFORMATION REQUEST Function: This command acquires the projector information. Lamp Timer Acquisition Examples DATA83 DATA84 DATA85 DATA86 : Lamp Timer 00H 00H 00H 00H : Total 0 seconds C0H 65H 52H 00H ...
NP115 : RS232 codes- Projectors
Page 39
... / On/Off 00H Image / Auto Adjust 00H Image / Position H 01H Image / Position V 00H Image / Pixel Adjust Clock 01H Image / Pixel Adjust Phase 00H Image / Video Filter 00H Image / Resolution 00H Image / Amplitude H 01H Image / Amplitude V 00H Image / Input Signal Size H 01H Image / Input Signal Size V 00H Image / Output Signal Size H 01H...
... / On/Off 00H Image / Auto Adjust 00H Image / Position H 01H Image / Position V 00H Image / Pixel Adjust Clock 01H Image / Pixel Adjust Phase 00H Image / Video Filter 00H Image / Resolution 00H Image / Amplitude H 01H Image / Amplitude V 00H Image / Input Signal Size H 01H Image / Input Signal Size V 00H Image / Output Signal Size H 01H...
Installation Guide
Page 3
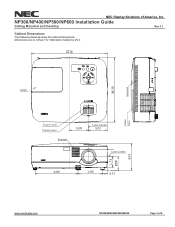
Dimensions are in inches. For millimeters multiply by 25.4. Exhaust Intake Filter Lamp Zoom Lever Focus Lever Exhaust Lens Center Lens Center www.necdisplay.com NP300/NP400/NP500/NP600 Page 3 of America, Inc. NP300/NP400/NP500/NP600 Installation Guide Ceiling Mounted and Desktop Rev 1.1 Cabinet Dimensions The following drawings show the cabinet dimensions. NEC Display Solutions of 6
Dimensions are in inches. For millimeters multiply by 25.4. Exhaust Intake Filter Lamp Zoom Lever Focus Lever Exhaust Lens Center Lens Center www.necdisplay.com NP300/NP400/NP500/NP600 Page 3 of America, Inc. NP300/NP400/NP500/NP600 Installation Guide Ceiling Mounted and Desktop Rev 1.1 Cabinet Dimensions The following drawings show the cabinet dimensions. NEC Display Solutions of 6

Installation Guide
Page 4
For millimeters multiply by 25.4. M4*8 Max for Ceiling Mount Kit NP300/NP400/NP500/NP600 Page 4 of America, Inc. NP300/NP400/NP500/NP600 Installation Guide Ceiling Mounted and Desktop Rev 1.1 Cabinet Dimensions (continued) The following drawings show the cabinet dimensions. Intake Filter Exhaust Lens Center www.necdisplay.com 3 - Dimensions are in inches. NEC Display Solutions of 6
For millimeters multiply by 25.4. M4*8 Max for Ceiling Mount Kit NP300/NP400/NP500/NP600 Page 4 of America, Inc. NP300/NP400/NP500/NP600 Installation Guide Ceiling Mounted and Desktop Rev 1.1 Cabinet Dimensions (continued) The following drawings show the cabinet dimensions. Intake Filter Exhaust Lens Center www.necdisplay.com 3 - Dimensions are in inches. NEC Display Solutions of 6

Users Manual
Page 9
... Remote Mouse Receiver (NP01MR 39 7 Network Setting by Using an HTTP Browser 41 8 Using the VGA Signal Cable to Operate the Projector (Virtual Remote 44 5. Convenient Features 34 1 Turning off the Projector 32 After Use...33 4. Table of Menu Items...47 4 Menu Descriptions & Functions [SOURCE 49 5 Menu Descriptions & Functions... Control Connector (D-SUB 9P 83 Troubleshooting Check List 84 TravelCare Guide...86 vii Maintenance...70 Cleaning or Replacing the Filters 70 2 Cleaning the Cabinet and the Lens 71 Replacing the Lamp...72 7.
... Remote Mouse Receiver (NP01MR 39 7 Network Setting by Using an HTTP Browser 41 8 Using the VGA Signal Cable to Operate the Projector (Virtual Remote 44 5. Convenient Features 34 1 Turning off the Projector 32 After Use...33 4. Table of Menu Items...47 4 Menu Descriptions & Functions [SOURCE 49 5 Menu Descriptions & Functions... Control Connector (D-SUB 9P 83 Troubleshooting Check List 84 TravelCare Guide...86 vii Maintenance...70 Cleaning or Replacing the Filters 70 2 Cleaning the Cabinet and the Lens 71 Replacing the Lamp...72 7.

Users Manual
Page 13
...Projector Front/Top Zoom Lever (→ page 27) Focus Ring (→ page 27) Remote sensor (→ page 8) Lens Lens Cap FOCUS MENU SELECT EXIT STATLUASMP ENTER AUTOADJ. Part Names of the rear foot, remove the spacer and rotate the rear foot to 0.18 inch/ 4.6 mm in Security Slot ( )* Ventilation (inlet) / Filter...Foot (→ page 26) * This security slot supports the MicroSaver ® Security System. Rear Ventilation (inlet) / Filter Cover (→ page 70) Terminal Panel (→ page 6) SELECT MENU ENTER SOURCE AUTOADJ. Introduction Controls (→ ...
...Projector Front/Top Zoom Lever (→ page 27) Focus Ring (→ page 27) Remote sensor (→ page 8) Lens Lens Cap FOCUS MENU SELECT EXIT STATLUASMP ENTER AUTOADJ. Part Names of the rear foot, remove the spacer and rotate the rear foot to 0.18 inch/ 4.6 mm in Security Slot ( )* Ventilation (inlet) / Filter...Foot (→ page 26) * This security slot supports the MicroSaver ® Security System. Rear Ventilation (inlet) / Filter Cover (→ page 70) Terminal Panel (→ page 6) SELECT MENU ENTER SOURCE AUTOADJ. Introduction Controls (→ ...

Users Manual
Page 56
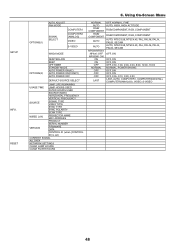
... BRIGHTNESS R BRIGHTNESS G BRIGHTNESS B ASPECT RATIO GENERAL POSITION VIDEO FILTER AUTO KEYSTONE KEYSTONE KEYSTONE SAVE WALL COLOR LAMP MODE CLOSED CAPTION LANGUAGE MENU COLOR SELECT DISPLAY TIME BACKGROUND FILTER MESSAGE ID DISPLAY ORIENTATION INSTALLATION CONTROL PANEL LOCK SECURITY COMMUNICATION SPEED ...1-6 HIGH-BRIGHT, PRESENTATION, VIDEO, MOVIE, GRAPHIC, sRGB DYNAMIC, NATURAL, BLACK DETAIL 5000, 6500, 7800, 8500, 9300, 10500 0[%], 5[%], 10[%] NP600/NP500/NP400:AUTO, 4:3, 16:9, 15:9, 16:10, WIDE ZOOM, NATIVE NP500W: AUTO, 4:3, 16:9, 15:9, 16:10, LETTERBOX, NATIVE (Not available...
... BRIGHTNESS R BRIGHTNESS G BRIGHTNESS B ASPECT RATIO GENERAL POSITION VIDEO FILTER AUTO KEYSTONE KEYSTONE KEYSTONE SAVE WALL COLOR LAMP MODE CLOSED CAPTION LANGUAGE MENU COLOR SELECT DISPLAY TIME BACKGROUND FILTER MESSAGE ID DISPLAY ORIENTATION INSTALLATION CONTROL PANEL LOCK SECURITY COMMUNICATION SPEED ...1-6 HIGH-BRIGHT, PRESENTATION, VIDEO, MOVIE, GRAPHIC, sRGB DYNAMIC, NATURAL, BLACK DETAIL 5000, 6500, 7800, 8500, 9300, 10500 0[%], 5[%], 10[%] NP600/NP500/NP400:AUTO, 4:3, 16:9, 15:9, 16:10, WIDE ZOOM, NATIVE NP500W: AUTO, 4:3, 16:9, 15:9, 16:10, LETTERBOX, NATIVE (Not available...
Users Manual
Page 57
... SOURCE SELECT LAMP LIFE REMAINING USAGE TIME LAMP HOURS USED FILTER HOURS USED SOURCE INDEX HORIZONTAL FREQUENCY VERTICAL FREQUENCY SOURCE SIGNAL TYPE VIDEO TYPE SYNC TYPE SYNC POLARITY SCAN TYPE WIRED LAN PROJECTOR NAME MAC ADDRESS PRODUCT SERIAL NUMBER VERSION FIRMWARE DATA CONTROL ID... (when [CONTROL ID] is set) CURRENT SIGNAL ALL DATA NETWORK SETTINGS CLEAR LAMP HOURS CLEAR FILTER HOURS NORMAL AUTO RGB/ COMPONENT RGB/ COMPONENT AUTO AUTO NP600/NP500/ NP400: OFF...
... SOURCE SELECT LAMP LIFE REMAINING USAGE TIME LAMP HOURS USED FILTER HOURS USED SOURCE INDEX HORIZONTAL FREQUENCY VERTICAL FREQUENCY SOURCE SIGNAL TYPE VIDEO TYPE SYNC TYPE SYNC POLARITY SCAN TYPE WIRED LAN PROJECTOR NAME MAC ADDRESS PRODUCT SERIAL NUMBER VERSION FIRMWARE DATA CONTROL ID... (when [CONTROL ID] is set) CURRENT SIGNAL ALL DATA NETWORK SETTINGS CLEAR LAMP HOURS CLEAR FILTER HOURS NORMAL AUTO RGB/ COMPONENT RGB/ COMPONENT AUTO AUTO NP600/NP500/ NP400: OFF...

Users Manual
Page 65
... turned off. OFF The low-pass filter is applied partially. MORE The low-pass filter is displayed with black borders on NP500W) (only when [16:9], [15:9], or [16:10] is selected for [ASPECT RATIO]) When [16:9], [15:9], or [16:10] ... the image and selecting [MORE] will give best image quality by way of Image [POSITION] (not available on the top and bottom. Selecting Video Filter Level [VIDEO FILTER] (not available for reducing video noise: [OFF], [LESS] or [MORE]. You can adjust the vertical position from the top to the bottom of the...
... turned off. OFF The low-pass filter is applied partially. MORE The low-pass filter is displayed with black borders on NP500W) (only when [16:9], [15:9], or [16:10] is selected for [ASPECT RATIO]) When [16:9], [15:9], or [16:10] ... the image and selecting [MORE] will give best image quality by way of Image [POSITION] (not available on the top and bottom. Selecting Video Filter Level [VIDEO FILTER] (not available for reducing video noise: [OFF], [LESS] or [MORE]. You can adjust the vertical position from the top to the bottom of the...

Users Manual
Page 68
... a blue/black screen or logo when no signal is 500[H]. Selecting Menu Display Time [DISPLAY TIME] This option allows you get the message "PLEASE CLEAN FILTER." (→page 70) Five options are [MANUAL], [AUTO 5 SEC], [AUTO 15 SEC], and [AUTO 45 SEC]. Selecting Menu Language [LANGUAGE] You can... preset choices are available: OFF, 100[H], 200[H], 500[H], 1000[H] The default setting is available. Clean the filter when you to select how long the projector waits after the last touch of 21 languages for on the remote control is the factory preset. The default background is done from...
... a blue/black screen or logo when no signal is 500[H]. Selecting Menu Display Time [DISPLAY TIME] This option allows you get the message "PLEASE CLEAN FILTER." (→page 70) Five options are [MANUAL], [AUTO 5 SEC], [AUTO 15 SEC], and [AUTO 45 SEC]. Selecting Menu Language [LANGUAGE] You can... preset choices are available: OFF, 100[H], 200[H], 500[H], 1000[H] The default setting is available. Clean the filter when you to select how long the projector waits after the last touch of 21 languages for on the remote control is the factory preset. The default background is done from...

Users Manual
Page 76
... bar indicator changes from 0% to the effect that the lamp or the filters should be replaced will be displayed for one minute when the projector is turned on and when the POWER button on the projector or the remote control is as follows: TIP: Pressing the HELP button ...& Functions [INFO.] Displays the status of lamp usage. If the remaining lamp time reaches 0 hours, the projector will show the [INFO.] menu items. [USAGE TIME] [LAMP LIFE REMAINING] (%)* [LAMP HOURS USED] (H) [FILTER HOURS USED] (H) * The progress indicator shows the percentage of whether the LAMP MODE is set to NORMAL ...
... bar indicator changes from 0% to the effect that the lamp or the filters should be replaced will be displayed for one minute when the projector is turned on and when the POWER button on the projector or the remote control is as follows: TIP: Pressing the HELP button ...& Functions [INFO.] Displays the status of lamp usage. If the remaining lamp time reaches 0 hours, the projector will show the [INFO.] menu items. [USAGE TIME] [LAMP LIFE REMAINING] (%)* [LAMP HOURS USED] (H) [FILTER HOURS USED] (H) * The progress indicator shows the percentage of whether the LAMP MODE is set to NORMAL ...
Users Manual
Page 78
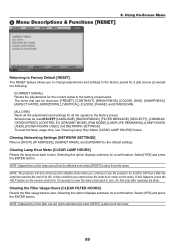
...] Resets the lamp clock back to the default settings. Select [YES] and press the ENTER button. NOTE: The projector will turn off and go into standby mode when you continue to use the projector for the current signal to zero. Do this option displays submenu for a (all the signals to zero. Selecting... this only after the lamp has reached the end of the filter use will not be affected even when [RESET] is done...
...] Resets the lamp clock back to the default settings. Select [YES] and press the ENTER button. NOTE: The projector will turn off and go into standby mode when you continue to use the projector for the current signal to zero. Do this option displays submenu for a (all the signals to zero. Selecting... this only after the lamp has reached the end of the filter use will not be affected even when [RESET] is done...
Users Manual
Page 79
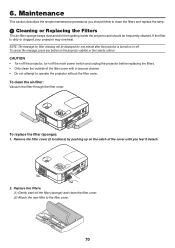
... message for one minute after the projector is dirty or clogged, your projector may overheat. CAUTION • Turn off the projector, turn off the filter (sponge) and clean the filter cover. (2) Attach the new filter to operate the projector without the filter cover. Remove the filter cover (2 locations) by pushing up on the projector cabinet or the remote control. 6. If...
... message for one minute after the projector is dirty or clogged, your projector may overheat. CAUTION • Turn off the projector, turn off the filter (sponge) and clean the filter cover. (2) Attach the new filter to operate the projector without the filter cover. Remove the filter cover (2 locations) by pushing up on the projector cabinet or the remote control. 6. If...

Users Manual
Page 80
... replacement lamp. 2 Cleaning the Cabinet and the Lens 1. Turn off the projector before cleaning. 2. SELECT MENU ENTER SOURCE AUTOADJ. EXIT STATLUASMP FOCUS AUTOADJ. NOTE: When you feel click. 3. Maintenance EXIT ENTER 4. To reset the filter usage time, from the projector cabinet. The filter comes in the same package with soap and water. Never use...
... replacement lamp. 2 Cleaning the Cabinet and the Lens 1. Turn off the projector before cleaning. 2. SELECT MENU ENTER SOURCE AUTOADJ. EXIT STATLUASMP FOCUS AUTOADJ. NOTE: When you feel click. 3. Maintenance EXIT ENTER 4. To reset the filter usage time, from the projector cabinet. The filter comes in the same package with soap and water. Never use...


