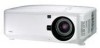
NP4100 : brochure
Page 2
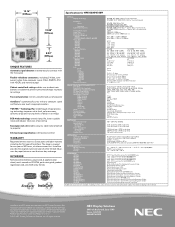
...NP4100 Series 2.22 - 4.43:1 zoom lens for the NP4100 Series 4.43 - 8.3:1 zoom lens for the NP4100 Series Ceiling mount ATA-certified case for shipping and secure storage Replacement remote control Replacement power cable Replacement RGB signal cable Suspended ceiling plate Replacement lamp for the NP4100... to projector settings Password protection restricts unauthorized use of projector AutoSense&#...NEC Display Solutions. DLP by Texas Instruments NP4100W: 0.65" DMD (DC3) - DLP by Texas Instruments NP4100: XGA 1024 x 768 NP4100W: WXGA 1280 x 800 NP4100/NP4100W: UXGA 1600 x 1200 NP4100...
...NP4100 Series 2.22 - 4.43:1 zoom lens for the NP4100 Series 4.43 - 8.3:1 zoom lens for the NP4100 Series Ceiling mount ATA-certified case for shipping and secure storage Replacement remote control Replacement power cable Replacement RGB signal cable Suspended ceiling plate Replacement lamp for the NP4100... to projector settings Password protection restricts unauthorized use of projector AutoSense&#...NEC Display Solutions. DLP by Texas Instruments NP4100W: 0.65" DMD (DC3) - DLP by Texas Instruments NP4100: XGA 1024 x 768 NP4100W: WXGA 1280 x 800 NP4100/NP4100W: UXGA 1600 x 1200 NP4100...

NP4100 : user's manual
Page 6
... technicians in a horizontal position Do not put the projector on its side when the lamp is turned on your hand or fingers. CAUTION: Do not drop the projector on . The projector must be installed by improper handling during transportation. Please... consult your dealer for more information. iv In addition, the ceiling must be strong enough to install the projector yourself. Place the projector in order to replace...
... technicians in a horizontal position Do not put the projector on its side when the lamp is turned on your hand or fingers. CAUTION: Do not drop the projector on . The projector must be installed by improper handling during transportation. Please... consult your dealer for more information. iv In addition, the ceiling must be strong enough to install the projector yourself. Place the projector in order to replace...
NP4100 : user's manual
Page 8
... cause premature lamp failure. • Do not place your projector by parcel delivery service or cargo shipment. If the projector exhibits a distinct change in performance, indicating a need for service. • Disconnect the power cable and any other cables before cleaning the cabinet or replacing the lamp. Misuses such... as it has been exposed to carry or hang (from the wall or ceiling) the projector can be damaged. • Do not unplug the power cable from the wall...
... cause premature lamp failure. • Do not place your projector by parcel delivery service or cargo shipment. If the projector exhibits a distinct change in performance, indicating a need for service. • Disconnect the power cable and any other cables before cleaning the cabinet or replacing the lamp. Misuses such... as it has been exposed to carry or hang (from the wall or ceiling) the projector can be damaged. • Do not unplug the power cable from the wall...

NP4100 : user's manual
Page 9
... If you will increase the possibility of reduced brightness. Lamp Replacement To replace either of the lamps, follow all instructions provided on and off will not be using the remote control for lamp replacement. Glass fragments could result in the lamp case. Do not inhale or do not touch glass ...dust or shards. Be sure to replace the lamp when the following is displayed on the screen: If you continue to use different types of batteries together. • Dispose of used batteries according to be discharged outward from a ceiling-mounted projector, make sure that you have the...
... If you will increase the possibility of reduced brightness. Lamp Replacement To replace either of the lamps, follow all instructions provided on and off will not be using the remote control for lamp replacement. Glass fragments could result in the lamp case. Do not inhale or do not touch glass ...dust or shards. Be sure to replace the lamp when the following is displayed on the screen: If you continue to use different types of batteries together. • Dispose of used batteries according to be discharged outward from a ceiling-mounted projector, make sure that you have the...

NP4100 : user's manual
Page 15
... Before Use...134 Handling of the Address for Troubleshooting...119 IMAGE PROBLEMS ...120 Lamp Problems...121 Remote Control Problems...121 Audio Problems ...122 HAVING THE PROJECTOR SERVICED 123 8. APPENDIX...115 USING THE OPTIONAL REMOTE MOUSE RECEIVER (NP01MR 115 Connecting... HTTP Server 137 15 PIN GPIO CONTROL ...139 9. MAINTENANCE...107 CLEANING THE PROJECTOR ...107 Cleaning the Cabinet ...107 Cleaning the Lens ...107 Cleaning the Filters ...108 REPLACING CONSUMABLE PARTS 110 Replacing the Filters ...110 Replacing the Lamps ...112 Resetting the Lamp Hours Counter 114 7.
... Before Use...134 Handling of the Address for Troubleshooting...119 IMAGE PROBLEMS ...120 Lamp Problems...121 Remote Control Problems...121 Audio Problems ...122 HAVING THE PROJECTOR SERVICED 123 8. APPENDIX...115 USING THE OPTIONAL REMOTE MOUSE RECEIVER (NP01MR 115 Connecting... HTTP Server 137 15 PIN GPIO CONTROL ...139 9. MAINTENANCE...107 CLEANING THE PROJECTOR ...107 Cleaning the Cabinet ...107 Cleaning the Lens ...107 Cleaning the Filters ...108 REPLACING CONSUMABLE PARTS 110 Replacing the Filters ...110 Replacing the Lamps ...112 Resetting the Lamp Hours Counter 114 7.
NP4100 : user's manual
Page 18
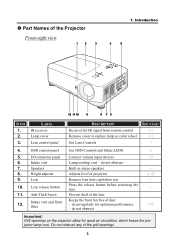
...obstruct 8 10 - - 6, 45 - - - 108 Important: Grill openings on the projector allow for good air circulation, which keeps the projector lamp cool. clean regularly for IR signal from remote control Remove cover to replace lamp or color wheel See Lens Controls SEE PAGE: 12 112 7 4. Introduction ITEM 1. 2.... 3. Intake vent Lamp cooling vent - Intake vent and front ...
...obstruct 8 10 - - 6, 45 - - - 108 Important: Grill openings on the projector allow for good air circulation, which keeps the projector lamp cool. clean regularly for IR signal from remote control Remove cover to replace lamp or color wheel See Lens Controls SEE PAGE: 12 112 7 4. Introduction ITEM 1. 2.... 3. Intake vent Lamp cooling vent - Intake vent and front ...

NP4100 : user's manual
Page 19
Lamp cover 4. OSD control panel 6. do not obstruct - Left-hand cooling intake - do not obstruct - Lens control panel 2. Right-hand speaker 3. Left intake vent DESCRIPTION See Lens Controls 3 SEE PAGE: 7 Right-hand speaker - See OSD Controls and Status LEDS 8 3 Rear cooling intake - Rear intake vent 7. Remove cover to replace lamp or color wheel 112 Exhaust vent - Exhaust vent 5. Introduction Top View ITEM LABEL 1. 1. do not obstruct - 4
Lamp cover 4. OSD control panel 6. do not obstruct - Left-hand cooling intake - do not obstruct - Lens control panel 2. Right-hand speaker 3. Left intake vent DESCRIPTION See Lens Controls 3 SEE PAGE: 7 Right-hand speaker - See OSD Controls and Status LEDS 8 3 Rear cooling intake - Rear intake vent 7. Remove cover to replace lamp or color wheel 112 Exhaust vent - Exhaust vent 5. Introduction Top View ITEM LABEL 1. 1. do not obstruct - 4

NP4100 : user's manual
Page 42
... and the color wheel cool off the main power switch before replacing the color wheel. Remove the lamp cover by sliding in electrical shock or damage to the following information if you own two or more NP4100/NP4100W projectors: When replacing or re-installing the color wheel, the original color wheel preinstalled or supplied as...
... and the color wheel cool off the main power switch before replacing the color wheel. Remove the lamp cover by sliding in electrical shock or damage to the following information if you own two or more NP4100/NP4100W projectors: When replacing or re-installing the color wheel, the original color wheel preinstalled or supplied as...

NP4100 : user's manual
Page 121
All items in Adjust can be used when components are replaced. Clear Lamp1 Hours Reset lamp1 hours Clear Lamp2 Hours Reset lamp2 hours Clear Filter Hours Reset filter hours These options should only be reset. ITEM ... Lock, Network Settings, Standby Mode, PC Control, Fan Mode, Control ID, Filter Message, Lamp Life Remaining, Lamp Hours Used, and Filter Hours Used. All Data Reset all the adjustments and settings for example, or when components are cleaned or replaced (see 6. Maintenance on page 110). 106 Using On-Screen Display Reset Menu Descriptions...
All items in Adjust can be used when components are replaced. Clear Lamp1 Hours Reset lamp1 hours Clear Lamp2 Hours Reset lamp2 hours Clear Filter Hours Reset filter hours These options should only be reset. ITEM ... Lock, Network Settings, Standby Mode, PC Control, Fan Mode, Control ID, Filter Message, Lamp Life Remaining, Lamp Hours Used, and Filter Hours Used. All Data Reset all the adjustments and settings for example, or when components are cleaned or replaced (see 6. Maintenance on page 110). 106 Using On-Screen Display Reset Menu Descriptions...

NP4100 : user's manual
Page 125
... and safely. Gently slide the filter covers in the direction shown. Replacing the Filters When the lamps are located on the bottom. 1. CAUTION: Do not drop the projector on the side and the rear are replaced, the filters should also be replaced, not cleaned. Note: The filters on your hand or fingers. Doing so could...
... and safely. Gently slide the filter covers in the direction shown. Replacing the Filters When the lamps are located on the bottom. 1. CAUTION: Do not drop the projector on the side and the rear are replaced, the filters should also be replaced, not cleaned. Note: The filters on your hand or fingers. Doing so could...

NP4100 : user's manual
Page 127
... meter using the menu. Replace the lamp. Note: 1. The projection lamps should only be disposed of operational life. Important: 1. The lamp contains a certain amount of both lamp modules (Lamp 1 and Lamp 2) is displayed. Installation of mercury and should be replaced with a certified replacement part (NP12LP), contact your local dealer if unsure. Note: The projector turns off and goes into standby...
... meter using the menu. Replace the lamp. Note: 1. The projection lamps should only be disposed of operational life. Important: 1. The lamp contains a certain amount of both lamp modules (Lamp 1 and Lamp 2) is displayed. Installation of mercury and should be replaced with a certified replacement part (NP12LP), contact your local dealer if unsure. Note: The projector turns off and goes into standby...

NP4100 : user's manual
Page 128
Lift the module handle up (B) in the direction shown to remove the lamp. 4. A B A B 3. Reverse steps 1 to 3 to the following. 1. Maintenance 2. Pull firmly on the module handle in the direction shown. Loosen the screw on the lamp module. To replace the lamp, refer to install the new lamp module and replace the lamp cover. Note: The filters should be replaced when replacing the lamp modules. 113 Loosen the two captive screws (A) on the lamp cover (A), and remove the lamp cover as shown (B). 6.
Lift the module handle up (B) in the direction shown to remove the lamp. 4. A B A B 3. Reverse steps 1 to 3 to the following. 1. Maintenance 2. Pull firmly on the module handle in the direction shown. Loosen the screw on the lamp module. To replace the lamp, refer to install the new lamp module and replace the lamp cover. Note: The filters should be replaced when replacing the lamp modules. 113 Loosen the two captive screws (A) on the lamp cover (A), and remove the lamp cover as shown (B). 6.

NP4100 : user's manual
Page 129
... required using ◄ or ► and press Enter to reset the selected Lamp hours to zero. 114 Maintenance Resetting the Lamp Hours Counter After replacing the lamp(s), the lamp hour counter(s) should be reset to open the Main menu. 2. Press the Menu button on the OSD control panel or Remote Control to zero. Refer ...
... required using ◄ or ► and press Enter to reset the selected Lamp hours to zero. 114 Maintenance Resetting the Lamp Hours Counter After replacing the lamp(s), the lamp hour counter(s) should be reset to open the Main menu. 2. Press the Menu button on the OSD control panel or Remote Control to zero. Refer ...

NP4100 : user's manual
Page 133
Appendix The Lamp LEDs PROJECTOR STATUS LED CONDITION Lamp off Off End of the lamp life Red blink No lamp Red 1 time blink (repeatedly) Lamp ERROR Red 6 times blink (repeatedly) Cooling lamp Re-light up sequence Lamp life over (cannot lamp on) Eco mode Normal mode Orange blink Green blink Red on ... on 2.5 secs off (0.5 secs ON > 0.5 secs OFF) * 6 > 2.0 secs OFF 0.5 secs ON > 0.5 secs OFF 0.5 secs ON > 0.5 secs OFF On On On PROJECTOR CONDITION Lamp off Replace lamp (see notes below) ERROR ERROR Switching lamp1 and 2 Start up Replace lamp (see notes below) Power on Power on 118 7.
Appendix The Lamp LEDs PROJECTOR STATUS LED CONDITION Lamp off Off End of the lamp life Red blink No lamp Red 1 time blink (repeatedly) Lamp ERROR Red 6 times blink (repeatedly) Cooling lamp Re-light up sequence Lamp life over (cannot lamp on) Eco mode Normal mode Orange blink Green blink Red on ... on 2.5 secs off (0.5 secs ON > 0.5 secs OFF) * 6 > 2.0 secs OFF 0.5 secs ON > 0.5 secs OFF 0.5 secs ON > 0.5 secs OFF On On On PROJECTOR CONDITION Lamp off Replace lamp (see notes below) ERROR ERROR Switching lamp1 and 2 Start up Replace lamp (see notes below) Power on Power on 118 7.

NP4100 : user's manual
Page 136
... turn off any fluorescent lights in the projector and have replaced the lamp recently, try resetting the lamp connections. 5. Restart the projector in the projector and have the projector serviced. Have the remote control serviced. 121 Check that the Power LED is securely connected. 2. Replace the lamp module. 6. Replace the lamp module. 3. Put the old lamp back in the room. 4. Check the...
... turn off any fluorescent lights in the projector and have replaced the lamp recently, try resetting the lamp connections. 5. Restart the projector in the projector and have the projector serviced. Have the remote control serviced. 121 Check that the Power LED is securely connected. 2. Replace the lamp module. 6. Replace the lamp module. 3. Put the old lamp back in the room. 4. Check the...

NP4100 : user's manual
Page 151
... Mail Alert Mail: Click "Enable" to 3: Type in your computer of a message sent from the projector: Projector Name: X X X X Lamp 1 or 2 Hours Used: xxxx [H] The lamp is correctly set a password when you entered an incorrect address in the SMTP server name to be notified...established by Japan Business Machine and Information System Industries Association (JBMIA) in the projector. This option notifies your recipient's address. Recipient's Address 1 to enable Alert Mail feature. Please replace the lamp. Unless any one of its usable life. Note: If you use the PJLink...
... Mail Alert Mail: Click "Enable" to 3: Type in your computer of a message sent from the projector: Projector Name: X X X X Lamp 1 or 2 Hours Used: xxxx [H] The lamp is correctly set a password when you entered an incorrect address in the SMTP server name to be notified...established by Japan Business Machine and Information System Industries Association (JBMIA) in the projector. This option notifies your recipient's address. Recipient's Address 1 to enable Alert Mail feature. Please replace the lamp. Unless any one of its usable life. Note: If you use the PJLink...

NP4100 : user's manual
Page 155
... even though you adjust the brightness and/or the contrast. Lamp cover is turned off . The source connected to projector's native resolution. Image is shifted in the projector's menu. Still unchanged even though you press the AUTO ADJUST...projector is pressed to the projector. • A combination of the "Fn" key along with the AUDIO OUT connector). 140 Power cable's plug is installed correctly. Lamp cover is fully inserted into the input connector A message appears on a computer signal. Lamp Hours Used (lamp operation hours) was cleared after lamp replacement...
... even though you adjust the brightness and/or the contrast. Lamp cover is turned off . The source connected to projector's native resolution. Image is shifted in the projector's menu. Still unchanged even though you press the AUTO ADJUST...projector is pressed to the projector. • A combination of the "Fn" key along with the AUDIO OUT connector). 140 Power cable's plug is installed correctly. Lamp cover is fully inserted into the input connector A message appears on a computer signal. Lamp Hours Used (lamp operation hours) was cleared after lamp replacement...


