RS232 codes- Projectors
Page 2
... Control NEC projectors make use the control commands in the standby mode. Setting method : From the projector's menu, select [SETUP] --> [OPTIONS(2)] -->[STANDBY MODE]--> [NORMAL]. ( CAUTION ) (!2) The projector accept the "POWER ON" command during [POWER-SAVING] mode for the LT220/240/260. * The serial cable, LAN card and LAN cable are separately sold. * The WT610 replaced the WT610 and uses the same command set the "idle mode". LAN connection using the supplied USB cable is required. 2. Contents 1. USB connection using the LAN port on the projector A USB cable...
... Control NEC projectors make use the control commands in the standby mode. Setting method : From the projector's menu, select [SETUP] --> [OPTIONS(2)] -->[STANDBY MODE]--> [NORMAL]. ( CAUTION ) (!2) The projector accept the "POWER ON" command during [POWER-SAVING] mode for the LT220/240/260. * The serial cable, LAN card and LAN cable are separately sold. * The WT610 replaced the WT610 and uses the same command set the "idle mode". LAN connection using the supplied USB cable is required. 2. Contents 1. USB connection using the LAN port on the projector A USB cable...

RS232 codes- Projectors
Page 35
This current model does not support this function. Invalid values specified. Command: 02H 0FH 00H 00H 02H DATA01 DATA02 CKS (*3) Data Portion Contents Setting not possible. DATA02 Results 00H : Normal 01H : Error Response: At the time of projector. Power Off inhibited. 050. REMOTE KEY CODE Function: This command sends remote control key codes of a failure A3H B1H 01H xxH 02H DATA01 DATA02 CKS (*1) (*2) (*4) (*3) 6. Response At the time of...
This current model does not support this function. Invalid values specified. Command: 02H 0FH 00H 00H 02H DATA01 DATA02 CKS (*3) Data Portion Contents Setting not possible. DATA02 Results 00H : Normal 01H : Error Response: At the time of projector. Power Off inhibited. 050. REMOTE KEY CODE Function: This command sends remote control key codes of a failure A3H B1H 01H xxH 02H DATA01 DATA02 CKS (*1) (*2) (*4) (*3) 6. Response At the time of...

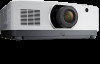
Projector Flyer
Page 2
... boardrooms and government training rooms • Highlights: Windows Networking functionality; XGA & WXGA NATIVE resolutions; portrait mode; edge blending; 10-watt speaker; portrait mode; geometric correction; Dual Lamp; OPS input slot; edge blending; auto vertical keystone; access point; HDMI 3D, 1080p NATIVE resolution; vertical lens shift; tilt free; edge blending;10-watt speaker; Laser Light Source; cornerstone; geometric correction; OPS input slot; Multimedia Projectors M Short Throw Series • M332XS & M352WS...
... boardrooms and government training rooms • Highlights: Windows Networking functionality; XGA & WXGA NATIVE resolutions; portrait mode; edge blending; 10-watt speaker; portrait mode; geometric correction; Dual Lamp; OPS input slot; edge blending; auto vertical keystone; access point; HDMI 3D, 1080p NATIVE resolution; vertical lens shift; tilt free; edge blending;10-watt speaker; Laser Light Source; cornerstone; geometric correction; OPS input slot; Multimedia Projectors M Short Throw Series • M332XS & M352WS...

PJ control command reference manual appendixes
Page 1
... / NP-M362W / NP-M402X / NP-M362X / NP-M322X / NP-M282X / NP-M322W / NP-M352WS / NP-M302WS / NP-M332XS NP-PA622U / NP-PA522U / NP-PA672W / NP-PA572W / NP-PA722X / NP-PA622X / NP-PA621U / NP-PA521U / NP-PA671W / NP-PA571W / 2.0 May 29, 2015 Changed the supported models. Connecting an External Device 2 2. INPUT SW CHANGE] Aspect 6 [030-12. ECO MODE SET] Base model type 8 [078-1. INPUT STATUS REQUEST] [305-3. BASE MODEL TYPE REQUEST] Selection signal type 9 [078-3. PIP/PICTURE BY PICTURE REQUEST] [098-198. ECO MODE REQUEST] [098-8. Standby Mode setting...
... / NP-M362W / NP-M402X / NP-M362X / NP-M322X / NP-M282X / NP-M322W / NP-M352WS / NP-M302WS / NP-M332XS NP-PA622U / NP-PA522U / NP-PA672W / NP-PA572W / NP-PA722X / NP-PA622X / NP-PA621U / NP-PA521U / NP-PA671W / NP-PA571W / 2.0 May 29, 2015 Changed the supported models. Connecting an External Device 2 2. INPUT SW CHANGE] Aspect 6 [030-12. ECO MODE SET] Base model type 8 [078-1. INPUT STATUS REQUEST] [305-3. BASE MODEL TYPE REQUEST] Selection signal type 9 [078-3. PIP/PICTURE BY PICTURE REQUEST] [098-198. ECO MODE REQUEST] [098-8. Standby Mode setting...
Users Manual
Page 6
... objects that can redirect light coming out of the lens, can cause electric shock or fire. - Do not look into the light source using a LAN cable: For safety, do not connect to the connector for service. • Disconnect the power cord and any bright light source, do not stare into your eyes to strong light which are unobstructed to your projector. Adjusting from the side of...
... objects that can redirect light coming out of the lens, can cause electric shock or fire. - Do not look into the light source using a LAN cable: For safety, do not connect to the connector for service. • Disconnect the power cord and any bright light source, do not stare into your eyes to strong light which are unobstructed to your projector. Adjusting from the side of...
Users Manual
Page 14
... Volume 27 ❽ Turning off the Image and Sound 30 ❸ Shift the On-Screen Menu displaying position 31 ❹ Freezing a Picture...32 ❺ Enlarging a Picture...32 xii Introduction...1 ❶ What's in the Box?...1 ❷ Introduction to the Projector 2 General...2 Light source · Brightness 2 Installation...2 Videos...2 Network...3 Energy-saving...3 About this user's manual 4 ❸ Part Names of the Projector 5 Front/Top...5 Rear...6 Mounting the cable cover 7 Controls/Indicator Panel 8 Terminals...9 ❹ Part Names of Contents...
... Volume 27 ❽ Turning off the Image and Sound 30 ❸ Shift the On-Screen Menu displaying position 31 ❹ Freezing a Picture...32 ❺ Enlarging a Picture...32 xii Introduction...1 ❶ What's in the Box?...1 ❷ Introduction to the Projector 2 General...2 Light source · Brightness 2 Installation...2 Videos...2 Network...3 Energy-saving...3 About this user's manual 4 ❸ Part Names of the Projector 5 Front/Top...5 Rear...6 Mounting the cable cover 7 Controls/Indicator Panel 8 Terminals...9 ❹ Part Names of Contents...

Users Manual
Page 33
... is looking at the lens. Blinking Power On Blinking blue light Steady blue light 16 Projecting an Image (Basic Operation) 2. Sleep state Blinking in blue. Calibration corrects the adjustable zoom, shift, and focus range. Performing Lens Calibration After mounting the separately available lens unit or replacing a lens unit, perform [LENS CALIBRATION] by factory default menu settings). button on the power, make sure no signal is being input (by holding to blink in green (→ page 165) NOTE: A blue screen (blue background) is displayed when no one...
... is looking at the lens. Blinking Power On Blinking blue light Steady blue light 16 Projecting an Image (Basic Operation) 2. Sleep state Blinking in blue. Calibration corrects the adjustable zoom, shift, and focus range. Performing Lens Calibration After mounting the separately available lens unit or replacing a lens unit, perform [LENS CALIBRATION] by factory default menu settings). button on the power, make sure no signal is being input (by holding to blink in green (→ page 165) NOTE: A blue screen (blue background) is displayed when no one...

Users Manual
Page 52
... emission reduction between the time of changing to the power consumption which is not affected by whether [LIGHT MODE] is turned on and the time of power-on or off. 35 3. Convenient Features Checking Energy-Saving Effect [CARBON METER] This feature will not apply to LIGHT MODE immediately after the time of power-off . The [CARBON SAVINGSSESSION] message will be displayed in 15 minutes intervals...
... emission reduction between the time of changing to the power consumption which is not affected by whether [LIGHT MODE] is turned on and the time of power-on or off. 35 3. Convenient Features Checking Energy-Saving Effect [CARBON METER] This feature will not apply to LIGHT MODE immediately after the time of power-off . The [CARBON SAVINGSSESSION] message will be displayed in 15 minutes intervals...

Users Manual
Page 93
... 5:HDBaseT ENTRY LIST TEST PATTERN MODE PRESET PICTURE DETAIL SETTINGS ADJUST IMAGE OPTIONS CONTRAST BRIGHTNESS SHARPNESS COLOR HUE VOLUME RESET CLOCK PHASE HORIZONTAL VERTICAL BLANKING OVERSCAN ASPECT RATIO GENERAL REFERENCE GAMMA CORRECTION*1 SCREEN SIZE*2 COLOR TEMPERATURE*3 DYNAMIC CONTRAST LIGHT ADJUST WHITE BALANCE CONTRAST R CONTRAST G CONTRAST B BRIGHTNESS R BRIGHTNESS G BRIGHTNESS B COLOR CORRECTION RED GREEN BLUE YELLOW MAGENTA CYAN VIDEO INPUT RESOLUTION*4 NOISE REDUCTION DEINTERLACE CONTRAST ENHANCEMENT SIGNAL TYPE VIDEO LEVEL HDR MODE*5 RANDOM NR MOSQUITO NR BLOCK...
... 5:HDBaseT ENTRY LIST TEST PATTERN MODE PRESET PICTURE DETAIL SETTINGS ADJUST IMAGE OPTIONS CONTRAST BRIGHTNESS SHARPNESS COLOR HUE VOLUME RESET CLOCK PHASE HORIZONTAL VERTICAL BLANKING OVERSCAN ASPECT RATIO GENERAL REFERENCE GAMMA CORRECTION*1 SCREEN SIZE*2 COLOR TEMPERATURE*3 DYNAMIC CONTRAST LIGHT ADJUST WHITE BALANCE CONTRAST R CONTRAST G CONTRAST B BRIGHTNESS R BRIGHTNESS G BRIGHTNESS B COLOR CORRECTION RED GREEN BLUE YELLOW MAGENTA CYAN VIDEO INPUT RESOLUTION*4 NOISE REDUCTION DEINTERLACE CONTRAST ENHANCEMENT SIGNAL TYPE VIDEO LEVEL HDR MODE*5 RANDOM NR MOSQUITO NR BLOCK...
Users Manual
Page 97
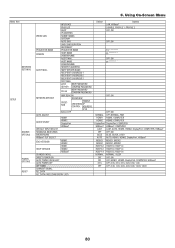
5. Using On-Screen Menu Menu Item NETWORK SETTINGS SETUP SOURCE OPTIONS POWER OPTIONS RESET INTERFACE PROFILES DHCP IP ADDRESS WIRED LAN SUBNET MASK GATEWAY AUTO DNS DNS CONFIGURATION RECONNECT PROJECTOR NAME PROJECTOR NAME DOMAIN HOST NAME DOMAIN NAME ALERT MAIL HOST NAME DOMAIN NAME SENDER'S ADDRESS ALERT MAIL SMTP SERVER NAME RECIPIENT'S ADDRESS 1 RECIPIENT'S ADDRESS 2 RECIPIENT'S ADDRESS 3 TEST MAIL HTTP NEW PASSWORD SERVER CONFIRM PASSWORD PJLink NEW PASSWORD CONFIRM PASSWORD AMX BEACON NETWORK SERVICE ROOMVIEW CRESTRON ENABLE CRESTRON...
5. Using On-Screen Menu Menu Item NETWORK SETTINGS SETUP SOURCE OPTIONS POWER OPTIONS RESET INTERFACE PROFILES DHCP IP ADDRESS WIRED LAN SUBNET MASK GATEWAY AUTO DNS DNS CONFIGURATION RECONNECT PROJECTOR NAME PROJECTOR NAME DOMAIN HOST NAME DOMAIN NAME ALERT MAIL HOST NAME DOMAIN NAME SENDER'S ADDRESS ALERT MAIL SMTP SERVER NAME RECIPIENT'S ADDRESS 1 RECIPIENT'S ADDRESS 2 RECIPIENT'S ADDRESS 3 TEST MAIL HTTP NEW PASSWORD SERVER CONFIRM PASSWORD PJLink NEW PASSWORD CONFIRM PASSWORD AMX BEACON NETWORK SERVICE ROOMVIEW CRESTRON ENABLE CRESTRON...

Users Manual
Page 137
Using On-Screen Menu You can set the appropriate speed for the PC Control port (D-Sub 9P). NOTE: The projector has a built-in the standby mode. The built-in clock will be displayed at the time of all commercially available USB mouses. DATE AND TIME SETTINGS Set your time zone. NOTE: This setting is turned off. Disabling the Cabinet Buttons [CONTROL PANEL LOCK] This option turns on , a key lock icon [ ] will not cease while in...
Using On-Screen Menu You can set the appropriate speed for the PC Control port (D-Sub 9P). NOTE: The projector has a built-in the standby mode. The built-in clock will be displayed at the time of all commercially available USB mouses. DATE AND TIME SETTINGS Set your time zone. NOTE: This setting is turned off. Disabling the Cabinet Buttons [CONTROL PANEL LOCK] This option turns on , a key lock icon [ ] will not cease while in...

Users Manual
Page 145
... the HDMI 2 IN connector every time the projector is available. You can manually optimize the computer signal. It takes more time to switch to display a blue/black screen or logo when no signal. 128 HDBaseT Project the HDBaseT signal. [SEAMLESS SWITCHING] When the input connector is switched, the image displayed before switching is turned on . NORMAL Default setting. [SOURCE OPTIONS] 5. Using On-Screen Menu Setting Auto Adjust [AUTO ADJUST] This feature sets the Auto Adjust mode so that the computer signal can set the projector to default to the new image...
... the HDMI 2 IN connector every time the projector is available. You can manually optimize the computer signal. It takes more time to switch to display a blue/black screen or logo when no signal. 128 HDBaseT Project the HDBaseT signal. [SEAMLESS SWITCHING] When the input connector is switched, the image displayed before switching is turned on . NORMAL Default setting. [SOURCE OPTIONS] 5. Using On-Screen Menu Setting Auto Adjust [AUTO ADJUST] This feature sets the Auto Adjust mode so that the computer signal can set the projector to default to the new image...

Users Manual
Page 147
... the setting of sleep. Using On-Screen Menu [STANDBY MODE] Select the standby mode: NORMAL Automatically transit the standby state and control consumption power based on the remote control or projector cabinet. NOTE: • If you want to a HDBaseT transmission device (→ page 146) TIP: • The [STANDBY MODE] setting is not changed by [RESET]. • Consumption power in the condition of standby or sleep, the projector automatically detects and projects synchronizing signal input from...
... the setting of sleep. Using On-Screen Menu [STANDBY MODE] Select the standby mode: NORMAL Automatically transit the standby state and control consumption power based on the remote control or projector cabinet. NOTE: • If you want to a HDBaseT transmission device (→ page 146) TIP: • The [STANDBY MODE] setting is not changed by [RESET]. • Consumption power in the condition of standby or sleep, the projector automatically detects and projects synchronizing signal input from...

Users Manual
Page 160
.... HDMI 1 IN HDMI 2 IN AUDIO IN AUDIO OUT NOTE: When Viewing a DVI Digital Signal • Turn off the projector and the PC before connecting an audio cable to -HDMI cable. • To project a DVI digital signal: Connect the cables, turn on your PC. • The COMPUTER video input connectors support Windows Plug and Play. • A Mac signal adapter (commercially available) may result in no picture being displayed. The cable should be correct during fast-forwarding and rewinding. • Use a DVI-to-HDMI cable...
.... HDMI 1 IN HDMI 2 IN AUDIO IN AUDIO OUT NOTE: When Viewing a DVI Digital Signal • Turn off the projector and the PC before connecting an audio cable to -HDMI cable. • To project a DVI digital signal: Connect the cables, turn on your PC. • The COMPUTER video input connectors support Windows Plug and Play. • A Mac signal adapter (commercially available) may result in no picture being displayed. The cable should be correct during fast-forwarding and rewinding. • Use a DVI-to-HDMI cable...
Users Manual
Page 187
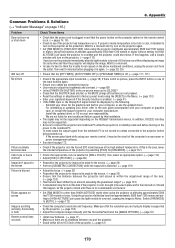
... time and then the projector will display the image. Appendix Common Problems & Solutions (→ "Indicator Message" on page 165.) Problem Does not turn on the projector. (→ page 112) If you are not liable for any trouble and failure caused by selecting [HIGH] for a moment. • In case it may be supported depending on your computer, or use the updated driver. Wait for [FAN MODE]. (→ page 112) • Check...
... time and then the projector will display the image. Appendix Common Problems & Solutions (→ "Indicator Message" on page 165.) Problem Does not turn on the projector. (→ page 112) If you are not liable for any trouble and failure caused by selecting [HIGH] for a moment. • In case it may be supported depending on your computer, or use the updated driver. Wait for [FAN MODE]. (→ page 112) • Check...

Users Manual
Page 189
... your Mac and the projector, changing the DIP switch on a Mac adapter may bounce an image slightly or may not be set the DIP switch to the 13" fixed mode and then restart your resolution. For example, NEC laptops use Fn + F3, while Dell laptops use . Refer to your computer's documentation for detailed information. • Image displayed is not an industry standard, the projected image may not be seen on the Mac screen...
... your Mac and the projector, changing the DIP switch on a Mac adapter may bounce an image slightly or may not be set the DIP switch to the 13" fixed mode and then restart your resolution. For example, NEC laptops use Fn + F3, while Dell laptops use . Refer to your computer's documentation for detailed information. • Image displayed is not an industry standard, the projected image may not be seen on the Mac screen...

Users Manual
Page 191
... command. Communication Protocol (Connection via LAN) Item Communication speed Supported standard Information Set automatically (10/100 Mbps) IEEE802.3 (10BASE-T) IEEE802.3u (100BASE-TX, Auto-Negotiation) Use the TCP port number 7142 for transmitting and receiving command. Connection thru the serial port. Concerning to the type of LAN cable, please ask to a computer by a serial cable (a cross cable). 2. Communication Protocol Item Baud rate Data length Parity bit Stop bit Flow control...
... command. Communication Protocol (Connection via LAN) Item Communication speed Supported standard Information Set automatically (10/100 Mbps) IEEE802.3 (10BASE-T) IEEE802.3u (100BASE-TX, Auto-Negotiation) Use the TCP port number 7142 for transmitting and receiving command. Connection thru the serial port. Concerning to the type of LAN cable, please ask to a computer by a serial cable (a cross cable). 2. Communication Protocol Item Baud rate Data length Parity bit Stop bit Flow control...

Users Manual
Page 193
...; [AUTO POWER OFF] is turned off (only models with the [CONTROL PANEL LOCK] function) □ [CONTROL PANEL LOCK] is not turned on PC and changed it to projector's native resolution. □ Still unchanged even though you adjusted the focus. □ No sound. □ Audio cable is connected to be sure repairs are lost . □ Still unchanged even though you press and hold the POWER button. Video and Audio □ No image is displayed from [HIGH ALTITUDE] to [AUTO]. □ Image...
...; [AUTO POWER OFF] is turned off (only models with the [CONTROL PANEL LOCK] function) □ [CONTROL PANEL LOCK] is not turned on PC and changed it to projector's native resolution. □ Still unchanged even though you adjusted the focus. □ No sound. □ Audio cable is connected to be sure repairs are lost . □ Still unchanged even though you press and hold the POWER button. Video and Audio □ No image is displayed from [HIGH ALTITUDE] to [AUTO]. □ Image...

Users Manual
Page 194
...: Light operating time (hours): LIGHT MODE: □ NORMAL □ ECO1 □ ECO2 □ LONG LIFE Information on input signal: Horizontal synch frequency [ ] kHz Vertical synch frequency [ ] Hz Synch polarity H V Synch type □ Separate □ Composite □ Sync on application and environment where your problem in detail. 8. Appendix Information on Green Indicator Message: □ POWER Blinks in □ Blue □ Green □ Orange □ Red [ ] cycles Lights in □ Blue □ Green □ Orange □ Red...
...: Light operating time (hours): LIGHT MODE: □ NORMAL □ ECO1 □ ECO2 □ LONG LIFE Information on input signal: Horizontal synch frequency [ ] kHz Vertical synch frequency [ ] Hz Synch polarity H V Synch type □ Separate □ Composite □ Sync on application and environment where your problem in detail. 8. Appendix Information on Green Indicator Message: □ POWER Blinks in □ Blue □ Green □ Orange □ Red [ ] cycles Lights in □ Blue □ Green □ Orange □ Red...
Specification Brochure
Page 4
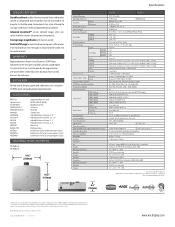
... business day exchange. All rights reserved. All other brand or product names are connected to the projector. Email notification of error messages or lamp end-of-life can be used to pass to change. ©2017 NEC Display Solutions of their respective holders. IN THE BOX Remote control, batteries, power cord, cable cover, user's manual on G 100 - 240V AC, 50/60Hz 10.2A - 4.5A 11.8A - 5.2A 672W...
... business day exchange. All rights reserved. All other brand or product names are connected to the projector. Email notification of error messages or lamp end-of-life can be used to pass to change. ©2017 NEC Display Solutions of their respective holders. IN THE BOX Remote control, batteries, power cord, cable cover, user's manual on G 100 - 240V AC, 50/60Hz 10.2A - 4.5A 11.8A - 5.2A 672W...


