

NaViSetAdmin2 Press Release
Page 1
... 2 Software CHICAGO - 1 FOR IMMEDIATE RELEASE Media Contact: Philip Anast Tech Image (for easier asset management," said Keith Yanke, Senior Director of Product Marketing at NEC Display Solutions. NEC Display Solutions of America, a leading provider of projectors, large-screen displays and desktop monitors. "Organizations do not have to gain better control of projector lamps, filters, and fan cleaning, in order to create their support costs by remotely diagnosing...
... 2 Software CHICAGO - 1 FOR IMMEDIATE RELEASE Media Contact: Philip Anast Tech Image (for easier asset management," said Keith Yanke, Senior Director of Product Marketing at NEC Display Solutions. NEC Display Solutions of America, a leading provider of projectors, large-screen displays and desktop monitors. "Organizations do not have to gain better control of projector lamps, filters, and fan cleaning, in order to create their support costs by remotely diagnosing...

Specification Brochure
Page 1
... intuitive setup and operation • Bright images easily viewed in any application • Versatile, color-coded connections to computer, video sources and external monitor • Automatic keystone correction technology instantly projects a square image even when the projector is set up to 10,000 hours, while lowering power consumption • Power management enables projector to automatically turn off when an incoming signal is not detected from any of the inputs • Auto Power On...
... intuitive setup and operation • Bright images easily viewed in any application • Versatile, color-coded connections to computer, video sources and external monitor • Automatic keystone correction technology instantly projects a square image even when the projector is set up to 10,000 hours, while lowering power consumption • Power management enables projector to automatically turn off when an incoming signal is not detected from any of the inputs • Auto Power On...
Specification Brochure
Page 4
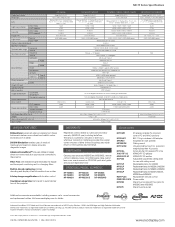
... Lens Light source (lamp) ECO mode ECO mode off Lamp life ECO mode ECO mode off Image size Light output Normal ECO mode Contrast ratio (white/black) Maximum resolution Horizontal Sychronization range Vertical Keystone correction Horizontal Vertical Computer Audio Video Audio Input terminals HDMI Microphone 3D Sync USB Port Type A Type B Output terminals Audio Wired LAN port Control terminals Built-in speaker Usage environment Operational temperature Storage temperature Power requirements Input current ECO mode off the projector WARRANTY Registered owners...
... Lens Light source (lamp) ECO mode ECO mode off Lamp life ECO mode ECO mode off Image size Light output Normal ECO mode Contrast ratio (white/black) Maximum resolution Horizontal Sychronization range Vertical Keystone correction Horizontal Vertical Computer Audio Video Audio Input terminals HDMI Microphone 3D Sync USB Port Type A Type B Output terminals Audio Wired LAN port Control terminals Built-in speaker Usage environment Operational temperature Storage temperature Power requirements Input current ECO mode off the projector WARRANTY Registered owners...

Users Manual
Page 8
.... AUTO POWER OFF (Factory preset: 1 hour) To control the projector from an angle may be sure to automatically turn off in the user's manual included with your LCD shutter eyeglasses or your family has a history of light-sensitive seizures, consult a doctor before viewing 3D images. • While viewing 3D images, if you can strain your area, please visit the company website: URL: http://www.nec-display.com...
.... AUTO POWER OFF (Factory preset: 1 hour) To control the projector from an angle may be sure to automatically turn off in the user's manual included with your LCD shutter eyeglasses or your family has a history of light-sensitive seizures, consult a doctor before viewing 3D images. • While viewing 3D images, if you can strain your area, please visit the company website: URL: http://www.nec-display.com...
Users Manual
Page 9
... video source 17 ❺ Adjusting the Picture Size and Position 18 Adjust the Tilt Foot 19 Zoom...20 Focus...21 ❻ Correcting Keystone Distortion Manually 22 Adjusting with the remote control 23 ❼ Optimizing Computer Signal Automatically 26 Adjusting the Image Using Auto Adjust 26 ❽ Turning Up or Down Volume 26 ❾ Turning off the Image and Sound 29 ❷ Freezing a Picture...29 ❸ Magnifying a Picture...29 ❹ Changing Eco Mode/Checking Energy-Saving Effect 31 Using Eco Mode...
... video source 17 ❺ Adjusting the Picture Size and Position 18 Adjust the Tilt Foot 19 Zoom...20 Focus...21 ❻ Correcting Keystone Distortion Manually 22 Adjusting with the remote control 23 ❼ Optimizing Computer Signal Automatically 26 Adjusting the Image Using Auto Adjust 26 ❽ Turning Up or Down Volume 26 ❾ Turning off the Image and Sound 29 ❷ Freezing a Picture...29 ❸ Magnifying a Picture...29 ❹ Changing Eco Mode/Checking Energy-Saving Effect 31 Using Eco Mode...

Users Manual
Page 11
... 125 Connecting Component Input 126 Connecting HDMI Input 127 Connecting to a Wired LAN 128 Connecting to Factory Default [RESET 116 6. Maintenance...132 ❶ Cleaning the Lens...132 ❷ Cleaning the Cabinet 132 ❸ Replacing the Lamp...133 8. Table of D-Sub COMPUTER Input Terminal 148 ❺ Compatible Input Signal List 149 ❻ PC Control Codes and Cable Connection 150 ❼ Troubleshooting Check List 151 ❽ TCO Certification...153 ❾ REGISTER YOUR PROJECTOR! (for a Wireless LAN Connection (with the optional USB Wireless LAN Unit...
... 125 Connecting Component Input 126 Connecting HDMI Input 127 Connecting to a Wired LAN 128 Connecting to Factory Default [RESET 116 6. Maintenance...132 ❶ Cleaning the Lens...132 ❷ Cleaning the Cabinet 132 ❸ Replacing the Lamp...133 8. Table of D-Sub COMPUTER Input Terminal 148 ❺ Compatible Input Signal List 149 ❻ PC Control Codes and Cable Connection 150 ❼ Troubleshooting Check List 151 ❽ TCO Certification...153 ❾ REGISTER YOUR PROJECTOR! (for a Wireless LAN Connection (with the optional USB Wireless LAN Unit...

Users Manual
Page 13
... short throw models) across (measured diagonally) from the menu can be used . • The supplied remote control allows you to assign a CONTROL ID to the projector Multiple projectors can be installed by assigning an ID number to each projector. • Auto vertical keystone correction Auto Keystone feature allows the projector to detect its tilt and correct vertical distortion automatically. • USB Display Using a commercially available USB cable (compatible with USB 2.0 specifications) to connect the computer...
... short throw models) across (measured diagonally) from the menu can be used . • The supplied remote control allows you to assign a CONTROL ID to the projector Multiple projectors can be installed by assigning an ID number to each projector. • Auto vertical keystone correction Auto Keystone feature allows the projector to detect its tilt and correct vertical distortion automatically. • USB Display Using a commercially available USB cable (compatible with USB 2.0 specifications) to connect the computer...

Users Manual
Page 14
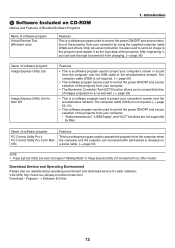
... turn off the AC power supply when the projector is powered on, use a power strip equipped with wireless networking capabilities An RJ-45 terminal is set to [NETWORK STANDBY] in the supplied CD-ROM The supplied NEC Projector includes three programs: Virtual Remote Tool, Image Express Utility Lite (for Windows/ Mac OS), PC Control Utility Pro 4 (for Windows)/5 (for Windows only) Image Express Utility Lite allows you can be started is required for wireless LAN connection. • Software programs (User Supportware...
... turn off the AC power supply when the projector is powered on, use a power strip equipped with wireless networking capabilities An RJ-45 terminal is set to [NETWORK STANDBY] in the supplied CD-ROM The supplied NEC Projector includes three programs: Virtual Remote Tool, Image Express Utility Lite (for Windows/ Mac OS), PC Control Utility Pro 4 (for Windows)/5 (for Windows only) Image Express Utility Lite allows you can be started is required for wireless LAN connection. • Software programs (User Supportware...
Users Manual
Page 23
... images projected on CD-ROM Names and Features of the projector from your computer's screen over the USB cable or the wired/wireless network. Download Service and Operating Environment Please visit our website about operating environment and download service for Mac OS Features • This is a software program used to control the power ON/OFF and source selection of Bundled Software Programs 1. After registering it as the logo data of software program Virtual Remote...
... images projected on CD-ROM Names and Features of the projector from your computer's screen over the USB cable or the wired/wireless network. Download Service and Operating Environment Please visit our website about operating environment and download service for Mac OS Features • This is a software program used to control the power ON/OFF and source selection of Bundled Software Programs 1. After registering it as the logo data of software program Virtual Remote...

Users Manual
Page 25
... connection to fix the computer cable (VGA). 2. See the Power Indicator section.(→ page 136) COMPUTER IN To wall outlet Make sure that the prongs are fully inserted into both terminals to a computer. This section will light red* (standby mode). Connect the computer cable (VGA) between the projector's COMPUTER IN terminal and the computer's port (mini D-Sub 15 Pin). Projecting an Image (Basic Operation) ❷ Connecting Your Computer/Connecting the Power Cord...
... connection to fix the computer cable (VGA). 2. See the Power Indicator section.(→ page 136) COMPUTER IN To wall outlet Make sure that the prongs are fully inserted into both terminals to a computer. This section will light red* (standby mode). Connect the computer cable (VGA) between the projector's COMPUTER IN terminal and the computer's port (mini D-Sub 15 Pin). Projecting an Image (Basic Operation) ❷ Connecting Your Computer/Connecting the Power Cord...

Users Manual
Page 27
..., replace the lamp. • If the STATUS indicator lights orange with the power button pressed, it back on again. guages from the menu. 2. Allow a minimum of six times, wait a full minute and then turn on . Cancel the lock by using a power strip or breaker. This is turned on to protect the internal system. Projecting an Image (Basic Operation) Note on Startup screen (Menu Language Select screen) When you first turn on the projector...
..., replace the lamp. • If the STATUS indicator lights orange with the power button pressed, it back on again. guages from the menu. 2. Allow a minimum of six times, wait a full minute and then turn on . Cancel the lock by using a power strip or breaker. This is turned on to protect the internal system. Projecting an Image (Basic Operation) Note on Startup screen (Menu Language Select screen) When you first turn on the projector...

Users Manual
Page 56
... setting method will be set to your software. Two ways of browser. Allowing Image Express Utility Lite to be downloaded and copied to accept these functions. Please refer to the help files and the other information provided in your USB memory This device uses "JavaScript" and "Cookies" and the browser should be sent via the network connected to a wired/wireless network, lamp replace time or error messages...
... setting method will be set to your software. Two ways of browser. Allowing Image Express Utility Lite to be downloaded and copied to accept these functions. Please refer to the help files and the other information provided in your USB memory This device uses "JavaScript" and "Cookies" and the browser should be sent via the network connected to a wired/wireless network, lamp replace time or error messages...

Users Manual
Page 61
... downloaded to your computer. (→ page 60) Click this happen, check if the Recipient's Address is done from the menu. 50 Clearing a checkmark will turn off for detection from AMX Device Discovery. Projector Name: NEC Projector Lamp Hours Used: 100 [H] SENDER'S ADDRESS Enter sender's address. Do not forget your recipient's address. Turn on the Alert Mail feature. Enter the hostname of lamp replace time or error messages via e-mail when using...
... downloaded to your computer. (→ page 60) Click this happen, check if the Recipient's Address is done from the menu. 50 Clearing a checkmark will turn off for detection from AMX Device Discovery. Projector Name: NEC Projector Lamp Hours Used: 100 [H] SENDER'S ADDRESS Enter sender's address. Do not forget your recipient's address. Turn on the Alert Mail feature. Enter the hostname of lamp replace time or error messages via e-mail when using...

Users Manual
Page 106
... distortion manually. (→ page 22) NOTE: • The [HORIZONTAL] keystone item is set to the screen. TIP: To adjust the projected image size roughly, move the projector away or closer to [ON], [KEYSTONE SAVE] is turned off. The changes are saved when the projector is not available. Using On-Screen Menu ❻ Menu Descriptions & Functions [SETUP] [GENERAL] [M403W/M363W/M323W/M403X/M363X/M323X/ M283X/M403H/M323H] [M353WS/M303WS/M333XS] Using Digital Zoom [DIGITAL ZOOM] (M353WS...
... distortion manually. (→ page 22) NOTE: • The [HORIZONTAL] keystone item is set to the screen. TIP: To adjust the projected image size roughly, move the projector away or closer to [ON], [KEYSTONE SAVE] is turned off. The changes are saved when the projector is not available. Using On-Screen Menu ❻ Menu Descriptions & Functions [SETUP] [GENERAL] [M403W/M363W/M323W/M403X/M363X/M323X/ M283X/M403H/M323H] [M353WS/M303WS/M333XS] Using Digital Zoom [DIGITAL ZOOM] (M353WS...

Users Manual
Page 133
... most cases the output signal from the notebook PC is in standby mode and before being powered up. * If the screen goes blank while using a PC compatible laptop, a combination of the 12 function keys gets the external display to the projector. Installation and Connections ❷ Making Connections NOTE: When using with USB 2.0 specifications) USB-B HDMI 2 IN HDMI 1 IN COMPUTER IN AUDIO IN Stereo mini-plug audio cable (not supplied) HDMI cable (not supplied) Use High Speed HDMI® Cable.
... most cases the output signal from the notebook PC is in standby mode and before being powered up. * If the screen goes blank while using a PC compatible laptop, a combination of the 12 function keys gets the external display to the projector. Installation and Connections ❷ Making Connections NOTE: When using with USB 2.0 specifications) USB-B HDMI 2 IN HDMI 1 IN COMPUTER IN AUDIO IN Stereo mini-plug audio cable (not supplied) HDMI cable (not supplied) Use High Speed HDMI® Cable.

Users Manual
Page 147
... the temperature inside of life. CONTROL ID error Remote control ID and projector ID are clogged with the STATUS indicator blinking (2-cycle On and Off.) Should this happen, do the following: • Unplug the power cord after the cooling fans stop. • Move the projector to a cooler location if the room where you may encounter while setting up or using the projector. Lamp replacement message will be On, 2.5 sec Off) connected to...
... the temperature inside of life. CONTROL ID error Remote control ID and projector ID are clogged with the STATUS indicator blinking (2-cycle On and Off.) Should this happen, do the following: • Unplug the power cord after the cooling fans stop. • Move the projector to a cooler location if the room where you may encounter while setting up or using the projector. Lamp replacement message will be On, 2.5 sec Off) connected to...

Users Manual
Page 148
... turned on the power again. • Set [FAN MODE] to [HIGH ALTITUDE] when using the projector at altitudes less than [HIGH ALTITUDE] mode when using the projector at altitudes approximately 5500 feet/1700 meters or higher without displaying an image for another 100 hours after the lamp is turned off . (→ page 97, 105) No picture • Use the input select button on the remote control to select your source (COMPUTER, HDMI1, HDMI2, VIDEO, USB-A, LAN, or USB...
... turned on the power again. • Set [FAN MODE] to [HIGH ALTITUDE] when using the projector at altitudes less than [HIGH ALTITUDE] mode when using the projector at altitudes approximately 5500 feet/1700 meters or higher without displaying an image for another 100 hours after the lamp is turned off . (→ page 97, 105) No picture • Use the input select button on the remote control to select your source (COMPUTER, HDMI1, HDMI2, VIDEO, USB-A, LAN, or USB...

Users Manual
Page 149
...'s LCD screen when the projector display is in standby mode and before being output from the notebook PC is not turned on unless connected to owner's manual supplied with one of the "Fn" key along with your Mac computer for the projector and the PC. When using the projector with the projector) according to the 13" fixed mode and then restart your resolution. NOTE: A Video Adapter cable manufactured by your Mac for a MacBook which...
...'s LCD screen when the projector display is in standby mode and before being output from the notebook PC is not turned on unless connected to owner's manual supplied with one of the "Fn" key along with your Mac computer for the projector and the PC. When using the projector with the projector) according to the 13" fixed mode and then restart your resolution. NOTE: A Video Adapter cable manufactured by your Mac for a MacBook which...

Users Manual
Page 162
... [RESET] in installation. Input source's resolution and frequency are not reversed in the projector's menu. Batteries are new and are supported by the projector. Some pixels are lost . Image shows flickering or color drift on the screen The source connected to projector's native resolution. Buttons on the projector cabinet do not work . No power even though you carry out the [KEYSTONE] adjustment). Video and Audio No image is distorted. Image is displayed from [HIGH ALTITUDE] to be sure repairs are lost . Image...
... [RESET] in installation. Input source's resolution and frequency are not reversed in the projector's menu. Batteries are new and are supported by the projector. Some pixels are lost . Image shows flickering or color drift on the screen The source connected to projector's native resolution. Buttons on the projector cabinet do not work . No power even though you carry out the [KEYSTONE] adjustment). Video and Audio No image is distorted. Image is displayed from [HIGH ALTITUDE] to be sure repairs are lost . Image...
Interactive Software / EyeRIS NEC Edition
Page 10
... the screen surface is in the EyeRIS setup menu is displayed on. Change the stylus pen status. Lines traced with the type B USB port on the Touch Module by appropriate measures as closing a curtain and keeping a certain distance from the window, etc. If clicking this by the mouse when RESUME CALIBRATION is started up. If a red square is indicated on this function is checked, the software starts...
... the screen surface is in the EyeRIS setup menu is displayed on. Change the stylus pen status. Lines traced with the type B USB port on the Touch Module by appropriate measures as closing a curtain and keeping a certain distance from the window, etc. If clicking this by the mouse when RESUME CALIBRATION is started up. If a red square is indicated on this function is checked, the software starts...

