

M Short Throw Series Specification Brochure
Page 2
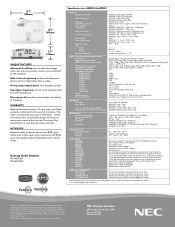
... effects of operating the projector in ECO Mode, which cleaning is required, thereby decreasing your total cost of ownership. This virtually maintenance-free filter reduces the frequency at which is encouraged by mode) minimizes energy costs 5000-hour filter life NEC is set countdown times ° Low power consumption (0.2W in medical environments to display accurate diagnostic images. Geometric correction allows these models to a standard flat screen or...
... effects of operating the projector in ECO Mode, which cleaning is required, thereby decreasing your total cost of ownership. This virtually maintenance-free filter reduces the frequency at which is encouraged by mode) minimizes energy costs 5000-hour filter life NEC is set countdown times ° Low power consumption (0.2W in medical environments to display accurate diagnostic images. Geometric correction allows these models to a standard flat screen or...
M Short Throw Series Specification Brochure
Page 4
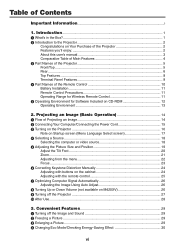
... / 170W eco1 / 140W eco2 M300WS: 260W AC / 195W eco Lamp Life (up to change. 3/11 ver. 2. ©2011 NEC Display Solutions of NEC Display Solutions. stereo mini stereo (Variable audio out) Yes 10W speaker RS-232, IR, LAN, DDC/CI, USB, Wireless LAN (optional) Separate Sync / Composite Sync / Sync on CD-ROM, quick start guide, product registration card, security sticker Ordering Model Numbers NP-M300XS NP-M300WS Specifications for M300WS Replacement remote control WARRANTY PROGRAMS NECEW1-MP NECEW2...
... / 170W eco1 / 140W eco2 M300WS: 260W AC / 195W eco Lamp Life (up to change. 3/11 ver. 2. ©2011 NEC Display Solutions of NEC Display Solutions. stereo mini stereo (Variable audio out) Yes 10W speaker RS-232, IR, LAN, DDC/CI, USB, Wireless LAN (optional) Separate Sync / Composite Sync / Sync on CD-ROM, quick start guide, product registration card, security sticker Ordering Model Numbers NP-M300XS NP-M300WS Specifications for M300WS Replacement remote control WARRANTY PROGRAMS NECEW1-MP NECEW2...

Users Manual
Page 6
... using the remote control for purposes other than originally intended. Doing so could be using a LAN cable (only models with the projector. - A damaged or frayed power cord can cause damage to the connector for service. • Disconnect the power cord and any power cord other than the one supplied with the RJ-45 LAN port): For safety, do not connect to the projector. • Do not send the projector in this user's manual...
... using the remote control for purposes other than originally intended. Doing so could be using a LAN cable (only models with the projector. - A damaged or frayed power cord can cause damage to the connector for service. • Disconnect the power cord and any power cord other than the one supplied with the RJ-45 LAN port): For safety, do not connect to the projector. • Do not send the projector in this user's manual...

Users Manual
Page 7
... as a light source. If this device must not be extremely hot. This device is under the projector. PLEASE REPLACE THE LAMP AND FILTER.] appears. Turn the projector off will be placed in the direct field of copyrights which are protected by copyright law. [ASPECT RATIO], [KEYSTONE], Magnifying feature and other similar features. Switch [FAN MODE] to [AUTO]. • Using the projector at visual display workplaces this...
... as a light source. If this device must not be extremely hot. This device is under the projector. PLEASE REPLACE THE LAMP AND FILTER.] appears. Turn the projector off will be placed in the direct field of copyrights which are protected by copyright law. [ASPECT RATIO], [KEYSTONE], Magnifying feature and other similar features. Switch [FAN MODE] to [AUTO]. • Using the projector at visual display workplaces this...
Users Manual
Page 8
...; Turning on the Projector 16 Note on Startup screen (Menu Language Select screen 17 Selecting a Source...18 Selecting the computer or video source 18 Adjusting the Picture Size and Position 19 Adjust the Tilt Foot 20 Zoom...21 Adjusting from the menu 22 Focus...23 Correcting Keystone Distortion Manually 24 Adjusting with buttons on the cabinet 24 Adjusting with the remote control 25 Optimizing Computer Signal Automatically 26 Adjusting the Image Using Auto Adjust 26...
...; Turning on the Projector 16 Note on Startup screen (Menu Language Select screen 17 Selecting a Source...18 Selecting the computer or video source 18 Adjusting the Picture Size and Position 19 Adjust the Tilt Foot 20 Zoom...21 Adjusting from the menu 22 Focus...23 Correcting Keystone Distortion Manually 24 Adjusting with buttons on the cabinet 24 Adjusting with the remote control 25 Optimizing Computer Signal Automatically 26 Adjusting the Image Using Auto Adjust 26...

Users Manual
Page 9
... the Unauthorized Use of Menu Items...71 4 Menu Descriptions & Functions [SOURCE 73 COMPUTER 1 and 2 73 HDMI...73 VIDEO...73 S-VIDEO...73 VIEWER...73 NETWORK...73 USB DISPLAY...73 5 Menu Descriptions & Functions [ADJUST 74 [PICTURE]...74 [IMAGE OPTIONS 77 6 Menu Descriptions & Functions [SETUP 81 [GENERAL]...81 [MENU]...83 [INSTALLATION]...85 [OPTIONS(1)]...87 [OPTIONS(2)]...89 Setting up the Projector for a Wired LAN Connection [WIRED LAN 91 Setting up the Projector for a Wireless LAN Connection (with GCT 56 Projecting an Image from an...
... the Unauthorized Use of Menu Items...71 4 Menu Descriptions & Functions [SOURCE 73 COMPUTER 1 and 2 73 HDMI...73 VIDEO...73 S-VIDEO...73 VIEWER...73 NETWORK...73 USB DISPLAY...73 5 Menu Descriptions & Functions [ADJUST 74 [PICTURE]...74 [IMAGE OPTIONS 77 6 Menu Descriptions & Functions [SETUP 81 [GENERAL]...81 [MENU]...83 [INSTALLATION]...85 [OPTIONS(1)]...87 [OPTIONS(2)]...89 Setting up the Projector for a Wired LAN Connection [WIRED LAN 91 Setting up the Projector for a Wireless LAN Connection (with GCT 56 Projecting an Image from an...
Users Manual
Page 12
... document camera. The HDMI input also supports audio signal. • 10 W built-in standby condition with energy saving technology Selecting [POWER-SAVING] for [STANDBY MODE] from your dealer for a larger image using the Main Power Switch or disconnecting the AC power supply. The projector enables you to project precise images up to a typical projector lens. • HDMI input port provides digital signal The HDMI input provides HDCP compatible digital signals. The projector must be turned off (even when projecting an image) by qualified...
... document camera. The HDMI input also supports audio signal. • 10 W built-in standby condition with energy saving technology Selecting [POWER-SAVING] for [STANDBY MODE] from your dealer for a larger image using the Main Power Switch or disconnecting the AC power supply. The projector enables you to project precise images up to a typical projector lens. • HDMI input port provides digital signal The HDMI input provides HDCP compatible digital signals. The projector must be turned off (even when projecting an image) by qualified...

Users Manual
Page 13
...), AUTO POWER ON(COMP1), AUTO POWER OFF, and OFF TIMER features eliminate the need of a traditional computer cable (VGA). • Integrated RJ-45 connector for wired networking capability along with wireless networking capabilities An RJ-45 connector is required for keyword protection, cabinet control panel lock, security slot, and security chain opening to help prevent unauthorized access, adjustments and theft deterrence. • High resolution up to UXGA High resolution display - up...
...), AUTO POWER ON(COMP1), AUTO POWER OFF, and OFF TIMER features eliminate the need of a traditional computer cable (VGA). • Integrated RJ-45 connector for wired networking capability along with wireless networking capabilities An RJ-45 connector is required for keyword protection, cabinet control panel lock, security slot, and security chain opening to help prevent unauthorized access, adjustments and theft deterrence. • High resolution up to UXGA High resolution display - up...

Users Manual
Page 25
... Pin). Connect the supplied power cord to the projector. The projector's power indicator will flash for [STANDBY MODE]. For information about other plug of both connectors to fix the computer cable (VGA). 2. First connect the supplied power cord's three-pin plug to a computer. Use caution when picking up the projector. 15 Turn two thumb screws of the supplied power cord in the wall outlet. Installation and Connections" on page 104. This section will light orange* (standby mode). See the Power Indicator section.(→...
... Pin). Connect the supplied power cord to the projector. The projector's power indicator will flash for [STANDBY MODE]. For information about other plug of both connectors to fix the computer cable (VGA). 2. First connect the supplied power cord's three-pin plug to a computer. Use caution when picking up the projector. 15 Turn two thumb screws of the supplied power cord in the wall outlet. Installation and Connections" on page 104. This section will light orange* (standby mode). See the Power Indicator section.(→...

Users Manual
Page 27
... turning off the power supply and then back on to execute the selection. Cancel the lock by using the power button. • Immediately after the lamp is turned off or when the temperature is turned on . • If the internal temperature of the 27 languages from the menu. 2. Allow a minimum of usable life, the projector will display the image. 17 Projecting an Image (Basic Operation) Note on Startup screen (Menu Language Select screen...
... turning off the power supply and then back on to execute the selection. Cancel the lock by using the power button. • Immediately after the lamp is turned off or when the temperature is turned on . • If the internal temperature of the 27 languages from the menu. 2. Allow a minimum of usable life, the projector will display the image. 17 Projecting an Image (Basic Operation) Note on Startup screen (Menu Language Select screen...

Users Manual
Page 46
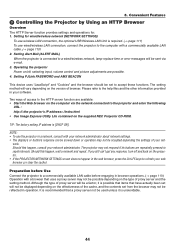
... same color as your CD-ROM drive. Number of colors: 256 colors or less • The logo data that can be displayed as well as one for 1 dot at the center of the screen. TIP: • The projector's COMPUTER 1 IN connector supports DDC/CI (Display Data Channel Command Interface). pleted. 1 Insert the accompanying NEC Projector CD-ROM into your computer screen. • Use the supplied computer cable (VGA) to connect the...
... same color as your CD-ROM drive. Number of colors: 256 colors or less • The logo data that can be displayed as well as one for 1 dot at the center of the screen. TIP: • The projector's COMPUTER 1 IN connector supports DDC/CI (Display Data Channel Command Interface). pleted. 1 Insert the accompanying NEC Projector CD-ROM into your computer screen. • Use the supplied computer cable (VGA) to connect the...
Users Manual
Page 54
... use wired/wireless LAN connection, connect the projector to the help files and the other information provided in your software. Setting PJLink PASSWORD and AMX BEACON This device uses "JavaScript" and "Cookies" and the browser should be sent via the network connected to the HTTP server function are available: • Start the Web browser on /off, selecting input, volume control and picture adjustments are possible. 4. Setting for : 1. Operating the projector Power on...
... use wired/wireless LAN connection, connect the projector to the help files and the other information provided in your software. Setting PJLink PASSWORD and AMX BEACON This device uses "JavaScript" and "Cookies" and the browser should be sent via the network connected to the HTTP server function are available: • Start the Web browser on /off, selecting input, volume control and picture adjustments are possible. 4. Setting for : 1. Operating the projector Power on...

Users Manual
Page 59
... menu. • INFORMATION WIRED LAN WIRELESS LAN UPDATE Display a list of settings of wireless LAN connection. Projector Name: NEC Projector Lamp Hours Used: 100 [H] SENDER'S ADDRESS Enter sender's address. SMTP SERVER NAME Enter the SMTP server name to be affected even when [RESET] is a standardization of protocol used for HTTP server. Do not forget your recipient's address. Turn on the Alert Mail feature. PJLink is done from AMX Device Discovery when connecting to check...
... menu. • INFORMATION WIRED LAN WIRELESS LAN UPDATE Display a list of settings of wireless LAN connection. Projector Name: NEC Projector Lamp Hours Used: 100 [H] SENDER'S ADDRESS Enter sender's address. SMTP SERVER NAME Enter the SMTP server name to be affected even when [RESET] is a standardization of protocol used for HTTP server. Do not forget your recipient's address. Turn on the Alert Mail feature. PJLink is done from AMX Device Discovery when connecting to check...

Users Manual
Page 82
... 72 RESET ORIENTATION INSTALLATION CONTROL PANEL LOCK SECURITY COMMUNICATION SPEED CONTROL ID CONTROL ID NUMBER CONTROL ID TEST PATTERN AUTO ADJUST FAN MODE COMPUTER1 COMPUTER2 SIGNAL SELECT VIDEO S-VIDEO OPTIONS(1) WXGA MODE OPTIONS(2) DEINTERLACE HDMI SETTINGS VIDEO LEVEL AUDIO SELECT* BEEP* STANDBY MODE AUTO POWER ON(AC) AUTO POWER ON(COMP1) AUTO POWER OFF DEFAULT SOURCE SELECT WIRED LAN WIRED LAN SETTINGS RECONNECT WIRELESS LAN PROFILE RECONNECT LAMP LIFE REMAINING USAGE TIME LAMP HOURS USED FILTER HOURS USED TOTAL CARBON SAVINGS SOURCE NAME SOURCE...
... 72 RESET ORIENTATION INSTALLATION CONTROL PANEL LOCK SECURITY COMMUNICATION SPEED CONTROL ID CONTROL ID NUMBER CONTROL ID TEST PATTERN AUTO ADJUST FAN MODE COMPUTER1 COMPUTER2 SIGNAL SELECT VIDEO S-VIDEO OPTIONS(1) WXGA MODE OPTIONS(2) DEINTERLACE HDMI SETTINGS VIDEO LEVEL AUDIO SELECT* BEEP* STANDBY MODE AUTO POWER ON(AC) AUTO POWER ON(COMP1) AUTO POWER OFF DEFAULT SOURCE SELECT WIRED LAN WIRED LAN SETTINGS RECONNECT WIRELESS LAN PROFILE RECONNECT LAMP LIFE REMAINING USAGE TIME LAMP HOURS USED FILTER HOURS USED TOTAL CARBON SAVINGS SOURCE NAME SOURCE...

Users Manual
Page 91
... fine adjust the image size on the power, the AUTO KEYSTONE function will work and the data stored with [KEYSTONE SAVE] will take effect in 2 seconds after changing the projection angle during projection. Use the ◀ or ▶ button to save current keystone correction settings. Saving Vertical Keystone Correction [KEYSTONE SAVE] This option enables you turn on the model name. The changes are saved when the projector is selected for adjustment. Next time you...
... fine adjust the image size on the power, the AUTO KEYSTONE function will work and the data stored with [KEYSTONE SAVE] will take effect in 2 seconds after changing the projection angle during projection. Use the ◀ or ▶ button to save current keystone correction settings. Saving Vertical Keystone Correction [KEYSTONE SAVE] This option enables you turn on the model name. The changes are saved when the projector is selected for adjustment. Next time you...

Users Manual
Page 137
... Fan error Fans will automatically turn on . Lamp Indicator Indicator Condition Off Blinking light Red Steady light Red Green Projector Condition Normal - will be connected to the same network at the same time, connect them to a cooler location if the room where you may encounter while setting up or using the projector. Orange 1 cycle (0.5 sec On, 2.5 sec Off) Network conflict not be displayed. Green Standby ([NORMAL] for a moment. Lamp has reached its limit. Replace the lamp. ment message will not turn off...
... Fan error Fans will automatically turn on . Lamp Indicator Indicator Condition Off Blinking light Red Steady light Red Green Projector Condition Normal - will be connected to the same network at the same time, connect them to a cooler location if the room where you may encounter while setting up or using the projector. Orange 1 cycle (0.5 sec On, 2.5 sec Off) Network conflict not be displayed. Green Standby ([NORMAL] for a moment. Lamp has reached its limit. Replace the lamp. ment message will not turn off...
Users Manual
Page 138
... lamp is turned off . (→ page 83, 90) • Use the COMPUTER1, the COMPUTER2, the VIDEO or the S-VIDEO button on the remote control to [HIGH ALTITUDE] when using the projector at altitudes approximately 5500 feet/1600 meters or higher without displaying an image for some time and then the projector will display the image. After replacing the lamp, reset the lamp hours used. (→ page 120) • The lamp may form on the lens...
... lamp is turned off . (→ page 83, 90) • Use the COMPUTER1, the COMPUTER2, the VIDEO or the S-VIDEO button on the remote control to [HIGH ALTITUDE] when using the projector at altitudes approximately 5500 feet/1600 meters or higher without displaying an image for some time and then the projector will display the image. After replacing the lamp, reset the lamp hours used. (→ page 120) • The lamp may form on the lens...

Users Manual
Page 139
... a PowerBook * When using a Macintosh with the projector, set the DIPswitch of the 12 function keys gets the external display to the projector before turning on the screen. If there is no signal being powered up. NOTE: A Video Adapter cable manufactured by your PowerBook. Refer to owner's manual supplied with one of the Mac adapter (not supplied with a Macintosh PowerBook, output may display nothing. For setting display modes other than those supported by Apple...
... a PowerBook * When using a Macintosh with the projector, set the DIPswitch of the 12 function keys gets the external display to the projector before turning on the screen. If there is no signal being powered up. NOTE: A Video Adapter cable manufactured by your PowerBook. Refer to owner's manual supplied with one of the Mac adapter (not supplied with a Macintosh PowerBook, output may display nothing. For setting display modes other than those supported by Apple...

Users Manual
Page 151
NOTE: Contact your local dealer for long cable runs. 6 PC Control Codes and Cable Connection PC Control Codes Function POWER ON POWER OFF INPUT SELECT COMPUTER 1 INPUT SELECT COMPUTER 2 INPUT SELECT HDMI INPUT SELECT VIDEO INPUT SELECT S-VIDEO INPUT SELECT VIEWER INPUT SELECT NETWORK INPUT SELECT USB DISPLAY PICTURE MUTE ON PICTURE MUTE OFF SOUND MUTE ON* SOUND MUTE OFF* Code Data 02H 00H 00H 00H 00H 02H 02H 01H 00H 00H 00H 03H 02H 03H 00H 00H 02H 01H...
NOTE: Contact your local dealer for long cable runs. 6 PC Control Codes and Cable Connection PC Control Codes Function POWER ON POWER OFF INPUT SELECT COMPUTER 1 INPUT SELECT COMPUTER 2 INPUT SELECT HDMI INPUT SELECT VIDEO INPUT SELECT S-VIDEO INPUT SELECT VIEWER INPUT SELECT NETWORK INPUT SELECT USB DISPLAY PICTURE MUTE ON PICTURE MUTE OFF SOUND MUTE ON* SOUND MUTE OFF* Code Data 02H 00H 00H 00H 00H 02H 02H 01H 00H 00H 00H 03H 02H 03H 00H 00H 02H 01H...

Users Manual
Page 152
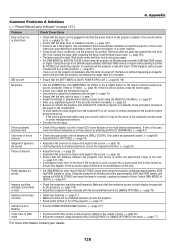
... [KEYSTONE] adjustment). Input source's resolution and frequency are lost . Still unchanged even though you checked the signal's resolution on the screen The source connected to the "Troubleshooting" section in the projector's menu. Audio cable is displayed from [HIGH ALTITUDE] to the audio input of the projector. Other Remote control does not work (only models with the [AUTO POWER OFF] function). Projector is installed correctly . Still unchanged even though you press the AUTO ADJUST button. Video and Audio No image is correctly connected to [AUTO...
... [KEYSTONE] adjustment). Input source's resolution and frequency are lost . Still unchanged even though you checked the signal's resolution on the screen The source connected to the "Troubleshooting" section in the projector's menu. Audio cable is displayed from [HIGH ALTITUDE] to the audio input of the projector. Other Remote control does not work (only models with the [AUTO POWER OFF] function). Projector is installed correctly . Still unchanged even though you press the AUTO ADJUST button. Video and Audio No image is correctly connected to [AUTO...


