
User Manual
Page 1
NEC Multimedia Theatre MultiSync® MT1035™ LCD Projector User's Manual NEC Technologies NEC Multimedia Theatre NEC Technologies, Inc. 1250 N. Arlington Heights Road,Suite 500 Itasca, Illinois 60143-1248 Part No. 78409631 Printed in Japan
NEC Multimedia Theatre MultiSync® MT1035™ LCD Projector User's Manual NEC Technologies NEC Multimedia Theatre NEC Technologies, Inc. 1250 N. Arlington Heights Road,Suite 500 Itasca, Illinois 60143-1248 Part No. 78409631 Printed in Japan

User Manual
Page 2
... voltage within the unit may cause harmful interference to radio communications. The information should be read this manual carefully before using your NEC MultiSync MT1035 LCD Projector and keep the manual handy for a Class A digital device, pursuant to correct the interference at their own expense. 2... cause electrical shock. This equipment has been tested and found to comply with this government regulation could void your MultiSync MT1035 . These limits are designed to remove the plug from power outlet. IMPORTANT INFORMATION 1 Precautions Please read carefully to...
... voltage within the unit may cause harmful interference to radio communications. The information should be read this manual carefully before using your NEC MultiSync MT1035 LCD Projector and keep the manual handy for a Class A digital device, pursuant to correct the interference at their own expense. 2... cause electrical shock. This equipment has been tested and found to comply with this government regulation could void your MultiSync MT1035 . These limits are designed to remove the plug from power outlet. IMPORTANT INFORMATION 1 Precautions Please read carefully to...
User Manual
Page 9
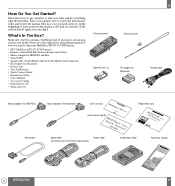
... pieces are missing, contact your box contains everything right the first time. Take a few minutes now to take your MultiSync MT1035 LCD Projector. • NEC MultiSync MT1035 LCD Projector • Remote Control With Built-In Laser Pointer And Cables • Mouse Adapter for IBM PS/2 and Mac ... for Macintosh 15 Remote cable Mouse adapter (For IBM PS/2) Serial cable Mouse adapter (For Macintosh) User's manual MultiSync MT1035 Quick connect guide QMuiGucluktiidSCyeonncneLcTt80 Registration card MLCuDltiPSryonjeccMtoTrSeries Signal cable (15-Pin Mini D-Sub To 15-Pin Mini D-Sub ...
... pieces are missing, contact your box contains everything right the first time. Take a few minutes now to take your MultiSync MT1035 LCD Projector. • NEC MultiSync MT1035 LCD Projector • Remote Control With Built-In Laser Pointer And Cables • Mouse Adapter for IBM PS/2 and Mac ... for Macintosh 15 Remote cable Mouse adapter (For IBM PS/2) Serial cable Mouse adapter (For Macintosh) User's manual MultiSync MT1035 Quick connect guide QMuiGucluktiidSCyeonncneLcTt80 Registration card MLCuDltiPSryonjeccMtoTrSeries Signal cable (15-Pin Mini D-Sub To 15-Pin Mini D-Sub ...
User Manual
Page 25
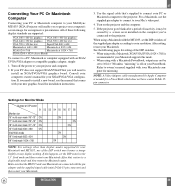
... Your PC Or Macintosh Computer Connecting your PC or Macintosh computer to your MultiSync MT1035 (XGA) Projector will need to install a new board, see the manual that comes with an XGA/ SVGA /VGA adapter or compatible graphics adapter, simply: 1. When using with the MT1035, set to 1024ן768 unless "mirroring" is recommended if your...
... Your PC Or Macintosh Computer Connecting your PC or Macintosh computer to your MultiSync MT1035 (XGA) Projector will need to install a new board, see the manual that comes with an XGA/ SVGA /VGA adapter or compatible graphics adapter, simply: 1. When using with the MT1035, set to 1024ן768 unless "mirroring" is recommended if your...

User Manual
Page 26
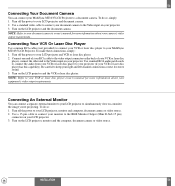
... about your computer's video output requirements and any special identification or configuring your projector's image and monitor may require. 49 → → → Examples... mode ON ON 12345678 12345678 VGA/SVGA mode ON 12345678 NOTE: Refer to your computer's owner's manual for Macintosh Adapter Macintosh models applied Setting Mode (Fixed resolution) Setting required to 17" multi-scan...VGA/SVGA (800ן600) 800ן600 LCD panel PowerBook with 640ן480 LCD panel 13" fixed mode (output is 640ן480) Set...
... about your computer's video output requirements and any special identification or configuring your projector's image and monitor may require. 49 → → → Examples... mode ON ON 12345678 12345678 VGA/SVGA mode ON 12345678 NOTE: Refer to your computer's owner's manual for Macintosh Adapter Macintosh models applied Setting Mode (Fixed resolution) Setting required to 17" multi-scan...VGA/SVGA (800ן600) 800ן600 LCD panel PowerBook with 640ן480 LCD panel 13" fixed mode (output is 640ן480) Set...
User Manual
Page 28
...connect the other end to the Video input on the LCD projector and the document camera. Turn on your LCD projector. 3. NOTE: Refer to your VCR or laser disc player owner's manual for more information about your MultiSync MT1035 LCD Projector to your right and left channel connections correct for more ... standard RCA audio patch cords to connect the audio from your VCR or laser disc player to your projector (if your MultiSync MT1035 LCD Projector. Turn off the power to your LCD projector and VCR or laser disc player. 2. 53 Connecting Your Document Camera You can connect a separate, ...
...connect the other end to the Video input on the LCD projector and the document camera. Turn on your LCD projector. 3. NOTE: Refer to your VCR or laser disc player owner's manual for more information about your MultiSync MT1035 LCD Projector to your right and left channel connections correct for more ... standard RCA audio patch cords to connect the audio from your VCR or laser disc player to your projector (if your MultiSync MT1035 LCD Projector. Turn off the power to your LCD projector and VCR or laser disc player. 2. 53 Connecting Your Document Camera You can connect a separate, ...

User Manual
Page 34
... "Horizontal Position", "Vertical Position", "Picture Adjustment", "Fine Picture" and "Resolution" manually. This adjustment is made automatically when the Auto mode is turned on . Horizontal Position...you connect your image appears to be necessary when you are made automatically when the Auto mode is selected, the LCD projector automatically determines the best resolution for each color (RGB) is turned on . Contrast for the current RGB input ....) Use the Mouse pad (+) and (-) buttons to project an image using NEC's AccuBlend Intelligent Pixel Blending Technology.
... "Horizontal Position", "Vertical Position", "Picture Adjustment", "Fine Picture" and "Resolution" manually. This adjustment is made automatically when the Auto mode is turned on . Horizontal Position...you connect your image appears to be necessary when you are made automatically when the Auto mode is selected, the LCD projector automatically determines the best resolution for each color (RGB) is turned on . Contrast for the current RGB input ....) Use the Mouse pad (+) and (-) buttons to project an image using NEC's AccuBlend Intelligent Pixel Blending Technology.

User Manual
Page 36
... a flash memory card is inserted into the slot of the data in the flash memory card or damage to select composite video standards M_NTSC manually. NOTE: Be sure not to display a black or blue screen when no signal is displayed. Background Use this feature to turn off the... being displayed. Use the Mouse pad (+) or (-) buttons to select from a source that the Capture feature is selected, press "Enter" on the projector cabinet or Left Click button on your remote control to access the submenu you to the card itself. Reset Changes all adjustments to display "Execute...
... a flash memory card is inserted into the slot of the data in the flash memory card or damage to select composite video standards M_NTSC manually. NOTE: Be sure not to display a black or blue screen when no signal is displayed. Background Use this feature to turn off the... being displayed. Use the Mouse pad (+) or (-) buttons to select from a source that the Capture feature is selected, press "Enter" on the projector cabinet or Left Click button on your remote control to access the submenu you to the card itself. Reset Changes all adjustments to display "Execute...

User Manual
Page 37
... Secure the board in step 2. 37 72 Set the LCD projector on end with the carrying handle up on the LCD projector, you must first install the optional MT Viewer board (VK-MT) in the original position. 5. See the user's manual included with a flat-head screwdriver until the board is ...securely fitted. 6. Using the Viewer function If you use the Viewer function on the catch of the cover with the VK-MT for installing and uninstalling the software. Be sure to unplug the LCD projector before installing the...
... Secure the board in step 2. 37 72 Set the LCD projector on end with the carrying handle up on the LCD projector, you must first install the optional MT Viewer board (VK-MT) in the original position. 5. See the user's manual included with a flat-head screwdriver until the board is ...securely fitted. 6. Using the Viewer function If you use the Viewer function on the catch of the cover with the VK-MT for installing and uninstalling the software. Be sure to unplug the LCD projector before installing the...

User Manual
Page 38
... a flash memory card into the PC card slot. * To eject the flash memory card, press the Eject button. Never use in the card slot, the LCD projector displays a blue back or black back image. 3. Doing so can break the slot or ruin the PC card. on the remote control to move the... be displayed. Multi Cursor 1File 2File 3File 4File 5File 6File 7File 8File * The first slide contained in only one orientation. See the flash memory card manual for use other types of PC card than this. and select "PC CARD" from , then select "Start" and press the Enter button on the cabinet...
... a flash memory card into the PC card slot. * To eject the flash memory card, press the Eject button. Never use in the card slot, the LCD projector displays a blue back or black back image. 3. Doing so can break the slot or ruin the PC card. on the remote control to move the... be displayed. Multi Cursor 1File 2File 3File 4File 5File 6File 7File 8File * The first slide contained in only one orientation. See the flash memory card manual for use other types of PC card than this. and select "PC CARD" from , then select "Start" and press the Enter button on the cabinet...


