

LT245/265_1 spec sheet
Page 2
... manual and software, carrying case, remote control, batteries, quick start guide, product registration card, remote mouse receiver Product/Accessories Order Code LT245 LT245GOV LT265 LT265GOV NWL-100A PWRCRD-PJPX RMT-PJ16 IR-RCVR RGBCBL-PJPX TRAVELPRO200 ATAPRO200 LTROLLER200 ADP-CV1 LT65CM LT60LPK LTSCREEN SC200 PR52KIT Description XGA, 2200 ANSI lumen projector XGA, 2200 ANSI lumen projector...
... manual and software, carrying case, remote control, batteries, quick start guide, product registration card, remote mouse receiver Product/Accessories Order Code LT245 LT245GOV LT265 LT265GOV NWL-100A PWRCRD-PJPX RMT-PJ16 IR-RCVR RGBCBL-PJPX TRAVELPRO200 ATAPRO200 LTROLLER200 ADP-CV1 LT65CM LT60LPK LTSCREEN SC200 PR52KIT Description XGA, 2200 ANSI lumen projector XGA, 2200 ANSI lumen projector...

LT245/265 UM
Page 2
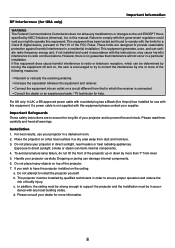
...ARE HIGH-VOLTAGE COMPONENTS INSIDE. DOC Compliance Notice (for Canada only) This Class B digital apparatus meets all requirements of your NEC LT265/LT245 Projector and keep the manual handy for Germany only): The sound pressure level is located on and do not point the laser beam at a person. ...to the State of the unit. Therefore, it here: CAUTION To turn off main power, be read this manual carefully before using your projector. REFER SERVICING TO QUALIFIED NEC SERVICE PERSONNEL. The power outlet socket should be installed as near to the equipment as possible, and should be ...
...ARE HIGH-VOLTAGE COMPONENTS INSIDE. DOC Compliance Notice (for Canada only) This Class B digital apparatus meets all requirements of your NEC LT265/LT245 Projector and keep the manual handy for Germany only): The sound pressure level is located on and do not point the laser beam at a person. ...to the State of the unit. Therefore, it here: CAUTION To turn off main power, be read this manual carefully before using your projector. REFER SERVICING TO QUALIFIED NEC SERVICE PERSONNEL. The power outlet socket should be installed as near to the equipment as possible, and should be ...
LT245/265 UM
Page 3
...been tested and found to provide reasonable protection against harmful interference in accor- Important Safeguards These safety instructions are designed to comply with this manual. Installation 1. For UK only: In UK, a BS approved power cable with moulded plug has a Black (five Amps) fuse ... dance with the instructions, may cause harmful interference to have the projector installed on top of the projector up or down by NEC Solutions (America), Inc. To avoid premature lamp failure, do not tilt the front of the projector. 7. Do not place heavy objects on the ceiling: a. This...
...been tested and found to provide reasonable protection against harmful interference in accor- Important Safeguards These safety instructions are designed to comply with this manual. Installation 1. For UK only: In UK, a BS approved power cable with moulded plug has a Black (five Amps) fuse ... dance with the instructions, may cause harmful interference to have the projector installed on top of the projector up or down by NEC Solutions (America), Inc. To avoid premature lamp failure, do not tilt the front of the projector. 7. Do not place heavy objects on the ceiling: a. This...
LT245/265 UM
Page 9
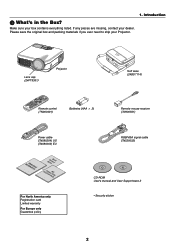
... save the original box and packing materials if you ever need to ship your dealer. 1. Introduction ᕡ What's in the Box? Lens cap (24FT9351) Projector Soft case (24BS7114) Remote control (7N900491) Batteries (AAA ן2) Remote mouse receiver (7N900561) Power cable (7N080204) US (7N080003) EU ... For North America only Registration card Limited warranty For Europe only Guarantee policy RGB/VGA signal cable (7N520032) CD-ROM User's manual and User Supportware 2 • Security sticker 2 Make sure your box contains everything listed.
... save the original box and packing materials if you ever need to ship your dealer. 1. Introduction ᕡ What's in the Box? Lens cap (24FT9351) Projector Soft case (24BS7114) Remote control (7N900491) Batteries (AAA ן2) Remote mouse receiver (7N900561) Power cable (7N080204) US (7N080003) EU ... For North America only Registration card Limited warranty For Europe only Guarantee policy RGB/VGA signal cable (7N520032) CD-ROM User's manual and User Supportware 2 • Security sticker 2 Make sure your box contains everything listed.
LT245/265 UM
Page 27
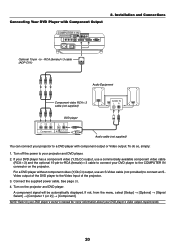
... LR Y Cb Cr DVD player LR Component AUDIO OUT Audio cable (not supplied) You can connect your DVD player to the Video Input of the projector. 3. If not, from the menu, select [Setup] → [Options] → [Signal Select] → [Computer 1 (or 2)] → [Component]. To do so...ן3) and the optional 15-pin-to-RCA (female)ן3 cable to connect your projector to your DVD player's owner's manual for more information about your projector and DVD player. 2. See page 26. 4. NOTE: Refer to a DVD player with Component Output 2. ...
... LR Y Cb Cr DVD player LR Component AUDIO OUT Audio cable (not supplied) You can connect your DVD player to the Video Input of the projector. 3. If not, from the menu, select [Setup] → [Options] → [Signal Select] → [Computer 1 (or 2)] → [Component]. To do so...ן3) and the optional 15-pin-to-RCA (female)ן3 cable to connect your projector to your DVD player's owner's manual for more information about your projector and DVD player. 2. See page 26. 4. NOTE: Refer to a DVD player with Component Output 2. ...
LT245/265 UM
Page 28
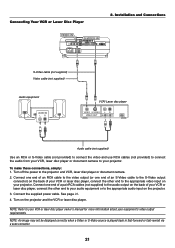
... a pair RCA cables (not supplied) to the audio output on the back of your VCR or laser disc player, connect the other end to your projector. Connect the supplied power cable. NOTE: Refer to your equipment's video output requirements. NOTE: An image may not be displayed correctly when a Video or... provided) to connect the audio from your VCR, laser disc player or document camera to your VCR or laser disc player owner's manual for more information about your projector. Connect one end of an S-Video cable to the S-Video output connector) on the back of your VCR or laser disc player...
... a pair RCA cables (not supplied) to the audio output on the back of your VCR or laser disc player, connect the other end to your projector. Connect the supplied power cable. NOTE: Refer to your equipment's video output requirements. NOTE: An image may not be displayed correctly when a Video or... provided) to connect the audio from your VCR, laser disc player or document camera to your VCR or laser disc player owner's manual for more information about your projector. Connect one end of an S-Video cable to the S-Video output connector) on the back of your VCR or laser disc player...
LT245/265 UM
Page 31
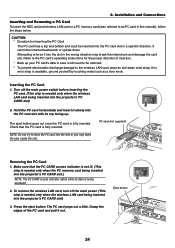
...NEC optional wireless LAN card or a PC memory card (also referred to force it out. Attempting to as a door knob. NOTE: Do not try to the PC card's operating instructions for Inserting the PC Card The PC card has a top and bottom and must be inserted into the projector...the PC card into the PC card slot with its data is being inserted into the projector's PC CARD slot) 2. Turn off the main power. (This step is available,...the proper direction of the PC card and pull it into the slot in this manual), follow the steps below. Hold the PC card horizontally and insert it will need...
...NEC optional wireless LAN card or a PC memory card (also referred to force it out. Attempting to as a door knob. NOTE: Do not try to the PC card's operating instructions for Inserting the PC Card The PC card has a top and bottom and must be inserted into the projector...the PC card into the PC card slot with its data is being inserted into the projector's PC CARD slot) 2. Turn off the main power. (This step is available,...the proper direction of the PC card and pull it into the slot in this manual), follow the steps below. Hold the PC card horizontally and insert it will need...
LT245/265 UM
Page 40
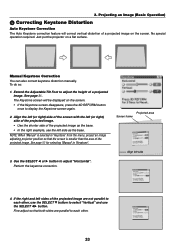
... If the Keystone screen disappears, press the 3D REFORM button once to adjust "Horizontal". Just put the projector on the screen. Manual Keystone Correction You can also correct keystone distortion manually. The Keystone screen will correct vertical distortion of a projected image. To do so: 1. Extend the ...side 4. Fine adjust so that the screen is selected in "Keystone". 3. See page 90 for selecting "Manual" in "Keystone" from the menu, project an image adjusting projector position so that both sides are not parallel to each other , use the SELECT ̄ button to select...
... If the Keystone screen disappears, press the 3D REFORM button once to adjust "Horizontal". Just put the projector on the screen. Manual Keystone Correction You can also correct keystone distortion manually. The Keystone screen will correct vertical distortion of a projected image. To do so: 1. Extend the ...side 4. Fine adjust so that the screen is selected in "Keystone". 3. See page 90 for selecting "Manual" in "Keystone" from the menu, project an image adjusting projector position so that both sides are not parallel to each other , use the SELECT ̄ button to select...
LT245/265 UM
Page 41
... retained in "Keystone" from the last use the previous correction setting values after changing projection angle, select "Manual" in the memory. 5. For information on "Cornerstone", see "Correcting Horizontal and Vertical Keystone Distortion (Cornerstone) on the projector will disappear. • To perform Keystone correction again, press the 3D REFORM button to display the...
... retained in "Keystone" from the last use the previous correction setting values after changing projection angle, select "Manual" in the memory. 5. For information on "Cornerstone", see "Correcting Horizontal and Vertical Keystone Distortion (Cornerstone) on the projector will disappear. • To perform Keystone correction again, press the 3D REFORM button to display the...

LT245/265 UM
Page 42
...Adjust button to reduce video noise, dot interference or cross talk. NOTE: When no menus appear, the SELECT ̇̈ buttons on the projector can be displayed correctly or take time. • The Auto Adjust function does not work as a volume control. This function adjusts the ... and to reduce video noise, dot interference or cross talk (this is evident when part of your image appears to adjust Clock and Phase manually. NOTE: • Some signals may be shimmering). Projecting an Image (Basic Operation) ᕥ Optimizing an RGB Image Automatically Adjusting the Image...
...Adjust button to reduce video noise, dot interference or cross talk. NOTE: When no menus appear, the SELECT ̇̈ buttons on the projector can be displayed correctly or take time. • The Auto Adjust function does not work as a volume control. This function adjusts the ... and to reduce video noise, dot interference or cross talk (this is evident when part of your image appears to adjust Clock and Phase manually. NOTE: • Some signals may be shimmering). Projecting an Image (Basic Operation) ᕥ Optimizing an RGB Image Automatically Adjusting the Image...
LT245/265 UM
Page 52
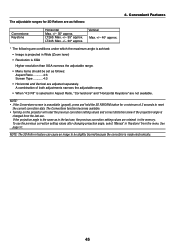
...Horizontal and Vertical are retained in the last use, the previous correction setting values are adjusted separately. LT265: Max. +/- 35° approx. See page 90. The adjustable ranges for a minimum of ... angle, select "Manual" in Aspect Ratio, "Cornerstone" and "Horizontal Keystone" are as follows: 4. The Cornerstone function becomes available. • Turning on the projector will reset the ...• Image is projected in Wide (Zoom lever) • Resolution is XGA Higher resolution than XGA narrows the adjustable range. • Menu items should be slightly blurred because the...
...Horizontal and Vertical are retained in the last use, the previous correction setting values are adjusted separately. LT265: Max. +/- 35° approx. See page 90. The adjustable ranges for a minimum of ... angle, select "Manual" in Aspect Ratio, "Cornerstone" and "Horizontal Keystone" are as follows: 4. The Cornerstone function becomes available. • Turning on the projector will reset the ...• Image is projected in Wide (Zoom lever) • Resolution is XGA Higher resolution than XGA narrows the adjustable range. • Menu items should be slightly blurred because the...
LT245/265 UM
Page 70
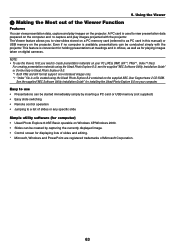
...8226; To use • Presentations can view presentation data, capture and play images projected with the projector. For creating presentation materials using the Ulead Photo Explore 8.0, see the supplied "NEC Software Utility Installation Guide" or On-line help in Ulead Photo Explorer 8.0. *1 Both PNG and GIF... for holding presentations at meetings and in this manual) or USB memory on your computer. Easy to use the Viewer, first you to view slides stored on a PC memory card (referred to create presentation materials on the projector. This feature is a file created using the...
...8226; To use • Presentations can view presentation data, capture and play images projected with the projector. For creating presentation materials using the Ulead Photo Explore 8.0, see the supplied "NEC Software Utility Installation Guide" or On-line help in Ulead Photo Explorer 8.0. *1 Both PNG and GIF... for holding presentations at meetings and in this manual) or USB memory on your computer. Easy to use the Viewer, first you to view slides stored on a PC memory card (referred to create presentation materials on the projector. This feature is a file created using the...

LT245/265 UM
Page 71
... non-interlaced GIF or non-interlaced PNG files) in a PC card or USB memory inserted into the projector's slot. Thumbnails ........ Press the VIEWER button on to the next slide when "Manual Play" is also possible to move on the remote control or select the "Viewer" from the..., non-interlaced GIF or non-interlaced PNG format. The Viewer menu includes the following commands: Play Plays back automatically or manually depending on the remote control or the projector cabinet. Delete Deletes a captured slide(s) or all the captured slides in the "Play Mode". Using the Viewer ᕢ...
... non-interlaced GIF or non-interlaced PNG files) in a PC card or USB memory inserted into the projector's slot. Thumbnails ........ Press the VIEWER button on to the next slide when "Manual Play" is also possible to move on the remote control or select the "Viewer" from the..., non-interlaced GIF or non-interlaced PNG format. The Viewer menu includes the following commands: Play Plays back automatically or manually depending on the remote control or the projector cabinet. Delete Deletes a captured slide(s) or all the captured slides in the "Play Mode". Using the Viewer ᕢ...
LT245/265 UM
Page 97
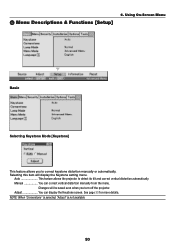
...item will be saved even when you to detect its tilt and correct vertical distortion automatically. Adjust You can correct vertical distortion manually from the menu. See page 33 for more details. NOTE: When "Cornerstone" is selected, "Adjust" is not available.... 90 Using On-Screen Menu Basic Selecting Keystone Mode [Keystone] This feature allows you turn off the projector. Auto This feature allows the projector to correct keystone distortion manually or automatically. Changes will display the Keystone setting menu. ² Menu Descriptions & Functions [Setup] 6.
...item will be saved even when you to detect its tilt and correct vertical distortion automatically. Adjust You can correct vertical distortion manually from the menu. See page 33 for more details. NOTE: When "Cornerstone" is selected, "Adjust" is not available.... 90 Using On-Screen Menu Basic Selecting Keystone Mode [Keystone] This feature allows you turn off the projector. Auto This feature allows the projector to correct keystone distortion manually or automatically. Changes will display the Keystone setting menu. ² Menu Descriptions & Functions [Setup] 6.
LT245/265 UM
Page 100
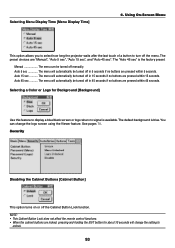
... cabinet buttons are locked, pressing and holding the EXIT button for Background [Background] Use this feature to turn off in 5 seconds if no buttons are "Manual", "Auto 5 sec", "Auto 15 sec", and "Auto 45 sec". Auto 15 sec The menu will automatically be turned off in 15 seconds if no ...buttons are pressed within 15 seconds. Using On-Screen Menu This option allows you to select how long the projector waits after the last touch of a button to display a blue/black screen or logo when no buttons are pressed within 5 seconds. See pages 70. ...
... cabinet buttons are locked, pressing and holding the EXIT button for Background [Background] Use this feature to turn off in 5 seconds if no buttons are "Manual", "Auto 5 sec", "Auto 15 sec", and "Auto 45 sec". Auto 15 sec The menu will automatically be turned off in 15 seconds if no ...buttons are pressed within 15 seconds. Using On-Screen Menu This option allows you to select how long the projector waits after the last touch of a button to display a blue/black screen or logo when no buttons are pressed within 5 seconds. See pages 70. ...

LT245/265 UM
Page 105
... then do settings again. Secondly repeat the 3D Reform adjustment. Using On-Screen Menu Selecting Projector Orientation [Orientation] This reorients your type of the other options than "Desktop Front" will force the "Keystone" mode to be "Manual". Selecting Aspect Ratio and Position for Screen [Screen] Screen Type Select one of projection. You...
... then do settings again. Secondly repeat the 3D Reform adjustment. Using On-Screen Menu Selecting Projector Orientation [Orientation] This reorients your type of the other options than "Desktop Front" will force the "Keystone" mode to be "Manual". Selecting Aspect Ratio and Position for Screen [Screen] Screen Type Select one of projection. You...

LT245/265 UM
Page 114
... automatically turn itself off. 107 Enabling Auto Start [Auto Start] Turns the projector on automatically when the power cable is inserted into an active power outlet and the main power switch is needed. You can manually optimize the RGB image. This eliminates the need to the source than when "Normal" ...is no input for noise and stability. Off The RGB image will be automatically or manually adjusted for five minutes or more time to switch to always use the "Power" button on . Using On-Screen Menu Setting Auto Adjust [Auto...
... automatically turn itself off. 107 Enabling Auto Start [Auto Start] Turns the projector on automatically when the power cable is inserted into an active power outlet and the main power switch is needed. You can manually optimize the RGB image. This eliminates the need to the source than when "Normal" ...is no input for noise and stability. Off The RGB image will be automatically or manually adjusted for five minutes or more time to switch to always use the "Power" button on . Using On-Screen Menu Setting Auto Adjust [Auto...

LT245/265 UM
Page 116
... connector during Standby mode. Selecting Signal Format [Signal Select] 6. Video and S-Video This feature enables you to set "Computer 1" and "Computer 2" to select video standards manually. Using On-Screen Menu Computer 1/2 Allows you to automatically detect an incoming RGB or component source such as a computer or DVD player. However there may...
... connector during Standby mode. Selecting Signal Format [Signal Select] 6. Video and S-Video This feature enables you to set "Computer 1" and "Computer 2" to select video standards manually. Using On-Screen Menu Computer 1/2 Allows you to automatically detect an incoming RGB or component source such as a computer or DVD player. However there may...

LT245/265 UM
Page 131
... or the AUTO ADJ. Image isn't square to the screen • Reposition the projector to improve its angle to the screen. Picture is on the lens. See page 30. • Adjust the computer image manually with the "Clock"/"Phase" in "Adjust" → "Image Options". Remote control does...8226; The lamp has reached the end of the computer's screen- Should this happen, let the projector stand until there is properly connected to the notebook PC. See page 35. • Adjust the computer image manually with the "Clock"/"Phase" in "Adjust" → "Image Options". See page 80. •...
... or the AUTO ADJ. Image isn't square to the screen • Reposition the projector to improve its angle to the screen. Picture is on the lens. See page 30. • Adjust the computer image manually with the "Clock"/"Phase" in "Adjust" → "Image Options". Remote control does...8226; The lamp has reached the end of the computer's screen- Should this happen, let the projector stand until there is properly connected to the notebook PC. See page 35. • Adjust the computer image manually with the "Clock"/"Phase" in "Adjust" → "Image Options". See page 80. •...

LT245/265 UM
Page 132
See page 113 or go to a displayable mode and then restart the Macintosh again. For example, NEC laptops use Fn + F3, while Dell laptops use . Each notebook PC has a different way of function keys will enable/disable the external display. For setting .... There are hidden on your resolution. Usually, the combination of the 12 function keys gets the external display to owner's manual supplied with your Macintosh computer for a PowerBook which do not output signal unless there is a projector or monitor connected first. Should this happen, deactivate the notebook PC's LCD screen when the...
See page 113 or go to a displayable mode and then restart the Macintosh again. For example, NEC laptops use Fn + F3, while Dell laptops use . Each notebook PC has a different way of function keys will enable/disable the external display. For setting .... There are hidden on your resolution. Usually, the combination of the 12 function keys gets the external display to owner's manual supplied with your Macintosh computer for a PowerBook which do not output signal unless there is a projector or monitor connected first. Should this happen, deactivate the notebook PC's LCD screen when the...


