

GT2150
Page 1
LCD Projector GT2150 User's Manual
LCD Projector GT2150 User's Manual
GT2150
Page 3
FOCUS ZOOM LEFT DOWN LENS SHIFT UP RIGHT SELECT MENU ENTER LAMP CANCEL STATUS POWER ADAJUUSTOT ON/STAND BY SOURCE LCD Projector GT2150 User's Manual
FOCUS ZOOM LEFT DOWN LENS SHIFT UP RIGHT SELECT MENU ENTER LAMP CANCEL STATUS POWER ADAJUUSTOT ON/STAND BY SOURCE LCD Projector GT2150 User's Manual

GT2150
Page 4
... OPEN THE CABINET. This equipment has been tested and found to comply with the limits for use with this manual carefully before using your GT2150. These limits are registered trademarks of Apple Computer, Inc. • Other product and company names mentioned in this user's manual may be... The sound pressure level is less than 70 dB (A) according to ISO 3744 or ISO 7779. • IBM is a registered trademark of your NEC GT2150 Projector and keep the manual handy for help. NO USER-SERVICEABLE PARTS INSIDE. Therefore, it here: CAUTION To turn off and on a circuit different from...
... OPEN THE CABINET. This equipment has been tested and found to comply with the limits for use with this manual carefully before using your GT2150. These limits are registered trademarks of Apple Computer, Inc. • Other product and company names mentioned in this user's manual may be... The sound pressure level is less than 70 dB (A) according to ISO 3744 or ISO 7779. • IBM is a registered trademark of your NEC GT2150 Projector and keep the manual handy for help. NO USER-SERVICEABLE PARTS INSIDE. Therefore, it here: CAUTION To turn off and on a circuit different from...

GT2150
Page 6
...." ternal components. 6. Do not attempt to cool the projector before replacing the lamp. To Dealer or Installer: To prevent the projector from falling, install it in a place and fasten it immediately and have the object removed by a qualified NEC service personnel. 3. Power Supply 1. A damaged cord can... the power cable and allow 60 minutes to install the projector yourself. If you continue to use your projector. appears. This message will be scattered in the lamp case. Installation 1. Do not place your NEC dealer for three minutes after the power cable is extensive,...
...." ternal components. 6. Do not attempt to cool the projector before replacing the lamp. To Dealer or Installer: To prevent the projector from falling, install it in a place and fasten it immediately and have the object removed by a qualified NEC service personnel. 3. Power Supply 1. A damaged cord can... the power cable and allow 60 minutes to install the projector yourself. If you continue to use your projector. appears. This message will be scattered in the lamp case. Installation 1. Do not place your NEC dealer for three minutes after the power cable is extensive,...
GT2150
Page 8
... cases, batteries, external cabinets, magnetic tapes, or any accessories used under the following terms. HOW LONG IS THE WARRANTY NEC Solutions' GT2150 projectors are cautioned that the product condition is not purchased, installed, and operated in excess of third party components. WHAT... NEC SOLUTIONS WILL PAY FOR NEC Solutions will pay labor and material expenses for covered items, but NEC Solutions will not pay for the following are ...
... cases, batteries, external cabinets, magnetic tapes, or any accessories used under the following terms. HOW LONG IS THE WARRANTY NEC Solutions' GT2150 projectors are cautioned that the product condition is not purchased, installed, and operated in excess of third party components. WHAT... NEC SOLUTIONS WILL PAY FOR NEC Solutions will pay labor and material expenses for covered items, but NEC Solutions will not pay for the following are ...

GT2150
Page 9
...DECLARATION OF CONFORMITY This device complies with Part 15 of Product: LCD Projector Equipment Classification: Class B Peripheral Models: GT2150 We hereby declare that the equipment specified above conforms to the ...following two conditions. (1) This device may not cause harmful interference, and (2) this device must accept any interference received, including interference that may cause undesired operation. U.S. Operation is subject to the technical standards as specified in the FCC Rules. No.: NEC...
...DECLARATION OF CONFORMITY This device complies with Part 15 of Product: LCD Projector Equipment Classification: Class B Peripheral Models: GT2150 We hereby declare that the equipment specified above conforms to the ...following two conditions. (1) This device may not cause harmful interference, and (2) this device must accept any interference received, including interference that may cause undesired operation. U.S. Operation is subject to the technical standards as specified in the FCC Rules. No.: NEC...

GT2150
Page 10
... Using the Remote Control in Wired Operation E-11 Signal Type E-45 2 INSTALLATION Switcher E-45 Switcher Gain E-45 Setting Up Your GT2150 Projector E-12 Switcher Volume E-45 Screen Size and Projection Distance E-12 Volume ...E-45 Lens Shift Adjustable Range E-13 Ref Adj ...E-45 ...(S8601) of the Switcher as follows E-30 Page 3 E-49 REMOTE 1 Connector E-31 Signal Select (Video 1/2 and S-Video) / Operating Multiple Projector with Remote Control E-33 Signal Select (RGB Connector) Using the PC CONTROL connectors E-34 Page 4 E-49 Auto Adjust (RGB Only)/ 5 OPERATION ...
... Using the Remote Control in Wired Operation E-11 Signal Type E-45 2 INSTALLATION Switcher E-45 Switcher Gain E-45 Setting Up Your GT2150 Projector E-12 Switcher Volume E-45 Screen Size and Projection Distance E-12 Volume ...E-45 Lens Shift Adjustable Range E-13 Ref Adj ...E-45 ...(S8601) of the Switcher as follows E-30 Page 3 E-49 REMOTE 1 Connector E-31 Signal Select (Video 1/2 and S-Video) / Operating Multiple Projector with Remote Control E-33 Signal Select (RGB Connector) Using the PC CONTROL connectors E-34 Page 4 E-49 Auto Adjust (RGB Only)/ 5 OPERATION ...
GT2150
Page 11
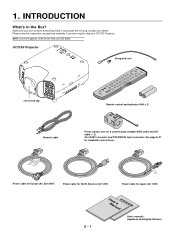
... a commercially available BNC cable and DVI cable (ן2) (For RGB1 connector and DVI DIGITAL Input connector. 1. NOTE: Lenses are missing, contact your NEC dealer. GT2150 Projector String and rivet POWER STATUS ADJAUUTSTO ON/STAND BY LAMP CANCEL SOURCE ENTER SELECT MENU LEFT DOWN LENS SHIFT UP RIGHT ZOOM FOCUS Lens hood...
... a commercially available BNC cable and DVI cable (ן2) (For RGB1 connector and DVI DIGITAL Input connector. 1. NOTE: Lenses are missing, contact your NEC dealer. GT2150 Projector String and rivet POWER STATUS ADJAUUTSTO ON/STAND BY LAMP CANCEL SOURCE ENTER SELECT MENU LEFT DOWN LENS SHIFT UP RIGHT ZOOM FOCUS Lens hood...

GT2150
Page 12
... 1 R/Cr RGB 2 G/Y VIDEO 2 L/MONO R H/HV L/MONO R S-VIDEO L/MONO B/Cb V R AUDIO OUT Remote sensor Ventilation (outlet) Built-in Security Slot ( )* Foot (four) Rotate to Know Your GT2150 Projector Lens hood POWER Controls STATUS ADJAUUTSTO ON/STAND BY LAMP CANCEL SOURCE ENTER SELECT MENU LEFT DOWN LENS SHIFT UP RIGHT ZOOM FOCUS Remote sensor...
... 1 R/Cr RGB 2 G/Y VIDEO 2 L/MONO R H/HV L/MONO R S-VIDEO L/MONO B/Cb V R AUDIO OUT Remote sensor Ventilation (outlet) Built-in Security Slot ( )* Foot (four) Rotate to Know Your GT2150 Projector Lens hood POWER Controls STATUS ADJAUUTSTO ON/STAND BY LAMP CANCEL SOURCE ENTER SELECT MENU LEFT DOWN LENS SHIFT UP RIGHT ZOOM FOCUS Remote sensor...

GT2150
Page 14
Attaching the lens hood cap to video sources are disconnected before moving the projector or when it is on. Thread the string through the hole on its side when the lamp is not in use, cover the lens with ... 1 L/MONO S-VIDEO G/Y B/Cb L/MONO R H/HV H/HV L/MONO R S-VIDEO R B/Cb V L/MONO V L/MONO R AUDIO OUT R AUDIO OUT SOURCE AUTO ADJUST ON/STAND BY Carrying the Projector Always carry your projector by the handle. EN E - 4 STATUS POWER MENU SELECT CANCEL LAMP TER RIGHT UP DOWN LEFT LENS SHIFT ZOOM FOCUS Ensure that the power cable...
Attaching the lens hood cap to video sources are disconnected before moving the projector or when it is on. Thread the string through the hole on its side when the lamp is not in use, cover the lens with ... 1 L/MONO S-VIDEO G/Y B/Cb L/MONO R H/HV H/HV L/MONO R S-VIDEO R B/Cb V L/MONO V L/MONO R AUDIO OUT R AUDIO OUT SOURCE AUTO ADJUST ON/STAND BY Carrying the Projector Always carry your projector by the handle. EN E - 4 STATUS POWER MENU SELECT CANCEL LAMP TER RIGHT UP DOWN LEFT LENS SHIFT ZOOM FOCUS Ensure that the power cable...

GT2150
Page 15
... input source will be displayed correctly or take time to the last condition while you that the lamp cover is not attached properly or the projector is in and out. 10 Focus Button Adjust the lens focus. 11. Select vwᮤ ᮣ / Volume (+) (-) Buttons vw: Use these ...this button to select a video source such as a volume control. ᮤ ᮣ: Use these buttons to turn off when the power is supplied and the projector is overheated. Some signals may not be skipped. 4. Menu Button Displays the menu. 5. A press of the ᮣ button executes the selection. 6. when...
... input source will be displayed correctly or take time to the last condition while you that the lamp cover is not attached properly or the projector is in and out. 10 Focus Button Adjust the lens focus. 11. Select vwᮤ ᮣ / Volume (+) (-) Buttons vw: Use these ...this button to select a video source such as a volume control. ᮤ ᮣ: Use these buttons to turn off when the power is supplied and the projector is overheated. Some signals may not be skipped. 4. Menu Button Displays the menu. 5. A press of the ᮣ button executes the selection. 6. when...

GT2150
Page 16
... connect Pr/Cr to the R,Y to the G and Pb/Cb to connect the DIGITAL OUTPUT connector of external equipment such as the NEC ISS-6020Switcher. When using a component with Y/Cb/Cr outputs or other RGB equipment. Cable is your right channel audio input for stereo...R H/HV L/MONO R S-VIDEO L/MONO B/Cb V R AUDIO OUT 12 5. RGB 2 Connector (Mini D-Sub 15 pin) Connect your monaural audio input. TAL input of the projector. 7 7. The L/MONO jack also serves as a VCR or laser disc player. VIDEO 2 Input Connector (RCA) Connect a VCR, DVD player, laser disc player, or document ...
... connect Pr/Cr to the R,Y to the G and Pb/Cb to connect the DIGITAL OUTPUT connector of external equipment such as the NEC ISS-6020Switcher. When using a component with Y/Cb/Cr outputs or other RGB equipment. Cable is your right channel audio input for stereo...R H/HV L/MONO R S-VIDEO L/MONO B/Cb V R AUDIO OUT 12 5. RGB 2 Connector (Mini D-Sub 15 pin) Connect your monaural audio input. TAL input of the projector. 7 7. The L/MONO jack also serves as a VCR or laser disc player. VIDEO 2 Input Connector (RCA) Connect a VCR, DVD player, laser disc player, or document ...

GT2150
Page 17
... screen controller and the screen will go down. PC CARD IN IN When the GT2150 is compatible with the GT2150 projector. NOTE: Screen Controllers are connected. 2. The optional LAN kit is required when this LCD projector: threepin type for daisy-chaining multiple projectors and operating them with the same remote control. Three types of the first...
... screen controller and the screen will go down. PC CARD IN IN When the GT2150 is compatible with the GT2150 projector. NOTE: Screen Controllers are connected. 2. The optional LAN kit is required when this LCD projector: threepin type for daisy-chaining multiple projectors and operating them with the same remote control. Three types of the first...

GT2150
Page 18
...Aspect Ratio" → "Resolution" → "Overscan" → "Video Filter" → "Blanking". Brightness" → "White Balance - IMAGE/PROJECTOR Press to display the main menu. Remote Control Features POWER OFF ON 2 1 MENU 5 - ADJUST WHITE BAL Press to display the Picture adjustment screen...in standby mode. 2. A press of a selected menu item. BS + ADDRESS ENTER 3 4 6 ADJUST IMAGE 7 8 PICTURE WHITE BAL. PROJECTOR ABC DEF GHI 123 JKL MNO PQR 456 9 STU VWX YZ/ 789 10 ,. POWER ON Press this button sequentially selects "Brightness" →...
...Aspect Ratio" → "Resolution" → "Overscan" → "Video Filter" → "Blanking". Brightness" → "White Balance - IMAGE/PROJECTOR Press to display the main menu. Remote Control Features POWER OFF ON 2 1 MENU 5 - ADJUST WHITE BAL Press to display the Picture adjustment screen...in standby mode. 2. A press of a selected menu item. BS + ADDRESS ENTER 3 4 6 ADJUST IMAGE 7 8 PICTURE WHITE BAL. PROJECTOR ABC DEF GHI 123 JKL MNO PQR 456 9 STU VWX YZ/ 789 10 ,. POWER ON Press this button sequentially selects "Brightness" →...

GT2150
Page 19
... KEYSTONE (R) Press to adjust the clock and phase. 16. CANCEL Press to restore the onscreen display. INFO Displays the "Source Information" or "Projector Information" window. Press again to exit the menu. MAGNIFY/ZOOM (+/-) Magnify the size of time. 10. Pressing this button displays a green test ...computer. 27. When the test pattern is turned off the picture for an optimal picture. 17. CTL Used in memory except the items on the projector cabinet. 27 28 + BS - While pressing and holding CTL, pressing this button allows you to turn off the main power. 20. G ...
... KEYSTONE (R) Press to adjust the clock and phase. 16. CANCEL Press to restore the onscreen display. INFO Displays the "Source Information" or "Projector Information" window. Press again to exit the menu. MAGNIFY/ZOOM (+/-) Magnify the size of time. 10. Pressing this button displays a green test ...computer. 27. When the test pattern is turned off the picture for an optimal picture. 17. CTL Used in memory except the items on the projector cabinet. 27 28 + BS - While pressing and holding CTL, pressing this button allows you to turn off the main power. 20. G ...

GT2150
Page 20
...remote sensor. Align and insert the batteries according to replace the batteries, two "AAA" type will also prevent the projector from the remote control when the remote con- NOTE: You cannot operate the projector using the remote control if: • The remote control ID is not set to [None]. • The ...remote ID is not going to splash on the remote control. Remote sensors on the projector cabinet Side View 30˚ 7m 30˚ Remote control 2. Replace the cover. Weak batteries will be used for a long period. See page E-33 ...
...remote sensor. Align and insert the batteries according to replace the batteries, two "AAA" type will also prevent the projector from the remote control when the remote con- NOTE: You cannot operate the projector using the remote control if: • The remote control ID is not set to [None]. • The ...remote ID is not going to splash on the remote control. Remote sensors on the projector cabinet Side View 30˚ 7m 30˚ Remote control 2. Replace the cover. Weak batteries will be used for a long period. See page E-33 ...
GT2150
Page 22
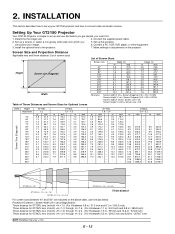
...1503;3.4 through Hן5.2 (For H between 40" and 500" not indicated on the projector. Projection Distance = Screen Width (H)ןLens Magnification Throw distance for GT10RL lens (m/inch) =H&#....1 1.9 74.8 - 2.3 90.6 2.6 102.4 - 3.5 137.8 - - - - - 2. INSTALLATION This section describes how to set up and use formulas below. E - 12 Setting Up Your GT2150 Projector Your GT2150 Projector is simple to set up your image. 6. Screen Size (Diagonal) 80" 1.6 63.0 2.1 82.7 - 2.6 102.4 2.9 114.2 - 3.9 153.5 5.5 216.5 - 8.5 334.6 84" 1.7 ...
...1503;3.4 through Hן5.2 (For H between 40" and 500" not indicated on the projector. Projection Distance = Screen Width (H)ןLens Magnification Throw distance for GT10RL lens (m/inch) =H&#....1 1.9 74.8 - 2.3 90.6 2.6 102.4 - 3.5 137.8 - - - - - 2. INSTALLATION This section describes how to set up and use formulas below. E - 12 Setting Up Your GT2150 Projector Your GT2150 Projector is simple to set up your image. 6. Screen Size (Diagonal) 80" 1.6 63.0 2.1 82.7 - 2.6 102.4 2.9 114.2 - 3.9 153.5 5.5 216.5 - 8.5 334.6 84" 1.7 ...

GT2150
Page 24
...driver and dust-protective sheets are supplied with the optional lens. Be careful not to the projector or the lens. * Do not touch the lens surface. CAUTION * The projector and lens contain high-precision parts. Do not induce shock to fold the sheet. Before ...MONO R L/MONO R RGB 1 VIDEO 1 R/Cr RGB 2 G/Y VIDEO 2 L/MONO R H/HV L/MONO R S-VIDEO L/MONO B/Cb V R AUDIO OUT 2. Check that the projector has cooled off sufficiently before proceeding. The 4 screws are four optional lenses available: GT10RL (Fixed short throw lens) GT19ZL, GT13ZL and GT34ZL (Zoom lens) * Press...
...driver and dust-protective sheets are supplied with the optional lens. Be careful not to the projector or the lens. * Do not touch the lens surface. CAUTION * The projector and lens contain high-precision parts. Do not induce shock to fold the sheet. Before ...MONO R L/MONO R RGB 1 VIDEO 1 R/Cr RGB 2 G/Y VIDEO 2 L/MONO R H/HV L/MONO R S-VIDEO L/MONO B/Cb V R AUDIO OUT 2. Check that the projector has cooled off sufficiently before proceeding. The 4 screws are four optional lenses available: GT10RL (Fixed short throw lens) GT19ZL, GT13ZL and GT34ZL (Zoom lens) * Press...

GT2150
Page 25
... of the lens unit. 2 Insert the lens unit so that the grooves on the 4 corners of the extension cable attached to the projector. POWER STATUS ADJAUUTSTO ON/STAND BY POWER STATUS ADJAUUTSTO ON/STAND BY LAMP LAMP CANCEL SOURCE CANCEL SOURCE ENTER SELECT SELECT MENU MENU LEFT ...front lens cap for protection while mounting the lens unit. ENTER ENTER 3. This completes installation. 4 If necessary, put the lens hood cap on the projector. 3 Secure the 4 screws using the hexagonal driver. 4 Insert the connector of the lens unit fully into the socket of the lens hood are...
... of the lens unit. 2 Insert the lens unit so that the grooves on the 4 corners of the extension cable attached to the projector. POWER STATUS ADJAUUTSTO ON/STAND BY POWER STATUS ADJAUUTSTO ON/STAND BY LAMP LAMP CANCEL SOURCE CANCEL SOURCE ENTER SELECT SELECT MENU MENU LEFT ...front lens cap for protection while mounting the lens unit. ENTER ENTER 3. This completes installation. 4 If necessary, put the lens hood cap on the projector. 3 Secure the 4 screws using the hexagonal driver. 4 Insert the connector of the lens unit fully into the socket of the lens hood are...

GT2150
Page 26
...LAMP ENTER UP RIGHT LENS SHIFT LEFT DOWN ZOOM FOCUS 3-1-3. Zoom the lens in Link mode and stack application. 5-3. Store all the projectors have the same display orientation. Remove the CompactFlash card from falling, install them in a place and fasten them before proceeding. NOTE: After...images will become more apparent when displaying small text and detailed graphics. Press and hold ENTER, then press MENU on Green of one projector as mentioned above, you must change to insert a CompactFlash card into the PC Card slot. Transfer the data to two units ...
...LAMP ENTER UP RIGHT LENS SHIFT LEFT DOWN ZOOM FOCUS 3-1-3. Zoom the lens in Link mode and stack application. 5-3. Store all the projectors have the same display orientation. Remove the CompactFlash card from falling, install them in a place and fasten them before proceeding. NOTE: After...images will become more apparent when displaying small text and detailed graphics. Press and hold ENTER, then press MENU on Green of one projector as mentioned above, you must change to insert a CompactFlash card into the PC Card slot. Transfer the data to two units ...

