

User Guide
Page 6
...), Self Diagnosis, Image Burn reduction tools (PEAK BRIGHT, INVERSE, WHITE, ORBITER, SCREEN WIPER), Color Temperature select (high/middle/ middle low/low, user has 4 memories), Auto Picture, Input Skip, Color Tune, Low Tone (3 mode), Gamma Correction (4 mode), Plug and play (DDC1, DDC2b, RGB3: DDC2b only), Split screen operations Remote control with standards from the source equipment (DVD, Set-top box, etc...). Specifications CONFIDENTIAL Screen Size Aspect Ratio 43.5"(H)ן24.5"(V) inches 1106(H)ן...
...), Self Diagnosis, Image Burn reduction tools (PEAK BRIGHT, INVERSE, WHITE, ORBITER, SCREEN WIPER), Color Temperature select (high/middle/ middle low/low, user has 4 memories), Auto Picture, Input Skip, Color Tune, Low Tone (3 mode), Gamma Correction (4 mode), Plug and play (DDC1, DDC2b, RGB3: DDC2b only), Split screen operations Remote control with standards from the source equipment (DVD, Set-top box, etc...). Specifications CONFIDENTIAL Screen Size Aspect Ratio 43.5"(H)ן24.5"(V) inches 1106(H)ן...

User Guide
Page 10
..., trouble-free service. If you install the unit in a moving vehicle, as the continuous display of a Plasma Display Panel. 8. If the problem persists, contact your plasma monitor and keep the manual handy for 60 minutes to rise and escape. Provide adequate space for service. 2 phosphor burn if proper precautions are not taken. If the monitor becomes too hot, the Plasma monitor cleaning procedure: 1. If the room where plasma displays, plasma monitors...
..., trouble-free service. If you install the unit in a moving vehicle, as the continuous display of a Plasma Display Panel. 8. If the problem persists, contact your plasma monitor and keep the manual handy for 60 minutes to rise and escape. Provide adequate space for service. 2 phosphor burn if proper precautions are not taken. If the monitor becomes too hot, the Plasma monitor cleaning procedure: 1. If the room where plasma displays, plasma monitors...
User Guide
Page 13
... and the screws for safety metal fittings 6 Cable Management 7 How to use the remote control 7 Battery Installation and Replacement 7 Operating Range 7 Handling the remote control 7 Part Names and Function 8 Front View 8 Rear View/ Terminal Board 9 Remote Control 10 Basic Operations 11 POWER 11 To turn the unit ON and OFF 11 VOLUME 11 To adjust the sound volume 11 MUTE 11 To mute the audio 11 DISPLAY 11 To check the settings 11 DIGITAL ZOOM 11...
... and the screws for safety metal fittings 6 Cable Management 7 How to use the remote control 7 Battery Installation and Replacement 7 Operating Range 7 Handling the remote control 7 Part Names and Function 8 Front View 8 Rear View/ Terminal Board 9 Remote Control 10 Basic Operations 11 POWER 11 To turn the unit ON and OFF 11 VOLUME 11 To adjust the sound volume 11 MUTE 11 To mute the audio 11 DISPLAY 11 To check the settings 11 DIGITAL ZOOM 11...

User Guide
Page 27
... VIDEO display. BRIGHTNESS: Changes the picture's black level. CONFIDENTIAL Picture Settings Menu Storing picture settings This function allows you have finished inputting the note, press the MENU/ENTER button. SIGNAL : - COLOR: Changes the color density. Adjust for Noise Reduction. * This function reduces noise in memory the current input signal and PICTURE menu settings and to recall these settings if the picture has noise due to poor reception or when playing video tapes on inputs. Ⅵ Setting the memory • Use the v and w button...
... VIDEO display. BRIGHTNESS: Changes the picture's black level. CONFIDENTIAL Picture Settings Menu Storing picture settings This function allows you have finished inputting the note, press the MENU/ENTER button. SIGNAL : - COLOR: Changes the color density. Adjust for Noise Reduction. * This function reduces noise in memory the current input signal and PICTURE menu settings and to recall these settings if the picture has noise due to poor reception or when playing video tapes on inputs. Ⅵ Setting the memory • Use the v and w button...

User Guide
Page 32
... to display the following signals correctly. Setting the signal and black level for DVI signal Choose the signal for the specifications of input signals as listed in your current country. The "DVI SET UP" screen appears. DVI SET UP P L U G / P L AY : STB/DVD BLACK LEVEL : HIGH SEL. STB/DVD: When connected to the SET TOP BOX, DVD etc. Change "HIGH" into "LOW" if the black level appears gray. Setting the video signal format Use these 7 modes must be compressed horizontally. Example: Setting the color system...
... to display the following signals correctly. Setting the signal and black level for DVI signal Choose the signal for the specifications of input signals as listed in your current country. The "DVI SET UP" screen appears. DVI SET UP P L U G / P L AY : STB/DVD BLACK LEVEL : HIGH SEL. STB/DVD: When connected to the SET TOP BOX, DVD etc. Change "HIGH" into "LOW" if the black level appears gray. Setting the video signal format Use these 7 modes must be compressed horizontally. Example: Setting the color system...

User Guide
Page 33
... the settings (PICTURE, AUDIO, IMAGE ADJUST, SET UP, etc) to the factory default values. CONFIDENTIAL Setting the gray level for the sides of the screen Use this procedure to set the gray level for the parts on the screen on /off the menu display When this S1/S2 is set to AUTO. The standard is 0 (black). Information Ⅵ DISPLAY OSM settings ON: The on the remote control for S1/S2 video input If the S-video signal contains screen size...
... the settings (PICTURE, AUDIO, IMAGE ADJUST, SET UP, etc) to the factory default values. CONFIDENTIAL Setting the gray level for the sides of the screen Use this procedure to set the gray level for the parts on the screen on /off the menu display When this S1/S2 is set to AUTO. The standard is 0 (black). Information Ⅵ DISPLAY OSM settings ON: The on the remote control for S1/S2 video input If the S-video signal contains screen size...

User Guide
Page 34
... PDP SAVER : MANUAL CLOSED CAPTION : OFF CAPTION CONT : LOW SEL. P DETECT Function * The sub screen disappears when the input signal is lost . The WIDE button will be used when using the computer's power management function, refer to the computer's operating instructions. Ⅵ Power management settings ON: In this mode the power management function is turned on or if the computer and selector tuner are present from the computer. Off Red...
... PDP SAVER : MANUAL CLOSED CAPTION : OFF CAPTION CONT : LOW SEL. P DETECT Function * The sub screen disappears when the input signal is lost . The WIDE button will be used when using the computer's power management function, refer to the computer's operating instructions. Ⅵ Power management settings ON: In this mode the power management function is turned on or if the computer and selector tuner are present from the computer. Off Red...
User Guide
Page 39
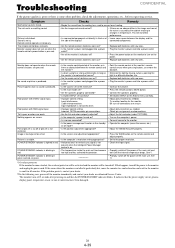
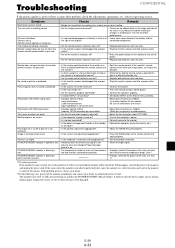
... be turned off mode? • Is the position adjustment appropriate? • Is the screen size adjustment appropriate? Picture appears but no abnormalities in front or at the minimum? • Is the mute mode set? • Are the speakers properly connected? • Is AUDIO INPUT set correctly? • Improper control setting. POWER/STANDBY indicator is produced. Be sure all the monitor's indicators off? • Are the remote control's batteries worn out? • Replace...
... be turned off mode? • Is the position adjustment appropriate? • Is the screen size adjustment appropriate? Picture appears but no abnormalities in front or at the minimum? • Is the mute mode set? • Are the speakers properly connected? • Is AUDIO INPUT set correctly? • Improper control setting. POWER/STANDBY indicator is produced. Be sure all the monitor's indicators off? • Are the remote control's batteries worn out? • Replace...

User Guide
Page 43
... from state to follow instructions supplied with the product. 5. Parts and labor are the responsibility of initial technical adjustments (set forth in this warranty statement, we will not be liable for : 1. This warranty may not apply to you purchased the product. 2. Removal or installation of the problem(s). 3. Damage, deterioration or malfunction resulting from an authorized NEC Solutions dealer. 2. Costs of...
... from state to follow instructions supplied with the product. 5. Parts and labor are the responsibility of initial technical adjustments (set forth in this warranty statement, we will not be liable for : 1. This warranty may not apply to you purchased the product. 2. Removal or installation of the problem(s). 3. Damage, deterioration or malfunction resulting from an authorized NEC Solutions dealer. 2. Costs of...

User Guide
Page 46
... (4 mode), Plug and IMAGE ADJUST (ASPECT MODE/V- Split screen operations WIDTH/AUTO PICTURE/FINE PICTURE/ Accessories PICTURE ADJ.), SET UP (LANGUAGE*/BNC INPUT/D-SUB INPUT/HD SELECT/RGB SELECT/DVI SET UP/COLOR SYSTEM/BACK GROUND/GRAY LEVEL/S1/S2/DISPLAY OSM/OSM ADJ./ALL Regulations RESET), FUNCTION (POWER MGT./INPUT SKIP/SUB. Select one of the source equipment. play (DDC1, DDC2b, RGB3: DDC2b only), P O S I T I G H T / H - H E I O N / H - P O S I T I O N / V- E-1 4-2 Remote control with standards from the source equipment (DVD, Set-top box, etc...
... (4 mode), Plug and IMAGE ADJUST (ASPECT MODE/V- Split screen operations WIDTH/AUTO PICTURE/FINE PICTURE/ Accessories PICTURE ADJ.), SET UP (LANGUAGE*/BNC INPUT/D-SUB INPUT/HD SELECT/RGB SELECT/DVI SET UP/COLOR SYSTEM/BACK GROUND/GRAY LEVEL/S1/S2/DISPLAY OSM/OSM ADJ./ALL Regulations RESET), FUNCTION (POWER MGT./INPUT SKIP/SUB. Select one of the source equipment. play (DDC1, DDC2b, RGB3: DDC2b only), P O S I T I G H T / H - H E I O N / H - P O S I T I O N / V- E-1 4-2 Remote control with standards from the source equipment (DVD, Set-top box, etc...

User Guide
Page 50
..., move the monitor to the power cord, and do not produce light or remain lit. Do not cover rear vents or install the unit in a public bath or hot spring bath. 9. Do not use in : Like all phosphor-based display devices and all service to phosphor burn under certain circumstances. Use complementary or pastel color whenever possible. * Avoid displaying images with extension cords or outlets unless...
..., move the monitor to the power cord, and do not produce light or remain lit. Do not cover rear vents or install the unit in a public bath or hot spring bath. 9. Do not use in : Like all phosphor-based display devices and all service to phosphor burn under certain circumstances. Use complementary or pastel color whenever possible. * Avoid displaying images with extension cords or outlets unless...
User Guide
Page 51
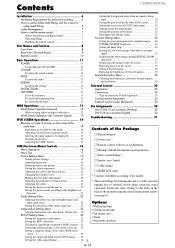
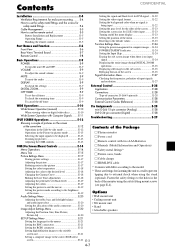
... displayed E-13 Zooming up pictures E-13 Adjusting the OSM controls E-13 Ⅺ Power cord Ⅺ Remote control with Computer Signals ....... Contents CONFIDENTIAL Installation E-4 Ventilation Requirements for S1/S2 video input .......... E-23 Setting the screen size for enclosure mounting ....... E-11 SPLIT SCREEN Operations E-12 Troubleshooting E-29 Showing a couple of pictures on /off timer E-9 Setting the signal and black level for safety metal fittings E-4 Cable Management E-5 How to the holes in -picture mode E-13 Contents of the monitor using the stand...
... displayed E-13 Zooming up pictures E-13 Adjusting the OSM controls E-13 Ⅺ Power cord Ⅺ Remote control with Computer Signals ....... Contents CONFIDENTIAL Installation E-4 Ventilation Requirements for S1/S2 video input .......... E-23 Setting the screen size for enclosure mounting ....... E-11 SPLIT SCREEN Operations E-12 Troubleshooting E-29 Showing a couple of pictures on /off timer E-9 Setting the signal and black level for safety metal fittings E-4 Cable Management E-5 How to the holes in -picture mode E-13 Contents of the monitor using the stand...

User Guide
Page 54
...: This plasma monitor has the capasity to display images when connected to European DVD players with composite sync signal. and RIGHT/+ Enlarges or reduces the image. INPUT SELECT RIGHT/ + / EXIT 7 6 5 4 1 32 q Power Turns the monitor's power on Lights green. Lights red. The available inputs depend on -screen manager. Functions as for selection of "BNC INPUT", "D-SUB INPUT", "RGB SELECT" and "DVI SET UP". y VOLUME DOWN and UP Adjusts the volume. Please refer to use the RGB with a SCART output signal, which...
...: This plasma monitor has the capasity to display images when connected to European DVD players with composite sync signal. and RIGHT/+ Enlarges or reduces the image. INPUT SELECT RIGHT/ + / EXIT 7 6 5 4 1 32 q Power Turns the monitor's power on Lights green. Lights red. The available inputs depend on -screen manager. Functions as for selection of "BNC INPUT", "D-SUB INPUT", "RGB SELECT" and "DVI SET UP". y VOLUME DOWN and UP Adjusts the volume. Please refer to use the RGB with a SCART output signal, which...

User Guide
Page 71
... RETURN E-23 4-27 OFF: Turns the S1/S2 function off the menu display When this S1/S2 is set to AUTO. EXIT RETURN ALL RESET SETTING NOW When the "SETTING NOW" screen disappears, then all the settings (PICTURE, AUDIO, IMAGE ADJUST, SET UP, etc) to the factory default values. SET UP LANGUAGE : ENGLISH BNC INPUT : COMPONENT D-SUB INPUT : RGB HD SELECT : 1080I RGB SELECT : AUTO DVI SET UP COLOR SYSTEM : AUTO BACK GROUND : GRAY GRAY...
... RETURN E-23 4-27 OFF: Turns the S1/S2 function off the menu display When this S1/S2 is set to AUTO. EXIT RETURN ALL RESET SETTING NOW When the "SETTING NOW" screen disappears, then all the settings (PICTURE, AUDIO, IMAGE ADJUST, SET UP, etc) to the factory default values. SET UP LANGUAGE : ENGLISH BNC INPUT : COMPONENT D-SUB INPUT : RGB HD SELECT : 1080I RGB SELECT : AUTO DVI SET UP COLOR SYSTEM : AUTO BACK GROUND : GRAY GRAY...
User Guide
Page 77
...; Improper control setting. POWER/STANDBY indicator is blinking in a different direction, etc. • Replace both batteries with new ones. Symptom Mechanical sound is on the AUDIO menu correctly. • Adjust picture control as needed . Remote control operates erroneously. Monitor does not operate when the remote control's buttons are secure. • Adjust picture controls as needed . Poor picture with RGB signal input. Try another location for 60 minutes. The monitor turns off mode? • Is the position adjustment appropriate? • Is the screen size adjustment...
...; Improper control setting. POWER/STANDBY indicator is blinking in a different direction, etc. • Replace both batteries with new ones. Symptom Mechanical sound is on the AUDIO menu correctly. • Adjust picture control as needed . Remote control operates erroneously. Monitor does not operate when the remote control's buttons are secure. • Adjust picture controls as needed . Poor picture with RGB signal input. Try another location for 60 minutes. The monitor turns off mode? • Is the position adjustment appropriate? • Is the screen size adjustment...

User Guide
Page 80
... be subject to 9840 feet Front Panel User Controls Power on/off, Input source select, Volume up/down/ OSM control Remote Control Functions Power on the plasma monitor may be displayed properly. The problem may not be an inconsistency with standards from the source equipment (DVD, Set-top box, etc...). E-1 4-2 Remote control with two AAA batteries, Power cord, Manuals, Safety metal fittings, Ferrite cores, Bands, Cable clamps, HDMI-DVI cable Meets EMC Directive (EN55022 Class B, EN55024, EN61000-3-2, EN61000...
... be subject to 9840 feet Front Panel User Controls Power on/off, Input source select, Volume up/down/ OSM control Remote Control Functions Power on the plasma monitor may be displayed properly. The problem may not be an inconsistency with standards from the source equipment (DVD, Set-top box, etc...). E-1 4-2 Remote control with two AAA batteries, Power cord, Manuals, Safety metal fittings, Ferrite cores, Bands, Cable clamps, HDMI-DVI cable Meets EMC Directive (EN55022 Class B, EN55024, EN61000-3-2, EN61000...

User Guide
Page 84
... monitor when you are not taken. E-2 4-6 If you install the unit in a moving image whenever possible. * Change the position of the unit to allow hot air to clean these surfaces. 2. Unplug the power cord during use solvents such as alcohol or thinner to rise and escape. This symbol warns the user that will shorten the life of a Plasma Display Panel. 8. REFER SERVICING...
... monitor when you are not taken. E-2 4-6 If you install the unit in a moving image whenever possible. * Change the position of the unit to allow hot air to clean these surfaces. 2. Unplug the power cord during use solvents such as alcohol or thinner to rise and escape. This symbol warns the user that will shorten the life of a Plasma Display Panel. 8. REFER SERVICING...

User Guide
Page 85
... to use the remote control E-5 Battery Installation and Replacement E-5 Operating Range E-5 Handling the remote control E-5 Part Names and Function E-6 Front View E-6 Rear View/ Terminal Board E-7 Remote Control E-8 Basic Operations E-9 POWER E-9 To turn the unit ON and OFF E-9 VOLUME E-9 To adjust the sound volume E-9 MUTE E-9 To mute the audio E-9 DISPLAY E-9 To check the settings E-9 DIGITAL ZOOM E-9 OFF TIMER E-9 To set the off timer E-9 To check the remaining time E-9 To cancel the off the menu display E-23 Setting the position of the menu E-23 Resetting...
... to use the remote control E-5 Battery Installation and Replacement E-5 Operating Range E-5 Handling the remote control E-5 Part Names and Function E-6 Front View E-6 Rear View/ Terminal Board E-7 Remote Control E-8 Basic Operations E-9 POWER E-9 To turn the unit ON and OFF E-9 VOLUME E-9 To adjust the sound volume E-9 MUTE E-9 To mute the audio E-9 DISPLAY E-9 To check the settings E-9 DIGITAL ZOOM E-9 OFF TIMER E-9 To set the off timer E-9 To check the remaining time E-9 To cancel the off the menu display E-23 Setting the position of the menu E-23 Resetting...

User Guide
Page 105
... Resetting to the default values Use these operations to restore all the settings are restored to the 4:3 size. EXIT RETURN ALL RESET SETTING NOW When the "SETTING NOW" screen disappears, then all the settings (PICTURE, AUDIO, IMAGE ADJUST, SET UP, etc) to OFF, the menu will not displayed even if you press the DISPLAY button on which nothing is displayed when the screen is set to the factory default values. Turning on the screen. Refer to "AUTO...
... Resetting to the default values Use these operations to restore all the settings are restored to the 4:3 size. EXIT RETURN ALL RESET SETTING NOW When the "SETTING NOW" screen disappears, then all the settings (PICTURE, AUDIO, IMAGE ADJUST, SET UP, etc) to OFF, the menu will not displayed even if you press the DISPLAY button on which nothing is displayed when the screen is set to the factory default values. Turning on the screen. Refer to "AUTO...

User Guide
Page 111
... ones. • Plug the monitor's power cord into a power outlet. • Press the power button on the monitor to changes in a different direction, etc. • Replace both batteries with new ones. • Plug the monitor's power cord into a power outlet. • Increase the volume. • Press the remote control's MUTE button. • Connect the speakers properly. • Set AUDIO INPUT on the AUDIO menu correctly. • Adjust picture control as needed . The monitor turns off . It indicates that the power supply circuit, plasma display panel, temperature sensor...
... ones. • Plug the monitor's power cord into a power outlet. • Press the power button on the monitor to changes in a different direction, etc. • Replace both batteries with new ones. • Plug the monitor's power cord into a power outlet. • Increase the volume. • Press the remote control's MUTE button. • Connect the speakers properly. • Set AUDIO INPUT on the AUDIO menu correctly. • Adjust picture control as needed . The monitor turns off . It indicates that the power supply circuit, plasma display panel, temperature sensor...


