
42XM5/50XM6/60XM5 UM
Page 3
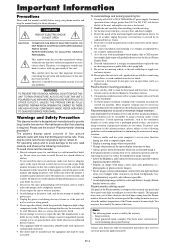
... is installed. Recommendations to avoid or minimize image retention: Like all phosphor-based display devices and all service to received video signals. Contact your dealer for ventilation to the monitor and unplug the power cord. CAUTION RISK OF ELECTRIC SHOCK DO NOT OPEN CAUTION: TO REDUCE THE RISK OF ELECTRIC SHOCK, DO NOT REMOVE COVER. up or down or with a computer input source. * Display a moving...
... is installed. Recommendations to avoid or minimize image retention: Like all phosphor-based display devices and all service to received video signals. Contact your dealer for ventilation to the monitor and unplug the power cord. CAUTION RISK OF ELECTRIC SHOCK DO NOT OPEN CAUTION: TO REDUCE THE RISK OF ELECTRIC SHOCK, DO NOT REMOVE COVER. up or down or with a computer input source. * Display a moving...

42XM5/50XM6/60XM5 UM
Page 5
... cancel the off timer En-13 WIDE Operations En-14 Wide Screen Operation (manual En-14 When viewing videos or digital video discs En-14 Wide Screen Operation with STB En-40 Troubleshooting En-41 Picture Settings Menu En-21 Table of Signals Supported En-42 Adjusting the picture En-21 Setting the picture mode according to the brightness of the room En-21 Specifications En-46 Limited Warranty Plasma Monitors En-49...
... cancel the off timer En-13 WIDE Operations En-14 Wide Screen Operation (manual En-14 When viewing videos or digital video discs En-14 Wide Screen Operation with STB En-40 Troubleshooting En-41 Picture Settings Menu En-21 Table of Signals Supported En-42 Adjusting the picture En-21 Setting the picture mode according to the brightness of the room En-21 Specifications En-46 Limited Warranty Plasma Monitors En-49...
42XM5/50XM6/60XM5 UM
Page 10
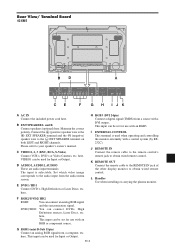
... the other display monitor to obtain wired remote control. DVD2/ HD2: You can be set for Input or Output. G RGB1 (mini D-Sub 15pin) Connect an analog RGB signal from the audio menu screen. The input is used for use with an RGB or component source. I JK A AC IN Connect the included power cord here. L Handles Use when installing or carrying the plasma monitor. D AUDIO1, AUDIO2, AUDIO3 These are audio input terminals. E DVD1 / HD1 Connect DVD's, High Definition...
... the other display monitor to obtain wired remote control. DVD2/ HD2: You can be set for Input or Output. G RGB1 (mini D-Sub 15pin) Connect an analog RGB signal from the audio menu screen. The input is used for use with an RGB or component source. I JK A AC IN Connect the included power cord here. L Handles Use when installing or carrying the plasma monitor. D AUDIO1, AUDIO2, AUDIO3 These are audio input terminals. E DVD1 / HD1 Connect DVD's, High Definition...
42XM5/50XM6/60XM5 UM
Page 11
... speaker's owner's manual. This input can be set for Input or Output. J REMOTE IN Connect the remote cable to the remote control's remote jack to obtain wired remote control. E DVD1 / HD1 Connect DVD's, High Definition or Laser Discs, etc. DVD2/ HD2: You can connect an analog RGB signal and the syncronization signal. here. I JK A AC IN Connect the included power cord here. F RGB2/ DVD2/ HD2 RGB2: You can connect DVDs, High Definition sources, Laser Discs, etc. Rear View/ Terminal Board...
... speaker's owner's manual. This input can be set for Input or Output. J REMOTE IN Connect the remote cable to the remote control's remote jack to obtain wired remote control. E DVD1 / HD1 Connect DVD's, High Definition or Laser Discs, etc. DVD2/ HD2: You can connect an analog RGB signal and the syncronization signal. here. I JK A AC IN Connect the included power cord here. F RGB2/ DVD2/ HD2 RGB2: You can connect DVDs, High Definition sources, Laser Discs, etc. Rear View/ Terminal Board...

42XM5/50XM6/60XM5 UM
Page 12
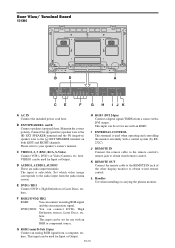
... monitor externally with a DVI output. J REMOTE IN Connect the remote cable to the remote control's remote jack to the EXT SPEAKER terminal on both LEFT and RIGHT channels. here. VIDEO1 can be used for use with an RGB or component source. H RGB3 (DVI 24pin) Connect a digital signal (TMDS) from a computer, etc. I JK A AC IN Connect the included power cord here. F RGB2/ DVD2/ HD2 RGB2: You can connect DVDs, High Definition sources, Laser Discs, etc. Rear View/ Terminal Board 60XM5 L VIDEO AUDIO...
... monitor externally with a DVI output. J REMOTE IN Connect the remote cable to the remote control's remote jack to the EXT SPEAKER terminal on both LEFT and RIGHT channels. here. VIDEO1 can be used for use with an RGB or component source. H RGB3 (DVI 24pin) Connect a digital signal (TMDS) from a computer, etc. I JK A AC IN Connect the included power cord here. F RGB2/ DVD2/ HD2 RGB2: You can connect DVDs, High Definition sources, Laser Discs, etc. Rear View/ Terminal Board 60XM5 L VIDEO AUDIO...
42XM5/50XM6/60XM5 UM
Page 16
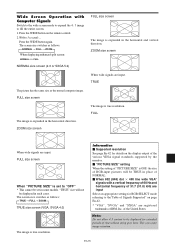
Press the WIDE button again. Within 3 seconds ... The screen size switches as the normal computer image. ZOOM size screen When wide signals are input. Information Ⅵ Supported resolution See page En-42 for details on the display output of the various VESA signal standards supported by the monitor. Ⅵ "PICTURE SIZE" setting When the setting of time without using gray bars. This can cause image retention. TRUE The picture has the same size as follows: → NORMAL...
Press the WIDE button again. Within 3 seconds ... The screen size switches as the normal computer image. ZOOM size screen When wide signals are input. Information Ⅵ Supported resolution See page En-42 for details on the display output of the various VESA signal standards supported by the monitor. Ⅵ "PICTURE SIZE" setting When the setting of time without using gray bars. This can cause image retention. TRUE The picture has the same size as follows: → NORMAL...
42XM5/50XM6/60XM5 UM
Page 21
... S1/S2 PICTURE SIZE*3 DVI SET UP PROTOCOL SET CLOSECAPTION CAPTION CONT Sub menu 2 Sub menu 3 Sub menu 4 OFF←→ON OFF←→ON PLE AUTO/LOCK 1/LOCK 2/LOCK 3 ORBITER AUTO 1 AUTO 2 MANUAL H-DOT/V-LINE/TIME OFF INVERSE OFF ON WORKING TIME/WAITING TIME WHITE SCREEN WIPER OFF ON WORKING TIME/WAITING TIME/SPEED SOFT FOCUS OFF/1/2/3/4 0←...→3←...→15 AUTO←→OFF OFF←→ON PLUG/PLAY PC←→STB/DVD BLACK LEVEL...
... S1/S2 PICTURE SIZE*3 DVI SET UP PROTOCOL SET CLOSECAPTION CAPTION CONT Sub menu 2 Sub menu 3 Sub menu 4 OFF←→ON OFF←→ON PLE AUTO/LOCK 1/LOCK 2/LOCK 3 ORBITER AUTO 1 AUTO 2 MANUAL H-DOT/V-LINE/TIME OFF INVERSE OFF ON WORKING TIME/WAITING TIME WHITE SCREEN WIPER OFF ON WORKING TIME/WAITING TIME/SPEED SOFT FOCUS OFF/1/2/3/4 0←...→3←...→15 AUTO←→OFF OFF←→ON PLUG/PLAY PC←→STB/DVD BLACK LEVEL...

42XM5/50XM6/60XM5 UM
Page 22
.... BRIGHTNESS: Changes the picture's black level. EXIT RETURN Information Ⅵ Setting the color temperature LOW: More red MID LOW: Slightly red MID: Standard (slightly bluer) HIGH: More blue Information Ⅵ Types of noise reduction There are viewing the display. ADJ. Setting the color temperature Use this mode when watching video in a dark room. Picture Settings Menu Adjusting the picture The contrast, brightness, sharpness, color and tint can be adjusted as the number increases...
.... BRIGHTNESS: Changes the picture's black level. EXIT RETURN Information Ⅵ Setting the color temperature LOW: More red MID LOW: Slightly red MID: Standard (slightly bluer) HIGH: More blue Information Ⅵ Types of noise reduction There are viewing the display. ADJ. Setting the color temperature Use this mode when watching video in a dark room. Picture Settings Menu Adjusting the picture The contrast, brightness, sharpness, color and tint can be adjusted as the number increases...
42XM5/50XM6/60XM5 UM
Page 24
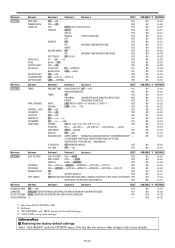
...: Setting "AUDIO INPUT1" to suit your tastes. Example: Adjusting the vertical position in ASPECT MODE. BASS TREBLE BALANCE AUDIO INPUT 1 AUDIO INPUT 2 AUDIO INPUT 3 AUDIO L : : : VIDEO2 DVD/HD1 RGB1 : 13 : 13 R : ±0 SEL. H E I G H T : 32 H-WIDTH : 32 AUTO PICTURE : OFF FINE PICTURE : 32 PICTURE ADJ. : 32 UNDERSCAN : OFF SEL. H E I G H T : 0 H-WIDTH : 0 AUTO PICTURE : OFF FINE PICTURE : 0 PICTURE ADJ. : 0 UNDERSCAN : OFF SEL. The mode switches as the audio channel for digital ZOOM. The available sources depend on the AUDIO menu correctly...
...: Setting "AUDIO INPUT1" to suit your tastes. Example: Adjusting the vertical position in ASPECT MODE. BASS TREBLE BALANCE AUDIO INPUT 1 AUDIO INPUT 2 AUDIO INPUT 3 AUDIO L : : : VIDEO2 DVD/HD1 RGB1 : 13 : 13 R : ±0 SEL. H E I G H T : 32 H-WIDTH : 32 AUTO PICTURE : OFF FINE PICTURE : 32 PICTURE ADJ. : 32 UNDERSCAN : OFF SEL. H E I G H T : 0 H-WIDTH : 0 AUTO PICTURE : OFF FINE PICTURE : 0 PICTURE ADJ. : 0 UNDERSCAN : OFF SEL. The mode switches as the audio channel for digital ZOOM. The available sources depend on the AUDIO menu correctly...

42XM5/50XM6/60XM5 UM
Page 26
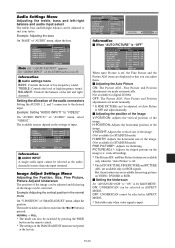
... the default values Use these operations to restore all the settings (PICTURE, AUDIO, IMAGE ADJUST, OPTION1~4, etc.) to "1035I" On "HD SELECT" of the input high definition image is valid only for items to "ON" On "INPUT SKIP" of "OPTION1" menu, select "ON", then press the MENU/ENTER button. On "ALL RESET" of "OPTION1" menu, select "ON". OPTION 1 OSM BNC INPUT : RGB D-SUB INPUT : RGB RGB SELECT : AUTO...
... the default values Use these operations to restore all the settings (PICTURE, AUDIO, IMAGE ADJUST, OPTION1~4, etc.) to "1035I" On "HD SELECT" of the input high definition image is valid only for items to "ON" On "INPUT SKIP" of "OPTION1" menu, select "ON", then press the MENU/ENTER button. On "ALL RESET" of "OPTION1" menu, select "ON". OPTION 1 OSM BNC INPUT : RGB D-SUB INPUT : RGB RGB SELECT : AUTO...
42XM5/50XM6/60XM5 UM
Page 28
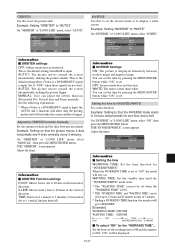
... picture bigger. Example: Setting to that the picture moves 2 dots horizontally and 4 lines vertically every 3 minutes. EXIT RETURN Information Ⅵ Setting the time WORKING TIME: Set the time duration for INVERSE/WHITE Set a time duration. EXIT RETURN Information Ⅵ INVERSE Settings ON: The picture is input. This is the default setting when a Video or a DVD/HD/DTV signal is displayed alternately between movement. Adjust the ORBITER function manually Set the amount of 3 minutes. * Ending a WORKING TIME function, the monitor...
... picture bigger. Example: Setting to that the picture moves 2 dots horizontally and 4 lines vertically every 3 minutes. EXIT RETURN Information Ⅵ Setting the time WORKING TIME: Set the time duration for INVERSE/WHITE Set a time duration. EXIT RETURN Information Ⅵ INVERSE Settings ON: The picture is input. This is the default setting when a Video or a DVD/HD/DTV signal is displayed alternately between movement. Adjust the ORBITER function manually Set the amount of 3 minutes. * Ending a WORKING TIME function, the monitor...

42XM5/50XM6/60XM5 UM
Page 30
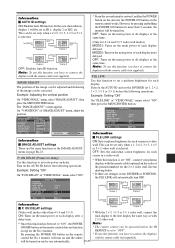
...; PLUG/PLAY settings PC: When connected to the SET TOP BOX, DVD etc. HIGH: When connected to "OFF" On "PICTURE SIZE" of "DVI SET UP" menu, select "STB/ DVD". Setting the screen size for S1/S2 video input If the S-video signal contains screen size information, the image will be automatically adjusted to fit the screen when this S1/S2 is set Use this procedure to switch the setting to "AUTO" On "S1/S2" of "OPTION2" menu, select "ON". Setting the picture size for 50 and...
...; PLUG/PLAY settings PC: When connected to the SET TOP BOX, DVD etc. HIGH: When connected to "OFF" On "PICTURE SIZE" of "DVI SET UP" menu, select "STB/ DVD". Setting the screen size for S1/S2 video input If the S-video signal contains screen size information, the image will be automatically adjusted to fit the screen when this S1/S2 is set Use this procedure to switch the setting to "AUTO" On "S1/S2" of "OPTION2" menu, select "ON". Setting the picture size for 50 and...

42XM5/50XM6/60XM5 UM
Page 35
.... Select "4" of "VIDEO WALL" menu, select "2ן2". MODE : BLANK AUTO ID : OFF IMAGE ADJUST P. On "OPTION3" menu, select "VIDEO WALL", then press the MENU/ENTER button. ON DELAY : OFF PLE LINK : OFF SEL. ON DELAY : OFF PLE LINK : OFF SEL. VIDEO WALL POSITION Set the position of multiple displays connected to set the VIDEO WALL POSITION. Example: Setting "ON" Set the ID number for the No. 1 display on ID NUMBER menu. Video Wall setting Use this feature to...
.... Select "4" of "VIDEO WALL" menu, select "2ן2". MODE : BLANK AUTO ID : OFF IMAGE ADJUST P. On "OPTION3" menu, select "VIDEO WALL", then press the MENU/ENTER button. ON DELAY : OFF PLE LINK : OFF SEL. ON DELAY : OFF PLE LINK : OFF SEL. VIDEO WALL POSITION Set the position of multiple displays connected to set the VIDEO WALL POSITION. Example: Setting "ON" Set the ID number for the No. 1 display on ID NUMBER menu. Video Wall setting Use this feature to...
42XM5/50XM6/60XM5 UM
Page 36
... turn on the AUTO ID before the following operations. On "P. ON DELAY" of all displays at the same time. (Only for the 2ן2 video wall. MODE : SPLIT AUTO ID : OFF IMAGE ADJUST P. ADJ. EXIT RETURN Information Ⅵ P. By pressing the POWER ON button on the remote * To use this function to set to connect the displays with the remote cable (not supplied). * From the second monitor onward, neither the POWER button...
... turn on the AUTO ID before the following operations. On "P. ON DELAY" of all displays at the same time. (Only for the 2ן2 video wall. MODE : SPLIT AUTO ID : OFF IMAGE ADJUST P. ADJ. EXIT RETURN Information Ⅵ P. By pressing the POWER ON button on the remote * To use this function to set to connect the displays with the remote cable (not supplied). * From the second monitor onward, neither the POWER button...
42XM5/50XM6/60XM5 UM
Page 40
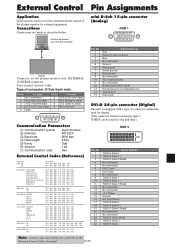
... 12 11 Display Connector on -green Blue No connection Ground Red ground Green ground Blue ground No connection Sync signal ground No connection Bi-directional DATA (SDA) Horizontal sync or Composite sync Vertical sync Data clock DVI-D 24-pin connector (Digital) The unit is equipped with a type of connector commonly used for digital. (This cannot be used for an analog input.) (TMDS can be used for a full list of the External Control Codes if needed. En-39...
... 12 11 Display Connector on -green Blue No connection Ground Red ground Green ground Blue ground No connection Sync signal ground No connection Bi-directional DATA (SDA) Horizontal sync or Composite sync Vertical sync Data clock DVI-D 24-pin connector (Digital) The unit is equipped with a type of connector commonly used for digital. (This cannot be used for an analog input.) (TMDS can be used for a full list of the External Control Codes if needed. En-39...

42XM5/50XM6/60XM5 UM
Page 42
... the power supply circuit, plasma display panel, temperature sensor, or one or more fans have been damaged. This will be activated and the monitor will not affect performance. • Is a connected component set to ALL. • Plug the monitor's power cord into a power outlet. • Increase the volume. • Press the remote control's MUTE button. • Connect the speakers properly. • Set AUDIO INPUT on the AUDIO menu correctly. • Adjust picture control as needed . The monitor turns off the power...
... the power supply circuit, plasma display panel, temperature sensor, or one or more fans have been damaged. This will be activated and the monitor will not affect performance. • Is a connected component set to ALL. • Plug the monitor's power cord into a power outlet. • Increase the volume. • Press the remote control's MUTE button. • Connect the speakers properly. • Set AUDIO INPUT on the AUDIO menu correctly. • Adjust picture control as needed . The monitor turns off the power...
42XM5/50XM6/60XM5 UM
Page 47
..., Programmable Timer, Loop Throughout Interface, Plug and play (DDC1, DDC2b, RGB3: DDC2b only), Enhanced Split Screen, Protocol Set, etc. Select one of the source equipment. If you do experience such a problem please contact NEC Corporation of America and also the manufacturer of them under "BNC INPUT". *3 Compatible with standards from the source equipment (DVD, Set-top box, etc.). En-46 Accessories Power cord (ן1), Remote control...
..., Programmable Timer, Loop Throughout Interface, Plug and play (DDC1, DDC2b, RGB3: DDC2b only), Enhanced Split Screen, Protocol Set, etc. Select one of the source equipment. If you do experience such a problem please contact NEC Corporation of America and also the manufacturer of them under "BNC INPUT". *3 Compatible with standards from the source equipment (DVD, Set-top box, etc.). En-46 Accessories Power cord (ן1), Remote control...
42XM5/50XM6/60XM5 UM
Page 48
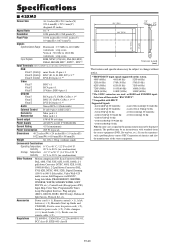
... Power Supply AC100 V to 240 V 50 Hz/60 Hz Current Rating 5.0 A (maximum) Power Consumption 340 W (typical) Dimensions 48.1 inches(W)ן29.0 inches(H)ן3.9 inches(D) 1222 mm(W)ן736 mm(H)ן99 mm(D) Weight 91.4 lbs / 41.5 kg (without notice. *1 HD/DVD/DTV input signals supported on the plasma monitor may not be displayed properly. Accessories Power cord (ן1), Remote control (...
... Power Supply AC100 V to 240 V 50 Hz/60 Hz Current Rating 5.0 A (maximum) Power Consumption 340 W (typical) Dimensions 48.1 inches(W)ן29.0 inches(H)ן3.9 inches(D) 1222 mm(W)ן736 mm(H)ן99 mm(D) Weight 91.4 lbs / 41.5 kg (without notice. *1 HD/DVD/DTV input signals supported on the plasma monitor may not be displayed properly. Accessories Power cord (ן1), Remote control (...

42XM5/50XM6/60XM5 UM
Page 49
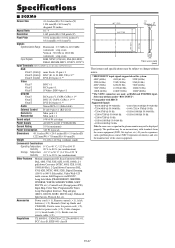
... Mode (PEAK BRIGHT, ORBITER, INVERSE, WHITE, SCREEN WIPER, SOFT FOCUS, etc.), Control Lock (Except power SW), Input Skip, Color Tune, Programmable Timer, Loop Throughout Interface, Plug and play (DDC1, DDC2b, RGB3: DDC2b only), Enhanced Split Screen, Protocol Set, etc. If you do experience such a problem please contact NEC Corporation of America and also the manufacturer of them under "BNC INPUT". *3 Compatible with standards from the source equipment (DVD, Set-top box...
... Mode (PEAK BRIGHT, ORBITER, INVERSE, WHITE, SCREEN WIPER, SOFT FOCUS, etc.), Control Lock (Except power SW), Input Skip, Color Tune, Programmable Timer, Loop Throughout Interface, Plug and play (DDC1, DDC2b, RGB3: DDC2b only), Enhanced Split Screen, Protocol Set, etc. If you do experience such a problem please contact NEC Corporation of America and also the manufacturer of them under "BNC INPUT". *3 Compatible with standards from the source equipment (DVD, Set-top box...
42XM5/50XM6/60XM5 UM
Page 50
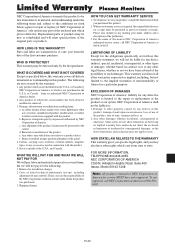
... to follow instructions supplied with the product. 5. Limited Warranty Plasma Monitors NEC Corporation of America warrants this product to be free from whom you purchased the product. 2. HOW LONG IS THE WARRANTY? Removal or installation of America. Burns or residual images upon inconvenience, loss of use of the product, loss of the original parts or products. Cartons, carrying cases, batteries, external cabinets, magnetic...
... to follow instructions supplied with the product. 5. Limited Warranty Plasma Monitors NEC Corporation of America warrants this product to be free from whom you purchased the product. 2. HOW LONG IS THE WARRANTY? Removal or installation of America. Burns or residual images upon inconvenience, loss of use of the product, loss of the original parts or products. Cartons, carrying cases, batteries, external cabinets, magnetic...


