
User Manual
Page 6
INTRODUCTION Ͼ Part Names of the Projector Part Names of Kensington Microware Inc. E-6 The logo is exhausted from here Adjustable Tilt Foot Lever (See page E-42) Adjustable Tilt Foot (See page E-42) Built-... Lever (See page E-43) Carrying Handle Lens Lens Cap * This security slot supports the MicroSaver® Security System. MicroSaver® is a registered trademark of the Projector Remote Sensor (See page E-20) Focus Ring (See page E-43) Controls (See page E-8) ON STAND BY PO SWTEALRTAUMSP ALIGNMENT AUTO ADJUST PC-CARD TER SELECT...
INTRODUCTION Ͼ Part Names of the Projector Part Names of Kensington Microware Inc. E-6 The logo is exhausted from here Adjustable Tilt Foot Lever (See page E-42) Adjustable Tilt Foot (See page E-42) Built-... Lever (See page E-43) Carrying Handle Lens Lens Cap * This security slot supports the MicroSaver® Security System. MicroSaver® is a registered trademark of the Projector Remote Sensor (See page E-20) Focus Ring (See page E-43) Controls (See page E-8) ON STAND BY PO SWTEALRTAUMSP ALIGNMENT AUTO ADJUST PC-CARD TER SELECT...

User Manual
Page 7
INTRODUCTION Ͼ Part Names of the Projector PC Card Slot Remote Sensor (See page E-20) PC Card Eject Button Monaural Speaker (2W) Lamp cover (See page E-121) Ventilation (outlet) Lamp cover screw Rear Foot Rear Foot Rotate to make the projector level. (See page E-43) AC Input Connect the supplied power cable's three-pin... you plug the supplied power cable into an active wall outlet and turn on the Main Power switch, the POWER indicator turns orange and the projector is in standby mode. (See page E-36) E-7
INTRODUCTION Ͼ Part Names of the Projector PC Card Slot Remote Sensor (See page E-20) PC Card Eject Button Monaural Speaker (2W) Lamp cover (See page E-121) Ventilation (outlet) Lamp cover screw Rear Foot Rear Foot Rotate to make the projector level. (See page E-43) AC Input Connect the supplied power cable's three-pin... you plug the supplied power cable into an active wall outlet and turn on the Main Power switch, the POWER indicator turns orange and the projector is in standby mode. (See page E-36) E-7

User Manual
Page 8
.... See the Power Indicator section on page E-126 for more details. POWER Indicator ( ) When this indicator is green, the projector is in standby mode. E-8 INTRODUCTION Ͼ Part Names of the Projector Top Features 9 10 45 11 2 6 7 8 12 1 3 1.POWER Button (ON / STAND BY) Use this button... to turn on or off when the main power is supplied and the projector is enabled. when this light blinks red rapidly...
.... See the Power Indicator section on page E-126 for more details. POWER Indicator ( ) When this indicator is green, the projector is in standby mode. E-8 INTRODUCTION Ͼ Part Names of the Projector Top Features 9 10 45 11 2 6 7 8 12 1 3 1.POWER Button (ON / STAND BY) Use this button... to turn on or off when the main power is supplied and the projector is enabled. when this light blinks red rapidly...

User Manual
Page 9
...-H/V and Pixel Clock/Phase for a minimum of ONE second, the input source will be displayed correctly or take time to select the menu of the Projector Ͼ Top Features 4. E-9 CANCEL Button Press this button to return the adjustments to the last condition while you wish to adjust. When no input signal... input will change as a PC, VCR, DVD player, Viewer (PC card), or LAN. If no menus appear, these buttons to switch between sources. 6. INTRODUCTION Ͼ Part Names of the item you are in the adjustment or setting menu. 9. Each time this button to exit "Menus".
...-H/V and Pixel Clock/Phase for a minimum of ONE second, the input source will be displayed correctly or take time to select the menu of the Projector Ͼ Top Features 4. E-9 CANCEL Button Press this button to return the adjustments to the last condition while you wish to adjust. When no input signal... input will change as a PC, VCR, DVD player, Viewer (PC card), or LAN. If no menus appear, these buttons to switch between sources. 6. INTRODUCTION Ͼ Part Names of the item you are in the adjustment or setting menu. 9. Each time this button to exit "Menus".

User Manual
Page 10
... A press of service. If this light blinks red rapidly, it indicates that the projection lamp has exceeded 2000 hours (up to Eco. INTRODUCTION Ͼ Part Names of the Projector Ͼ Top Features ̇̈ : Use these ̆̄̇̈ buttons move the cursor in Eco mode) of the ̈ button executes...
... A press of service. If this light blinks red rapidly, it indicates that the projection lamp has exceeded 2000 hours (up to Eco. INTRODUCTION Ͼ Part Names of the Projector Ͼ Top Features ̇̈ : Use these ̆̄̇̈ buttons move the cursor in Eco mode) of the ̈ button executes...
User Manual
Page 11
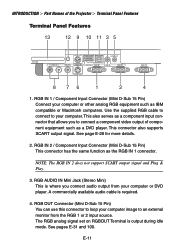
... has the same function as a DVD player. RGB AUDIO IN Mini Jack (Stereo Mini) This is output during idle mode. E-11 INTRODUCTION Ͼ Part Names of component equipment such as the RGB IN 1 connector. Use the supplied RGB cable to connect to connect a component video output of the... Projector Ͼ Terminal Panel Features Terminal Panel Features 13 12 9 10 11 3 5 8 76 1 2 4 1. RGB OUT Connector (Mini D-Sub 15 Pin) You can use this ...
... has the same function as a DVD player. RGB AUDIO IN Mini Jack (Stereo Mini) This is output during idle mode. E-11 INTRODUCTION Ͼ Part Names of component equipment such as the RGB IN 1 connector. Use the supplied RGB cable to connect to connect a component video output of the... Projector Ͼ Terminal Panel Features Terminal Panel Features 13 12 9 10 11 3 5 8 76 1 2 4 1. RGB OUT Connector (Mini D-Sub 15 Pin) You can use this ...

User Manual
Page 12
... VIDEO source. If you to use this port to connect your PC to audio coming from the VIDEO source. 9. INTRODUCTION Ͼ Part Names of the Projector Ͼ Terminal Panel Features 5. E-12 Note that there is no audio output from this jack during Standby and Idle. 6 S-VIDEO... using the port. Remove the cap when using Dynamic Image Utility 2.0 included on the port at the factory. The NEC optional serial cable (CA03D) is your projector via a serial cable. A cap is your PC. NOTE: S-Video provides more vivid color and higher resolution than the traditional composite...
... VIDEO source. If you to use this port to connect your PC to audio coming from the VIDEO source. 9. INTRODUCTION Ͼ Part Names of the Projector Ͼ Terminal Panel Features 5. E-12 Note that there is no audio output from this jack during Standby and Idle. 6 S-VIDEO... using the port. Remove the cap when using Dynamic Image Utility 2.0 included on the port at the factory. The NEC optional serial cable (CA03D) is your projector via a serial cable. A cap is your PC. NOTE: S-Video provides more vivid color and higher resolution than the traditional composite...

User Manual
Page 13
INTRODUCTION Ͼ Part Names of your computer's mouse functions from the remote control. 12. USB Port (Type A) Connect a commercially available mouse that this port to the USB port (type A) of the Projector Ͼ Terminal Panel Features 10. PC CARD Eject ...Button Press to a computer and that there may be some brands of USB mouse that the projector does not support. 11. E-13 You can operate your PC using the supplied USB cable. You can ... supports USB. PC CARD Slot Insert a PC card, commercially available LAN card or NEC optional wireless LAN card here.
INTRODUCTION Ͼ Part Names of your computer's mouse functions from the remote control. 12. USB Port (Type A) Connect a commercially available mouse that this port to the USB port (type A) of the Projector Ͼ Terminal Panel Features 10. PC CARD Eject ...Button Press to a computer and that there may be some brands of USB mouse that the projector does not support. 11. E-13 You can operate your PC using the supplied USB cable. You can ... supports USB. PC CARD Slot Insert a PC card, commercially available LAN card or NEC optional wireless LAN card here.

User Manual
Page 14
... on . NIFY POINTER FREEZE 3D ASPECT INTRODUCTION Ͼ Part Names of the Remote Control Part Names of the Remote Control SLIDE VIEWER REFORM NOTE: If you are using a Macintosh computer, you can use this button to turn on the projector, press 21 and hold the POWER OFF button for a...a laser light when the LA- 3 SER button is 6 9 pressed. 10 AUTO ADJ. NOTE: To turn your 23 projector off. 24 25 NOTE: To turn off the projector, press SELECT ENTER CANCEL PJ ASPECT FREEZE 3D REFORM HELP POINTER VIEWER VOLUME MAGNIFY SLIDE PICTURE PIC-MUTE FOLDER SLIDE LIST 13...
... on . NIFY POINTER FREEZE 3D ASPECT INTRODUCTION Ͼ Part Names of the Remote Control Part Names of the Remote Control SLIDE VIEWER REFORM NOTE: If you are using a Macintosh computer, you can use this button to turn on the projector, press 21 and hold the POWER OFF button for a...a laser light when the LA- 3 SER button is 6 9 pressed. 10 AUTO ADJ. NOTE: To turn your 23 projector off. 24 25 NOTE: To turn off the projector, press SELECT ENTER CANCEL PJ ASPECT FREEZE 3D REFORM HELP POINTER VIEWER VOLUME MAGNIFY SLIDE PICTURE PIC-MUTE FOLDER SLIDE LIST 13...

User Manual
Page 15
..., PAL-N, PAL-M, PAL60, SECAM or NTSC4.43 compatible video source from a VCR. 8. RGB 2 Button Press this button to your RGB IN 1 port. 9. E-15 INTRODUCTION Ͼ Part Names of the Remote Control 6. When lit, you can use the laser to a red dot that you can place on any object. 12. See page...
..., PAL-N, PAL-M, PAL60, SECAM or NTSC4.43 compatible video source from a VCR. 8. RGB 2 Button Press this button to your RGB IN 1 port. 9. E-15 INTRODUCTION Ͼ Part Names of the Remote Control 6. When lit, you can use the laser to a red dot that you can place on any object. 12. See page...

User Manual
Page 16
...cabinet. 16. It works the same way as the mouse right button. E-16 INTRODUCTION Ͼ Part Names of the ̈ button executes the selection. When the pointer is not displayed, these buttons to the Projector mode and the PJ button lights red. To switch back to switch the SELECT, CANCEL, and...works as the CANCEL button on the cabinet. When this button to enter your menu selection. See page E-9. 15. When you are in the Projector mode, which is indicated by lighting the PJ button: Press this button is pressed and held for adjusting the image. 14. Press this button ...
...cabinet. 16. It works the same way as the mouse right button. E-16 INTRODUCTION Ͼ Part Names of the ̈ button executes the selection. When the pointer is not displayed, these buttons to the Projector mode and the PJ button lights red. To switch back to switch the SELECT, CANCEL, and...works as the CANCEL button on the cabinet. When this button to enter your menu selection. See page E-9. 15. When you are in the Projector mode, which is indicated by lighting the PJ button: Press this button is pressed and held for adjusting the image. 14. Press this button ...

User Manual
Page 17
... to correct the keystone (trapezoidal) distortion, and make the image square. See page E-55. 24. You can move your pointer icon to 400%. INTRODUCTION Ͼ Part Names of the pointer. HELP Button Provides the online help or the set information. 21. When the image is magnified, the pointer is magnified about...
... to correct the keystone (trapezoidal) distortion, and make the image square. See page E-55. 24. You can move your pointer icon to 400%. INTRODUCTION Ͼ Part Names of the pointer. HELP Button Provides the online help or the set information. 21. When the image is magnified, the pointer is magnified about...

User Manual
Page 18
... the Remote Control 25. NOTE: The default is the Computer mode, which allows you are pressed within 60 seconds, the light goes out and the Projector mode is displayed, a press of this button to select the previous folder or slide. E-18 See page E-67. 28. FOLDER LIST Button Press this button... sound. SLIDE LIST Button Press this button to select Viewer source to use the SELECT, CANCEL, and ENTER buttons as your computer mouse. INTRODUCTION Ͼ Part Names of slides included in a PC card. See page E-67. NOTE: When the menu is canceled. If no buttons are in the...
... the Remote Control 25. NOTE: The default is the Computer mode, which allows you are pressed within 60 seconds, the light goes out and the Projector mode is displayed, a press of this button to select the previous folder or slide. E-18 See page E-67. 28. FOLDER LIST Button Press this button... sound. SLIDE LIST Button Press this button to select Viewer source to use the SELECT, CANCEL, and ENTER buttons as your computer mouse. INTRODUCTION Ͼ Part Names of slides included in a PC card. See page E-67. NOTE: When the menu is canceled. If no buttons are in the...

User Manual
Page 19
... you press and hold the SELECT ̆̄̇̈ button while installing new batteries, the remote control may fail to work properly. INTRODUCTION Ͼ Part Names of batteries or new and old batteries.
... you press and hold the SELECT ̆̄̇̈ button while installing new batteries, the remote control may fail to work properly. INTRODUCTION Ͼ Part Names of batteries or new and old batteries.

User Manual
Page 20
...are objects between the remote control and the sensor, or if strong light falls on the projector cabinet. • The projector will also prevent the remote control from properly operating the projector. INTRODUCTION Ͼ Part Names of the Remote Control Remote Control Precautions • Handle the remote control carefully. &#... of batteries together Operating Range 7m/22 feet 30˚ 30˚ 7m/22 feet 30˚ 30˚ Remote sensor on the projector cabinet Remote control • The infrared signal operates by line-of-sight up to a distance of about 22 feet/7 m and within a...
...are objects between the remote control and the sensor, or if strong light falls on the projector cabinet. • The projector will also prevent the remote control from properly operating the projector. INTRODUCTION Ͼ Part Names of the Remote Control Remote Control Precautions • Handle the remote control carefully. &#... of batteries together Operating Range 7m/22 feet 30˚ 30˚ 7m/22 feet 30˚ 30˚ Remote sensor on the projector cabinet Remote control • The infrared signal operates by line-of-sight up to a distance of about 22 feet/7 m and within a...

User Manual
Page 47
This function adjusts the clock frequencies that might appear and to reduce video noise, dot interference or cross talk (this is evident when part of your computer for component and video signal. • If the Auto Adjust operation cannot optimize the RGB signal, try to be shimmering). ...47 See page E-88. This function also adjusts the clock phase to reduce video noise, dot interference or cross talk. (This is evident when part of your image appears to be shimmering.) This adjustment may not be necessary when you connect your image appears to adjust Clock and Phase manually...
This function adjusts the clock frequencies that might appear and to reduce video noise, dot interference or cross talk (this is evident when part of your computer for component and video signal. • If the Auto Adjust operation cannot optimize the RGB signal, try to be shimmering). ...47 See page E-88. This function also adjusts the clock phase to reduce video noise, dot interference or cross talk. (This is evident when part of your image appears to be shimmering.) This adjustment may not be necessary when you connect your image appears to adjust Clock and Phase manually...

User Manual
Page 61
... lines of different thickness from which you can select a line you prefer by left-clicking. Hide ...... Right-clicking anywhere on the blue part. (for USB mouse operation only) Pen ....... E-61 NOTE: The ChalkBoard feature is available only when a USB mouse is not available ... to clear the drawing completely from which you can select a color you prefer by left -clicking. Color ..... Left-click to erase part of different thickness from the ChalkBoard screen. Clears the complete drawing and exits the ChalkBoard. CONVENIENT FEATURES Making Freehand Drawings on a Projected Image...
... lines of different thickness from which you can select a line you prefer by left-clicking. Hide ...... Right-clicking anywhere on the blue part. (for USB mouse operation only) Pen ....... E-61 NOTE: The ChalkBoard feature is available only when a USB mouse is not available ... to clear the drawing completely from which you can select a color you prefer by left -clicking. Color ..... Left-click to erase part of different thickness from the ChalkBoard screen. Clears the complete drawing and exits the ChalkBoard. CONVENIENT FEATURES Making Freehand Drawings on a Projected Image...

User Manual
Page 69
... from the root directory, and searchable images are searched for USB mouse operation only) Capture ...... The image is saved as a JPEG file on the blue part. (for in directories and images in a format supported by clicking on a PC card. The tool bar includes the following conditions are met: • If the... following buttons: Capture Drag Freeze Exit Drive Drag Drags to capture an image from a source that is currently being displayed. Storing Images Displayed on the Projector on the PC card (Capture) The Capture features allows you will get a tool bar.
... from the root directory, and searchable images are searched for USB mouse operation only) Capture ...... The image is saved as a JPEG file on the blue part. (for in directories and images in a format supported by clicking on a PC card. The tool bar includes the following conditions are met: • If the... following buttons: Capture Drag Freeze Exit Drive Drag Drags to capture an image from a source that is currently being displayed. Storing Images Displayed on the Projector on the PC card (Capture) The Capture features allows you will get a tool bar.

User Manual
Page 70
Make more space available on the card by clicking on the blue part (for saving images. The tool bar includes the following buttons: Drag...Project the image you wish to eject the card. 1. Captures an image and save it as a JPEG file on the projector. E-70 cient for USB mouse operation only). Freezes and unfreezes images. USING THE VIEWER NOTE: * Unless a PC card... into the card slot. ture feature is insuffi- A tool bar will appear. Doing so could cause a loss of the projector, the Cap- The number of images that the free space of the PC card. * Be sure not to the card ...
Make more space available on the card by clicking on the blue part (for saving images. The tool bar includes the following buttons: Drag...Project the image you wish to eject the card. 1. Captures an image and save it as a JPEG file on the projector. E-70 cient for USB mouse operation only). Freezes and unfreezes images. USING THE VIEWER NOTE: * Unless a PC card... into the card slot. ture feature is insuffi- A tool bar will appear. Doing so could cause a loss of the projector, the Cap- The number of images that the free space of the PC card. * Be sure not to the card ...

User Manual
Page 88
... this item to fine tune the computer image or to remove any vertical banding that eliminate the horizontal banding in its true resolution. E-88 The projector automatically reduces or enlarges the current image to fit the full screen. Press the SELECT ̇ and ̈ buttons until the banding disappears. ...& Functions Clock Use this item to adjust the clock phase or to reduce video noise, dot interference or cross talk. (This is evident when part of your computer for turning on or off the Advanced AccuBlend feature. The projector displays the current image in the image.
... this item to fine tune the computer image or to remove any vertical banding that eliminate the horizontal banding in its true resolution. E-88 The projector automatically reduces or enlarges the current image to fit the full screen. Press the SELECT ̇ and ̈ buttons until the banding disappears. ...& Functions Clock Use this item to adjust the clock phase or to reduce video noise, dot interference or cross talk. (This is evident when part of your computer for turning on or off the Advanced AccuBlend feature. The projector displays the current image in the image.

