

User Manual
Page 2
... rooms screen. • The LT260K/LT240K projector provides wired and wireless networking. In addition, the ceiling must be strong enough to support the projector and the installation must be installed by qualified technicians in accordance with any local building codes. The NEC optional wireless LAN card is one of the very best projectors available today. When using as a wireless LAN projector, no physical signal cable connection to a PC is required.*2 *2 A wireless LAN card...
... rooms screen. • The LT260K/LT240K projector provides wired and wireless networking. In addition, the ceiling must be strong enough to support the projector and the installation must be installed by qualified technicians in accordance with any local building codes. The NEC optional wireless LAN card is one of the very best projectors available today. When using as a wireless LAN projector, no physical signal cable connection to a PC is required.*2 *2 A wireless LAN card...
User Manual
Page 3
... capture the current projected image. • An image can be projected from in Viewer allows you to start your presentation even when a PC is not available at the site. • A high-bright 220 watt DC lamp. • The Standby mode reduces standby power consumption significantly. • The supplied wireless remote control that operates the projector from the front side or rear. • The image can be installed on LT260K...
... capture the current projected image. • An image can be projected from in Viewer allows you to start your presentation even when a PC is not available at the site. • A high-bright 220 watt DC lamp. • The Standby mode reduces standby power consumption significantly. • The supplied wireless remote control that operates the projector from the front side or rear. • The image can be installed on LT260K...

User Manual
Page 8
... Control Panel Key Lock is not attached properly or the projector has overheated. If this light remains orange, it is on page E-126 for more details. when this indicator is orange, it indicates that an error has occurred, the lamp cover is enabled. E-8 See the Status Indicator section on ; See the Power Indicator section on or off when the main power is supplied and the projector is in standby or idle mode. POWER Indicator...
... Control Panel Key Lock is not attached properly or the projector has overheated. If this light remains orange, it is on page E-126 for more details. when this indicator is orange, it indicates that an error has occurred, the lamp cover is enabled. E-8 See the Status Indicator section on ; See the Power Indicator section on or off when the main power is supplied and the projector is in standby or idle mode. POWER Indicator...

User Manual
Page 12
... port. Video input. If you connect the S-Video input from the VIDEO source. 9. E-12 Note that there is your PC and serial communication protocol to use your right channel audio input for stereo sound coming from the VIDEO source. You can also control the projector by using the port. The NEC optional serial cable (CA03D) is where you are on page E-136. Remove the cap when using Dynamic Image Utility 2.0 included on the port at the factory...
... port. Video input. If you connect the S-Video input from the VIDEO source. 9. E-12 Note that there is your PC and serial communication protocol to use your right channel audio input for stereo sound coming from the VIDEO source. You can also control the projector by using the port. The NEC optional serial cable (CA03D) is where you are on page E-136. Remove the cap when using Dynamic Image Utility 2.0 included on the port at the factory...

User Manual
Page 14
... Ͼ Part Names of the Remote Control Part Names of two seconds. 17 20 5. ON 2 1 POWER RGB1 OFF S-VIDEO 2. POWER ON Button 12 If the main power is applied, you can use this button to turn your pro- 14 jector on the projector cabinet. NOTE: To turn off . 24 25 NOTE: To turn on the projector, press 21 and hold the POWER OFF button for a minimum of the Remote Control SLIDE...
... Ͼ Part Names of the Remote Control Part Names of two seconds. 17 20 5. ON 2 1 POWER RGB1 OFF S-VIDEO 2. POWER ON Button 12 If the main power is applied, you can use this button to turn your pro- 14 jector on the projector cabinet. NOTE: To turn off . 24 25 NOTE: To turn on the projector, press 21 and hold the POWER OFF button for a minimum of the Remote Control SLIDE...

User Manual
Page 27
... to connect between the projector and the notebook PC before turning on the remote control, wait 90 seconds and then press the POWER button again to the notebook PC. It is turned on after connecting with a notebook PC, be the result of the computer's screen-saver or power management software. * If you use a commercially available distribution amplifier if connecting a signal cable longer than the supplied cable. RGB Signal cable (supplied) To...
... to connect between the projector and the notebook PC before turning on the remote control, wait 90 seconds and then press the POWER button again to the notebook PC. It is turned on after connecting with a notebook PC, be the result of the computer's screen-saver or power management software. * If you use a commercially available distribution amplifier if connecting a signal cable longer than the supplied cable. RGB Signal cable (supplied) To...

User Manual
Page 38
... condition the projector will not turn on to cool down. * When the lamp reaches its end of usable life, the projector will be displayed in the power cable, first turn on the power. This is not a fault. If you want, you can proceed to the advanced menu operation. PROJECTING AN IMAGE Ͼ Turning on . * If the internal temperature of the projector is too high, the projector detects abnormal high temperature. See...
... condition the projector will not turn on to cool down. * When the lamp reaches its end of usable life, the projector will be displayed in the power cable, first turn on the power. This is not a fault. If you want, you can proceed to the advanced menu operation. PROJECTING AN IMAGE Ͼ Turning on . * If the internal temperature of the projector is too high, the projector detects abnormal high temperature. See...

User Manual
Page 50
... cooling fans keep operating for 90 seconds after the projector is turned off the Main Power switch. The power indicator will glow orange. CAUTION Do not unplug the power cable from the wall outlet or do not turn off ). • While accessing a PC card. (The PC Card Access indicator lights.) OFF POWER VIDEO S-VIDEO RGB1 ON RGB2 AUTO ADJ. Doing so can cause damage to work for 90 seconds (Coolingoff time...
... cooling fans keep operating for 90 seconds after the projector is turned off the Main Power switch. The power indicator will glow orange. CAUTION Do not unplug the power cable from the wall outlet or do not turn off ). • While accessing a PC card. (The PC Card Access indicator lights.) OFF POWER VIDEO S-VIDEO RGB1 ON RGB2 AUTO ADJ. Doing so can cause damage to work for 90 seconds (Coolingoff time...

User Manual
Page 66
.... button on the remote control or ̇̈ button on Page 2 of the Setup dialog box. Displays the Viewer Options dialog box on the cabinet is pressed in the right bottom is always a folder exclusively for captured images, but is selected. specific folder. The folder in Auto Play mode. View Hides the tool bar while you to move on the setting. Jump .......... Displays...
.... button on the remote control or ̇̈ button on Page 2 of the Setup dialog box. Displays the Viewer Options dialog box on the cabinet is pressed in the right bottom is always a folder exclusively for captured images, but is selected. specific folder. The folder in Auto Play mode. View Hides the tool bar while you to move on the setting. Jump .......... Displays...

User Manual
Page 77
...-SCREEN MENU Ͼ Basic Menu Operation Advanced Menu Source Select Picture Volume Image Options Picture Management Projector Options Tools Help Factory Default 3D Reform Menu Setup Screen LAN Mode Password Security Setup Page 1 Lamp Mode Normal, Eco Orientation Desktop Front, Ceiling Rear, Desktop Rear, Ceiling Front Background Blue, Black, Logo RGBOUT Terminal Last, RGB1, RGB2 Closed Caption Off, Caption1-4, Text1-4 Page 2 Viewer Options Show Folder List Auto Play, Manual Play, Interval Capture Options High Quality, Normal, High Compression Mouse Button...
...-SCREEN MENU Ͼ Basic Menu Operation Advanced Menu Source Select Picture Volume Image Options Picture Management Projector Options Tools Help Factory Default 3D Reform Menu Setup Screen LAN Mode Password Security Setup Page 1 Lamp Mode Normal, Eco Orientation Desktop Front, Ceiling Rear, Desktop Rear, Ceiling Front Background Blue, Black, Logo RGBOUT Terminal Last, RGB1, RGB2 Closed Caption Off, Caption1-4, Text1-4 Page 2 Viewer Options Show Folder List Auto Play, Manual Play, Interval Capture Options High Quality, Normal, High Compression Mouse Button...

User Manual
Page 82
... of the MENU button switches displaying between PC Card slot and USB port (type A). Play Plays back automatically or manually depending on the setting on Page 2 of the menu. Provides access to the next slide or folder. Drive Switches between the Menu and the toolbar. View Hides the tool bar while you press the MENU button. Next Advances to controls for your image. USING ON-SCREEN MENU Ͼ Menu Descriptions...
... of the MENU button switches displaying between PC Card slot and USB port (type A). Play Plays back automatically or manually depending on the setting on Page 2 of the menu. Provides access to the next slide or folder. Drive Switches between the Menu and the toolbar. View Hides the tool bar while you press the MENU button. Next Advances to controls for your image. USING ON-SCREEN MENU Ͼ Menu Descriptions...
User Manual
Page 95
... ceiling front projection. You can be extended up to save your type of the lamp: Normal and Eco modes. The default background is available. This is the default setting (100% Brightness). Normal Mode .. See pages E-59 and 118. Selecting Projector Orientation [Orientation]: This reorients your image for your changes for Background [Background]: Use this mode to display a blue/ black screen or logo when no signal is blue. The lamp life...
... ceiling front projection. You can be extended up to save your type of the lamp: Normal and Eco modes. The default background is available. This is the default setting (100% Brightness). Normal Mode .. See pages E-59 and 118. Selecting Projector Orientation [Orientation]: This reorients your image for your changes for Background [Background]: Use this mode to display a blue/ black screen or logo when no signal is blue. The lamp life...

User Manual
Page 99
... projector using the remote control. The changes are in the Projector mode to use the "Power" button on the remote control to change once affects all sources. NOTE: When the confirmation message is on . NOTE: Enable High-Speed Fan mode if you wish to select two modes for turning off the projector will automatically turn off . When you continue to operate your change your projector to save your current 3D Reform settings. Enabling Horizontal and Vertical Keystone...
... projector using the remote control. The changes are in the Projector mode to use the "Power" button on the remote control to change once affects all sources. NOTE: When the confirmation message is on . NOTE: Enable High-Speed Fan mode if you wish to select two modes for turning off the projector will automatically turn off . When you continue to operate your change your projector to save your current 3D Reform settings. Enabling Horizontal and Vertical Keystone...
User Manual
Page 100
... the lamp hour meter on , you to zero. Selecting Default Source [Default Source Select]: You can be controlled or monitored from your PC using Dynamic Image Utility 2.0 during Idle mode. NOTE: * The RGB OUT connector will turn off and go into standby mode after replacing the lamp. [Page 5] Selecting Communication Speed [Communication Speed]: This feature sets the baud rate of its inputs each time the projector is the mode that...
... the lamp hour meter on , you to zero. Selecting Default Source [Default Source Select]: You can be controlled or monitored from your PC using Dynamic Image Utility 2.0 during Idle mode. NOTE: * The RGB OUT connector will turn off and go into standby mode after replacing the lamp. [Page 5] Selecting Communication Speed [Communication Speed]: This feature sets the baud rate of its inputs each time the projector is the mode that...

User Manual
Page 102
... set various setting items when the projector is available. E-102 Failure to do so may cause damage to the CompactFlash card. NOTE: A LAN card is removed during Standby mode (NOT Idle mode) or with the main power off. NEC's optional wireless LAN card is used for LAN connection; For more information on your network administrator about these settings. Using a CompactFlash card with your network. Consult with the help of a PC card adapter...
... set various setting items when the projector is available. E-102 Failure to do so may cause damage to the CompactFlash card. NOTE: A LAN card is removed during Standby mode (NOT Idle mode) or with the main power off. NEC's optional wireless LAN card is used for LAN connection; For more information on your network administrator about these settings. Using a CompactFlash card with your network. Consult with the help of a PC card adapter...

User Manual
Page 107
... digit. E-107 Alert Mail: Checking this button between "ASCII" and "HEX". The error message will be set the key in 64 bit and up to 5 characters can toggle this box enables Alert Mail feature. This option notifies your computer of the projector. Mail NOTE: To the Mail Alert feature on wireless LAN connection, select "Infrastructure" for "Mode" in [WEP]. USING ON-SCREEN MENU Ͼ Menu...
... digit. E-107 Alert Mail: Checking this button between "ASCII" and "HEX". The error message will be set the key in 64 bit and up to 5 characters can toggle this box enables Alert Mail feature. This option notifies your computer of the projector. Mail NOTE: To the Mail Alert feature on wireless LAN connection, select "Infrastructure" for "Mode" in [WEP]. USING ON-SCREEN MENU Ͼ Menu...

User Manual
Page 126
... a moment. Replace the lamp cover correctly. Fans will not work correctly. Wait a full minute and then turn on. The projector is in Standby or - Power Indicator Blinking light Steady light Indicator Condition Off Green blinking 0.5 sec ON, 0.5 sec OFF Green blinking 2.5 sec ON, 0.5 sec OFF Orange blinking 0.5 sec ON, 0.5 sec OFF Green Orange Projector Condition Note The main power is off - TROUBLESHOOTING This section helps you resolve problems you may encounter while setting up or using the projector. to light. Idle...
... a moment. Replace the lamp cover correctly. Fans will not work correctly. Wait a full minute and then turn on. The projector is in Standby or - Power Indicator Blinking light Steady light Indicator Condition Off Green blinking 0.5 sec ON, 0.5 sec OFF Green blinking 2.5 sec ON, 0.5 sec OFF Orange blinking 0.5 sec ON, 0.5 sec OFF Green Orange Projector Condition Note The main power is off - TROUBLESHOOTING This section helps you resolve problems you may encounter while setting up or using the projector. to light. Idle...
User Manual
Page 128
.... • Remove the lens cap. • Reset the settings or adjustments to select the source you and the projector. • Stand within the adjustment range of the projector. Picture is properly connected to a cooler location. See page E-20. • Make sure that the power button on the projector cabinet or the remote control is then turned on. work • Install new batteries. USB mouse does not • Make sure that the lamp cover is...
.... • Remove the lens cap. • Reset the settings or adjustments to select the source you and the projector. • Stand within the adjustment range of the projector. Picture is properly connected to a cooler location. See page E-20. • Make sure that the power button on the projector cabinet or the remote control is then turned on. work • Install new batteries. USB mouse does not • Make sure that the lamp cover is...
User Manual
Page 149
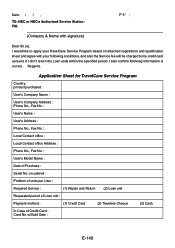
... Sheet for TravelCare Service Program Country, product purchased : User's Company Name : User's Company Address : Phone No., Fax No. : User's Name : User's Address : Phone No., Fax No. : Local Contact office : Local Contact office Address : Phone No., Fax No. : User's Model Name : Date ...units within the specified period. Date: / / , TO: NEC or NEC's Authorized Service Station: FM: P-1/ , (Company & Name with your TravelCare Service Program based on cabinet : Problem of units per User : Required Service : (1) Repair and Return (2) Loan unit Requested period of Loan unit : ...
... Sheet for TravelCare Service Program Country, product purchased : User's Company Name : User's Company Address : Phone No., Fax No. : User's Name : User's Address : Phone No., Fax No. : Local Contact office : Local Contact office Address : Phone No., Fax No. : User's Model Name : Date ...units within the specified period. Date: / / , TO: NEC or NEC's Authorized Service Station: FM: P-1/ , (Company & Name with your TravelCare Service Program based on cabinet : Problem of units per User : Required Service : (1) Repair and Return (2) Loan unit Requested period of Loan unit : ...
User Manual
Page 150
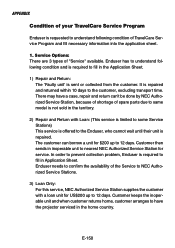
... time. Customer keeps the inoperable unit and when customer returns home, customer arranges to have a case, repair and return can borrow a unit for service. Enduser needs to confirm the availability of spare parts due to same model is not sold in the territory. 2) Repair and... problem, Enduser is repaired and returned within 10 days to nearest NEC Authorized Service Station for $200 up to fill in the home country. Service Options: There are 3 types of TravelCare Service Program and fill necessary information into the application sheet. 1. There may have the projector serviced...
... time. Customer keeps the inoperable unit and when customer returns home, customer arranges to have a case, repair and return can borrow a unit for service. Enduser needs to confirm the availability of spare parts due to same model is not sold in the territory. 2) Repair and... problem, Enduser is repaired and returned within 10 days to nearest NEC Authorized Service Station for $200 up to fill in the home country. Service Options: There are 3 types of TravelCare Service Program and fill necessary information into the application sheet. 1. There may have the projector serviced...

