
User Guide
Page 4
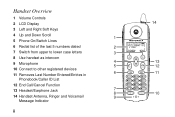
Handset Overview 1 Volume Controls 2 LCD Display 3 Left and Right Soft Keys 4 Up and Down Scroll 1 5 Phone On/Switch Lines 6 Redial list of the last 5 numbers dialed 2 7 Switch from upper to lower case letters 3 8 Use handset as intercom 9 Microphone 4 5 10 Connect to other registered devices 11 Removes Last Number Entered/Entries in 6 Phonebook/Caller ID List 12 End Call/Cancel Function 13 Headset/Earphone Jack 7 8 14 Handset Antenna, Ringer and Voicemail 9 Message Indicator ii 14 13 12 11 10
Handset Overview 1 Volume Controls 2 LCD Display 3 Left and Right Soft Keys 4 Up and Down Scroll 1 5 Phone On/Switch Lines 6 Redial list of the last 5 numbers dialed 2 7 Switch from upper to lower case letters 3 8 Use handset as intercom 9 Microphone 4 5 10 Connect to other registered devices 11 Removes Last Number Entered/Entries in 6 Phonebook/Caller ID List 12 End Call/Cancel Function 13 Headset/Earphone Jack 7 8 14 Handset Antenna, Ringer and Voicemail 9 Message Indicator ii 14 13 12 11 10
User Guide
Page 5
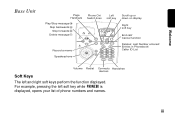
Welcome Base Unit Page Handsets Play/Stop message Skip backwards Skip forwards Delete message Phone On/ Switch lines Left soft key Record a memo Speakerphone Scroll up or down on display Right soft key End call/ Cancel function Deletes: Last Number entered/ Entries in Phonebook/ Caller ID List Volume Redial Connects Handsfree devices Soft Keys The left soft key while PHONEBK is displayed, opens your list of phone numbers and names. For example, pressing the left and right soft keys perform the function displayed. iii
Welcome Base Unit Page Handsets Play/Stop message Skip backwards Skip forwards Delete message Phone On/ Switch lines Left soft key Record a memo Speakerphone Scroll up or down on display Right soft key End call/ Cancel function Deletes: Last Number entered/ Entries in Phonebook/ Caller ID List Volume Redial Connects Handsfree devices Soft Keys The left soft key while PHONEBK is displayed, opens your list of phone numbers and names. For example, pressing the left and right soft keys perform the function displayed. iii
User Guide
Page 6
Table of Contents Welcome i Handset Overview ii Base Unit iii Soft Keys iii Important Safety Instructions xi Getting Started 1 Battery Safety Instructions 1 Installing the Batteries 2 Installing the Base Unit 4 Removing the Wall Mount Bracket 4 Setting Up Your Phone 5 Removing the Wall Mount and Base Unit . . . . . 6 Removing the Base Unit from the Wall Bracket 6 Handset Overview 7 Standby Screen Information 7 iv
Table of Contents Welcome i Handset Overview ii Base Unit iii Soft Keys iii Important Safety Instructions xi Getting Started 1 Battery Safety Instructions 1 Installing the Batteries 2 Installing the Base Unit 4 Removing the Wall Mount Bracket 4 Setting Up Your Phone 5 Removing the Wall Mount and Base Unit . . . . . 6 Removing the Base Unit from the Wall Bracket 6 Handset Overview 7 Standby Screen Information 7 iv
User Guide
Page 7
Using the Soft Keys 8 Using the Navigation Keys 8 Setting Up 9 Registering Your Handset 9 Deregistering a Handset 10 Personalizing Your Handset 11 Ringer Options 11 Setting the Ring Tone and Ring Volume 12 Setting Key Beeps On or Off 13 Naming a Handset or Base Station 14 Setting Date and Time 16 Setting the Language Option 17 Setting Touch Tone or Pulse Dialing 18 Using Your SD4580 19 Making a Call from the Handset or Base Unit . . . 19 Answering/Ending a Call 20 v
Using the Soft Keys 8 Using the Navigation Keys 8 Setting Up 9 Registering Your Handset 9 Deregistering a Handset 10 Personalizing Your Handset 11 Ringer Options 11 Setting the Ring Tone and Ring Volume 12 Setting Key Beeps On or Off 13 Naming a Handset or Base Station 14 Setting Date and Time 16 Setting the Language Option 17 Setting Touch Tone or Pulse Dialing 18 Using Your SD4580 19 Making a Call from the Handset or Base Unit . . . 19 Answering/Ending a Call 20 v

User Guide
Page 8
Adjusting the Volume During a Call 20 Making a Call Using the Speakerphone 21 Switching Between the Handset and Speakerphone 21 Muting a Call 21 Placing a Call on Hold 22 Redialing a Number 22 Finding a Lost or Misplaced Handset 23 vi
Adjusting the Volume During a Call 20 Making a Call Using the Speakerphone 21 Switching Between the Handset and Speakerphone 21 Muting a Call 21 Placing a Call on Hold 22 Redialing a Number 22 Finding a Lost or Misplaced Handset 23 vi

User Guide
Page 10
Setting the Number of Rings Before the Answering Machine Picks Up 36 Using Call Screening 37 Setting the Security ID Number 38 Using the Answer Machine 39 Checking Messages from the Base Station . . 39 Checking Messages from the Handset 40 Recording a Memo 41 Advanced Features 43 Conference Calling 44 Using the Intercom 45 Intercom Setup 45 Handset to Handset Intercom 46 Transferring a Call from One Handset to Another 47 Unannounced Transfer 47 Announced Transfer 48 Using the Handset as a Walkie Talkie 49 viii
Setting the Number of Rings Before the Answering Machine Picks Up 36 Using Call Screening 37 Setting the Security ID Number 38 Using the Answer Machine 39 Checking Messages from the Base Station . . 39 Checking Messages from the Handset 40 Recording a Memo 41 Advanced Features 43 Conference Calling 44 Using the Intercom 45 Intercom Setup 45 Handset to Handset Intercom 46 Transferring a Call from One Handset to Another 47 Unannounced Transfer 47 Announced Transfer 48 Using the Handset as a Walkie Talkie 49 viii
User Guide
Page 13
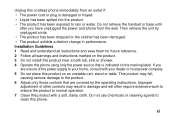
... use chemicals or cleaning agents to normal operation. 7 Clean this product with your home, consult with a soft, damp cloth. Unplug this cordless phone immediately from the wall. Installation Guidelines 1 Read and understand all instructions and save them for future reference. 2 Follow all warnings and instructions marked... the product. • The product has been exposed to your dealer or local power company. 5 Do not place this phone. Do not retrieve the handset or base until after you are covered by unplugged cords. • The product has been dropped or the cabinet has been...
... use chemicals or cleaning agents to normal operation. 7 Clean this product with your home, consult with a soft, damp cloth. Unplug this cordless phone immediately from the wall. Installation Guidelines 1 Read and understand all instructions and save them for future reference. 2 Follow all warnings and instructions marked... the product. • The product has been exposed to your dealer or local power company. 5 Do not place this phone. Do not retrieve the handset or base until after you are covered by unplugged cords. • The product has been dropped or the cabinet has been...
User Guide
Page 15
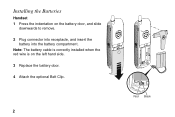
Installing the Batteries Handset 1 Press the indentation on the left hand side. 3 Replace the battery door. 4 Attach the optional Belt Clip. 2 Red Black Note: The battery cable is correctly installed when the red wire is on the battery door, and slide downwards to remove. 2 Plug connector into receptacle, and insert the battery into the battery compartment.
Installing the Batteries Handset 1 Press the indentation on the left hand side. 3 Replace the battery door. 4 Attach the optional Belt Clip. 2 Red Black Note: The battery cable is correctly installed when the red wire is on the battery door, and slide downwards to remove. 2 Plug connector into receptacle, and insert the battery into the battery compartment.
User Guide
Page 20
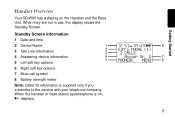
When they are not in use, the display shows the Standby Screen. Standby Screen Information 1 Date and time 2 Device Name 1 8 3 Talk Line Information 2 3 4 Answering device information 4 7 5 6 5 Left soft key options 6 Right soft key options 7 Mute call symbol 8 Battery strength meter Note: Caller ID information is on the Handset and the Base Unit. When the handset or base station speakerphone is supplied only if you subscribe to the service with your telephone company. Getting Started Handset Overview Your SD4580 has a display on , V displays. 7
When they are not in use, the display shows the Standby Screen. Standby Screen Information 1 Date and time 2 Device Name 1 8 3 Talk Line Information 2 3 4 Answering device information 4 7 5 6 5 Left soft key options 6 Right soft key options 7 Mute call symbol 8 Battery strength meter Note: Caller ID information is on the Handset and the Base Unit. When the handset or base station speakerphone is supplied only if you subscribe to the service with your telephone company. Getting Started Handset Overview Your SD4580 has a display on , V displays. 7

User Guide
Page 21
The up and down scroll keys navigate through soft key menu items, settings, phonebook entries, Caller ID and redial lists. The handset display uses an arrowhead to select the functions listed directly above and below the selected item. Using the Soft Keys Use the left and right ...
The up and down scroll keys navigate through soft key menu items, settings, phonebook entries, Caller ID and redial lists. The handset display uses an arrowhead to select the functions listed directly above and below the selected item. Using the Soft Keys Use the left and right ...

User Guide
Page 22
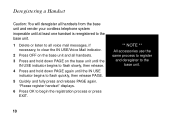
Left soft key Scroll Note: If you exceed the registration limit of 8 devices, the handset display reads Unable to Register. 3 Press SELECT. 4 Press and hold PAGE button on base unit until the base beeps. To register your new handset: 1 Press the right soft key to select menu. 2 Scroll to Register. Setting Up Registering Your Handset You can register up to 8 devices (handsets, cameras, or Cell Dock) to a base unit. Right soft key 9 Setting Up
Left soft key Scroll Note: If you exceed the registration limit of 8 devices, the handset display reads Unable to Register. 3 Press SELECT. 4 Press and hold PAGE button on base unit until the base beeps. To register your new handset: 1 Press the right soft key to select menu. 2 Scroll to Register. Setting Up Registering Your Handset You can register up to 8 devices (handsets, cameras, or Cell Dock) to a base unit. Right soft key 9 Setting Up
User Guide
Page 23
... base unit and render your cordless telephone system inoperable until at least one handset is reregistered to the base unit. 1 Delete or listen to all voice mail messages, if necessary, to clear the IN USE/Voice Mail indicator. 2 Press OFF on the base unit and all handsets. 3 Press and hold down...begins to flash slowly, then release. 4 Press and hold down PAGE again until the IN USE indicator begins to the base unit. 10 "Please register handset" displays. 6 Press OK to begin the registration process or press EXIT. ** NOTE ** All accessories use the same process to register and deregister to ...
... base unit and render your cordless telephone system inoperable until at least one handset is reregistered to the base unit. 1 Delete or listen to all voice mail messages, if necessary, to clear the IN USE/Voice Mail indicator. 2 Press OFF on the base unit and all handsets. 3 Press and hold down...begins to flash slowly, then release. 4 Press and hold down PAGE again until the IN USE indicator begins to the base unit. 10 "Please register handset" displays. 6 Press OK to begin the registration process or press EXIT. ** NOTE ** All accessories use the same process to register and deregister to ...
User Guide
Page 24
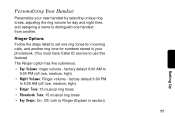
...15 musical ring tones • Phonebook Tone: 15 musical ring tones • Key Beeps: On, Off, Link to Ringer (Explain in your new handset by selecting unique ring tones, adjusting the ring volume for numbers stored in section) 11 Setting Up factory default 9:00 PM to 6:00 AM (off... , low, medium, high) • Night Volume: Ringer volume - Personalizing Your Handset Personalize your phonebook. (You must have Caller ID service to use this feature) The Ringer option has five submenus: • Day Volume: ringer volume - Ringer...
...15 musical ring tones • Phonebook Tone: 15 musical ring tones • Key Beeps: On, Off, Link to Ringer (Explain in your new handset by selecting unique ring tones, adjusting the ring volume for numbers stored in section) 11 Setting Up factory default 9:00 PM to 6:00 AM (off... , low, medium, high) • Night Volume: Ringer volume - Personalizing Your Handset Personalize your phonebook. (You must have Caller ID service to use this feature) The Ringer option has five submenus: • Day Volume: ringer volume - Ringer...
User Guide
Page 27
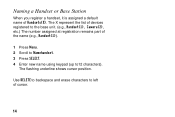
Use DELETE to backspace and erase characters to Namehandset. 3 Press SELECT. 4 Enter new name using keypad (up to12 characters). Naming a Handset or Base Station When you register a handset, it is assigned a default name of cursor. 14 The flashing underline shows cursor position. The X represent the list of devices registered to the base unit. (e.g., Handset(1), Camera(2), etc.) The number assigned at registration remains part of the name (e.g., Handset(1)). 1 Press Menu. 2 Scroll to left of Handsets(X).
Use DELETE to backspace and erase characters to Namehandset. 3 Press SELECT. 4 Enter new name using keypad (up to12 characters). Naming a Handset or Base Station When you register a handset, it is assigned a default name of cursor. 14 The flashing underline shows cursor position. The X represent the list of devices registered to the base unit. (e.g., Handset(1), Camera(2), etc.) The number assigned at registration remains part of the name (e.g., Handset(1)). 1 Press Menu. 2 Scroll to left of Handsets(X).
User Guide
Page 28
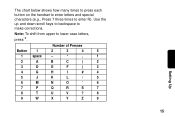
The chart below shows how many times to press each button on the handset to enter letters and special characters (e.g., Press 7 three times to lower case letters, press *. Number of Presses Button 1 2 3 4 5 1 space - * , 1 2 A B C ( 2 3 D E F ) 3 4 G H I # 4 5 J K L / 5 6 M N O ' 6 7 P Q R S 7 8 T U V ? 8 9 W X Y Z 9 Setting Up 15 Note: To shift from upper to enter R). Use the up and down scroll keys to backspace to make corrections.
The chart below shows how many times to press each button on the handset to enter letters and special characters (e.g., Press 7 three times to lower case letters, press *. Number of Presses Button 1 2 3 4 5 1 space - * , 1 2 A B C ( 2 3 D E F ) 3 4 G H I # 4 5 J K L / 5 6 M N O ' 6 7 P Q R S 7 8 T U V ? 8 9 W X Y Z 9 Setting Up 15 Note: To shift from upper to enter R). Use the up and down scroll keys to backspace to make corrections.
User Guide
Page 32
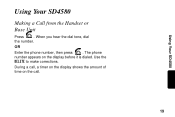
During a call, a timer on the display shows the amount of time on the display before it is dialed. Use the DELETE to make corrections. When you hear the dial tone, dial the number. OR Enter the phone number, then press . The phone number appears on the call. 19 Using Your SD4580 Using Your SD4580 Making a Call from the Handset or Base Unit Press .
During a call, a timer on the display shows the amount of time on the display before it is dialed. Use the DELETE to make corrections. When you hear the dial tone, dial the number. OR Enter the phone number, then press . The phone number appears on the call. 19 Using Your SD4580 Using Your SD4580 Making a Call from the Handset or Base Unit Press .
User Guide
Page 33
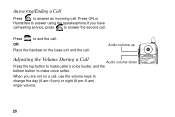
Audio volume up Adjusting the Volume During a Call Audio volume down Press the top button to make caller's voice louder, and the bottom button to answer an incoming call. Press to end the call . OR Place the handset on a call . Press ON or Handsfree to change the day (6 am-9 pm) or night (9 pm-6 am) ringer volume. 20 When you have call waiting service, press to answer the second call , use the volume keys to answer using the speakerphone.If you are not on the base unit end the call . Answering/Ending a Call Press to make voice softer.
Audio volume up Adjusting the Volume During a Call Audio volume down Press the top button to make caller's voice louder, and the bottom button to answer an incoming call. Press to end the call . OR Place the handset on a call . Press ON or Handsfree to change the day (6 am-9 pm) or night (9 pm-6 am) ringer volume. 20 When you have call waiting service, press to answer the second call , use the volume keys to answer using the speakerphone.If you are not on the base unit end the call . Answering/Ending a Call Press to make voice softer.

User Guide
Page 34
... Using the Speakerphone 1 Press HANDSFREE. 2 Dial the number. Note: For optimal speakerphone quality, when using the handset, make sure the belt clip is on the back of the handset). Pressing Handsfree while in the Phonebook, Caller ID Redial lists, automatically turns on . Switching Between the... Handset and Speakerphone Press HANDSFREE to toggle between handset and speakerphone. This raises the handset up so it is not lying flat (the speakerphone is on the speakerphone and dials the ...
... Using the Speakerphone 1 Press HANDSFREE. 2 Dial the number. Note: For optimal speakerphone quality, when using the handset, make sure the belt clip is on the back of the handset). Pressing Handsfree while in the Phonebook, Caller ID Redial lists, automatically turns on . Switching Between the... Handset and Speakerphone Press HANDSFREE to toggle between handset and speakerphone. This raises the handset up so it is not lying flat (the speakerphone is on the speakerphone and dials the ...
User Guide
Page 36
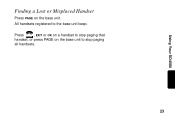
Press , EXIT or OK on a handset to stop paging all handsets. Finding a Lost or Misplaced Handset Press PAGE on the base unit to the base unit beep. Using Your SD4580 23 All handsets registered to stop paging that handset, or press PAGE on the base unit.
Press , EXIT or OK on a handset to stop paging all handsets. Finding a Lost or Misplaced Handset Press PAGE on the base unit to the base unit beep. Using Your SD4580 23 All handsets registered to stop paging that handset, or press PAGE on the base unit.

User Guide
Page 37
... from the caller ID or redial list. Storing numbers in the private or shared phonebook. Each private phonebook stores up to each handset and is not accessible by other handsets. You can enter numbers directly into the phonebook or add them from the Caller ID or redial list. Saving a Number in the...
... from the caller ID or redial list. Storing numbers in the private or shared phonebook. Each private phonebook stores up to each handset and is not accessible by other handsets. You can enter numbers directly into the phonebook or add them from the Caller ID or redial list. Saving a Number in the...

