
User Guide
Page 2
... or used to make changes in the U.S. Patent and Trademark Office. Motorola provides this guide, or for a particular purpose. All other product or service names are registered in content from Motorola, Inc. Motorola reserves the right to revise this publication and to provide notification of this guide without obligation on the part of Motorola to make any derivative work (such as translation, transformation or adaptation...
... or used to make changes in the U.S. Patent and Trademark Office. Motorola provides this guide, or for a particular purpose. All other product or service names are registered in content from Motorola, Inc. Motorola reserves the right to revise this publication and to provide notification of this guide without obligation on the part of Motorola to make any derivative work (such as translation, transformation or adaptation...
User Guide
Page 4
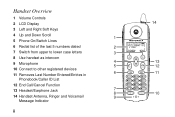
Handset Overview 1 Volume Controls 2 LCD Display 3 Left and Right Soft Keys 4 Up and Down Scroll 1 5 Phone On/Switch Lines 6 Redial list of the last 5 numbers dialed 2 7 Switch from upper to lower case letters 3 8 Use handset as intercom 9 Microphone 4 5 10 Connect to other registered devices 11 Removes Last Number Entered/Entries in 6 Phonebook/Caller ID List 12 End Call/Cancel Function 13 Headset/Earphone Jack 7 8 14 Handset Antenna, Ringer and Voicemail 9 Message Indicator ii 14 13 12 11 10
Handset Overview 1 Volume Controls 2 LCD Display 3 Left and Right Soft Keys 4 Up and Down Scroll 1 5 Phone On/Switch Lines 6 Redial list of the last 5 numbers dialed 2 7 Switch from upper to lower case letters 3 8 Use handset as intercom 9 Microphone 4 5 10 Connect to other registered devices 11 Removes Last Number Entered/Entries in 6 Phonebook/Caller ID List 12 End Call/Cancel Function 13 Headset/Earphone Jack 7 8 14 Handset Antenna, Ringer and Voicemail 9 Message Indicator ii 14 13 12 11 10
User Guide
Page 5
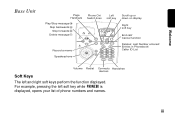
iii Welcome Base Unit Page Handsets Play/Stop message Skip backwards Skip forwards Delete message Phone On/ Switch lines Left soft key Record a memo Speakerphone Scroll up or down on display Right soft key End call/ Cancel function Deletes: Last Number entered/ Entries in Phonebook/ Caller ID List Volume Redial Connects Handsfree devices Soft Keys The left soft key while PHONEBK is displayed, opens your list of phone numbers and names. For example, pressing the left and right soft keys perform the function displayed.
iii Welcome Base Unit Page Handsets Play/Stop message Skip backwards Skip forwards Delete message Phone On/ Switch lines Left soft key Record a memo Speakerphone Scroll up or down on display Right soft key End call/ Cancel function Deletes: Last Number entered/ Entries in Phonebook/ Caller ID List Volume Redial Connects Handsfree devices Soft Keys The left soft key while PHONEBK is displayed, opens your list of phone numbers and names. For example, pressing the left and right soft keys perform the function displayed.
User Guide
Page 7
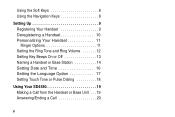
Using the Soft Keys 8 Using the Navigation Keys 8 Setting Up 9 Registering Your Handset 9 Deregistering a Handset 10 Personalizing Your Handset 11 Ringer Options 11 Setting the Ring Tone and Ring Volume 12 Setting Key Beeps On or Off 13 Naming a Handset or Base Station 14 Setting Date and Time 16 Setting the Language Option 17 Setting Touch Tone or Pulse Dialing 18 Using Your SD4580 19 Making a Call from the Handset or Base Unit . . . 19 Answering/Ending a Call 20 v
Using the Soft Keys 8 Using the Navigation Keys 8 Setting Up 9 Registering Your Handset 9 Deregistering a Handset 10 Personalizing Your Handset 11 Ringer Options 11 Setting the Ring Tone and Ring Volume 12 Setting Key Beeps On or Off 13 Naming a Handset or Base Station 14 Setting Date and Time 16 Setting the Language Option 17 Setting Touch Tone or Pulse Dialing 18 Using Your SD4580 19 Making a Call from the Handset or Base Unit . . . 19 Answering/Ending a Call 20 v
User Guide
Page 9
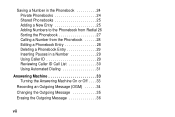
Saving a Number in the Phonebook 24 Private Phonebooks 24 Shared Phonebooks 25 Adding a New Entry 25 Adding Numbers to the Phonebook from Redial 26 Sorting the Phonebook 27 Calling a Number from the Phonebook 28 Editing a Phonebook Entry 28 Deleting a Phonebook Entry 29 Inserting Pauses in a Number 29 Using Caller ID 29 Reviewing Caller ID Call List 30 Using Automated Dialing 31 Answering Machine 33 Turning the Answering Machine On or Off . . . . 33 Recording an Outgoing Message (OGM 34 Changing the Outgoing Message 35 Erasing the Outgoing Message 36 vii
Saving a Number in the Phonebook 24 Private Phonebooks 24 Shared Phonebooks 25 Adding a New Entry 25 Adding Numbers to the Phonebook from Redial 26 Sorting the Phonebook 27 Calling a Number from the Phonebook 28 Editing a Phonebook Entry 28 Deleting a Phonebook Entry 29 Inserting Pauses in a Number 29 Using Caller ID 29 Reviewing Caller ID Call List 30 Using Automated Dialing 31 Answering Machine 33 Turning the Answering Machine On or Off . . . . 33 Recording an Outgoing Message (OGM 34 Changing the Outgoing Message 35 Erasing the Outgoing Message 36 vii

User Guide
Page 10
Setting the Number of Rings Before the Answering Machine Picks Up 36 Using Call Screening 37 Setting the Security ID Number 38 Using the Answer Machine 39 Checking Messages from the Base Station . . 39 Checking Messages from the Handset 40 Recording a Memo 41 Advanced Features 43 Conference Calling 44 Using the Intercom 45 Intercom Setup 45 Handset to Handset Intercom 46 Transferring a Call from One Handset to Another 47 Unannounced Transfer 47 Announced Transfer 48 Using the Handset as a Walkie Talkie 49 viii
Setting the Number of Rings Before the Answering Machine Picks Up 36 Using Call Screening 37 Setting the Security ID Number 38 Using the Answer Machine 39 Checking Messages from the Base Station . . 39 Checking Messages from the Handset 40 Recording a Memo 41 Advanced Features 43 Conference Calling 44 Using the Intercom 45 Intercom Setup 45 Handset to Handset Intercom 46 Transferring a Call from One Handset to Another 47 Unannounced Transfer 47 Announced Transfer 48 Using the Handset as a Walkie Talkie 49 viii
User Guide
Page 12
... use this user's guide. • Do not overload wall outlets and extension cords. • Avoid using your cordless phone to reduce the risk of the gas line. Use a damp cloth for example, near a bath tub, kitchen sink, or swimming pool). • Do not allow anything to report a gas leak, especially if you are in the back of the phone unblocked. x If service or repair work...
... use this user's guide. • Do not overload wall outlets and extension cords. • Avoid using your cordless phone to reduce the risk of the gas line. Use a damp cloth for example, near a bath tub, kitchen sink, or swimming pool). • Do not allow anything to report a gas leak, especially if you are in the back of the phone unblocked. x If service or repair work...
User Guide
Page 13
... of the power supply to normal operation. 7 Clean this product with your home, consult with a soft, damp cloth. Do not retrieve the handset or base until after you are covered by unplugged cords. • The product has been dropped or the cabinet has been damaged. • The product exhibits a distinct change in damage and will often require extensive work to...
... of the power supply to normal operation. 7 Clean this product with your home, consult with a soft, damp cloth. Do not retrieve the handset or base until after you are covered by unplugged cords. • The product has been dropped or the cabinet has been damaged. • The product exhibits a distinct change in damage and will often require extensive work to...
User Guide
Page 23
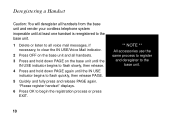
Deregistering a Handset Caution: You will deregister all handsets from the base unit and render your cordless telephone system inoperable until at least one handset is reregistered to the base unit. 1 Delete or listen to all voice mail messages, if necessary, to clear the IN USE/Voice Mail indicator. 2 Press OFF on the base unit and all handsets. 3 Press and hold down PAGE on the base unit until the IN USE indicator begins to flash slowly, then release. 4 Press and...
Deregistering a Handset Caution: You will deregister all handsets from the base unit and render your cordless telephone system inoperable until at least one handset is reregistered to the base unit. 1 Delete or listen to all voice mail messages, if necessary, to clear the IN USE/Voice Mail indicator. 2 Press OFF on the base unit and all handsets. 3 Press and hold down PAGE on the base unit until the IN USE indicator begins to flash slowly, then release. 4 Press and...
User Guide
Page 24
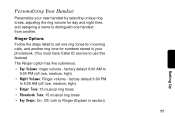
... musical ring tones • Key Beeps: On, Off, Link to Ringer (Explain in your new handset by selecting unique ring tones, adjusting the ring volume for day and night time, and assigning a name to distinguish one ring tones for numbers stored in section) 11 Setting Up factory default 9:00 PM to 6:00 AM (off , low, medium, high) • Night Volume: Ringer volume - Ringer Options Follow the steps listed to set one handset from another ring tone for incoming calls...
... musical ring tones • Key Beeps: On, Off, Link to Ringer (Explain in your new handset by selecting unique ring tones, adjusting the ring volume for day and night time, and assigning a name to distinguish one ring tones for numbers stored in section) 11 Setting Up factory default 9:00 PM to 6:00 AM (off , low, medium, high) • Night Volume: Ringer volume - Ringer Options Follow the steps listed to set one handset from another ring tone for incoming calls...

User Guide
Page 25
Each tone/volume plays as you press Change. 7 Stop at desired tone/volume to set. 8 Press Done. 9 Press Exit to return to Standby Screen or press scroll keys to Ringer. 3 Press Select. 4 Scroll through list of options. (Day Volume, Night Volume, Ringer Tone, etc.) 5 Select desired option. 6 Press Change. Setting the Ring Tone and Ring Volume 1 Press Menu. 2 Scroll to view different menu options. RING ER SUBM ENU OPTIONS Day Volume: Ringer volume from 6:00...
Each tone/volume plays as you press Change. 7 Stop at desired tone/volume to set. 8 Press Done. 9 Press Exit to return to Standby Screen or press scroll keys to Ringer. 3 Press Select. 4 Scroll through list of options. (Day Volume, Night Volume, Ringer Tone, etc.) 5 Select desired option. 6 Press Change. Setting the Ring Tone and Ring Volume 1 Press Menu. 2 Scroll to view different menu options. RING ER SUBM ENU OPTIONS Day Volume: Ringer volume from 6:00...
User Guide
Page 33
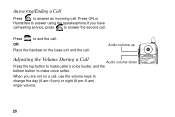
Answering/Ending a Call Press to change the day (6 am-9 pm) or night (9 pm-6 am) ringer volume. 20 When you have call waiting service, press to answer the second call . Press to make caller's voice louder, and the bottom button to end the call . OR Place the handset on a call, use the volume keys to answer an incoming call . Audio volume up Adjusting the Volume During a Call Audio volume down Press the top button to make voice softer. Press ON or Handsfree to answer using the speakerphone.If you are not on the base unit end the call .
Answering/Ending a Call Press to change the day (6 am-9 pm) or night (9 pm-6 am) ringer volume. 20 When you have call waiting service, press to answer the second call . Press to make caller's voice louder, and the bottom button to end the call . OR Place the handset on a call, use the volume keys to answer an incoming call . Audio volume up Adjusting the Volume During a Call Audio volume down Press the top button to make voice softer. Press ON or Handsfree to answer using the speakerphone.If you are not on the base unit end the call .

User Guide
Page 45
All of the features of the answer machine are located in the SETUP DEVICE menu. 1 Press MENU. 2 Scroll to 15 minutes of messages and/or memos. Answering Machine Answering Machine You new answering machine stores up to SETUP DEVICE. 3 Press SELECT. Turning the Answering Machine On or Off 1 Go to the SETUP DEVICE menu. 2 Scroll to ANSWER ON/OFF. 3 Press SELECT. 4 Scroll to your messages from the base unit, the handset, or remotely. A voice prompt announces the change. 33 Listen to ON or OFF. 5 Press DONE. Use the base unit or a handset to setup the answering machine.
All of the features of the answer machine are located in the SETUP DEVICE menu. 1 Press MENU. 2 Scroll to 15 minutes of messages and/or memos. Answering Machine Answering Machine You new answering machine stores up to SETUP DEVICE. 3 Press SELECT. Turning the Answering Machine On or Off 1 Go to the SETUP DEVICE menu. 2 Scroll to ANSWER ON/OFF. 3 Press SELECT. 4 Scroll to your messages from the base unit, the handset, or remotely. A voice prompt announces the change. 33 Listen to ON or OFF. 5 Press DONE. Use the base unit or a handset to setup the answering machine.

User Guide
Page 47
Answering Machine Changing the Outgoing Message 1 Go to the SETUP DEVICE menu. 2 Scroll to OUTGOING MSG. 3 Press SELECT. 4 Scroll to CHANGE OGM. 5 Press SELECT. 6 Select DEFAULT OGM or RECORDED OGM. 7 Press SELECT. 8 Press EXIT to return to the standby screen. Press EXIT again to return to the OUTGOING MSG menu. Note: To listen to the current OGM, select PLAY OGM from the OUTGOING MSG menu. 35
Answering Machine Changing the Outgoing Message 1 Go to the SETUP DEVICE menu. 2 Scroll to OUTGOING MSG. 3 Press SELECT. 4 Scroll to CHANGE OGM. 5 Press SELECT. 6 Select DEFAULT OGM or RECORDED OGM. 7 Press SELECT. 8 Press EXIT to return to the standby screen. Press EXIT again to return to the OUTGOING MSG menu. Note: To listen to the current OGM, select PLAY OGM from the OUTGOING MSG menu. 35
User Guide
Page 48
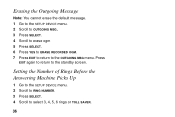
Setting the Number of Rings Before the Answering Machine Picks Up 1 Go to the SETUP DEVICE menu. 2 Scroll to RING NUMBER. 3 Press SELECT. 4 Scroll to the OUTGOING MSG menu. Erasing the Outgoing Message Note: You cannot erase the default message. 1 Go to the SETUP DEVICE menu. 2 Scroll to OUTGOING MSG. 3 Press SELECT. 4 Scroll to erase ogm 5 Press SELECT. 6 Press YES to ERASE RECORDED OGM. 7 Press EXIT to return to select 3, 4, 5, 6 rings or TOLL SAVER. 36 Press EXIT again to return to the standby screen.
Setting the Number of Rings Before the Answering Machine Picks Up 1 Go to the SETUP DEVICE menu. 2 Scroll to RING NUMBER. 3 Press SELECT. 4 Scroll to the OUTGOING MSG menu. Erasing the Outgoing Message Note: You cannot erase the default message. 1 Go to the SETUP DEVICE menu. 2 Scroll to OUTGOING MSG. 3 Press SELECT. 4 Scroll to erase ogm 5 Press SELECT. 6 Press YES to ERASE RECORDED OGM. 7 Press EXIT to return to select 3, 4, 5, 6 rings or TOLL SAVER. 36 Press EXIT again to return to the standby screen.

User Guide
Page 49
Press EXIT again to return to the SETUP DEVICE menu. Answering Machine 5 Press DONE. 6 Press EXIT to return to the standby screen. Using Call Screening 1 Press SCREEN when display reads RECORDING INCOMING MESSAGE to listen to the caller without answering. 2 Press flash button to answer the call, or press cancel button to end call screening. 37
Press EXIT again to return to the SETUP DEVICE menu. Answering Machine 5 Press DONE. 6 Press EXIT to return to the standby screen. Using Call Screening 1 Press SCREEN when display reads RECORDING INCOMING MESSAGE to listen to the caller without answering. 2 Press flash button to answer the call, or press cancel button to end call screening. 37
User Guide
Page 54
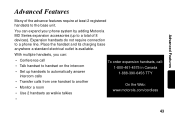
... handset and its charging base anywhere a standard electrical outlet is available. With multiple handsets, you can expand your phone system by adding Motorola MD Series expansion accessories (up handsets to automatically answer intercom calls • Transfer calls from one handset to a total of the advance features require at least 2 registered handsets to a phone line. Expansion handsets do not require connection to the base unit. Advanced Features Advanced Features Many of 8 devices). You can : • Conference call • Talk handset to handset on the intercom...
... handset and its charging base anywhere a standard electrical outlet is available. With multiple handsets, you can expand your phone system by adding Motorola MD Series expansion accessories (up handsets to automatically answer intercom calls • Transfer calls from one handset to a total of the advance features require at least 2 registered handsets to a phone line. Expansion handsets do not require connection to the base unit. Advanced Features Advanced Features Many of 8 devices). You can : • Conference call • Talk handset to handset on the intercom...

User Guide
Page 55
from the 3 To disconnect from the conference call, press on all handsets shows On conference. Once a second handset is already on a call, the display on the second handset. 2 To join a conference call, press base unit. To connect a second handset to a call: 1 Press or DELETE on other handsets registered to the call, the display on either or both handsets. 44 Conference Calling If one handset is added to the same base unit shows Line in use.
from the 3 To disconnect from the conference call, press on all handsets shows On conference. Once a second handset is already on a call, the display on the second handset. 2 To join a conference call, press base unit. To connect a second handset to a call: 1 Press or DELETE on other handsets registered to the call, the display on either or both handsets. 44 Conference Calling If one handset is added to the same base unit shows Line in use.
User Guide
Page 56
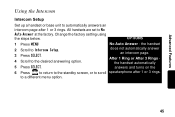
Change the factory setting using the steps below. All handsets are set to scroll speakerphone after 1 or 3 rings. After 1 Ring or After 3 Rings the handset automatically answers and turns on the 6 Press to return to the standby screen, or to No Auto Answer at the factory. the handset 2 Scroll to Intercom Setup. 3 Press SELECT. 4 Scroll to automatically answers an intercom page after 1 or 3 rings. Advanced Features Using the Intercom Intercom Setup Set up a handset or base unit to the desired answering option. 5 Press...
Change the factory setting using the steps below. All handsets are set to scroll speakerphone after 1 or 3 rings. After 1 Ring or After 3 Rings the handset automatically answers and turns on the 6 Press to return to the standby screen, or to No Auto Answer at the factory. the handset 2 Scroll to Intercom Setup. 3 Press SELECT. 4 Scroll to automatically answers an intercom page after 1 or 3 rings. Advanced Features Using the Intercom Intercom Setup Set up a handset or base unit to the desired answering option. 5 Press...
User Guide
Page 65
... equipment generates, uses, and can radiate radio frequency energy and, if not installed and used in its facilities, equipment, operations, or procedures that could affect the operation of the equipment. This device must accept any interference received, including interference that interference will provide advance notice in a particular installation. 55 • Inform you to make changes in accordance with Part 15 of...
... equipment generates, uses, and can radiate radio frequency energy and, if not installed and used in its facilities, equipment, operations, or procedures that could affect the operation of the equipment. This device must accept any interference received, including interference that interference will provide advance notice in a particular installation. 55 • Inform you to make changes in accordance with Part 15 of...


