
User Guide
Page 4
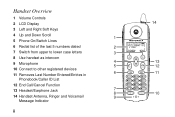
Handset Overview 1 Volume Controls 2 LCD Display 3 Left and Right Soft Keys 4 Up and Down Scroll 1 5 Phone On/Switch Lines 6 Redial list of the last 5 numbers dialed 2 7 Switch from upper to lower case letters 3 8 Use handset as intercom 9 Microphone 4 5 10 Connect to other registered devices 11 Removes Last Number Entered/Entries in 6 Phonebook/Caller ID List 12 End Call/Cancel Function 13 Headset/Earphone Jack 7 8 14 Handset Antenna, Ringer and Voicemail 9 Message Indicator ii 14 13 12 11 10
Handset Overview 1 Volume Controls 2 LCD Display 3 Left and Right Soft Keys 4 Up and Down Scroll 1 5 Phone On/Switch Lines 6 Redial list of the last 5 numbers dialed 2 7 Switch from upper to lower case letters 3 8 Use handset as intercom 9 Microphone 4 5 10 Connect to other registered devices 11 Removes Last Number Entered/Entries in 6 Phonebook/Caller ID List 12 End Call/Cancel Function 13 Headset/Earphone Jack 7 8 14 Handset Antenna, Ringer and Voicemail 9 Message Indicator ii 14 13 12 11 10
User Guide
Page 5
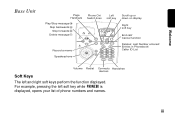
Welcome Base Unit Page Handsets Play/Stop message Skip backwards Skip forwards Delete message Phone On/ Switch lines Left soft key Record a memo Speakerphone Scroll up or down on display Right soft key End call/ Cancel function Deletes: Last Number entered/ Entries in Phonebook/ Caller ID List Volume Redial Connects Handsfree devices Soft Keys The left soft key while PHONEBK is displayed, opens your list of phone numbers and names. For example, pressing the left and right soft keys perform the function displayed. iii
Welcome Base Unit Page Handsets Play/Stop message Skip backwards Skip forwards Delete message Phone On/ Switch lines Left soft key Record a memo Speakerphone Scroll up or down on display Right soft key End call/ Cancel function Deletes: Last Number entered/ Entries in Phonebook/ Caller ID List Volume Redial Connects Handsfree devices Soft Keys The left soft key while PHONEBK is displayed, opens your list of phone numbers and names. For example, pressing the left and right soft keys perform the function displayed. iii
User Guide
Page 6
Table of Contents Welcome i Handset Overview ii Base Unit iii Soft Keys iii Important Safety Instructions xi Getting Started 1 Battery Safety Instructions 1 Installing the Batteries 2 Installing the Base Unit 4 Removing the Wall Mount Bracket 4 Setting Up Your Phone 5 Removing the Wall Mount and Base Unit . . . . . 6 Removing the Base Unit from the Wall Bracket 6 Handset Overview 7 Standby Screen Information 7 iv
Table of Contents Welcome i Handset Overview ii Base Unit iii Soft Keys iii Important Safety Instructions xi Getting Started 1 Battery Safety Instructions 1 Installing the Batteries 2 Installing the Base Unit 4 Removing the Wall Mount Bracket 4 Setting Up Your Phone 5 Removing the Wall Mount and Base Unit . . . . . 6 Removing the Base Unit from the Wall Bracket 6 Handset Overview 7 Standby Screen Information 7 iv
User Guide
Page 12
... it will not be walked on. • Never insert objects of any kind into the product slits as that proper ventilation is required, contact the Motorola address found in the back of this product from the wall outlet before cleaning. If service or repair work is provided at the installation site... that may result in fire or shock. • Unplug this user's guide. • Do not overload wall outlets and extension cords. • Avoid using your cordless phone to reduce the risk of fire, electric shock and injury to report a gas leak, especially if you are in the vicinity of the...
... it will not be walked on. • Never insert objects of any kind into the product slits as that proper ventilation is required, contact the Motorola address found in the back of this product from the wall outlet before cleaning. If service or repair work is provided at the installation site... that may result in fire or shock. • Unplug this user's guide. • Do not overload wall outlets and extension cords. • Avoid using your cordless phone to reduce the risk of fire, electric shock and injury to report a gas leak, especially if you are in the vicinity of the...
User Guide
Page 13
...on the product. 3 Do not install this product near a bath tub, sink or shower. 4 Operate this phone using only the power source that are unsure of other controls may fall, causing serious damage to rain or ...water. Then retrieve the unit by the operating instructions. xi If you have unplugged the power and phone from an outlet if: • The power cord or plug is damaged or frayed. • Liquid ... require extensive work to restore the product to clean this phone. Improper adjustment of the power supply to your home, consult with a soft, damp cloth. Unplug this...
...on the product. 3 Do not install this product near a bath tub, sink or shower. 4 Operate this phone using only the power source that are unsure of other controls may fall, causing serious damage to rain or ...water. Then retrieve the unit by the operating instructions. xi If you have unplugged the power and phone from an outlet if: • The power cord or plug is damaged or frayed. • Liquid ... require extensive work to restore the product to clean this phone. Improper adjustment of the power supply to your home, consult with a soft, damp cloth. Unplug this...
User Guide
Page 14
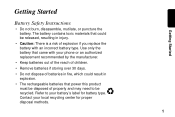
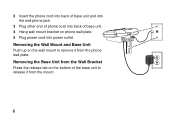
Refer to be recycled. Contact your phone or an authorized replacement recommended by the manufacturer. • Keep batteries out of the reach of children. • Remove batteries if storing over 30 days. &#...
Refer to be recycled. Contact your phone or an authorized replacement recommended by the manufacturer. • Keep batteries out of the reach of children. • Remove batteries if storing over 30 days. &#...
User Guide
Page 18
Getting Started Setting Up Your Phone 1 Select location convenient to both an electrical outlet, and phone jack. 5
Getting Started Setting Up Your Phone 1 Select location convenient to both an electrical outlet, and phone jack. 5
User Guide
Page 19
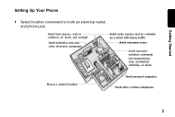
Removing the Base Unit from the Wall Bracket Press the release tab on the bottom of base unit. 4 Hang wall mount bracket on the wall mount to release it from the mount. 6 2 Insert the phone cord into back of base unit and into the wall phone jack. 3 Plug other end of phone cord into power outlet. Removing the Wall Mount and Base Unit Push up on phone wall plate. 5 Plug power cord into back of the base unit to remove it from the phone wall plate.
Removing the Base Unit from the Wall Bracket Press the release tab on the bottom of base unit. 4 Hang wall mount bracket on the wall mount to release it from the mount. 6 2 Insert the phone cord into back of base unit and into the wall phone jack. 3 Plug other end of phone cord into power outlet. Removing the Wall Mount and Base Unit Push up on phone wall plate. 5 Plug power cord into back of the base unit to remove it from the phone wall plate.

User Guide
Page 31
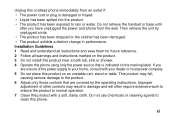
Do not change the setting unless touch tone service is set for touch tone dialing. Setting Touch Tone or Pulse Dialing Your phone is not available in your area. 1 Press Menu. 2 Scroll to Tone/Pulse. 3 Press Select. 4 Press Change to switch between Tone and Pulse. 5 Press Done. 6 Press Exit to return to the Standby Screen. 18
Do not change the setting unless touch tone service is set for touch tone dialing. Setting Touch Tone or Pulse Dialing Your phone is not available in your area. 1 Press Menu. 2 Scroll to Tone/Pulse. 3 Press Select. 4 Press Change to switch between Tone and Pulse. 5 Press Done. 6 Press Exit to return to the Standby Screen. 18
User Guide
Page 32
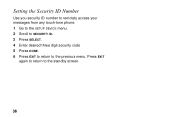
OR Enter the phone number, then press . Use the DELETE to make corrections. When you hear the dial tone, dial the number. The phone number appears on the call , a timer on the display shows the amount of time on the display before it is dialed. During a call . 19 Using Your SD4580 Using Your SD4580 Making a Call from the Handset or Base Unit Press .
OR Enter the phone number, then press . Use the DELETE to make corrections. When you hear the dial tone, dial the number. The phone number appears on the call , a timer on the display shows the amount of time on the display before it is dialed. During a call . 19 Using Your SD4580 Using Your SD4580 Making a Call from the Handset or Base Unit Press .

User Guide
Page 39
The display shows the last numbers you dialed, with the most recent number at the top. 1 Scroll to the number you want to the Phonebook from Redial Press REDIAL. Adding Numbers to save. 2 Press STORE. 3 Select the PRIVATE or SHARD phonebook. Press DELETE to backspace and erase characters to the standby menu. 26 The phone number displays in the Number field. 5 Press DONE. 6 Press EXIT once to return to the redial list, or press EXIT twice to return to the left of the blinking cursor. 4 Scroll down. Enter the name up to 11 characters.
The display shows the last numbers you dialed, with the most recent number at the top. 1 Scroll to the number you want to the Phonebook from Redial Press REDIAL. Adding Numbers to save. 2 Press STORE. 3 Select the PRIVATE or SHARD phonebook. Press DELETE to backspace and erase characters to the standby menu. 26 The phone number displays in the Number field. 5 Press DONE. 6 Press EXIT once to return to the redial list, or press EXIT twice to return to the left of the blinking cursor. 4 Scroll down. Enter the name up to 11 characters.

User Guide
Page 41
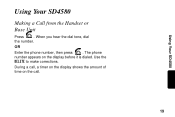
Editing a Phonebook Entry 1 Press Phonebk. 2 Scroll to entry you want to edit. 3 Press Options. 4 Scroll to Edit. 5 Press Select. Use Delete to backspace and erase characters to the left of the blinking cursor. 6 Scroll down to move to phone number field. 7 Modify number. 8 Press Done. 28 Calling a Number from the Phonebook 1 Press Phonebk. 2 Scroll to entry you want to call. 3 Press or Handsfree.
Editing a Phonebook Entry 1 Press Phonebk. 2 Scroll to entry you want to edit. 3 Press Options. 4 Scroll to Edit. 5 Press Select. Use Delete to backspace and erase characters to the left of the blinking cursor. 6 Scroll down to move to phone number field. 7 Modify number. 8 Press Done. 28 Calling a Number from the Phonebook 1 Press Phonebk. 2 Scroll to entry you want to call. 3 Press or Handsfree.
User Guide
Page 42
... the entry you have to dial 9 to get a dial tone or for example, when you want to use the caller ID features of your phone. 29 This is useful, for going into a voicemail system. Using Caller ID Note: You must subscribe to caller ID service from your local telephone... company to insert a pause, press and hold # until P appears. Inserting Pauses in a Number At the position where you call a number with a pause, the phone waits 3 seconds before transmitting the next digits in the dialing sequence. When you want to delete. 3 Press Options. 4 Scroll to Delete. 5 Press Select.
... the entry you have to dial 9 to get a dial tone or for example, when you want to use the caller ID features of your phone. 29 This is useful, for going into a voicemail system. Using Caller ID Note: You must subscribe to caller ID service from your local telephone... company to insert a pause, press and hold # until P appears. Inserting Pauses in a Number At the position where you call a number with a pause, the phone waits 3 seconds before transmitting the next digits in the dialing sequence. When you want to delete. 3 Press Options. 4 Scroll to Delete. 5 Press Select.
User Guide
Page 43
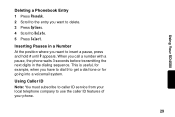
Reviewing Caller ID Call List The handset can hold up to 40 caller ID records. 1 Scroll to Caller ID service, the display shows Incoming Call. If no Caller ID information was sent from the phone company, or you receive an incoming call selected number. 30 Most recent call listed first. 2 Scroll to review more calls. 3 Press to call . If you subscribe to Caller ID service, the caller's name and/or number are displayed when you do not subscribe to enter recent calls list.
Reviewing Caller ID Call List The handset can hold up to 40 caller ID records. 1 Scroll to Caller ID service, the display shows Incoming Call. If no Caller ID information was sent from the phone company, or you receive an incoming call selected number. 30 Most recent call listed first. 2 Scroll to review more calls. 3 Press to call . If you subscribe to Caller ID service, the caller's name and/or number are displayed when you do not subscribe to enter recent calls list.

User Guide
Page 44
... account number (using automated dialing), and PIN (using automated response systems. For example, you can retrieve previously entered information from the phone book (such as a PIN or credit card number) during a phone call without have to re-enter additional numbers. 1 While on a call, scroll the entry that you want to recall. 2 Press...
... account number (using automated dialing), and PIN (using automated response systems. For example, you can retrieve previously entered information from the phone book (such as a PIN or credit card number) during a phone call without have to re-enter additional numbers. 1 While on a call, scroll the entry that you want to recall. 2 Press...

User Guide
Page 46
... EXIT again to return to the standby screen. 34 If you do not record a personal greeting, a prerecorded greeting plays when you do not answer the phone. Press EXIT again to return to the standby screen.
... EXIT again to return to the standby screen. 34 If you do not record a personal greeting, a prerecorded greeting plays when you do not answer the phone. Press EXIT again to return to the standby screen.
User Guide
Page 50
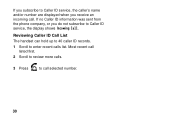
Setting the Security ID Number Use you security ID number to remotely access your messages from any touch-tone phone. 1 Go to the SETUP DEVICE menu. 2 Scroll to SECURITY ID. 3 Press SELECT. 4 Enter desired three digit security code 5 Press DONE. 6 Press EXIT to return to the standby screen. 38 Press EXIT again to return to the previous menu.
Setting the Security ID Number Use you security ID number to remotely access your messages from any touch-tone phone. 1 Go to the SETUP DEVICE menu. 2 Scroll to SECURITY ID. 3 Press SELECT. 4 Enter desired three digit security code 5 Press DONE. 6 Press EXIT to return to the standby screen. 38 Press EXIT again to return to the previous menu.
User Guide
Page 53
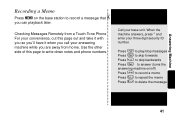
Call your three digit security ID number. Checking Messages Remotely from home. Use the other side of this page out and take it with you so you'll have it when you call your convenience, cut this page to write down notes and phone numbers. Press 2 to play/stop messages ...to skip backwards Press 4 to answer (turns the answering machine on the base station to record a message that you are away from a Touch-Tone Phone For your answering machine while you can playback later. When the machine answers, press * and enter your base unit. Answering Machine Recording a Memo Press...
Call your three digit security ID number. Checking Messages Remotely from home. Use the other side of this page out and take it with you so you'll have it when you call your convenience, cut this page to write down notes and phone numbers. Press 2 to play/stop messages ...to skip backwards Press 4 to answer (turns the answering machine on the base station to record a message that you are away from a Touch-Tone Phone For your answering machine while you can playback later. When the machine answers, press * and enter your base unit. Answering Machine Recording a Memo Press...
User Guide
Page 54
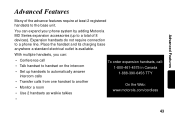
... from one handset to a phone line. Expansion handsets do not require connection to another • Monitor a room • Use 2 handsets as walkie talkies To order expansion handsets, call: 1-800-461-4575 in Canada 1-888-390-6456 TTY (Text Telephone) On the Web: www.motorola.com/cordless • 43 Advanced Features Advanced Features Many of 8 devices...
... from one handset to a phone line. Expansion handsets do not require connection to another • Monitor a room • Use 2 handsets as walkie talkies To order expansion handsets, call: 1-800-461-4575 in Canada 1-888-390-6456 TTY (Text Telephone) On the Web: www.motorola.com/cordless • 43 Advanced Features Advanced Features Many of 8 devices...
User Guide
Page 60
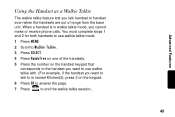
... unit. You must complete steps 1 and 2 for both handsets to use walkie talkie with. (For example, if the handset you cannot make or receive phone calls. Advanced Features Using the Handset as a Walkie Talkie The walkie talkie feature lets you talk handset to is in walkie talkie mode, you want to talk...
... unit. You must complete steps 1 and 2 for both handsets to use walkie talkie with. (For example, if the handset you cannot make or receive phone calls. Advanced Features Using the Handset as a Walkie Talkie The walkie talkie feature lets you talk handset to is in walkie talkie mode, you want to talk...


