User Guide
Page 3
... 5 Package Contents 5 Batteries and Chargers Safety Information 7 Operational Safety Guidelines 8 FCC Licensing Information 9 Interference Information 9 Radio Overview 11 Parts of the Radio 11 On/Off/Volume Knob 12 Channel Selector Knob 12 Accessory Connector 12 Model Label 12 Microphone 12 Antenna 12 LED Indicator 12 Side Buttons 12 The Lithium-Ion (Li-Ion) Battery...
... 5 Package Contents 5 Batteries and Chargers Safety Information 7 Operational Safety Guidelines 8 FCC Licensing Information 9 Interference Information 9 Radio Overview 11 Parts of the Radio 11 On/Off/Volume Knob 12 Channel Selector Knob 12 Accessory Connector 12 Model Label 12 Microphone 12 Antenna 12 LED Indicator 12 Side Buttons 12 The Lithium-Ion (Li-Ion) Battery...

User Guide
Page 4
... Getting Started 29 Turning radio ON/OFF 29 Adjusting Volume 29 Selecting a Channel 29 Talking and Monitoring 29 Receiving a Call 30 Talk Range 30 Radio LED Indicators 32 Hands-Free Use/VOX 33 With Compatible VOX Accessories. . . . .33 Setting VOX Sensitivity 34 Microphone Gain 34 Battery Save ...34 Reset to Factory Defaults 34 End of Transmission Tone (Roger Beep Tone 35 Programming Features 36 Programming Mode 36 Learning to Read the Values the Radio Signals You 36 Entering Programming Mode 39 Reading ...
... Getting Started 29 Turning radio ON/OFF 29 Adjusting Volume 29 Selecting a Channel 29 Talking and Monitoring 29 Receiving a Call 30 Talk Range 30 Radio LED Indicators 32 Hands-Free Use/VOX 33 With Compatible VOX Accessories. . . . .33 Setting VOX Sensitivity 34 Microphone Gain 34 Battery Save ...34 Reset to Factory Defaults 34 End of Transmission Tone (Roger Beep Tone 35 Programming Features 36 Programming Mode 36 Learning to Read the Values the Radio Signals You 36 Entering Programming Mode 39 Reading ...

User Guide
Page 14
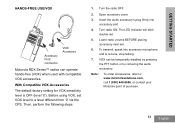
...RDU4100 antennas are non-removable. LED Indicator Used to listen. For more information, see "Battery Features" on page 14. Side Button 1 (SB1) • The Side Button 1 is a general button that can be configured by the CPS. The default setting of SB1 is 'Scan/Nuisance Channel Delete'. RADIO... RDX Series™ provides different types of the radio. CPS. Microphone Speaks clearly into the microphone when sending a message. Model Label Indicates the model of batteries. Accessory Connector Used to different channels. Channel Selector Knob Used to switch the radio ...
...RDU4100 antennas are non-removable. LED Indicator Used to listen. For more information, see "Battery Features" on page 14. Side Button 1 (SB1) • The Side Button 1 is a general button that can be configured by the CPS. The default setting of SB1 is 'Scan/Nuisance Channel Delete'. RADIO... RDX Series™ provides different types of the radio. CPS. Microphone Speaks clearly into the microphone when sending a message. Model Label Indicates the model of batteries. Accessory Connector Used to different channels. Channel Selector Knob Used to switch the radio ...
User Guide
Page 35
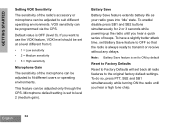
...to a level different from '0' via the CPS. GETTING STARTED HANDS-FREE USE/VOX Accessory Port/ Connector VOX Accessory Motorola RDX Series™ radios can be temporarily disabled by pressing the PTT button or by removing the audio accessory. Before using VOX, set VOX...Motorola point of purchase 33 English Then, perform the following steps: 1. Turn the radio OFF. 2. The LED Indicator will blink double red 5. Lower radio volume BEFORE placing accessory near ear. 6. Turn radio ON. Open accessory cover. 3. Insert the audio accessory's plug firmly into accessory microphone...
...to a level different from '0' via the CPS. GETTING STARTED HANDS-FREE USE/VOX Accessory Port/ Connector VOX Accessory Motorola RDX Series™ radios can be temporarily disabled by pressing the PTT button or by removing the audio accessory. Before using VOX, set VOX...Motorola point of purchase 33 English Then, perform the following steps: 1. Turn the radio OFF. 2. The LED Indicator will blink double red 5. Lower radio volume BEFORE placing accessory near ear. 6. Turn radio ON. Open accessory cover. 3. Insert the audio accessory's plug firmly into accessory microphone...
User Guide
Page 36
...press SB1 and SB2 buttons simultaneously for 2 or 3 seconds while powering up the radio until you hear a quick series of beeps. To do so, press PTT, SB2 and SB1 simultaneously while turning ON the radio until you hear a high tone chirp. If you want to use the VOX ... VOX sensitivity can be adjusted only through the CPS. Microphone default setting is set Battery Save feature to OFF so that the radio is OFF (level 0). GETTING STARTED Setting VOX Sensitivity The sensitivity of the radio's accessory or microphone can be adjusted to fit different users or operating environments....
...press SB1 and SB2 buttons simultaneously for 2 or 3 seconds while powering up the radio until you hear a quick series of beeps. To do so, press PTT, SB2 and SB1 simultaneously while turning ON the radio until you hear a high tone chirp. If you want to use the VOX ... VOX sensitivity can be adjusted only through the CPS. Microphone default setting is set Battery Save feature to OFF so that the radio is OFF (level 0). GETTING STARTED Setting VOX Sensitivity The sensitivity of the radio's accessory or microphone can be adjusted to fit different users or operating environments....
User Guide
Page 90
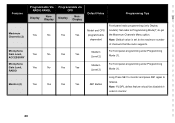
... Button Long Press SB1 to monitor and press SB1 again to get the Maximum Channels Menu option. Medium (Level 2) For front panel programming enter Programming Mode (1). Features Maximum Channels (2) Microphone Gain Level, ACCESSORY Microphone Gain Level, RADIO Monitor (4) Programmable Via RADIO PANEL Display NonDisplay Programmable via CPS Display NonDisplay Yes No Yes Yes Yes No Yes...
... Button Long Press SB1 to monitor and press SB1 again to get the Maximum Channels Menu option. Medium (Level 2) For front panel programming enter Programming Mode (1). Features Maximum Channels (2) Microphone Gain Level, ACCESSORY Microphone Gain Level, RADIO Monitor (4) Programmable Via RADIO PANEL Display NonDisplay Programmable via CPS Display NonDisplay Yes No Yes Yes Yes No Yes...

User Guide
Page 94
...and scrolling down/up radio. Short press PTT to get to blink green). Before using this feature and/or for radio models details. (4)... For Non-Display Models, feature can be enabled for 3-5 seconds while turning radio ON (LED will start... Sensitivity Level Yes No Yes Yes OFF (level 0) Front panel radio programming available in the CPS settings. Long press PTT to SB1...CPS Menus. 92 Features Programmable Via RADIO PANEL Display NonDisplay Programmable via front panel radio. (3) Contact your Motorola Point of the programmable buttons rather ...
...and scrolling down/up radio. Short press PTT to get to blink green). Before using this feature and/or for radio models details. (4)... For Non-Display Models, feature can be enabled for 3-5 seconds while turning radio ON (LED will start... Sensitivity Level Yes No Yes Yes OFF (level 0) Front panel radio programming available in the CPS settings. Long press PTT to SB1...CPS Menus. 92 Features Programmable Via RADIO PANEL Display NonDisplay Programmable via front panel radio. (3) Contact your Motorola Point of the programmable buttons rather ...