User Guide
Page 4
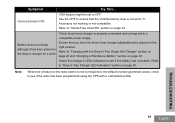
...Factory Defaults 34 End of Transmission Tone (Roger Beep Tone 35 Programming Features 36 Programming Mode 36 Learning to Read the Values the Radio Signals You 36 Entering Programming Mode 39 Reading Frequencies Values 39 English 2 Reading CTCSS/DPL Values 40 Reading Auto-Scan Values 41... . . . . . 44 Example of Programming Auto-Scan . . 45 Other Programming Features 46 Scan 46 Editing Scan List 47 Nuisance Channel Delete 47 CPS (Computer Programming Software) . . . 48 Bandwidth Select 49 Time-Out Timer 49 Power Select 49 Battery Type Setting 49 Call Tones 49 Scramble L 50 ...
...Factory Defaults 34 End of Transmission Tone (Roger Beep Tone 35 Programming Features 36 Programming Mode 36 Learning to Read the Values the Radio Signals You 36 Entering Programming Mode 39 Reading Frequencies Values 39 English 2 Reading CTCSS/DPL Values 40 Reading Auto-Scan Values 41... . . . . . 44 Example of Programming Auto-Scan . . 45 Other Programming Features 46 Scan 46 Editing Scan List 47 Nuisance Channel Delete 47 CPS (Computer Programming Software) . . . 48 Bandwidth Select 49 Time-Out Timer 49 Power Select 49 Battery Type Setting 49 Call Tones 49 Scramble L 50 ...
User Guide
Page 5
...Radio using the Radio to Radio (R2R) Cloning Cable (Optional Accessory 53 Cloning using the CPS (Computer Programming Software 55 Troubleshooting 56 Use and Care 60 Frequency and Code Charts 61 RDX VHF Frequencies Chart 61 RDV2020 - UHF Default Frequencies Chart 71 CTCSS and PL/DPL Codes 72 Programming Customized Frequencies on 4W/5W RDX models 75 Motorola...81 Power Supplies 82 RDX Series™ Features Summary 83 Programmable Buttons Chart 92 Icons Chart 93 3 English CONTENTS VHF Default Frequencies Chart 65 RDX UHF Frequencies Chart 66 RDU2020 - Quick Instructions 64...
...Radio using the Radio to Radio (R2R) Cloning Cable (Optional Accessory 53 Cloning using the CPS (Computer Programming Software 55 Troubleshooting 56 Use and Care 60 Frequency and Code Charts 61 RDX VHF Frequencies Chart 61 RDV2020 - UHF Default Frequencies Chart 71 CTCSS and PL/DPL Codes 72 Programming Customized Frequencies on 4W/5W RDX models 75 Motorola...81 Power Supplies 82 RDX Series™ Features Summary 83 Programmable Buttons Chart 92 Icons Chart 93 3 English CONTENTS VHF Default Frequencies Chart 65 RDX UHF Frequencies Chart 66 RDU2020 - Quick Instructions 64...
User Guide
Page 14
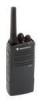
...be configured by the CPS. The default setting of batteries. Antenna For models RDU2020, and RDV2020 the antennas are removable. Side Button 2 (SB2) • The Side Button 2 is a general button that can be configured by the Computer Programming Software - RADIO OVERVIEW English 12 Side ...button to talk, release it to different channels. Accessory Connector Used to adjust the radio's volume. For RDV5100, RDU4100 antennas are non-removable. CPS. The Lithium-Ion (Li-Ion) Battery RDX Series™ provides different types of SB1 is 'Scan/Nuisance Channel Delete'. The...
...be configured by the CPS. The default setting of batteries. Antenna For models RDU2020, and RDV2020 the antennas are removable. Side Button 2 (SB2) • The Side Button 2 is a general button that can be configured by the Computer Programming Software - RADIO OVERVIEW English 12 Side ...button to talk, release it to different channels. Accessory Connector Used to adjust the radio's volume. For RDV5100, RDU4100 antennas are non-removable. CPS. The Lithium-Ion (Li-Ion) Battery RDX Series™ provides different types of SB1 is 'Scan/Nuisance Channel Delete'. The...
User Guide
Page 35
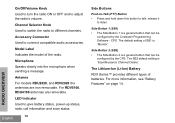
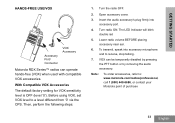
.... To transmit, speak into accessory port. 4. Note: To order accessories, refer to a level different from '0' via the CPS. GETTING STARTED HANDS-FREE USE/VOX Accessory Port/ Connector VOX Accessory Motorola RDX Series™ radios can be temporarily disabled by pressing the PTT button or by removing the audio accessory. The LED Indicator will blink...
.... To transmit, speak into accessory port. 4. Note: To order accessories, refer to a level different from '0' via the CPS. GETTING STARTED HANDS-FREE USE/VOX Accessory Port/ Connector VOX Accessory Motorola RDX Series™ radios can be temporarily disabled by pressing the PTT button or by removing the audio accessory. The LED Indicator will blink...
User Guide
Page 36
This feature can be programmed via the CPS. To enable/ disable press SB1 and SB2 buttons simultaneously for 2 or 3 seconds while powering up the radio until you hear a high tone chirp. To have a slightly better attack time, set at a level different from 0. • 1 = Low sensitivity • 2 = Medium ...be adjusted to suit different operating environments. VOX sensitivity can be adjusted only through the CPS. If you hear a quick series of beeps. Battery Save Battery Save feature extends battery life as your radio goes into 'Idle' state. To do so, press PTT, SB2 and SB1 ...
This feature can be programmed via the CPS. To enable/ disable press SB1 and SB2 buttons simultaneously for 2 or 3 seconds while powering up the radio until you hear a high tone chirp. To have a slightly better attack time, set at a level different from 0. • 1 = Low sensitivity • 2 = Medium ...be adjusted to suit different operating environments. VOX sensitivity can be adjusted only through the CPS. If you hear a quick series of beeps. Battery Save Battery Save feature extends battery life as your radio goes into 'Idle' state. To do so, press PTT, SB2 and SB1 ...
User Guide
Page 38
...-Scan feature allows you to set to Programming Mode, you are being programmed, the radio will blink two colors: • Orange to use the CPS Programming Cable and CPS software. CPS software download is available for free at www.motorola.com/RDX PROGRAMMING MODE Programming Mode is set a particular channel to read and modify three features...
...-Scan feature allows you to set to Programming Mode, you are being programmed, the radio will blink two colors: • Orange to use the CPS Programming Cable and CPS software. CPS software download is available for free at www.motorola.com/RDX PROGRAMMING MODE Programming Mode is set a particular channel to read and modify three features...
User Guide
Page 44
... as you will be automatically saved. For example, if you try to make sure you are programming a valid number. 3. The radio might be able to return to the Programming Mode (the radio does not provide further way to let you know the specific stage you are not available in the beginning of... and took me back to program any values that were changed will not be locked using the CPS to not allow you to value '0'. To re-enable, use the CPS. English 42 Programming Mode FAQ 1. The radio will start over, as the maximum value allowed is 122. PROGRAMMING FEATURES • If you '...
... as you will be automatically saved. For example, if you try to make sure you are programming a valid number. 3. The radio might be able to return to the Programming Mode (the radio does not provide further way to let you know the specific stage you are not available in the beginning of... and took me back to program any values that were changed will not be locked using the CPS to not allow you to value '0'. To re-enable, use the CPS. English 42 Programming Mode FAQ 1. The radio will start over, as the maximum value allowed is 122. PROGRAMMING FEATURES • If you '...
User Guide
Page 49
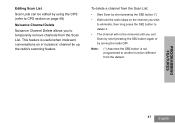
...radio stops on the channel you to another function different from the Scan List. PROGRAMMING FEATURES 47 English To delete a channel from the Scan List: • Start Scan by short pressing the SB2 button (*) • Wait until you exit Scan by short pressing the SB2 button again or by using the CPS... (refer to CPS section on page 48) Nuisance Channel Delete Nuisance Channel Delete allows you wish to eliminate, then long press the SB2 button to delete it...
...radio stops on the channel you to another function different from the Scan List. PROGRAMMING FEATURES 47 English To delete a channel from the Scan List: • Start Scan by short pressing the SB2 button (*) • Wait until you exit Scan by short pressing the SB2 button again or by using the CPS... (refer to CPS section on page 48) Nuisance Channel Delete Nuisance Channel Delete allows you wish to eliminate, then long press the SB2 button to delete it...
User Guide
Page 50
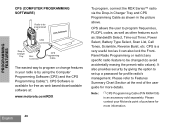
.... Please refer to Features Summary Chart Section at : www.motorola.com/RDX To program, connect the RDX Series™ radio via the Drop-in Charger Tray and CPS Programming Cable as shown in your Motorola point of the user guide for more information. PROGRAMMING FEATURES CPS (COMPUTER PROGRAMMING SOFTWARE) Radio to be changed (to set up a password for...
.... Please refer to Features Summary Chart Section at : www.motorola.com/RDX To program, connect the RDX Series™ radio via the Drop-in Charger Tray and CPS Programming Cable as shown in your Motorola point of the user guide for more information. PROGRAMMING FEATURES CPS (COMPUTER PROGRAMMING SOFTWARE) Radio to be changed (to set up a password for...
User Guide
Page 52
... value is OFF. You can select values of carrier detection. Notes: • The features described in the CPS. • Some of the features available with the CPS software may vary depending on the radio model. CPS offers more information refer to anyone listening without the same code. Scramble L The Scramble feature makes transmissions sound...
... value is OFF. You can select values of carrier detection. Notes: • The features described in the CPS. • Some of the features available with the CPS software may vary depending on the radio model. CPS offers more information refer to anyone listening without the same code. Scramble L The Scramble feature makes transmissions sound...

User Guide
Page 53
...RADIOS You can clone RDX Series™ radio profiles from the source radio.) The Source radio has to be in Pocket 1, 3 or 5 while the Target radio has to be in Pocket 2, 4 or 6, matching in the MUCs pockets by using the MUC, there must be at least two radios: • a Source radio (radio...: • Long press the PTT button and SB2 simultaneously while turning the radio ON. 51 English Radio cloning cable (optional accessory), • the CPS (free software download) Cloning with a Multi Unit Charger (MUC) To clone radios using any one of these 3 methods: • a Multi Unit Charger ...
...RADIOS You can clone RDX Series™ radio profiles from the source radio.) The Source radio has to be in Pocket 1, 3 or 5 while the Target radio has to be in Pocket 2, 4 or 6, matching in the MUCs pockets by using the MUC, there must be at least two radios: • a Source radio (radio...: • Long press the PTT button and SB2 simultaneously while turning the radio ON. 51 English Radio cloning cable (optional accessory), • the CPS (free software download) Cloning with a Multi Unit Charger (MUC) To clone radios using any one of these 3 methods: • a Multi Unit Charger ...
User Guide
Page 57
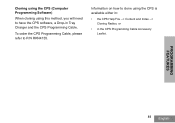
Cloning using the CPS (Computer Programming Software) When cloning using the CPS is available either in: • the CPS Help File --> Content and Index --> Cloning Radios, or • in Tray Charger and the CPS Programming Cable. PROGRAMMING FEATURES 55 English Information on how to clone using this method, you will need to P/N RKN4155. To order the CPS Programming Cable, please refer to have the CPS software, a Drop-in the CPS Programming Cable Accessory Leaflet.
Cloning using the CPS (Computer Programming Software) When cloning using the CPS is available either in: • the CPS Help File --> Content and Index --> Cloning Radios, or • in Tray Charger and the CPS Programming Cable. PROGRAMMING FEATURES 55 English Information on how to clone using this method, you will need to P/N RKN4155. To order the CPS Programming Cable, please refer to have the CPS software, a Drop-in the CPS Programming Cable Accessory Leaflet.
User Guide
Page 61
...-in charger for a while Check drop-in Tray Charger LED Indicators" section on the right position. Refer to see if the radio has been programmed using the CPS with the Drop-In Tray Single Unit Charger" section on page 22 and "Charging a Standalone Battery" section on page 33. Note...a customized profile. Ensure that the VOX Sensitivity level is properly connected and correspond to see if the battery has a problem. Use the CPS to ensure that you have the drop-in the radio seems to not correspond to the default or preprogrammed values, check to a compatible power supply.
...-in charger for a while Check drop-in Tray Charger LED Indicators" section on the right position. Refer to see if the radio has been programmed using the CPS with the Drop-In Tray Single Unit Charger" section on page 22 and "Charging a Standalone Battery" section on page 33. Note...a customized profile. Ensure that the VOX Sensitivity level is properly connected and correspond to see if the battery has a problem. Use the CPS to ensure that you have the drop-in the radio seems to not correspond to the default or preprogrammed values, check to a compatible power supply.
User Guide
Page 83
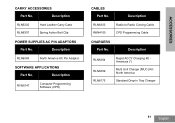
ACCESSORIES CARRY ACCESSORIES Part No. Description RVN5147 Computer Programming Software (CPS) CABLES Part No. Description RLN6349 North America AC Pin Adaptor SOFTWARE APPLICATIONS Part No. Description RLN6302 RLN6307 Hard Leather Carry Case Spring Action Belt Clip POWER SUPPLIES AC PIN ADAPTORS Part No. Description RLN6304 RLN6309 RLN6175 Rapid ACCY Charging Kit Americas (*) Multi Unit Charger (MUC) Kit North America Standard Drop-in Tray Charger 81 English Description RLN6303 RKN4155 Radio to Radio Cloning Cable CPS Programming Cable CHARGERS Part No.
ACCESSORIES CARRY ACCESSORIES Part No. Description RVN5147 Computer Programming Software (CPS) CABLES Part No. Description RLN6349 North America AC Pin Adaptor SOFTWARE APPLICATIONS Part No. Description RLN6302 RLN6307 Hard Leather Carry Case Spring Action Belt Clip POWER SUPPLIES AC PIN ADAPTORS Part No. Description RLN6304 RLN6309 RLN6175 Rapid ACCY Charging Kit Americas (*) Multi Unit Charger (MUC) Kit North America Standard Drop-in Tray Charger 81 English Description RLN6303 RKN4155 Radio to Radio Cloning Cable CPS Programming Cable CHARGERS Part No.
User Guide
Page 85
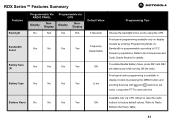
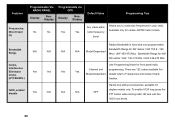
... Section for details. Front panel programming available only on display models by using the CPS. Refer to factory default values. Allows to reset the radio ON buttons to Radio Buttons Summary Table. 83 Bandwidth is available in display models by pressing the MENU... frequency regulations. To enable/disable Battery Save, press SB1 and SB2 simultaneously while turning ON the radio. Front panel radio programming is programmable according to set value. RDX Series™ Features Summary M Features Backlight Bandwidth Select Battery Save (2) Battery Type Programmable Via Programmable...
... Section for details. Front panel programming available only on display models by using the CPS. Refer to factory default values. Allows to reset the radio ON buttons to Radio Buttons Summary Table. 83 Bandwidth is available in display models by pressing the MENU... frequency regulations. To enable/disable Battery Save, press SB1 and SB2 simultaneously while turning ON the radio. Front panel radio programming is programmable according to set value. RDX Series™ Features Summary M Features Backlight Bandwidth Select Battery Save (2) Battery Type Programmable Via Programmable...

User Guide
Page 86
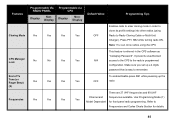
...the Max Channels you are 0 (OFF),1, 2 and 3. You can select channels using the CPS. Values available are able to program via CPS Display NonDisplay Default Value Programming Tips Front panel radio programming available only for 3 sec. You can also add or delete Yes Yes Yes Yes... enable/disable Call Tones press Button A (default button). To enter or exit Channel Aliasing mode press PTT and buttons simultaneously while turning radio ON for Display Models by using the Channel Selector Knob (non-display models) or the MENU button (display models). Features Call Tones ...
...the Max Channels you are 0 (OFF),1, 2 and 3. You can select channels using the CPS. Values available are able to program via CPS Display NonDisplay Default Value Programming Tips Front panel radio programming available only for 3 sec. You can also add or delete Yes Yes Yes Yes... enable/disable Call Tones press Button A (default button). To enter or exit Channel Aliasing mode press PTT and buttons simultaneously while turning radio ON for Display Models by using the Channel Selector Knob (non-display models) or the MENU button (display models). Features Call Tones ...
User Guide
Page 87
... Dependant for details. 85 Note: You can clone radios using Radio to Radio Cloning Cable or Multi-Unit Charger). Make sure you set up the radio There are 27 VHF frequencies and 89 UHF Channel and frequencies available. Features Programmable Via RADIO PANEL Display NonDisplay Programmable via CPS Display NonDisplay Default Value Programming Tips Cloning Mode Yes...
... Dependant for details. 85 Note: You can clone radios using Radio to Radio Cloning Cable or Multi-Unit Charger). Make sure you set up the radio There are 27 VHF frequencies and 89 UHF Channel and frequencies available. Features Programmable Via RADIO PANEL Display NonDisplay Programmable via CPS Display NonDisplay Default Value Programming Tips Cloning Mode Yes...
User Guide
Page 88
... Mode for display models only. Features Frequencies, Direct Input (3) Programmable Via RADIO PANEL Display NonDisplay No No Programmable via CPS Display NonDisplay Yes Yes Default Value Programming Tips Any value within radio frequency band Allows you to Frequencies and Codes Charts (CTCSS/DPL) Section.... 5W radios: VHF: 146-174 Mhz / UHF 438-470 Mhz. Bandwidth Range Radios Bandwidth is fixed and non-programmable. Bandwidth Range for 2W radios: VHF 150.8 - 160 N/A N/A N/A N/A Model Dependant Mhz / UHF 450-470 Mhz Bandwidth Range for certain 4W/5W radio models. ...
... Mode for display models only. Features Frequencies, Direct Input (3) Programmable Via RADIO PANEL Display NonDisplay No No Programmable via CPS Display NonDisplay Yes Yes Default Value Programming Tips Any value within radio frequency band Allows you to Frequencies and Codes Charts (CTCSS/DPL) Section.... 5W radios: VHF: 146-174 Mhz / UHF 438-470 Mhz. Bandwidth Range Radios Bandwidth is fixed and non-programmable. Bandwidth Range for 2W radios: VHF 150.8 - 160 N/A N/A N/A N/A Model Dependant Mhz / UHF 450-470 Mhz Bandwidth Range for certain 4W/5W radio models. ...

User Guide
Page 89
...or Keypad Yes Yes Yes Yes Tone) (2) Press SB2 while turning ON radio to lock the N/A UNLOCKED radio keypad.To unlock, press MENU for Display models only. For front panel radio programming use the MENU button. N/A N/A N/A N/A Shutdown Gives a sequence ...of loud and high beep tones to specify IVOX sensitivity level. Features IVOX, sensitivity Level Programmable Via RADIO PANEL Display NonDisplay Programmable via CPS Display NonDisplay Yes N/A Yes N/A Default Value Programming Tips HIGH (Level 3) Available for 4 seconds. LEDs Enabled/ ...
...or Keypad Yes Yes Yes Yes Tone) (2) Press SB2 while turning ON radio to lock the N/A UNLOCKED radio keypad.To unlock, press MENU for Display models only. For front panel radio programming use the MENU button. N/A N/A N/A N/A Shutdown Gives a sequence ...of loud and high beep tones to specify IVOX sensitivity level. Features IVOX, sensitivity Level Programmable Via RADIO PANEL Display NonDisplay Programmable via CPS Display NonDisplay Yes N/A Yes N/A Default Value Programming Tips HIGH (Level 3) Available for 4 seconds. LEDs Enabled/ ...

User Guide
Page 90
... panel programming enter Programming Mode (1). Features Maximum Channels (2) Microphone Gain Level, ACCESSORY Microphone Gain Level, RADIO Monitor (4) Programmable Via RADIO PANEL Display NonDisplay Programmable via CPS Display NonDisplay Yes No Yes Yes Yes No Yes Yes Yes No Yes Yes Yes Yes Yes Yes Default... Value Programming Tips Model and CPS programmable dependant Front panel radio programming (only Display models): Set radio to Programming Mode(1) to release. SB1 Button Long Press SB1 to monitor and press SB1...
... panel programming enter Programming Mode (1). Features Maximum Channels (2) Microphone Gain Level, ACCESSORY Microphone Gain Level, RADIO Monitor (4) Programmable Via RADIO PANEL Display NonDisplay Programmable via CPS Display NonDisplay Yes No Yes Yes Yes No Yes Yes Yes No Yes Yes Yes Yes Yes Yes Default... Value Programming Tips Model and CPS programmable dependant Front panel radio programming (only Display models): Set radio to Programming Mode(1) to release. SB1 Button Long Press SB1 to monitor and press SB1...