
Manual
Page 2
... a TV Using the A/V Cable 12 • Connecting the Unit to a TV Using the S-Video Cable 13 • Connecting Another Unit to this DVD Player 14 About Discs 15 Setup Menu 17 • General Setup Menu 18 • Audio Setup Menu 19 • Video Setup Menu 20 • Preference Setup Menu 20 •TV Guardian 22 Basic Operation 25 • Headphone Jack(s 25 • Screen Mode Button 25 • Volume Control 25 • Display Button 26 DVD Operation 27 • Playback of a DVD 27 •...
... a TV Using the A/V Cable 12 • Connecting the Unit to a TV Using the S-Video Cable 13 • Connecting Another Unit to this DVD Player 14 About Discs 15 Setup Menu 17 • General Setup Menu 18 • Audio Setup Menu 19 • Video Setup Menu 20 • Preference Setup Menu 20 •TV Guardian 22 Basic Operation 25 • Headphone Jack(s 25 • Screen Mode Button 25 • Volume Control 25 • Display Button 26 DVD Operation 27 • Playback of a DVD 27 •...
Manual
Page 4
... void user's authority to operate this equipment does cause harmful interference to radio communications. Only qualified service personnel should attempt to which the receiver is no guarantee that interference will not occur in a particular installation. Modifications not authorized by the party responsible for AC connection. Lightning and power surges ARE NOT covered under warranty for a Class B digital device, pursuant to part...
... void user's authority to operate this equipment does cause harmful interference to radio communications. Only qualified service personnel should attempt to which the receiver is no guarantee that interference will not occur in a particular installation. Modifications not authorized by the party responsible for AC connection. Lightning and power surges ARE NOT covered under warranty for a Class B digital device, pursuant to part...
Manual
Page 6
... components of use a chemical-saturated cloth to wipe it was originally packed at the factory. • Do not use the DVD player occasionally. Warning: Cleaning and adjustment of lenses and/or other types of batteries may become poor and the sound may damage the surface of solvent, such as thinner or benzene, as insect spray, near a TV, radio or VCR, the playback picture...
... components of use a chemical-saturated cloth to wipe it was originally packed at the factory. • Do not use the DVD player occasionally. Warning: Cleaning and adjustment of lenses and/or other types of batteries may become poor and the sound may damage the surface of solvent, such as thinner or benzene, as insect spray, near a TV, radio or VCR, the playback picture...
Manual
Page 7
.... Keep the DVD player connected to a warm place. • When you use the DVD player in a hot and humid place just after you pour a cold drink into a glass on the optical pick-up lens and disc drive parts are dirty or worn down, the picture quality becomes poor. To obtain a clear picture, we recommend regular inspection and maintenance (cleaning or parts replacement) every...
.... Keep the DVD player connected to a warm place. • When you use the DVD player in a hot and humid place just after you pour a cold drink into a glass on the optical pick-up lens and disc drive parts are dirty or worn down, the picture quality becomes poor. To obtain a clear picture, we recommend regular inspection and maintenance (cleaning or parts replacement) every...

Manual
Page 12
... type. 2. Be sure to follow the correct polarity when installing the battery as indicated next to the polarity diagram in this device: 1. it can overheat and rupture. (Follow battery manufacturer's directions.) EFFECTIVE DISTANCE OF THE REMOTE CONTROL TRANSMITTER 20ft BOOKMARK SETUP 4 STOP MENU /OK GOTO 8 ZOOM 3 CLEAR 7 SLOW 2 PROG 0 5 6 TITLE 1 DISPLAY 9 REPEAT AUDIO FPRAAUMSEE/ SETUP TITLE 1 SLOW 2 ZOOM BOOKMARK 3 4 5 6 9 0 DISPLAY 7 CLEAR 8 GOTO MENU PAUSE/ FRAME /OK STOP TITLE 1 SLOW 2 SETUP...
... type. 2. Be sure to follow the correct polarity when installing the battery as indicated next to the polarity diagram in this device: 1. it can overheat and rupture. (Follow battery manufacturer's directions.) EFFECTIVE DISTANCE OF THE REMOTE CONTROL TRANSMITTER 20ft BOOKMARK SETUP 4 STOP MENU /OK GOTO 8 ZOOM 3 CLEAR 7 SLOW 2 PROG 0 5 6 TITLE 1 DISPLAY 9 REPEAT AUDIO FPRAAUMSEE/ SETUP TITLE 1 SLOW 2 ZOOM BOOKMARK 3 4 5 6 9 0 DISPLAY 7 CLEAR 8 GOTO MENU PAUSE/ FRAME /OK STOP TITLE 1 SLOW 2 SETUP...

Manual
Page 13
... playback picture will be distorted because DVD video discs are unplugged before making any connections. • Connect the unit to the OUT position. 12 CONNECTION CONNECTING THE UNIT TO A TV USING THE A/V CABLE VOLUME 1 2 VIDEO AUDIO AV S-VIDEO OUT IN NOTES FOR CONNECTING TO A TV: • If your TV has an S-Video input, connect the DVD player with the S-Video cable (as described on the next page) for best results. • Set the TV's TV/VIDEO button...
... playback picture will be distorted because DVD video discs are unplugged before making any connections. • Connect the unit to the OUT position. 12 CONNECTION CONNECTING THE UNIT TO A TV USING THE A/V CABLE VOLUME 1 2 VIDEO AUDIO AV S-VIDEO OUT IN NOTES FOR CONNECTING TO A TV: • If your TV has an S-Video input, connect the DVD player with the S-Video cable (as described on the next page) for best results. • Set the TV's TV/VIDEO button...
Manual
Page 14
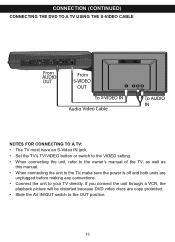
... playback picture will be distorted because DVD video discs are unplugged before making any connections. • Connect the unit to the OUT position. 13 CONNECTION (CONTINUED) CONNECTING THE DVD TO A TV USING THE S-VIDEO CABLE VOLUME 1 2 VIDEO AUDIO AV S-VIDEO OUT IN NOTES FOR CONNECTING TO A TV: • The TV must have an S-Video IN jack. • Set the TV's TV/VIDEO button or switch to the VIDEO setting. • When connecting the unit, refer to the owner's manual...
... playback picture will be distorted because DVD video discs are unplugged before making any connections. • Connect the unit to the OUT position. 13 CONNECTION (CONTINUED) CONNECTING THE DVD TO A TV USING THE S-VIDEO CABLE VOLUME 1 2 VIDEO AUDIO AV S-VIDEO OUT IN NOTES FOR CONNECTING TO A TV: • The TV must have an S-Video IN jack. • Set the TV's TV/VIDEO button or switch to the VIDEO setting. • When connecting the unit, refer to the owner's manual...
Manual
Page 15
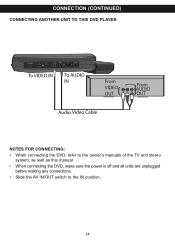
CONNECTION (CONTINUED) CONNECTING ANOTHER UNIT TO THIS DVD PLAYER VOLUME 1 2 VIDEO AUDIO AV S-VIDEO OUT IN NOTES FOR CONNECTING: • When connecting the DVD, refer to the owner's manuals of the TV and stereo system, as well as this manual. • When connecting the DVD, make sure the power is off and all units are unplugged before making any connections. • Slide the AV IN/OUT switch to the IN position. 14
CONNECTION (CONTINUED) CONNECTING ANOTHER UNIT TO THIS DVD PLAYER VOLUME 1 2 VIDEO AUDIO AV S-VIDEO OUT IN NOTES FOR CONNECTING: • When connecting the DVD, refer to the owner's manuals of the TV and stereo system, as well as this manual. • When connecting the DVD, make sure the power is off and all units are unplugged before making any connections. • Slide the AV IN/OUT switch to the IN position. 14
Manual
Page 16
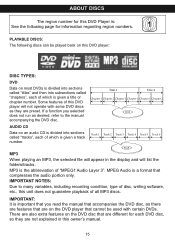
... playing an MP3, the selected file will appear in this DVD player will list the folders/tracks. IMPORTANT NOTES: Due to the manual accompanying the DVD disc. ABOUT DISCS The region number for information regarding region numbers. If a function you read the manual that accompanies the DVD disc, as there are features that are preset. AUDIO CD Data on the DVD player that you selected does not run as they are on an audio...
... playing an MP3, the selected file will appear in this DVD player will list the folders/tracks. IMPORTANT NOTES: Due to the manual accompanying the DVD disc. ABOUT DISCS The region number for information regarding region numbers. If a function you read the manual that accompanies the DVD disc, as there are features that are preset. AUDIO CD Data on the DVD player that you selected does not run as they are on an audio...
Manual
Page 17
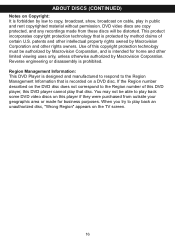
... rights owners. Region Management Information: This DVD Player is recorded on a DVD disc. If the Region number described on the DVD disc does not correspond to the Region Management Information that disc. DVD video discs are copy protected, and any recordings made from outside your geographic area or made for home and other limited viewing uses only, unless otherwise authorized by law to copy, broadcast, show, broadcast on cable, play back an unauthorized disc, "Wrong Region...
... rights owners. Region Management Information: This DVD Player is recorded on a DVD disc. If the Region number described on the DVD disc does not correspond to the Region Management Information that disc. DVD video discs are copy protected, and any recordings made from outside your geographic area or made for home and other limited viewing uses only, unless otherwise authorized by law to copy, broadcast, show, broadcast on cable, play back an unauthorized disc, "Wrong Region...

Manual
Page 18
... Stop mode, press the SETUP button 1 to the previous menu, simply press the Navigation (√) button 2. Use the Navigation (π,†) buttons 2 to 5 6 9 0 DISPLAY 7 CLEAR 8 GOTO MENU select one of the Setup icons at the top of the Setup options, then press the PLAY (®)/OK button 3 to make REPEAT A-B PROG RANDOM the change the options as described on and off, adjust what type of television screen you customize the DVD player by selecting...
... Stop mode, press the SETUP button 1 to the previous menu, simply press the Navigation (√) button 2. Use the Navigation (π,†) buttons 2 to 5 6 9 0 DISPLAY 7 CLEAR 8 GOTO MENU select one of the Setup icons at the top of the Setup options, then press the PLAY (®)/OK button 3 to make REPEAT A-B PROG RANDOM the change the options as described on and off, adjust what type of television screen you customize the DVD player by selecting...
Manual
Page 20
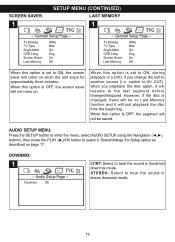
... the unit stops for approximately three minutes. Audio Setup Page -- AUDIO SETUP MENU: Press the SETUP button to enter the menu, select AUDIO SETUP using the Navigation (√,®) buttons, then press the PLAY (®)/OK button to the last segment before changed , there will be saved. DOWNMIX 1 TVG -- General Setup Page -- -- When this option is changed /stopped. STEREO: Select to another source (i.e. TV Display TV Type Angle Mark OSD Lang Screen Saver Last...
... the unit stops for approximately three minutes. Audio Setup Page -- AUDIO SETUP MENU: Press the SETUP button to enter the menu, select AUDIO SETUP using the Navigation (√,®) buttons, then press the PLAY (®)/OK button to the last segment before changed , there will be saved. DOWNMIX 1 TVG -- General Setup Page -- -- When this option is changed /stopped. STEREO: Select to another source (i.e. TV Display TV Type Angle Mark OSD Lang Screen Saver Last...
Manual
Page 22
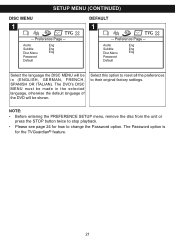
... the STOP button twice to stop playback. • Please see page 24 for the TVGuardian® feature. 21 Audio Eng Subtitle Eng Disc Menu Eng Password Default Select the language the DISC MENU will be in (ENGLISH, GERMAN, FRENCH, SPANISH OR ITALIAN). Audio Eng Subtitle Eng Disc Menu Eng Password Default DEFAULT 1 TVG -- Select this option to reset all the preferences to change the Password option. The Password option is for how to their original factory settings. SETUP MENU (CONTINUED) DISC MENU 1 TVG...
... the STOP button twice to stop playback. • Please see page 24 for the TVGuardian® feature. 21 Audio Eng Subtitle Eng Disc Menu Eng Password Default Select the language the DISC MENU will be in (ENGLISH, GERMAN, FRENCH, SPANISH OR ITALIAN). Audio Eng Subtitle Eng Disc Menu Eng Password Default DEFAULT 1 TVG -- Select this option to reset all the preferences to change the Password option. The Password option is for how to their original factory settings. SETUP MENU (CONTINUED) DISC MENU 1 TVG...
Manual
Page 23
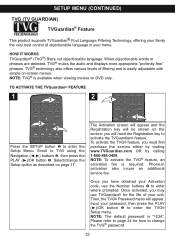
... an sacdrdeietino;naylosuewrviillcenAUDeIfOeeed. Strict Filters out all common offensive language Input your password, then press the PLAY Word Subset Filtering (®)/OK button 2 to enter the TVG® In addition to the main TVGuardian® Modes listed above, you have obtained your Activation TVGuardian SETUP MENU code, use TVGuardian® for language filtering. SETUP MENU (CONTINUED) TVG (TV GUARDIAN) TVGuardian® Feature This product...
... an sacdrdeietino;naylosuewrviillcenAUDeIfOeeed. Strict Filters out all common offensive language Input your password, then press the PLAY Word Subset Filtering (®)/OK button 2 to enter the TVG® In addition to the main TVGuardian® Modes listed above, you have obtained your Activation TVGuardian SETUP MENU code, use TVGuardian® for language filtering. SETUP MENU (CONTINUED) TVG (TV GUARDIAN) TVGuardian® Feature This product...
Manual
Page 28
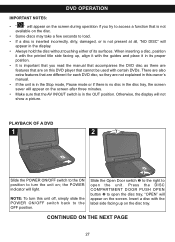
... the disc tray. the POWER indicator will not show a picture. Press the DISC COMPARTMENT DOOR PUSH OPEN button 2 to open the unit. Otherwise, the display will light. There are also extra features that are different for each DVD disc, so they are not explained in this owner's manual. • If the unit is in the Stop mode, Pause mode or if there is no disc in the disc tray, the screen...
... the disc tray. the POWER indicator will not show a picture. Press the DISC COMPARTMENT DOOR PUSH OPEN button 2 to open the unit. Otherwise, the display will light. There are also extra features that are different for each DVD disc, so they are not explained in this owner's manual. • If the unit is in the Stop mode, Pause mode or if there is no disc in the disc tray, the screen...
Manual
Page 32
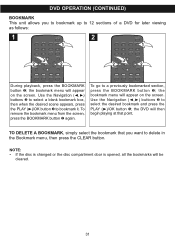
... 3 4 5 9 DISPLAY 2 PAUSE/ FRAME 6 7 CLEAR 0 3 /OK 8 GOTO MENU 2 STOP REPEAT A-B PROG RANDOM AUDIO ANGLE SUBTITLE During playback, press the BOOKMARK button 1; DVD OPERATION (CONTINUED) BOOKMARK This unit allows you want to delete in the Bookmark menu, then press the CLEAR button. the bookmark menu will appear on the screen. NOTE: • If the disc is changed or the disc compartment door is opened, all the bookmarks will then begin playing...
... 3 4 5 9 DISPLAY 2 PAUSE/ FRAME 6 7 CLEAR 0 3 /OK 8 GOTO MENU 2 STOP REPEAT A-B PROG RANDOM AUDIO ANGLE SUBTITLE During playback, press the BOOKMARK button 1; DVD OPERATION (CONTINUED) BOOKMARK This unit allows you want to delete in the Bookmark menu, then press the CLEAR button. the bookmark menu will appear on the screen. NOTE: • If the disc is changed or the disc compartment door is opened, all the bookmarks will then begin playing...
Manual
Page 36
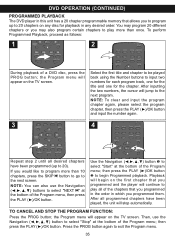
... button and input the number again. 4 SETUP TITLE 1 SLOW 2 ZOOM BOOKMARK 3 4 5 9 DISPLAY 1 PAUSE/ FRAME 6 7 8 CLEAR GOTO 0 MENU /OK 2 STOP Repeat step 2 until all of the chapters that you programmed in the order in any disc for the chapter. TO CANCEL AND STOP THE PROGRAM FUNCTION: Press the PROG button; Then, use the Navigation buttons to select "NEXT n" at the AUDIO bottom of a DVD disc, press the PROG button; DVD OPERATION (CONTINUED) PROGRAMMED PLAYBASETUCP K The DVD...
... button and input the number again. 4 SETUP TITLE 1 SLOW 2 ZOOM BOOKMARK 3 4 5 9 DISPLAY 1 PAUSE/ FRAME 6 7 8 CLEAR GOTO 0 MENU /OK 2 STOP Repeat step 2 until all of the chapters that you programmed in the order in any disc for the chapter. TO CANCEL AND STOP THE PROGRAM FUNCTION: Press the PROG button; Then, use the Navigation buttons to select "NEXT n" at the AUDIO bottom of a DVD disc, press the PROG button; DVD OPERATION (CONTINUED) PROGRAMMED PLAYBASETUCP K The DVD...
Manual
Page 39
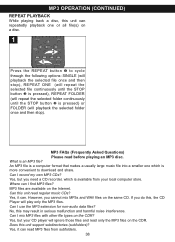
... Internet. No, this unit support subdirectories (subfolders)? What is a computer format that makes a usually large music file into a smaller one or all TITLE SLOW ZOOM BOOKMARK file(s) on 1 2 3 4 a disc. 5 6 7 8 CLEAR GOTO 1 9 0 DISPLAY MENU PAUSE/ FRAME /OK 2 STOP REPEAT A-B 1 PROG RANDOM AUDIO ANGLE SUBTITLE Press the REPEAT button ‚ to download and share. MP3 FAQs (Frequently Asked Questions) Please read MP3 files from your CD player will play only the MP3 files...
... Internet. No, this unit support subdirectories (subfolders)? What is a computer format that makes a usually large music file into a smaller one or all TITLE SLOW ZOOM BOOKMARK file(s) on 1 2 3 4 a disc. 5 6 7 8 CLEAR GOTO 1 9 0 DISPLAY MENU PAUSE/ FRAME /OK 2 STOP REPEAT A-B 1 PROG RANDOM AUDIO ANGLE SUBTITLE Press the REPEAT button ‚ to download and share. MP3 FAQs (Frequently Asked Questions) Please read MP3 files from your CD player will play only the MP3 files...
Manual
Page 44
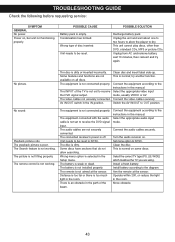
... reset to be reset. Unplug from AC and remove battery, wait 10 minutes, then reinsert and try another function. Select the appropriate video input mode, usually VIDEO or AV. Connect the video cables securely. Unit needs to NTSC. Wrong menu option is poor. The remote is empty. POSSIBLE CAUSE Battery pack is not aimed at the sensor. This is off. The connected receiver's power is normal; No sound. Turn the audio receiver on all discs...
... reset to be reset. Unplug from AC and remove battery, wait 10 minutes, then reinsert and try another function. Select the appropriate video input mode, usually VIDEO or AV. Connect the video cables securely. Unit needs to NTSC. Wrong menu option is poor. The remote is empty. POSSIBLE CAUSE Battery pack is not aimed at the sensor. This is off. The connected receiver's power is normal; No sound. Turn the audio receiver on all discs...
Manual
Page 45
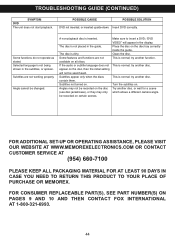
... and functions are not working properly. If the audio or subtitle language does not appear on the disc, then the initial setting will appear in the guide. Angles may only be seen/heard. Clean the disc. This is not placed in the display. Angle cannot be changed. Subtitles appear only when the discs contain them. Make sure to insert a DVD; Try another function. FOR CONSUMER REPLACEABLE PART(S), SEE PART NUMBER...
... and functions are not working properly. If the audio or subtitle language does not appear on the disc, then the initial setting will appear in the guide. Angles may only be seen/heard. Clean the disc. This is not placed in the display. Angle cannot be changed. Subtitles appear only when the discs contain them. Make sure to insert a DVD; Try another function. FOR CONSUMER REPLACEABLE PART(S), SEE PART NUMBER...


