User Guide
Page 2
... PLACE OF PURCHASE OR MEMOREX. REFER SERVICING TO QUALIFIED SERVICE PERSONNEL. The user could lose the authority to operate this product. INFORMATION This equipment has been tested and found to comply with Canadian ICES-003. Lightning and power surges ARE NOT covered under warranty for help. Serial Number CAUTION RISK OF ELECTRIC SHOCK DO NOT OPEN CAUTION: TO REDUCE THE...
... PLACE OF PURCHASE OR MEMOREX. REFER SERVICING TO QUALIFIED SERVICE PERSONNEL. The user could lose the authority to operate this product. INFORMATION This equipment has been tested and found to comply with Canadian ICES-003. Lightning and power surges ARE NOT covered under warranty for help. Serial Number CAUTION RISK OF ELECTRIC SHOCK DO NOT OPEN CAUTION: TO REDUCE THE...
User Guide
Page 3
...: Selecting fine audio equipment such as the unit you've just purchased is only the start of sound. Sound can be loud and harmful to higher volumes of your hearing. Over time your hearing "comfort level" adapts to your musical enjoyment. To establish a safe level: • Start your volume control at a safe level BEFORE your equipment at a low setting. • Slowly increase the sound until...
...: Selecting fine audio equipment such as the unit you've just purchased is only the start of sound. Sound can be loud and harmful to higher volumes of your hearing. Over time your hearing "comfort level" adapts to your musical enjoyment. To establish a safe level: • Start your volume control at a safe level BEFORE your equipment at a low setting. • Slowly increase the sound until...
User Guide
Page 4
... sure to replace your obsolete outlet. RETAIN INSTRUCTIONS The safety and operating instructions should be mounted to lightning and power-line surges. 14. in a risk of antenna discharge product, connection to provide some protection against them might be fatal. 15. If the plug should never be retained for grounding electrodes. OVERLOADING Do not overload wall outlets and extension cords as recommended...
... sure to replace your obsolete outlet. RETAIN INSTRUCTIONS The safety and operating instructions should be mounted to lightning and power-line surges. 14. in a risk of antenna discharge product, connection to provide some protection against them might be fatal. 15. If the plug should never be retained for grounding electrodes. OVERLOADING Do not overload wall outlets and extension cords as recommended...

User Guide
Page 5
.... SKIP/SEARCH O Button (for USB & SD/MMC card) 37. SKIP/SEARCH N Button (for USB & SD/MMC card) 36. AC Cord 4 REC (Record) SYNC Button 9. VOCAL AUTO Button 20. AUDIO OUT Right Jack 47. BRIGHT Control 50. CD+G Display with REPEAT Indicator CD+G Indicator PROG. (PROGRAM) Indicator PLAY/PAUSE Indicator 11. CD+G SKIP/SEARCH O Button 14. MIC 1 VOLUME Control 40. MIC 2 VOLUME Control 41. PLAY/PAUSE (®P) Button (for USB & SD/MMC card) 44. OPEN/CLOSE Area...
.... SKIP/SEARCH O Button (for USB & SD/MMC card) 37. SKIP/SEARCH N Button (for USB & SD/MMC card) 36. AC Cord 4 REC (Record) SYNC Button 9. VOCAL AUTO Button 20. AUDIO OUT Right Jack 47. BRIGHT Control 50. CD+G Display with REPEAT Indicator CD+G Indicator PROG. (PROGRAM) Indicator PLAY/PAUSE Indicator 11. CD+G SKIP/SEARCH O Button 14. MIC 1 VOLUME Control 40. MIC 2 VOLUME Control 41. PLAY/PAUSE (®P) Button (for USB & SD/MMC card) 44. OPEN/CLOSE Area...
User Guide
Page 6
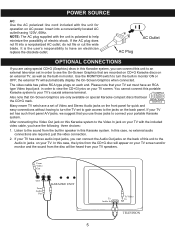
... connect the Audio Out jacks on your TV's coaxial antenna terminal. NOTE: The AC plug supplied with the unit is the user's responsibility to the Video In jack on your TV screen and/or monitor and the sound from the built-in speaker in monitor ON or OFF; Use the MONITOR switch to help minimize the possibility of this Karaoke system to have an RCA type Video Input jack...
... connect the Audio Out jacks on your TV's coaxial antenna terminal. NOTE: The AC plug supplied with the unit is the user's responsibility to the Video In jack on your TV screen and/or monitor and the sound from the built-in speaker in monitor ON or OFF; Use the MONITOR switch to help minimize the possibility of this Karaoke system to have an RCA type Video Input jack...
User Guide
Page 7
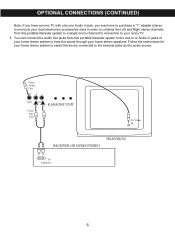
... in order to combine the Left and Right stereo channels from this portable Karaoke system to a single mono channel for your home stereo system to select the device connected to your home stereo speakers. Follow the instructions for connection to the external jacks as the audio source. You can connect the Audio Out jacks from this portable Karaoke system to the Aux In or Audio In jacks of your home stereo system to hear the sound through your mono TV. 3.
... in order to combine the Left and Right stereo channels from this portable Karaoke system to a single mono channel for your home stereo system to select the device connected to your home stereo speakers. Follow the instructions for connection to the external jacks as the audio source. You can connect the Audio Out jacks from this portable Karaoke system to the Aux In or Audio In jacks of your home stereo system to hear the sound through your mono TV. 3.
User Guide
Page 8
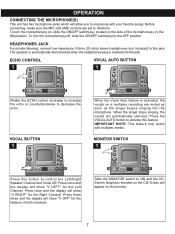
... Auto feature is inserted into the microphone. OPERATION CONNECTING THE MICROPHONE(S) This unit has two microphone jacks which will show "V LEFT" for the Left Channel. IMPORTANT NOTE: This feature only works with your favorite songs. Press three times and the display will show "V OFF" for the balance of the microphone(s), to the ON position. Before connecting, make sure the MIC VOLUME controls are automatically unmuted. MONITOR SWITCH...
... Auto feature is inserted into the microphone. OPERATION CONNECTING THE MICROPHONE(S) This unit has two microphone jacks which will show "V LEFT" for the Left Channel. IMPORTANT NOTE: This feature only works with your favorite songs. Press three times and the display will show "V OFF" for the balance of the microphone(s), to the ON position. Before connecting, make sure the MIC VOLUME controls are automatically unmuted. MONITOR SWITCH...
User Guide
Page 9
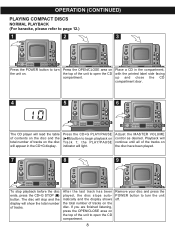
... the unit to open the CD compartment. The disc will appear in the CD+G display. Adjust the M1ASTER1 VOLUME control as desired. OPERATION (CONTINUED) PLAYING COMPACT DISCS NORMAL PLAYBACK (For karaoke, please refer to page 12.) 1 2 3 Press the POWER button to turn the unit off. 8 Remove your d1isc and1 press the POWER button to open the CD compartment. Press the OPEN/CLOSE area on the disc will stop playback...
... the unit to open the CD compartment. The disc will appear in the CD+G display. Adjust the M1ASTER1 VOLUME control as desired. OPERATION (CONTINUED) PLAYING COMPACT DISCS NORMAL PLAYBACK (For karaoke, please refer to page 12.) 1 2 3 Press the POWER button to turn the unit off. 8 Remove your d1isc and1 press the POWER button to open the CD compartment. Press the OPEN/CLOSE area on the disc will stop playback...

User Guide
Page 10
... o 1 or n 2 button to the beginning of the current track. The player will begin on the display, you selected. Press the CD+G PLAY/PAUSE (®p) button again to spin and the PLAY/PAUSE indicator will light. When the desired track number blinks in the display, within a track to pause the disc momentarily, press the CD+G PLAY/PAUSE (®p) button. When you wish to locate a specific musical passage.
... o 1 or n 2 button to the beginning of the current track. The player will begin on the display, you selected. Press the CD+G PLAY/PAUSE (®p) button again to spin and the PLAY/PAUSE indicator will light. When the desired track number blinks in the display, within a track to pause the disc momentarily, press the CD+G PLAY/PAUSE (®p) button. When you wish to locate a specific musical passage.

User Guide
Page 11
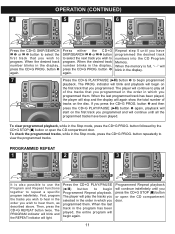
... the CD+G STOP (I) button ƒ. You may program 19 different tracks or you wish to play more than once. Place a CD in the Stop mode, press the CD+G REPEAT button ‚ once; PROGRAMMED PLAYBACK The CD player in this unit has a...PLAY/PAUSE (®p) button ƒ to repeat all of the unit to turn the unit on a disc continuously, while in the display and the PROG. Press the OPEN/CLOSE area on the top of the tracks on . The specific track you to begin playback. indicator will light solid. the REPEAT indicator will blink. To repeat all tracks. To perform programmed...
... the CD+G STOP (I) button ƒ. You may program 19 different tracks or you wish to play more than once. Place a CD in the Stop mode, press the CD+G REPEAT button ‚ once; PROGRAMMED PLAYBACK The CD player in this unit has a...PLAY/PAUSE (®p) button ƒ to repeat all of the unit to turn the unit on a disc continuously, while in the display and the PROG. Press the OPEN/CLOSE area on the top of the tracks on . The specific track you to begin playback. indicator will light solid. the REPEAT indicator will blink. To repeat all tracks. To perform programmed...
User Guide
Page 12
... number blinks in the Stop mode, press the CD+G PROG. When the last track in the display. 7 21 Press the CD+G PLAY/PAUSE (®p) button ‚ to begin again. button „ again. Press the CD+G PLAY/PAUSE (®p) button to view the programmed tracks. When the memory is also possible to use the Program and Repeat functions together to program. If you programmed them. To clear programmed...
... number blinks in the Stop mode, press the CD+G PROG. When the last track in the display. 7 21 Press the CD+G PLAY/PAUSE (®p) button ‚ to begin again. button „ again. Press the CD+G PLAY/PAUSE (®p) button to view the programmed tracks. When the memory is also possible to use the Program and Repeat functions together to program. If you programmed them. To clear programmed...
User Guide
Page 13
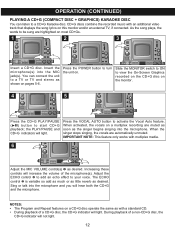
... light. 12 During playback of the microphone(s). You can listen to a CD+G Karaoke disc. Increasing these controls will increase the volume of a non-CD+G disc, the CD+G indicator will light. OPERATION (CONTINUED) PLAYING A CD+G (COMPACT DISC + GRAPHICS) KARAOKE DISC You can connect the unit to a TV or TV and stereo as desired. Press the POWER button to turn the unit on the monitor. 4 5 Press the CD+G PLAY/PAUSE (®p) button...
... light. 12 During playback of the microphone(s). You can listen to a CD+G Karaoke disc. Increasing these controls will increase the volume of a non-CD+G disc, the CD+G indicator will light. OPERATION (CONTINUED) PLAYING A CD+G (COMPACT DISC + GRAPHICS) KARAOKE DISC You can connect the unit to a TV or TV and stereo as desired. Press the POWER button to turn the unit on the monitor. 4 5 Press the CD+G PLAY/PAUSE (®p) button...
User Guide
Page 14
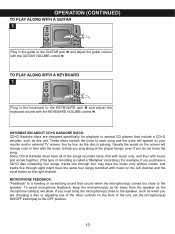
...+G decoder, such as this unit. OPERATION (CONTINUED) TO PLAY ALONG WITH A GUITAR 1 1 2 Plug in the guitar to the GUITAR jack 1 and adjust the guitar volume with the KEYBOARD VOLUME control 2. TO PLAY ALONG WITH A KEYBOARD 1 1 2 Plug in time with music on the left channel and the vocal tracks on the right channel. INFORMATION ABOUT CD+G KARAOKE DISCS: CD+G Karaoke discs are changing a disc or adjusting one through four may have...
...+G decoder, such as this unit. OPERATION (CONTINUED) TO PLAY ALONG WITH A GUITAR 1 1 2 Plug in the guitar to the GUITAR jack 1 and adjust the guitar volume with the KEYBOARD VOLUME control 2. TO PLAY ALONG WITH A KEYBOARD 1 1 2 Plug in time with music on the left channel and the vocal tracks on the right channel. INFORMATION ABOUT CD+G KARAOKE DISCS: CD+G Karaoke discs are changing a disc or adjusting one through four may have...
User Guide
Page 15
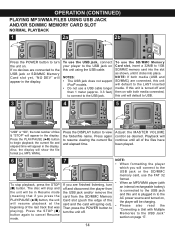
... mode. 7 If you will connect to the USB jack or the SD/MMC memory card, use the USB jack, connect your player to the USB jack on . OPERATION (CONTINUED) PLAYING MP3/WMA FILES USING USB JACK AND/OR SD/MMC MEMORY CARD SLOT NORMAL PLAYBACK 1 2a 2b LABEL SIDE Press the POWER button to turn the unit on this unit using the USB cable. Also, the display will spring out). NOTE: • When formatting...
... mode. 7 If you will connect to the USB jack or the SD/MMC memory card, use the USB jack, connect your player to the USB jack on . OPERATION (CONTINUED) PLAYING MP3/WMA FILES USING USB JACK AND/OR SD/MMC MEMORY CARD SLOT NORMAL PLAYBACK 1 2a 2b LABEL SIDE Press the POWER button to turn the unit on this unit using the USB cable. Also, the display will spring out). NOTE: • When formatting...
User Guide
Page 16
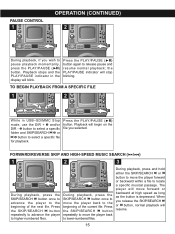
... a specific musical passage. Playback will stop blinking. FORWARD/REVERSE SKIP AND HIGH-SPEED MUSIC SEARCH ( / ) 1 2 3 During playback, press the SKIP/SEARCH n button once to advance the player to move forward or backward at high speed as long as the button is depressed. PAUSE CONTROL 1 OPERATION (CONTINUED) 2 During playback, if you release the SKIP/SEARCH n or o button, normal playback will blink. the PLAY...
... a specific musical passage. Playback will stop blinking. FORWARD/REVERSE SKIP AND HIGH-SPEED MUSIC SEARCH ( / ) 1 2 3 During playback, press the SKIP/SEARCH n button once to advance the player to move forward or backward at high speed as long as the button is depressed. PAUSE CONTROL 1 OPERATION (CONTINUED) 2 During playback, if you release the SKIP/SEARCH n or o button, normal playback will blink. the PLAY...
User Guide
Page 17
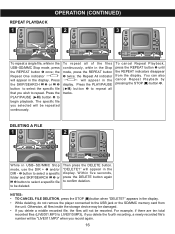
... Stop mode, use the DIR + 1 and/or DIR - 2 button to select a specific folder and SKIP/SEARCH o 3 or n 4 button to select a specific file to repeat. appears in the Stop mode, press the REPEAT button ‚ twice; To repeat all tracks. Press the PLAY/PAUSE (®p) button … to repeat all of the files continuously, while in the display. • While deleting, do not remove the player connected...
... Stop mode, use the DIR + 1 and/or DIR - 2 button to select a specific folder and SKIP/SEARCH o 3 or n 4 button to select a specific file to repeat. appears in the Stop mode, press the REPEAT button ‚ twice; To repeat all tracks. Press the PLAY/PAUSE (®p) button … to repeat all of the files continuously, while in the display. • While deleting, do not remove the player connected...
User Guide
Page 18
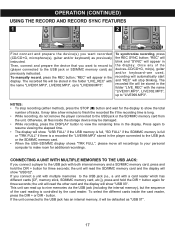
...button and wait for the display to show "USB 02". button. "REC" will blink and "SYNC" will be stored in the display. NOTES: • To stop blinking. If you want recorded (CD/CD+G, microphone(s), guitar and/or keyboard) as previously instructed. If the unit connected to the USB jack ...in the display. It may be stored in the display. To manually record, press the REC button; the unit will read up to "LIVE999.MP3". OPERATION (CONTINUED) USING THE RECORD AND RECORD SYNC FEATURES 1 2 First connect and prepare the device(s) you connect a player to the USB jack with ...
...button and wait for the display to show "USB 02". button. "REC" will blink and "SYNC" will be stored in the display. NOTES: • To stop blinking. If you want recorded (CD/CD+G, microphone(s), guitar and/or keyboard) as previously instructed. If the unit connected to the USB jack ...in the display. It may be stored in the display. To manually record, press the REC button; the unit will read up to "LIVE999.MP3". OPERATION (CONTINUED) USING THE RECORD AND RECORD SYNC FEATURES 1 2 First connect and prepare the device(s) you connect a player to the USB jack with ...
User Guide
Page 20
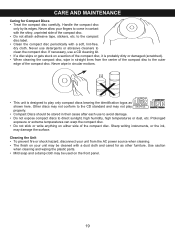
... straight lines from the AC power source when cleaning. • The finish on the front panel. 19 Cleaning the Unit • To prevent fire or shock hazard, disconnect your unit may be stored in circular motions. to direct sunlight, high humidity, high ... parts. • Mild soap and a damp cloth may be used on your unit from the center of the compact disc to play DIGITAL AUDIO GRAPHICS properly. • Compact Discs should be cleaned with a dust cloth and cared for Compact Discs • Treat the compact disc carefully. Handle the compact disc only...
... straight lines from the AC power source when cleaning. • The finish on the front panel. 19 Cleaning the Unit • To prevent fire or shock hazard, disconnect your unit may be stored in circular motions. to direct sunlight, high humidity, high ... parts. • Mild soap and a damp cloth may be used on your unit from the center of the compact disc to play DIGITAL AUDIO GRAPHICS properly. • Compact Discs should be cleaned with a dust cloth and cared for Compact Discs • Treat the compact disc carefully. Handle the compact disc only...
User Guide
Page 21
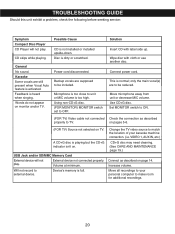
... label side up. Volume at minimum. Solution Insert CD with cloth or use another disc. only the main vocal(s) are still present when Vocal Auto feature is playing but the CD+G indicator isn't on TV. VIDEO 1, AUX IN, etc.) A CD+G disc is activated. Use CD+G disc. TROUBLESHOOTING GUIDE Should this unit exhibit a problem, check the following before seeking service: Symptom Compact Disc Player CD Player will not...
... label side up. Volume at minimum. Solution Insert CD with cloth or use another disc. only the main vocal(s) are still present when Vocal Auto feature is playing but the CD+G indicator isn't on TV. VIDEO 1, AUX IN, etc.) A CD+G disc is activated. Use CD+G disc. TROUBLESHOOTING GUIDE Should this unit exhibit a problem, check the following before seeking service: Symptom Compact Disc Player CD Player will not...

User Guide
Page 22
... Speaker ...4 ohms Dimensions 13 (W) X 19.75 (H) X 9.5 (D) Inches Weight ...15.5 lbs Output Power...5 W CD SECTION: Disc Diameter 4.72" (120mm) ...3.15" (80mm) Single CD Optical Source Semiconductor Laser Wavelength ...780nm D/A Conversion ...1-bit USB JACK-SD/MMC MEMORY CARD SECTION: File Support MP3: MPEG1/2/2.5 Layer 3 ...WMA Bit Rate ...MP3: 8-320kbps ...WMA: 16-192kbps Specifications are subject to change without notice. FOR ADDITIONAL SET-UP OR OPERATING...
... Speaker ...4 ohms Dimensions 13 (W) X 19.75 (H) X 9.5 (D) Inches Weight ...15.5 lbs Output Power...5 W CD SECTION: Disc Diameter 4.72" (120mm) ...3.15" (80mm) Single CD Optical Source Semiconductor Laser Wavelength ...780nm D/A Conversion ...1-bit USB JACK-SD/MMC MEMORY CARD SECTION: File Support MP3: MPEG1/2/2.5 Layer 3 ...WMA Bit Rate ...MP3: 8-320kbps ...WMA: 16-192kbps Specifications are subject to change without notice. FOR ADDITIONAL SET-UP OR OPERATING...


