User Guide
Page 7
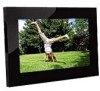
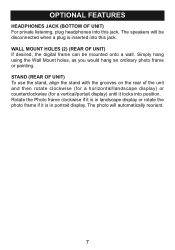
WALL MOUNT HOLES (2) (REAR OF UNIT) If desired, the digital frame can be disconnected when a plug is in landscape display or rotate the photo frame if it locks into this jack. The photo will be mounted onto a wall. OPTIONAL FEATURES HEADPHONES JACK (BOTTOM OF UNIT) For private listening, plug headphones into this jack.... Simply hang using the Wall Mount holes, as you would hang an ordinary photo frame or painting. STAND (REAR OF UNIT) To use the stand, align the stand with the grooves on the rear of the unit and then...
WALL MOUNT HOLES (2) (REAR OF UNIT) If desired, the digital frame can be disconnected when a plug is in landscape display or rotate the photo frame if it locks into this jack. The photo will be mounted onto a wall. OPTIONAL FEATURES HEADPHONES JACK (BOTTOM OF UNIT) For private listening, plug headphones into this jack.... Simply hang using the Wall Mount holes, as you would hang an ordinary photo frame or painting. STAND (REAR OF UNIT) To use the stand, align the stand with the grooves on the rear of the unit and then...
User Guide
Page 8
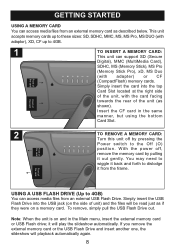
Front of the card USING A USB FLASH DRIVE (Up to 4GB. 1 TO INSERT A MEMORY CARD: This unit can support SD (Secure Digital), MMC (MultiMedia Card), SDHC, MS (Memory Stick), MS Pro (Memory Stick Pro), xD, MS Duo (with the card facing Front of the card towards the ... the USB Flash Drive out. Insert the CF card in the Main menu, insert the external memory card or USB Flash drive; it from the frame. With the power off by pulling it out gently.
Front of the card USING A USB FLASH DRIVE (Up to 4GB. 1 TO INSERT A MEMORY CARD: This unit can support SD (Secure Digital), MMC (MultiMedia Card), SDHC, MS (Memory Stick), MS Pro (Memory Stick Pro), xD, MS Duo (with the card facing Front of the card towards the ... the USB Flash Drive out. Insert the CF card in the Main menu, insert the external memory card or USB Flash drive; it from the frame. With the power off by pulling it out gently.
User Guide
Page 9
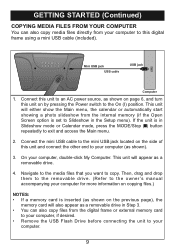
... memory card will also appear as a removable drive. 4. GETTING STARTED (Continued) COPYING MEDIA FILES FROM YOUR COMPUTER You can also copy files from the digital frame or external memory card to your computer, if desired. • Remove the USB Flash Drive before connecting the unit to your computer to this...the other end to exit and access the Main menu. 2. This unit will either show the Main menu, the calendar or automatically start showing a photo slideshow from the internal memory (if the Open Screen option is in the Setup menu). Navigate to the media files that you want to the...
... memory card will also appear as a removable drive. 4. GETTING STARTED (Continued) COPYING MEDIA FILES FROM YOUR COMPUTER You can also copy files from the digital frame or external memory card to your computer, if desired. • Remove the USB Flash Drive before connecting the unit to your computer to this...the other end to exit and access the Main menu. 2. This unit will either show the Main menu, the calendar or automatically start showing a photo slideshow from the internal memory (if the Open Screen option is in the Setup menu). Navigate to the media files that you want to the...
User Guide
Page 16
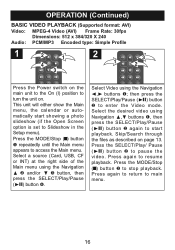
... Select the desired video using Navigation π,† buttons 1, then press the SELECT/Play/Pause (®p) button 2 again to start showing a photo slideshow (if the Open Screen option is set to main menu. 16 OPERATION (Continued) BASIC VIDEO PLAYBACK (Supported format: AVI) Video: MPEG-4 Video ...(AVI) Frame Rate: 30fps Dimensions: 512 x 384/320 X 240 Audio: PCM/MP3 Encoded type: Simple Profile 1 2 1 4 3 2 1 3 2 Press the Power switch on the ...
... Select the desired video using Navigation π,† buttons 1, then press the SELECT/Play/Pause (®p) button 2 again to start showing a photo slideshow (if the Open Screen option is set to main menu. 16 OPERATION (Continued) BASIC VIDEO PLAYBACK (Supported format: AVI) Video: MPEG-4 Video ...(AVI) Frame Rate: 30fps Dimensions: 512 x 384/320 X 240 Audio: PCM/MP3 Encoded type: Simple Profile 1 2 1 4 3 2 1 3 2 Press the Power switch on the ...

User Guide
Page 19
... position to make the change the desired option setting (i.e. OPERATION (Continued) SETUP MENU 4 2 1 3 The Setup menu lets you customize this digital frame by allowing you to navigate and change the options. 1. This unit will be highlighted in the Setup menu). 2. the option will either show the... Main menu, the calendar or automatically start showing a photo slideshow (if the Open Screen option is set to change . 6. Exit by pressing the SETUP button 4 while in the Main menu.) 4. ...
... position to make the change the desired option setting (i.e. OPERATION (Continued) SETUP MENU 4 2 1 3 The Setup menu lets you customize this digital frame by allowing you to navigate and change the options. 1. This unit will be highlighted in the Setup menu). 2. the option will either show the... Main menu, the calendar or automatically start showing a photo slideshow (if the Open Screen option is set to change . 6. Exit by pressing the SETUP button 4 while in the Main menu.) 4. ...
User Guide
Page 21
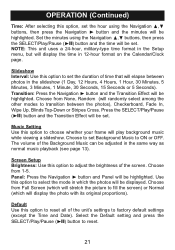
... 1-5. Transition: Press the Navigation ® button and the Transition Effect will be highlighted. Choose to set Background Music to choose whether your frame will play background music while viewing a slideshow. Panel: Press the Navigation ® button and Panel will be highlighted. Music Setting Use this...Up, Blinds Top-Down or Stripes Cross. Select the Default setting and press the SELECT/Play/Pause (®p) button to transition between photos in the same way as normal music playback (see page 13). The volume of time that will randomly select among the other modes...
... 1-5. Transition: Press the Navigation ® button and the Transition Effect will be highlighted. Choose to set Background Music to choose whether your frame will play background music while viewing a slideshow. Panel: Press the Navigation ® button and Panel will be highlighted. Music Setting Use this...Up, Blinds Top-Down or Stripes Cross. Select the Default setting and press the SELECT/Play/Pause (®p) button to transition between photos in the same way as normal music playback (see page 13). The volume of time that will randomly select among the other modes...
User Guide
Page 22
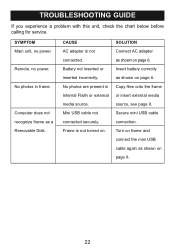
...Battery not inserted or inserted incorrectly. SOLUTION Connect AC adapter as shown on . Copy files onto the frame or insert external media source, see page 9. Remote, no power. No photos in Internal Flash or external media source. CAUSE AC adapter is not turned on page 9. 22 Turn ...on frame and connect the mini USB cable again as shown on page 6. No photos are present in frame. Computer does not recognize frame as shown on page 6. Secure mini USB cable connection. Frame is not connected. Mini USB cable not connected ...
...Battery not inserted or inserted incorrectly. SOLUTION Connect AC adapter as shown on . Copy files onto the frame or insert external media source, see page 9. Remote, no power. No photos in Internal Flash or external media source. CAUSE AC adapter is not turned on page 9. 22 Turn ...on frame and connect the mini USB cable again as shown on page 6. No photos are present in frame. Computer does not recognize frame as shown on page 6. Secure mini USB cable connection. Frame is not connected. Mini USB cable not connected ...


