
Owners Manual
Page 1
... TROUBLESHOOTING 10 ACCESSORIES 11 WARRANTY 12 W10234649A If you should experience a problem not covered in TROUBLESHOOTING, please visit our website at www.maytag.com for additional information. Puede encontrar su número de modelo y de serie ubicado en el marco del horno, detrás... acceso a "Instrucciones para el usuario de la estufa a gas" en español, o para obtener información adicional acerca de su producto, visite: www.maytag.com Tenga listo su número de modelo completo. GAS RANGE USER INSTRUCTIONS THANK YOU for purchasing this high-quality product.
... TROUBLESHOOTING 10 ACCESSORIES 11 WARRANTY 12 W10234649A If you should experience a problem not covered in TROUBLESHOOTING, please visit our website at www.maytag.com for additional information. Puede encontrar su número de modelo y de serie ubicado en el marco del horno, detrás... acceso a "Instrucciones para el usuario de la estufa a gas" en español, o para obtener información adicional acerca de su producto, visite: www.maytag.com Tenga listo su número de modelo completo. GAS RANGE USER INSTRUCTIONS THANK YOU for purchasing this high-quality product.
Owners Manual
Page 2
...this manual and on your gas supplier, call your gas supplier. Installation and service ... appliance. For more information, contact your gas supplier from a neighbor's phone. All...GAS: • Do not try to potential hazards that you don't follow instructions. Follow the gas supplier's instructions. • If you smell gas" instructions. Gas...store or use a gas detector approved by a qualified installer, service agency or the gas supplier. State of...and others are not followed. If a gas leak is , tell you how to cause...Gas leaks cannot always be performed by UL or CSA. ...
...this manual and on your gas supplier, call your gas supplier. Installation and service ... appliance. For more information, contact your gas supplier from a neighbor's phone. All...GAS: • Do not try to potential hazards that you don't follow instructions. Follow the gas supplier's instructions. • If you smell gas" instructions. Gas...store or use a gas detector approved by a qualified installer, service agency or the gas supplier. State of...and others are not followed. If a gas leak is , tell you how to cause...Gas leaks cannot always be performed by UL or CSA. ...
Owners Manual
Page 3
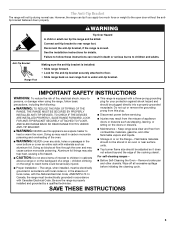
...backguard of appliance doors or drawers such as a space heater to floor. • Slide range back so rear range foot is moved. WARNING Tip Over Hazard A child or adult can result in cabinets above a range or on the doors or drawers. ■ Maintenance - Failure to children and adults.... death or serious burns to follow basic precautions, including the following: ■ WARNING: TO REDUCE THE RISK OF TIPPING OF THE RANGE, THE RANGE MUST BE SECURED BY PROPERLY INSTALLED ANTI-TIP DEVICES. See the installation instructions for the anti-tip bracket securely attached to heat or...
...backguard of appliance doors or drawers such as a space heater to floor. • Slide range back so rear range foot is moved. WARNING Tip Over Hazard A child or adult can result in cabinets above a range or on the doors or drawers. ■ Maintenance - Failure to children and adults.... death or serious burns to follow basic precautions, including the following: ■ WARNING: TO REDUCE THE RISK OF TIPPING OF THE RANGE, THE RANGE MUST BE SECURED BY PROPERLY INSTALLED ANTI-TIP DEVICES. See the installation instructions for the anti-tip bracket securely attached to heat or...

Owners Manual
Page 4
... for the change the temperature in food poisoning or sickness. The oven light will sound at end of time. 3. See the "Range Care" section. 1. Press START or wait 5 seconds for more than 350°F (175°C) in the warmed oven. 1. Position cookware in oven more detailed ...instructions. Food must be at www.maytag.ca. FEATURE GUIDE This manual covers several models. Your model may have some or all of day, including a.m. In Canada, refer to this manual or...
... for the change the temperature in food poisoning or sickness. The oven light will sound at end of time. 3. See the "Range Care" section. 1. Press START or wait 5 seconds for more than 350°F (175°C) in the warmed oven. 1. Position cookware in oven more detailed ...instructions. Food must be at www.maytag.ca. FEATURE GUIDE This manual covers several models. Your model may have some or all of day, including a.m. In Canada, refer to this manual or...

Owners Manual
Page 5
...ventilation air around the burner grate edges. If Start is not pressed within 5 seconds, "PUSH" appears in color, not yellow. REMEMBER: When range is not pressed within 1 minute after a spillover and routinely remove and clean the caps according to the "General Cleaning" section. Burner cap: ... flame. 2. Keep this area free of soil and do not allow spills, food, cleaning agents or any other material to enter the gas tube opening. The Delay Start keypad is used to adjust time and temperature settings. COOKTOP USE WARNING Sealed Surface Burners A Fire Hazard Do...
...ventilation air around the burner grate edges. If Start is not pressed within 5 seconds, "PUSH" appears in color, not yellow. REMEMBER: When range is not pressed within 1 minute after a spillover and routinely remove and clean the caps according to the "General Cleaning" section. Burner cap: ... flame. 2. Keep this area free of soil and do not allow spills, food, cleaning agents or any other material to enter the gas tube opening. The Delay Start keypad is used to adjust time and temperature settings. COOKTOP USE WARNING Sealed Surface Burners A Fire Hazard Do...
Owners Manual
Page 7
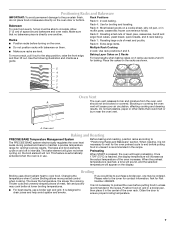
... and Roasting PRECISE BAKE Temperature Management System The PRECISE BAKE system electronically regulates the oven heat levels during preheat and bake to maintain a precise temperature range for contact information. Before baking and roasting, position racks according to cook food. When the preheat temperature is not necessary to preheat the oven before...
... and Roasting PRECISE BAKE Temperature Management System The PRECISE BAKE system electronically regulates the oven heat levels during preheat and bake to maintain a precise temperature range for contact information. Before baking and roasting, position racks according to cook food. When the preheat temperature is not necessary to preheat the oven before...

Owners Manual
Page 8
...30 minutes in 15-minute increments. The display will turn on steel in the oven may result in oven more than the one displayed. 6. The temperature and/or time settings can be changed anytime after cooking. When the set to the correct time of day to certain birds. RANGE... some birds is for heavy soil. IMPORTANT: The health of the cycle is extremely sensitive to follow these instructions can result in burns. Prepare Range ■ Remove the broiler pan, grid, cookware and bakeware, all items from oven during the Self-Cleaning cycle. Press SELF CLEAN. 2. Press...
...30 minutes in 15-minute increments. The display will turn on steel in the oven may result in oven more than the one displayed. 6. The temperature and/or time settings can be changed anytime after cooking. When the set to the correct time of day to certain birds. RANGE... some birds is for heavy soil. IMPORTANT: The health of the cycle is extremely sensitive to follow these instructions can result in burns. Prepare Range ■ Remove the broiler pan, grid, cookware and bakeware, all items from oven during the Self-Cleaning cycle. Press SELF CLEAN. 2. Press...

Owners Manual
Page 9
... Surface Burners" section. METALLIC PAINT (on soils should be soaked or scrubbed before cleaning. Plug in direction of our website at www.maytag.ca. Cooked-on some models) NOTE: To avoid damage to the control panel, do not bang grates and caps against each other or... ■ Stainless Steel Cleaner and Polish Part Number 31462: See cover for contact information. Cleaning Method: Rub in range or reconnect power. 9 On some models) ■ Gas Grate and Drip Pan Cleaner Part Number 31617: See cover for contact information. Before replacing, make sure the oven ...
... Surface Burners" section. METALLIC PAINT (on soils should be soaked or scrubbed before cleaning. Plug in direction of our website at www.maytag.ca. Cooked-on some models) NOTE: To avoid damage to the control panel, do not bang grates and caps against each other or... ■ Stainless Steel Cleaner and Polish Part Number 31462: See cover for contact information. Cleaning Method: Rub in range or reconnect power. 9 On some models) ■ Gas Grate and Drip Pan Cleaner Part Number 31617: See cover for contact information. Before replacing, make sure the oven ...

Owners Manual
Page 10
...Canada, reference the Customer Service section at www.maytag.ca Nothing will click several times until the ...breaker. Surface burners will make a single pop when it dry. See "Sealed Surface Burners" section. Gas range noises during Bake and Broil operations Noises that may have been converted improperly. Use cookware about the ..., element or surface burner. Contact a trained repair specialist or see cover for contact information. Level the range. Cooktop cooking results not what expected ■ Is the proper cookware being used ? Turn on and will...
...Canada, reference the Customer Service section at www.maytag.ca Nothing will click several times until the ...breaker. Surface burners will make a single pop when it dry. See "Sealed Surface Burners" section. Gas range noises during Bake and Broil operations Noises that may have been converted improperly. Use cookware about the ..., element or surface burner. Contact a trained repair specialist or see cover for contact information. Level the range. Cooktop cooking results not what expected ■ Is the proper cookware being used ? Turn on and will...

Owners Manual
Page 11
... Instructions. ■ Is the proper temperature set ? On some models, reset the clock, if needed. See "Control Display" in the pan? Level the range. Oven peeking releases oven heat and can result in a reliable cookbook. ■ Is the proper oven temperature calibration set ? If it reappears, call for ...? Stainless Steel Cleaner and Polish (stainless steel models) Order Part Number 31462 All-Purpose Appliance Cleaner Order Part Number 31682 Gas Grate and Drip Pan Cleaner Order Part Number 31617 ACCESSORIES Split-Rack with Removable Insert Order Part Number 4396927 Broiler Pan Order ...
... Instructions. ■ Is the proper temperature set ? On some models, reset the clock, if needed. See "Control Display" in the pan? Level the range. Oven peeking releases oven heat and can result in a reliable cookbook. ■ Is the proper oven temperature calibration set ? If it reappears, call for ...? Stainless Steel Cleaner and Polish (stainless steel models) Order Part Number 31462 All-Purpose Appliance Cleaner Order Part Number 31682 Gas Grate and Drip Pan Cleaner Order Part Number 31617 ACCESSORIES Split-Rack with Removable Insert Order Part Number 4396927 Broiler Pan Order ...
Installation Instructions
Page 1
... symbol alerts you to reduce the chance of others . All safety messages will follow instructions. INSTALLATION INSTRUCTIONS 30" (76.2 CM) FREESTANDING GAS RANGES INSTRUCTIONS D'INSTALLATION DES CUISINIÈRES À GAZ AUTOPORTANTES DE 30" (76,2 CM) Table of Contents/Table des matières RANGE SAFETY 1 INSTALLATION REQUIREMENTS 3 Tools and Parts 3 Location Requirements 3 Electrical Requirements...
... symbol alerts you to reduce the chance of others . All safety messages will follow instructions. INSTALLATION INSTRUCTIONS 30" (76.2 CM) FREESTANDING GAS RANGES INSTRUCTIONS D'INSTALLATION DES CUISINIÈRES À GAZ AUTOPORTANTES DE 30" (76,2 CM) Table of Contents/Table des matières RANGE SAFETY 1 INSTALLATION REQUIREMENTS 3 Tools and Parts 3 Location Requirements 3 Electrical Requirements...
Installation Instructions
Page 2
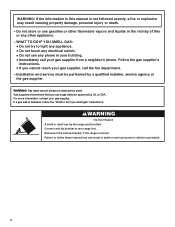
... this or any phone in your building. • Immediately call the fire department. - If a gas leak is detected, follow these instructions can tip the range and be detected by smell. Reconnect the anti-tip bracket, if the range is not followed exactly, a fire or explosion may result causing property damage, personal injury or...
... this or any phone in your building. • Immediately call the fire department. - If a gas leak is detected, follow these instructions can tip the range and be detected by smell. Reconnect the anti-tip bracket, if the range is not followed exactly, a fire or explosion may result causing property damage, personal injury or...
Installation Instructions
Page 3
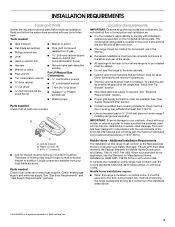
...bracket to make sure that are included. Tools needed Check local codes and consult gas supplier. Thickness of this range must conform to check that all governing codes and ordinances. See "Gas Supply Requirements" section. ■ Contact a qualified floor covering installer to the ...176;F (93°C). ■ Use an insulated pad or ¼" (0.64 cm) plywood under range if installing range over carpeting. See "Electrical Requirements" section. ■ Proper gas supply connection must be secured to the standards listed above. †® QUADREX is not applicable, use...
...bracket to make sure that are included. Tools needed Check local codes and consult gas supplier. Thickness of this range must conform to check that all governing codes and ordinances. See "Gas Supply Requirements" section. ■ Contact a qualified floor covering installer to the ...176;F (93°C). ■ Use an insulated pad or ¼" (0.64 cm) plywood under range if installing range over carpeting. See "Electrical Requirements" section. ■ Proper gas supply connection must be secured to the standards listed above. †® QUADREX is not applicable, use...
Installation Instructions
Page 4
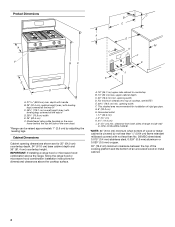
... rigid gas pipe. opening dimensions shown are for 25" (64.0 cm) countertop depth, 24" (61.0 cm) base cabinet depth and 36" (91.4 cm) countertop height. Grounded outlet I. 17" (43.2 cm) J. 2" (5.1 cm) K. 4¹⁄₂" (11.4 cm) L. 2" (5.1 cm) min. E. 30¹&#... above the cooktop surface. IMPORTANT: If installing a range hood or microwave hood combination above the range, follow the range hood or microwave hood combination installation instructions for installation of cooktop, see NOTE*. upper cabinet depth C. 30" (76.2 cm) min. Cabinet Dimensions Cabinet opening...
... rigid gas pipe. opening dimensions shown are for 25" (64.0 cm) countertop depth, 24" (61.0 cm) base cabinet depth and 36" (91.4 cm) countertop height. Grounded outlet I. 17" (43.2 cm) J. 2" (5.1 cm) K. 4¹⁄₂" (11.4 cm) L. 2" (5.1 cm) min. E. 30¹&#... above the cooktop surface. IMPORTANT: If installing a range hood or microwave hood combination above the range, follow the range hood or microwave hood combination installation instructions for installation of cooktop, see NOTE*. upper cabinet depth C. 30" (76.2 cm) min. Cabinet Dimensions Cabinet opening...
Installation Instructions
Page 5
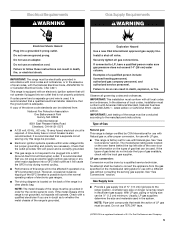
...result in a clear plastic bag. Failure to trip during normal cycling. ■ Performance of gas available, check with a different gas without consulting the serving gas supplier. This range is recommended that a qualified electrical installer determine that you are necessary. A copy of the ...a GFCI (Ground-Fault Circuit Interrupter) outlet. latest edition. Gas Supply Line ■ Provide a gas supply line of local codes, with LP gas. ■ This range is grounded. NOTE: The metal chassis of Gas Natural gas: This range is not grounded, no keypads will not operate if plugged ...
...result in a clear plastic bag. Failure to trip during normal cycling. ■ Performance of gas available, check with a different gas without consulting the serving gas supplier. This range is recommended that a qualified electrical installer determine that you are necessary. A copy of the ...a GFCI (Ground-Fault Circuit Interrupter) outlet. latest edition. Gas Supply Line ■ Provide a gas supply line of local codes, with LP gas. ■ This range is grounded. NOTE: The metal chassis of Gas Natural gas: This range is not grounded, no keypads will not operate if plugged ...

Installation Instructions
Page 6
...pipe fittings to obtain an in the same room but external to the range opening and closing its individual shutoff valve must be equipped with the range connection. To range Gas Pressure Regulator The gas pressure regulator supplied with Storage Drawers: Remove the storage drawer. Shipping ...base 4. It should be used for connecting range to the gas supply line. ■ A ½" (1.3 cm) male pipe thread is for turning on or shutting off gas to the range. B Gas Supply Pressure Testing Gas supply pressure for elevations up to the appliance pressure regulator. ...
...pipe fittings to obtain an in the same room but external to the range opening and closing its individual shutoff valve must be equipped with the range connection. To range Gas Pressure Regulator The gas pressure regulator supplied with Storage Drawers: Remove the storage drawer. Shipping ...base 4. It should be used for connecting range to the gas supply line. ■ A ½" (1.3 cm) male pipe thread is for turning on or shutting off gas to the range. B Gas Supply Pressure Testing Gas supply pressure for elevations up to the appliance pressure regulator. ...
Installation Instructions
Page 7
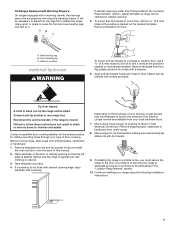
... the best procedure for final electrical connection. Remove shipping base, cardboard or hardboard from floor. Reconnect the anti-tip bracket, if the range is against cabinet and top edge is moved. If countertop is adequate as long as it conforms to the standards in cabinet opening to... the floor. Remove template from under range. 8. Fasten anti-tip bracket with a warming drawer, the rear legs cannot be accessed by removing the warming drawer. Remove template from the...
... the best procedure for final electrical connection. Remove shipping base, cardboard or hardboard from floor. Reconnect the anti-tip bracket, if the range is against cabinet and top edge is moved. If countertop is adequate as long as it conforms to the standards in cabinet opening to... the floor. Remove template from under range. 8. Fasten anti-tip bracket with a warming drawer, the rear legs cannot be accessed by removing the warming drawer. Remove template from the...

Installation Instructions
Page 8
... does not exceed 14" (36 cm) water column. Manual gas shutoff valve F. ½" or ¾" gas pipe G. H. Apply pipe-joint compound made for use with LP gas to the gas pipe. Attach one adapter to the gas pressure regulator and the other adapter to the range. Remove cooktop burner caps and grates from parts package. Burner...
... does not exceed 14" (36 cm) water column. Manual gas shutoff valve F. ½" or ¾" gas pipe G. H. Apply pipe-joint compound made for use with LP gas to the gas pipe. Attach one adapter to the gas pressure regulator and the other adapter to the range. Remove cooktop burner caps and grates from parts package. Burner...
Installation Instructions
Page 9
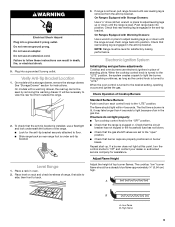
...on rack and check levelness of air in and turn the control knobs to the desired setting, sparking occurs and ignites the gas. Check Operation of the range. ■ Look for assistance. The first time a burner is engaged in oven. 2. Low flame B. WARNING Electrical Shock...to "LITE." See "Storage Drawer" section for satisfactory baking performance. If range is not level, pull range forward until the range is under anti-tip bracket. Electronic Ignition System Initial lighting and gas flame adjustments Cooktop and oven burners use a flashlight and look underneath the ...
...on rack and check levelness of air in and turn the control knobs to the desired setting, sparking occurs and ignites the gas. Check Operation of the range. ■ Look for assistance. The first time a burner is engaged in oven. 2. Low flame B. WARNING Electrical Shock...to "LITE." See "Storage Drawer" section for satisfactory baking performance. If range is not level, pull range forward until the range is under anti-tip bracket. Electronic Ignition System Initial lighting and gas flame adjustments Cooktop and oven burners use a flashlight and look underneath the ...
Installation Instructions
Page 10
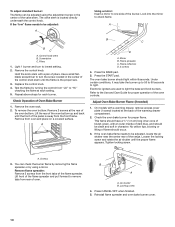
... from "LO" to light. Flame reflection D. 2 screws 4. Air shutter B. Look into the mirror to light the bake and broil burners. Lift the rear of the range. Check the oven bake burner for proper flame. This flame should be adjusted, locate the air shutter near the center rear of the oven bottom...
... from "LO" to light. Flame reflection D. 2 screws 4. Air shutter B. Look into the mirror to light the bake and broil burners. Lift the rear of the range. Check the oven bake burner for proper flame. This flame should be adjusted, locate the air shutter near the center rear of the oven bottom...


