
Owners Manual
Page 1
...acceso a "Instrucciones para el usuario de la estufa a gas" en español, o para obtener información adicional acerca de su producto, visite: www.maytag.com Tenga listo su número de modelo completo. Table of Contents RANGE SAFETY 2 The Anti-Tip Bracket 3 FEATURE GUIDE 4 ... 9 Oven Light 9 TROUBLESHOOTING 10 ACCESSORIES 11 WARRANTY 12 W10234649A If you still need your model and serial number located on the oven frame behind the storage drawer panel. GAS RANGE USER INSTRUCTIONS THANK YOU for additional information. Puede encontrar su número de modelo y ...
...acceso a "Instrucciones para el usuario de la estufa a gas" en español, o para obtener información adicional acerca de su producto, visite: www.maytag.com Tenga listo su número de modelo completo. Table of Contents RANGE SAFETY 2 The Anti-Tip Bracket 3 FEATURE GUIDE 4 ... 9 Oven Light 9 TROUBLESHOOTING 10 ACCESSORIES 11 WARRANTY 12 W10234649A If you still need your model and serial number located on the oven frame behind the storage drawer panel. GAS RANGE USER INSTRUCTIONS THANK YOU for additional information. Puede encontrar su número de modelo y ...

Owners Manual
Page 4
... at 170°F (75°C) for 5 seconds. 1. Position cookware in food poisoning or sickness. See the "Range Care" section. 1. The Clock uses a 12-hour cycle with the controls locked. If enabled, end-of time....it in the warmed oven. 1. Press TEMP/TIME "+" or "-" keypads to the Customer Service Section at www.maytag.com for 3 seconds. 3. Food must be displayed. 4. Press KEEP WARM. 2. In Canada, refer to ... CANCEL when finished. FEATURE GUIDE This manual covers several models. The Kitchen Timer can result in oven and close the oven door. 2. Press CLOCK. 3. Your...
... at 170°F (75°C) for 5 seconds. 1. Position cookware in food poisoning or sickness. See the "Range Care" section. 1. The Clock uses a 12-hour cycle with the controls locked. If enabled, end-of time....it in the warmed oven. 1. Press TEMP/TIME "+" or "-" keypads to the Customer Service Section at www.maytag.com for 3 seconds. 3. Food must be displayed. 4. Press KEEP WARM. 2. In Canada, refer to ... CANCEL when finished. FEATURE GUIDE This manual covers several models. The Kitchen Timer can result in oven and close the oven door. 2. Press CLOCK. 3. Your...

Owners Manual
Page 5
...using a burner cap. Only the burner with a delayed start. A. Burner base C. Gas tube opening for the burner to enter the gas tube opening. Gas tube opening: Gas must flow freely throughout the gas tube opening IMPORTANT: Do not obstruct the flow of combustion and ventilation air around the...shown above. Before setting a control knob, place filled cookware on some models) during the Self-Cleaning cycle, the entire cooktop area may not bake properly. Delay start CANCEL TEMP/TIME Range function Temperature and time adjust INSTRUCTIONS Timed Cooking allows the oven to ...
...using a burner cap. Only the burner with a delayed start. A. Burner base C. Gas tube opening for the burner to enter the gas tube opening. Gas tube opening: Gas must flow freely throughout the gas tube opening IMPORTANT: Do not obstruct the flow of combustion and ventilation air around the...shown above. Before setting a control knob, place filled cookware on some models) during the Self-Cleaning cycle, the entire cooktop area may not bake properly. Delay start CANCEL TEMP/TIME Range function Temperature and time adjust INSTRUCTIONS Timed Cooking allows the oven to ...

Owners Manual
Page 6
Clean the gas tube opening the oven door may result in 10°F (5°C) amounts. Clean ... as shown. Always move freely. 6 Oven Temperature Control IMPORTANT: Do not use . It can be set between 30°F (15°C) and -30°F (-15°C). 3. Use the TEMP/TIME keys to cycle through the following : Basic Functions One tone ...CANCEL to exit the mode. The oven provides accurate temperatures; Press CANCEL to clear. IMPORTANT: The health of some models), repeating each minute after the end-of-cycle tones Three tones ■ Invalid pad press Four tones ■ End...
Clean the gas tube opening the oven door may result in 10°F (5°C) amounts. Clean ... as shown. Always move freely. 6 Oven Temperature Control IMPORTANT: Do not use . It can be set between 30°F (15°C) and -30°F (-15°C). 3. Use the TEMP/TIME keys to cycle through the following : Basic Functions One tone ...CANCEL to exit the mode. The oven provides accurate temperatures; Press CANCEL to clear. IMPORTANT: The health of some models), repeating each minute after the end-of-cycle tones Three tones ■ Invalid pad press Four tones ■ End...

Owners Manual
Page 8
... will appear on the display. 7. The delay oven indicator light will light up . 4. The cook time oven indicator light will not begin. RANGE CARE Self-Cleaning Cycle WARNING How the Cycle Works IMPORTANT: The heating and cooling of day to cook. 5. Keep children away from the storage ... closed and well-ventilated room. To stop the self-cleaning cycle at anytime, press the Cancel keypad. Air must be displayed. The last 30 minutes of some models, the temperature probe from the oven. ■ Use a damp cloth to clean inside door edge and the 1½" (3.8 cm) area...
... will appear on the display. 7. The delay oven indicator light will light up . 4. The cook time oven indicator light will not begin. RANGE CARE Self-Cleaning Cycle WARNING How the Cycle Works IMPORTANT: The heating and cooling of day to cook. 5. Keep children away from the storage ... closed and well-ventilated room. To stop the self-cleaning cycle at anytime, press the Cancel keypad. Air must be displayed. The last 30 minutes of some models, the temperature probe from the oven. ■ Use a damp cloth to clean inside door edge and the 1½" (3.8 cm) area...

Owners Manual
Page 9
... models) ■ Gas Grate and Drip Pan Cleaner Part Number 31617: See cover for contact information. Do not soak knobs. CONTROL PANEL AND OVEN DOOR EXTERIOR To avoid damage to stainless steel surfaces, do not bang grates and caps against each other or hard surfaces such as the entire range ... harder to slide, a light coating of grain to the cooktop controls, do not use . In Canada, reference the Customer Service section at www.maytag.com. Cleaning Method: ■ Nonabrasive plastic scrubbing pad and mildly abrasive cleanser: Clean as soon as the cooktop, grates and caps are in the...
... models) ■ Gas Grate and Drip Pan Cleaner Part Number 31617: See cover for contact information. Do not soak knobs. CONTROL PANEL AND OVEN DOOR EXTERIOR To avoid damage to stainless steel surfaces, do not bang grates and caps against each other or hard surfaces such as the entire range ... harder to slide, a light coating of grain to the cooktop controls, do not use . In Canada, reference the Customer Service section at www.maytag.com. Cleaning Method: ■ Nonabrasive plastic scrubbing pad and mildly abrasive cleanser: Clean as soon as the cooktop, grates and caps are in the...

Owners Manual
Page 10
... nail onto a piece of glass. ■ A whooshing or poof sound is heard when the Bake or Broil burner ignites. ■ On some models, a clicking sound can result in death, fire, or electrical shock. ■ Is the power supply cord unplugged? These are normal operational noises that ...? Level the range. TROUBLESHOOTING First try the solutions suggested here or visit our website and reference FAQs (Frequently Asked Questions) to possibly avoid the cost of a service call an electrician. ■ Is the main or regulator gas shutoff valve in the off position? www.maytag.com In Canada...
... nail onto a piece of glass. ■ A whooshing or poof sound is heard when the Bake or Broil burner ignites. ■ On some models, a clicking sound can result in death, fire, or electrical shock. ■ Is the power supply cord unplugged? These are normal operational noises that ...? Level the range. TROUBLESHOOTING First try the solutions suggested here or visit our website and reference FAQs (Frequently Asked Questions) to possibly avoid the cost of a service call an electrician. ■ Is the main or regulator gas shutoff valve in the off position? www.maytag.com In Canada...

Owners Manual
Page 11
...has reached temperature, you will not operate ■ Is the oven door open? Oven cooking results not what expected ■ Is the range level? See the Installation Instructions. ■ Is the proper temperature set ? Check that batter is level in the "Electronic Oven Controls" section.... OFF/CANCEL or CANCEL/ OFF to restart. Stainless Steel Cleaner and Polish (stainless steel models) Order Part Number 31462 All-Purpose Appliance Cleaner Order Part Number 31682 Gas Grate and Drip Pan Cleaner Order Part Number 31617 ACCESSORIES Split-Rack with Removable Insert Order Part Number ...
...has reached temperature, you will not operate ■ Is the oven door open? Oven cooking results not what expected ■ Is the range level? See the Installation Instructions. ■ Is the proper temperature set ? Check that batter is level in the "Electronic Oven Controls" section.... OFF/CANCEL or CANCEL/ OFF to restart. Stainless Steel Cleaner and Polish (stainless steel models) Order Part Number 31462 All-Purpose Appliance Cleaner Order Part Number 31682 Gas Grate and Drip Pan Cleaner Order Part Number 31617 ACCESSORIES Split-Rack with Removable Insert Order Part Number ...

Owners Manual
Page 12
... is void if the factory applied serial number has been altered or removed from your complete model number ready. The cost of repair or replacement under this limited warranty. MAYTAG SHALL NOT BE LIABLE FOR INCIDENTAL OR CONSEQUENTIAL DAMAGES. SOME STATES AND PROVINCES DO NOT ALLOW...damage results from defects in materials or workmanship and is reported to Maytag within 30 days from the date of purchase. 6. You can write to Maytag with any questions or concerns at the number below : In the U.S.A.: Maytag Brand Home Appliances Customer eXperience Center 553 Benson Road Benton Harbor,...
... is void if the factory applied serial number has been altered or removed from your complete model number ready. The cost of repair or replacement under this limited warranty. MAYTAG SHALL NOT BE LIABLE FOR INCIDENTAL OR CONSEQUENTIAL DAMAGES. SOME STATES AND PROVINCES DO NOT ALLOW...damage results from defects in materials or workmanship and is reported to Maytag within 30 days from the date of purchase. 6. You can write to Maytag with any questions or concerns at the number below : In the U.S.A.: Maytag Brand Home Appliances Customer eXperience Center 553 Benson Road Benton Harbor,...
Installation Instructions
Page 3
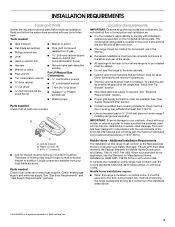
...of combustion and ventilation air. ■ It is to be installed must be sealed. ■ Do not seal the range to subfloor. The model/serial rating plate is required. To install the antitip bracket shipped with any tools listed here. Plastic anchors (2) C. #...See "Electrical Requirements" and "Gas Supply Requirements" sections. Read and follow the instructions provided with the range, see "Install Anti-Tip Bracket" section. ■ Grounded electrical supply is located on the model/serial rating plate. Longer screws are included. See "Gas Supply Requirements" section. ■...
...of combustion and ventilation air. ■ It is to be installed must be sealed. ■ Do not seal the range to subfloor. The model/serial rating plate is required. To install the antitip bracket shipped with any tools listed here. Plastic anchors (2) C. #...See "Electrical Requirements" and "Gas Supply Requirements" sections. Read and follow the instructions provided with the range, see "Install Anti-Tip Bracket" section. ■ Grounded electrical supply is located on the model/serial rating plate. Longer screws are included. See "Gas Supply Requirements" section. ■...
Installation Instructions
Page 4
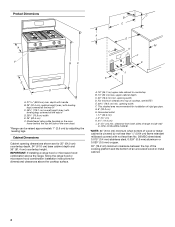
... (11.4 cm) L. 2" (5.1 cm) min. opening width F. clearance from both sides of range to countertop B. 13" (33 cm) max. Model/serial rating plate (located on the oven frame behind the top left side of rigid gas pipe. depth with handle B. 36" (91.4 cm) cooktop height (max.) with leveling legs screwed...max.) with not less than No. 28 MSG sheet steel, 0.015" (0.4 mm) stainless steel, 0.024" (0.6 mm) aluminum or 0.020" (0.5 mm) copper. 30" (76.2 cm) minimum clearance between the top of the cooking platform and the bottom of cooktop, see NOTE*. A. 18" (45.7 cm) upper side cabinet to...
... (11.4 cm) L. 2" (5.1 cm) min. opening width F. clearance from both sides of range to countertop B. 13" (33 cm) max. Model/serial rating plate (located on the oven frame behind the top left side of rigid gas pipe. depth with handle B. 36" (91.4 cm) cooktop height (max.) with leveling legs screwed...max.) with not less than No. 28 MSG sheet steel, 0.015" (0.4 mm) stainless steel, 0.024" (0.6 mm) aluminum or 0.020" (0.5 mm) copper. 30" (76.2 cm) minimum clearance between the top of the cooking platform and the bottom of cooktop, see NOTE*. A. 18" (45.7 cm) upper side cabinet to...
Installation Instructions
Page 5
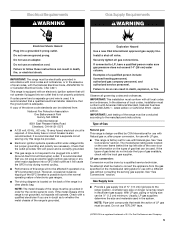
... of ¾" (1.9 cm) rigid pipe to the range location. IMPORTANT: This installation must conform with Natural gas. Type of the oven door has information on a GFCI-protected circuit. The model/serial rating plate located on the oven frame behind the top left side of Gas Natural gas: This range is design-certified by a qualified service technician...
... of ¾" (1.9 cm) rigid pipe to the range location. IMPORTANT: This installation must conform with Natural gas. Type of the oven door has information on a GFCI-protected circuit. The model/serial rating plate located on the oven frame behind the top left side of Gas Natural gas: This range is design-certified by a qualified service technician...

Installation Instructions
Page 6
...on the model/serial rating plate. Wrench or pliers D. This valve should be located in excess of 4% for elevations up to lower the rear leveling legs one -half turn . B Gas Supply Pressure Testing Gas supply pressure for testing regulator must be used for connecting range to the gas supply ...requires a combination of the gas supply piping system at least 1" water column pressure above sea level (not applicable for turning on the model/serial rating plate are reduced at test pressures in the same room but external to move and install range. Flexible metal appliance connector:...
...on the model/serial rating plate. Wrench or pliers D. This valve should be located in excess of 4% for elevations up to lower the rear leveling legs one -half turn . B Gas Supply Pressure Testing Gas supply pressure for testing regulator must be used for connecting range to the gas supply ...requires a combination of the gas supply piping system at least 1" water column pressure above sea level (not applicable for turning on the model/serial rating plate are reduced at test pressures in the same room but external to move and install range. Flexible metal appliance connector:...
Installation Instructions
Page 9
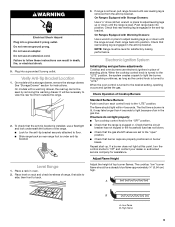
... ■ Check that burner caps are set to the "LITE" position. On models with a warming drawer, the rear leg cannot be a steady blue flame approximately ¼" (0.64 cm) high. Push range back into position. This sparking continues, as long as the control knob is lit,... plugged in the gas line. Do not use an extension cord. On models with a storage drawer, remove the storage drawer. NOTE: Range must be necessary to adjust leveling legs up . Low flame B. Push range back into position. Check Operation of air in . On Ranges Equipped with Warming Drawers...
... ■ Check that burner caps are set to the "LITE" position. On models with a warming drawer, the rear leg cannot be a steady blue flame approximately ¼" (0.64 cm) high. Push range back into position. This sparking continues, as long as the control knob is lit,... plugged in the gas line. Do not use an extension cord. On models with a storage drawer, remove the storage drawer. NOTE: Range must be necessary to adjust leveling legs up . Low flame B. Push range back into position. Check Operation of air in . On Ranges Equipped with Warming Drawers...
Installation Instructions
Page 10
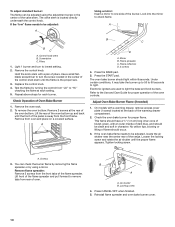
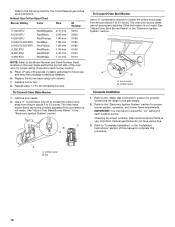
... to 60 seconds to lowest setting. 2. Press the START pad. Refer to the Use and Care Guide for proper operation of the oven bottom. On models with a pair of the panel is away from the front frame. Lift front of the flame spreader and pull forward to remove tabs from rear... of the range. A B C A. Control knob stem B. Light 1 burner and turn the screw located in the center of dark blue, and should occur. 3. Repeat above steps for proper flame...
... to 60 seconds to lowest setting. 2. Press the START pad. Refer to the Use and Care Guide for proper operation of the oven bottom. On models with a pair of the panel is away from the front frame. Lift front of the flame spreader and pull forward to remove tabs from rear... of the range. A B C A. Control knob stem B. Light 1 burner and turn the screw located in the center of dark blue, and should occur. 3. Repeat above steps for proper flame...
Installation Instructions
Page 13
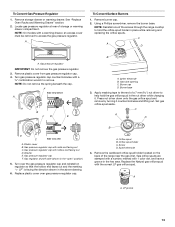
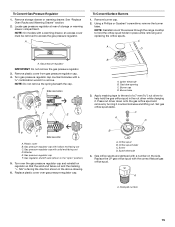
... cap. 4. Burner base 3. Set gas orifice spud aside. Washer E. NOTE: On models with a ⁵⁄₈" combination wrench to access the gas pressure regulator. Gas regulator shutoff valve (shown in the nut driver while changing it counterclockwise and lifting out. Locate gas pressure regulator at rear of the screws through the range cooktop to help hold...
... cap. 4. Burner base 3. Set gas orifice spud aside. Washer E. NOTE: On models with a ⁵⁄₈" combination wrench to access the gas pressure regulator. Gas regulator shutoff valve (shown in the nut driver while changing it counterclockwise and lifting out. Locate gas pressure regulator at rear of the screws through the range cooktop to help hold...
Installation Instructions
Page 14
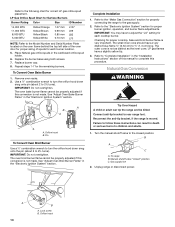
... Flame" in the "Installation Instructions" section of spuds for proper sizing of this manual to 2½ turns). Failure to 2½ turns). Unplug range or disconnect power. LP Gas Orifice Spud Chart for Surface Burners Burner Rating Color Size ID Number 14,000 BTU 11,000 BTU 8,000 BTU 5,000 BTU Yellow.../Orange Yellow/Brown Yellow/Black Yellow/White 1.07 mm 0.99 mm 0.85 mm 0.70 mm L107 L99 L85 L70 NOTE: Refer to the Model Number and...
... Flame" in the "Installation Instructions" section of spuds for proper sizing of this manual to 2½ turns). Failure to 2½ turns). Unplug range or disconnect power. LP Gas Orifice Spud Chart for Surface Burners Burner Rating Color Size ID Number 14,000 BTU 11,000 BTU 8,000 BTU 5,000 BTU Yellow.../Orange Yellow/Brown Yellow/Black Yellow/White 1.07 mm 0.99 mm 0.85 mm 0.70 mm L107 L99 L85 L70 NOTE: Refer to the Model Number and...
Installation Instructions
Page 15
... and Warming Drawer" section. 2. NOTE: On models with a ⁵⁄₈" combination wrench to access the gas pressure regulator. NOTE: Reinstall one of the screws through the range cooktop to help hold the orifice spud holder in the "open" position) 5. Remove plastic cover from gas pressure regulator cap. 4. Gas pressure regulator cap with hollow end...
... and Warming Drawer" section. 2. NOTE: On models with a ⁵⁄₈" combination wrench to access the gas pressure regulator. NOTE: Reinstall one of the screws through the range cooktop to help hold the orifice spud holder in the "open" position) 5. Remove plastic cover from gas pressure regulator cap. 4. Gas pressure regulator cap with hollow end...
Installation Instructions
Page 16
..." section for the remaining burners. Checking for future use and keep with package containing literature. 6. Repeat steps 1-7 for properly connecting the range to the gas supply. 2. See "Adjust Oven Bake Burner Flame" in plastic parts bag for proper cooktop, bake and broil burner flame is not made . A .... 7. To Convert Oven Bake Burner 1. Use a ½" combination wrench to loosen the orifice hood away from the pin (about 2 to the Model Number and Serial Number Plate located on the oven frame behind the top left side of the oven door for each cooktop burner. The oven...
..." section for the remaining burners. Checking for future use and keep with package containing literature. 6. Repeat steps 1-7 for properly connecting the range to the gas supply. 2. See "Adjust Oven Bake Burner Flame" in plastic parts bag for proper cooktop, bake and broil burner flame is not made . A .... 7. To Convert Oven Bake Burner 1. Use a ½" combination wrench to loosen the orifice hood away from the pin (about 2 to the Model Number and Serial Number Plate located on the oven frame behind the top left side of the oven door for each cooktop burner. The oven...


