Owners Manual
Page 7
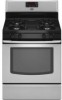
... cookie sheet, jelly roll pan, or in intervals. A. The bake and broil elements cycle on 2 racks use racks 2 and 5 for Part Number 4396923. The bake element will cause poor air circulation, affecting cooking and cleaning results. This feature is automatically activated when the oven is ... BAKE Temperature Management System The PRECISE BAKE system electronically regulates the oven heat levels during preheat and bake to maintain a precise temperature range for the oven preheat cycle to end before turning on grid in the recipe. When roasting, it is recommended in a broiler pan...
... cookie sheet, jelly roll pan, or in intervals. A. The bake and broil elements cycle on 2 racks use racks 2 and 5 for Part Number 4396923. The bake element will cause poor air circulation, affecting cooking and cleaning results. This feature is automatically activated when the oven is ... BAKE Temperature Management System The PRECISE BAKE system electronically regulates the oven heat levels during preheat and bake to maintain a precise temperature range for the oven preheat cycle to end before turning on grid in the recipe. When roasting, it is recommended in a broiler pan...

Owners Manual
Page 9
...cleaner to slide, a light coating of our website at www.maytag.ca. STORAGE DRAWER Check that have discolored and are harder to soft cloth or sponge, not directly on some models) ■ Gas Grate and Drip Pan Cleaner Part Number 31617: See cover for contact information. Food spills containing ...or abrasive paper towels. Do not clean in the off and the oven and cooktop are cool. Before replacing, make sure knobs are in range or reconnect power. 9 General Cleaning IMPORTANT: Before cleaning, make sure all -purpose cleaner: Rinse with clean water and dry with soft, lint...
...cleaner to slide, a light coating of our website at www.maytag.ca. STORAGE DRAWER Check that have discolored and are harder to soft cloth or sponge, not directly on some models) ■ Gas Grate and Drip Pan Cleaner Part Number 31617: See cover for contact information. Food spills containing ...or abrasive paper towels. Do not clean in the off and the oven and cooktop are cool. Before replacing, make sure knobs are in range or reconnect power. 9 General Cleaning IMPORTANT: Before cleaning, make sure all -purpose cleaner: Rinse with clean water and dry with soft, lint...

Owners Manual
Page 11
...in a reliable cookbook. ■ Is the proper oven temperature calibration set ? Use aluminum foil to higher position in the pan? Level the range. There has been a power failure. Clear the display. Adjust cooking time. ■ Has the oven door been opened while cooking? Stainless... Steel Cleaner and Polish (stainless steel models) Order Part Number 31462 All-Purpose Appliance Cleaner Order Part Number 31682 Gas Grate and Drip Pan Cleaner Order Part Number 31617 ACCESSORIES Split-Rack with Removable Insert Order...
...in a reliable cookbook. ■ Is the proper oven temperature calibration set ? Use aluminum foil to higher position in the pan? Level the range. There has been a power failure. Clear the display. Adjust cooking time. ■ Has the oven door been opened while cooking? Stainless... Steel Cleaner and Polish (stainless steel models) Order Part Number 31462 All-Purpose Appliance Cleaner Order Part Number 31682 Gas Grate and Drip Pan Cleaner Order Part Number 31617 ACCESSORIES Split-Rack with Removable Insert Order...

Owners Manual
Page 12
...be provided by the customer. Outside the 50 United States and Canada, this User Instructions and model number information for factory specified parts and repair labor to correct defects in materials or workmanship. ITEMS EXCLUDED FROM WARRANTY This limited warranty does not cover: 1. Repairs...is installed in a remote area where service by this limited warranty. This warranty is not available. 10. You can write to Maytag within 30 days from your correspondence. Service must be easily determined. Damage resulting from your home of repair or replacement under this warranty. ...
...be provided by the customer. Outside the 50 United States and Canada, this User Instructions and model number information for factory specified parts and repair labor to correct defects in materials or workmanship. ITEMS EXCLUDED FROM WARRANTY This limited warranty does not cover: 1. Repairs...is installed in a remote area where service by this limited warranty. This warranty is not available. 10. You can write to Maytag within 30 days from your correspondence. Service must be easily determined. Damage resulting from your home of repair or replacement under this warranty. ...
Installation Instructions
Page 1
... reference. W10196160E INSTALLATION INSTRUCTIONS 30" (76.2 CM) FREESTANDING GAS RANGES INSTRUCTIONS D'INSTALLATION DES CUISINIÈRES À GAZ AUTOPORTANTES DE 30" (76,2 CM) Table of Contents/Table des matières RANGE SAFETY 1 INSTALLATION REQUIREMENTS 3 Tools and Parts 3 Location Requirements 3 Electrical Requirements 5 Gas Supply Requirements 5 INSTALLATION INSTRUCTIONS 6 Unpack Range 6 Install Anti-Tip Bracket 7 Make Gas Connection 8 Verify Anti-Tip...
... reference. W10196160E INSTALLATION INSTRUCTIONS 30" (76.2 CM) FREESTANDING GAS RANGES INSTRUCTIONS D'INSTALLATION DES CUISINIÈRES À GAZ AUTOPORTANTES DE 30" (76,2 CM) Table of Contents/Table des matières RANGE SAFETY 1 INSTALLATION REQUIREMENTS 3 Tools and Parts 3 Location Requirements 3 Electrical Requirements 5 Gas Supply Requirements 5 INSTALLATION INSTRUCTIONS 6 Unpack Range 6 Install Anti-Tip Bracket 7 Make Gas Connection 8 Verify Anti-Tip...
Installation Instructions
Page 3
... left side of 194°F (90°C). Anti-tip bracket B. Check existing gas supply and electrical supply. Mobile home installations require: ■ When this range must conform to subfloor. A B C A. Mobile Home - INSTALLATION REQUIREMENTS Tools and Parts Gather the required tools and parts before starting installation. Do not obstruct flow of combustion and ventilation air...
... left side of 194°F (90°C). Anti-tip bracket B. Check existing gas supply and electrical supply. Mobile home installations require: ■ When this range must conform to subfloor. A B C A. Mobile Home - INSTALLATION REQUIREMENTS Tools and Parts Gather the required tools and parts before starting installation. Do not obstruct flow of combustion and ventilation air...

Installation Instructions
Page 6
... turn . Front leveling leg All strains must be removed from the gas supply piping system by closing . B Gas Supply Pressure Testing Gas supply pressure for testing regulator must be used for connecting range to the gas supply line. ■ A ½" (1.3 cm) male pipe... The valve is needed for Canada). 6 A A. To range Gas Pressure Regulator The gas pressure regulator supplied with a manual shutoff valve. Remove shipping materials, tape and film from inside oven. 3. Remove oven racks and parts package from range. 2. Use a wrench or pliers to lower front leveling ...
... turn . Front leveling leg All strains must be removed from the gas supply piping system by closing . B Gas Supply Pressure Testing Gas supply pressure for testing regulator must be used for connecting range to the gas supply line. ■ A ½" (1.3 cm) male pipe... The valve is needed for Canada). 6 A A. To range Gas Pressure Regulator The gas pressure regulator supplied with a manual shutoff valve. Remove shipping materials, tape and film from inside oven. 3. Remove oven racks and parts package from range. 2. Use a wrench or pliers to lower front leveling ...

Installation Instructions
Page 8
... fire. Use pipe-joint compound. Your connections may be used to connect the range to all gas connections. Union E. Union J. 90° elbow Typical flexible connection 1. Attach one adapter to the gas pressure regulator and the other adapter to do so can result in following illustration).... 2. Remove cooktop burner caps and grates from parts package. Burner grate ON 8 Use a combination wrench and channel lock ...
... fire. Use pipe-joint compound. Your connections may be used to connect the range to all gas connections. Union E. Union J. 90° elbow Typical flexible connection 1. Attach one adapter to the gas pressure regulator and the other adapter to do so can result in following illustration).... 2. Remove cooktop burner caps and grates from parts package. Burner grate ON 8 Use a combination wrench and channel lock ...
Installation Instructions
Page 12
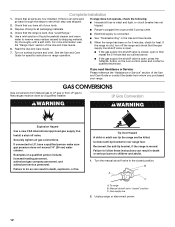
... C. Dry thoroughly with a soft cloth. Examples of /recycle all parts are now installed. Reconnect the anti-tip bracket, if the range is intact and tight, or circuit breaker has not tripped. 3. B A C A. See "Level Range." 5. Read the Use and Care Guide. 7. GAS CONVERSIONS Gas conversions from Natural gas to children and adults. 1. Failure to LP, have all...
... C. Dry thoroughly with a soft cloth. Examples of /recycle all parts are now installed. Reconnect the anti-tip bracket, if the range is intact and tight, or circuit breaker has not tripped. 3. B A C A. See "Level Range." 5. Read the Use and Care Guide. 7. GAS CONVERSIONS Gas conversions from Natural gas to children and adults. 1. Failure to LP, have all...
Installation Instructions
Page 16
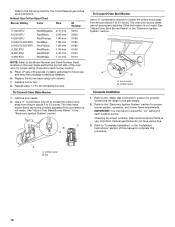
... be properly adjusted if this conversion is not made . Lock screw B. Refer to "Complete Installation" in plastic parts bag for the remaining burners. Orifice hood B. Natural Gas Orifice Spud Chart Burner Rating Color Size ID Number 17,000 BTU 15,500 BTU 14,200 BTU 13,000/... do not have to adjust the "LO" setting for each cooktop burner. Refer to the following chart for properly connecting the range to the gas supply. 2. Replace burner cap. 8. See "Adjust Oven Broil Burner Flame" in the "Electronic Ignition System" section. A A. Replace the burner base using both ...
... be properly adjusted if this conversion is not made . Lock screw B. Refer to "Complete Installation" in plastic parts bag for the remaining burners. Orifice hood B. Natural Gas Orifice Spud Chart Burner Rating Color Size ID Number 17,000 BTU 15,500 BTU 14,200 BTU 13,000/... do not have to adjust the "LO" setting for each cooktop burner. Refer to the following chart for properly connecting the range to the gas supply. 2. Replace burner cap. 8. See "Adjust Oven Broil Burner Flame" in the "Electronic Ignition System" section. A A. Replace the burner base using both ...


