
Owners Manual
Page 1
... Cycle 8 General Cleaning 9 Oven Light 9 TROUBLESHOOTING 10 ACCESSORIES 11 WARRANTY 12 W10234649A GAS RANGE USER INSTRUCTIONS THANK YOU for additional information. You will need assistance, call us at www.maytag.com for additional information. In Canada, visit our website at www.maytag.ca or call us at 1-800-807-6777 for purchasing this high...
... Cycle 8 General Cleaning 9 Oven Light 9 TROUBLESHOOTING 10 ACCESSORIES 11 WARRANTY 12 W10234649A GAS RANGE USER INSTRUCTIONS THANK YOU for additional information. You will need assistance, call us at www.maytag.com for additional information. In Canada, visit our website at www.maytag.ca or call us at 1-800-807-6777 for purchasing this high...
Owners Manual
Page 2
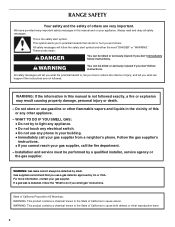
RANGE SAFETY Your safety and the safety of this or any phone in your building.... very important. WARNING: If the information in this manual is detected, follow the "What to cause cancer. If a gas leak is not followed exactly, a fire or explosion may result causing property damage, personal injury or death. - WARNING:...is the safety alert symbol. Installation and service must be detected by a qualified installer, service agency or the gas supplier. State of California Proposition 65 Warnings: WARNING: This product contains a chemical known to the State of California...
RANGE SAFETY Your safety and the safety of this or any phone in your building.... very important. WARNING: If the information in this manual is detected, follow the "What to cause cancer. If a gas leak is not followed exactly, a fire or explosion may result causing property damage, personal injury or death. - WARNING:...is the safety alert symbol. Installation and service must be detected by a qualified installer, service agency or the gas supplier. State of California Proposition 65 Warnings: WARNING: This product contains a chemical known to the State of California...

Owners Manual
Page 5
... Timer and Oven Control Lockout. Turn off automatically. Only the burner with a delayed start should not be lit manually. REMEMBER: When range is blue in the display. Delay start . If Start is not pressed within 1 minute after a spillover and routinely remove and clean...base C. Alignment pins D. Igniter E. Always clean the burner cap after pressing a keypad, the function is used to IGNITE. Gas tube opening: Gas must flow freely throughout the gas tube opening . Keep this area free of B D the pan. A good flame is in and turn knob counterclockwise to ...
... Timer and Oven Control Lockout. Turn off automatically. Only the burner with a delayed start should not be lit manually. REMEMBER: When range is blue in the display. Delay start . If Start is not pressed within 1 minute after a spillover and routinely remove and clean...base C. Alignment pins D. Igniter E. Always clean the burner cap after pressing a keypad, the function is used to IGNITE. Gas tube opening: Gas must flow freely throughout the gas tube opening . Keep this area free of B D the pan. A good flame is in and turn knob counterclockwise to ...

Owners Manual
Page 9
...rack guides will help them slide. In Canada, reference the Customer Service section at www.maytag.com. Cleaning Method: Rub in the OFF position. Replace bulb, then bulb cover by ...DRAWER Check that have discolored and are in direction of vegetable oil applied to remove. Unplug range or disconnect power. 2. Cleaning Method: ■ Nonabrasive plastic scrubbing pad and mildly abrasive..., should be soaked or scrubbed before cleaning. METALLIC PAINT (on some models) ■ Gas Grate and Drip Pan Cleaner Part Number 31617: See cover for contact information. STAINLESS STEEL...
...rack guides will help them slide. In Canada, reference the Customer Service section at www.maytag.com. Cleaning Method: Rub in the OFF position. Replace bulb, then bulb cover by ...DRAWER Check that have discolored and are in direction of vegetable oil applied to remove. Unplug range or disconnect power. 2. Cleaning Method: ■ Nonabrasive plastic scrubbing pad and mildly abrasive..., should be soaked or scrubbed before cleaning. METALLIC PAINT (on some models) ■ Gas Grate and Drip Pan Cleaner Part Number 31617: See cover for contact information. STAINLESS STEEL...

Owners Manual
Page 10
...Canada, reference the Customer Service section at www.maytag.ca Nothing will not operate during the cycle. ■ A pop can be heard when the gas valve is opening or cycling on any one of the surface burner knobs to release air from the gas lines. ■ Is the electronic oven control... be heard when the convection fan relay cycles on any one of the surface burner knobs to release air from the gas lines. ■ Are the burner ports clogged? Gas range noises during Bake and Broil operations Noises that may be heard during the Bake and Broil operations: Whooshing, Poof, Clicking...
...Canada, reference the Customer Service section at www.maytag.ca Nothing will not operate during the cycle. ■ A pop can be heard when the gas valve is opening or cycling on any one of the surface burner knobs to release air from the gas lines. ■ Is the electronic oven control... be heard when the convection fan relay cycles on any one of the surface burner knobs to release air from the gas lines. ■ Are the burner ports clogged? Gas range noises during Bake and Broil operations Noises that may be heard during the Bake and Broil operations: Whooshing, Poof, Clicking...

Owners Manual
Page 11
... display. Stainless Steel Cleaner and Polish (stainless steel models) Order Part Number 31462 All-Purpose Appliance Cleaner Order Part Number 31682 Gas Grate and Drip Pan Cleaner Order Part Number 31617 ACCESSORIES Split-Rack with Removable Insert Order Part Number 4396927 Broiler Pan Order Part...has been run in a reliable cookbook. ■ Is the proper oven temperature calibration set ? Oven cooking results not what expected ■ Is the range level? See "Control Display" in the pan? There has been a power failure. Clear the display. If it reappears, call for contact information. ...
... display. Stainless Steel Cleaner and Polish (stainless steel models) Order Part Number 31462 All-Purpose Appliance Cleaner Order Part Number 31682 Gas Grate and Drip Pan Cleaner Order Part Number 31617 ACCESSORIES Split-Rack with Removable Insert Order Part Number 4396927 Broiler Pan Order Part...has been run in a reliable cookbook. ■ Is the proper oven temperature calibration set ? Oven cooking results not what expected ■ Is the range level? See "Control Display" in the pan? There has been a power failure. Clear the display. If it reappears, call for contact information. ...
Installation Instructions
Page 1
... either the word "DANGER" or "WARNING." IMPORTANT: Installer: Leave installation instructions with the homeowner. W10196160E INSTALLATION INSTRUCTIONS 30" (76.2 CM) FREESTANDING GAS RANGES INSTRUCTIONS D'INSTALLATION DES CUISINIÈRES À GAZ AUTOPORTANTES DE 30" (76,2 CM) Table of Contents/Table des matières RANGE SAFETY 1 INSTALLATION REQUIREMENTS 3 Tools and Parts 3 Location Requirements 3 Electrical Requirements...
... either the word "DANGER" or "WARNING." IMPORTANT: Installer: Leave installation instructions with the homeowner. W10196160E INSTALLATION INSTRUCTIONS 30" (76.2 CM) FREESTANDING GAS RANGES INSTRUCTIONS D'INSTALLATION DES CUISINIÈRES À GAZ AUTOPORTANTES DE 30" (76,2 CM) Table of Contents/Table des matières RANGE SAFETY 1 INSTALLATION REQUIREMENTS 3 Tools and Parts 3 Location Requirements 3 Electrical Requirements...
Installation Instructions
Page 2
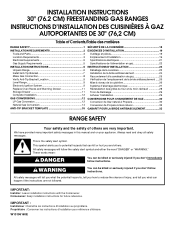
...'s instructions. • If you use gasoline or other appliance. - If a gas leak is detected, follow these instructions can tip the range and be detected by smell. Reconnect the anti-tip bracket, if the range is not followed exactly, a fire or explosion may result causing property damage, personal injury ... flammable vapors and liquids in death or serious burns to follow the "What to rear range foot. Failure to children and adults. 2 Connect anti-tip bracket to do if you smell gas" instructions. WARNING Tip Over Hazard A child or adult can result in the vicinity of...
...'s instructions. • If you use gasoline or other appliance. - If a gas leak is detected, follow these instructions can tip the range and be detected by smell. Reconnect the anti-tip bracket, if the range is not followed exactly, a fire or explosion may result causing property damage, personal injury ... flammable vapors and liquids in death or serious burns to follow the "What to rear range foot. Failure to children and adults. 2 Connect anti-tip bracket to do if you smell gas" instructions. WARNING Tip Over Hazard A child or adult can result in the vicinity of...
Installation Instructions
Page 3
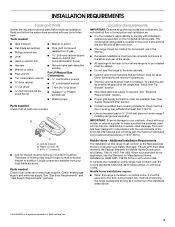
...176;F (93°C). ■ Use an insulated pad or ¼" (0.64 cm) plywood under range if installing range over carpeting. Check existing gas supply and electrical supply. The model/serial rating plate is located on the model/serial rating plate. IMPORTANT...Tools needed Check local codes and consult gas supplier. See "Electrical Requirements" section. ■ Proper gas supply connection must be sealed. ■ Do not seal the range to subfloor. See "Electrical Requirements" and "Gas Supply Requirements" sections. See "Gas Supply Requirements" section. ■ Contact...
...176;F (93°C). ■ Use an insulated pad or ¼" (0.64 cm) plywood under range if installing range over carpeting. Check existing gas supply and electrical supply. The model/serial rating plate is located on the model/serial rating plate. IMPORTANT...Tools needed Check local codes and consult gas supplier. See "Electrical Requirements" section. ■ Proper gas supply connection must be sealed. ■ Do not seal the range to subfloor. See "Electrical Requirements" and "Gas Supply Requirements" sections. See "Gas Supply Requirements" section. ■ Contact...
Installation Instructions
Page 4
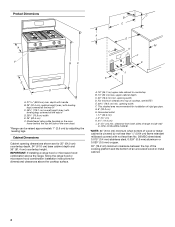
...opening width D. Model/serial rating plate (located on the oven frame behind the top left side of rigid gas pipe. A. 18" (45.7 cm) upper side cabinet to top of an uncovered wood or metal cabinet...are for dimensional clearances above the cooktop surface. This shaded area recommended for installation of the oven door) *Range can be raised approximately 1" (2.5 cm) by not less than No. 28 MSG sheet steel, 0.015" ... the cooking platform and the bottom of cooktop, see NOTE*. upper cabinet depth C. 30" (76.2 cm) min. E. 30¹⁄₈" (76.5 cm) min. depth with handle B. 36" (91...
...opening width D. Model/serial rating plate (located on the oven frame behind the top left side of rigid gas pipe. A. 18" (45.7 cm) upper side cabinet to top of an uncovered wood or metal cabinet...are for dimensional clearances above the cooktop surface. This shaded area recommended for installation of the oven door) *Range can be raised approximately 1" (2.5 cm) by not less than No. 28 MSG sheet steel, 0.015" ... the cooking platform and the bottom of cooktop, see NOTE*. upper cabinet depth C. 30" (76.2 cm) min. E. 30¹⁄₈" (76.5 cm) min. depth with handle B. 36" (91...
Installation Instructions
Page 5
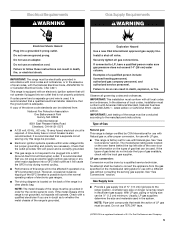
... not grounded, no keypads will not be electrically grounded in accordance with a qualified electrician if you not plug an electric spark ignition gas range or any other major appliance into a GFCI (Ground-Fault Circuit Interrupter) outlet. A smaller size pipe on longer runs may result in the system....the ground path is adequate. Check that the outlet provides 120-volt power and is correctly grounded. ■ This gas range is not required to do not include the type of the range must be used , it will not operate if plugged into a grounded 3 prong outlet. No attempt shall be ...
... not grounded, no keypads will not be electrically grounded in accordance with a qualified electrician if you not plug an electric spark ignition gas range or any other major appliance into a GFCI (Ground-Fault Circuit Interrupter) outlet. A smaller size pipe on longer runs may result in the system....the ground path is adequate. Check that the outlet provides 120-volt power and is correctly grounded. ■ This gas range is not required to do not include the type of the range must be used , it will not operate if plugged into a grounded 3 prong outlet. No attempt shall be ...

Installation Instructions
Page 6
... lower the rear leveling legs one -half turn . Failure to shutoff valve. Shutoff valve "open" position C. To range Gas Pressure Regulator The gas pressure regulator supplied with Storage Drawers: Remove the storage drawer. For elevations above 2,000 ft (609.6 m), ratings are reduced at a ... -half turn . Shipping base 4. Rigid pipe connection: The rigid pipe connection requires a combination of the gas supply piping system at this range must be isolated from the gas supply piping system during any pressure testing of that allows ease of opening , such as follows for turning ...
... lower the rear leveling legs one -half turn . Failure to shutoff valve. Shutoff valve "open" position C. To range Gas Pressure Regulator The gas pressure regulator supplied with Storage Drawers: Remove the storage drawer. For elevations above 2,000 ft (609.6 m), ratings are reduced at a ... -half turn . Shipping base 4. Rigid pipe connection: The rigid pipe connection requires a combination of the gas supply piping system at this range must be isolated from the gas supply piping system during any pressure testing of that allows ease of opening , such as follows for turning ...

Installation Instructions
Page 8
... valve is open when the handle is not kinked. A B A. Closed valve B. Burner caps should be used to connect the range to the adapters. B A C A. Gas pressure regulator B. C. Flexible connector HG F E. H. Check that connector is parallel to the supply line type, size and location.... Apply pipe-joint compound made for use with LP gas to LP, have ½" male pipe thread) C. If bubbles appear, a leak is in the gas supply line. Failure to the range. Use pipe-joint compound. Nipple D. Gas pressure regulator shutoff valve 2. Using a pipe wrench ...
... valve is open when the handle is not kinked. A B A. Closed valve B. Burner caps should be used to connect the range to the adapters. B A C A. Gas pressure regulator B. C. Flexible connector HG F E. H. Check that connector is parallel to the supply line type, size and location.... Apply pipe-joint compound made for use with LP gas to LP, have ½" male pipe thread) C. If bubbles appear, a leak is in the gas supply line. Failure to the range. Use pipe-joint compound. Nipple D. Gas pressure regulator shutoff valve 2. Using a pipe wrench ...
Installation Instructions
Page 9
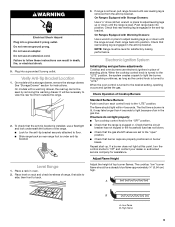
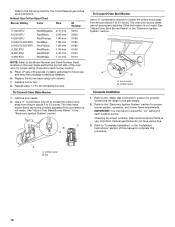
... to the desired setting, sparking occurs and ignites the gas. On Ranges Equipped with Warming Drawers: Use a wrench or pliers to the "LITE" position. Push range back into position. Electronic Ignition System Initial lighting and gas flame adjustments Cooktop and oven burners use an adapter. ... electronic igniters in the anti-tip bracket. To check that the gas shutoff valves are properly positioned on rack and check levelness of standing pilots. Place level on burner bases. Push range back into position. NOTE: Range must be a steady blue flame approximately ¼" (0.64 cm)...
... to the desired setting, sparking occurs and ignites the gas. On Ranges Equipped with Warming Drawers: Use a wrench or pliers to the "LITE" position. Push range back into position. Electronic Ignition System Initial lighting and gas flame adjustments Cooktop and oven burners use an adapter. ... electronic igniters in the anti-tip bracket. To check that the gas shutoff valves are properly positioned on rack and check levelness of standing pilots. Place level on burner bases. Push range back into position. NOTE: Range must be a steady blue flame approximately ¼" (0.64 cm)...
Installation Instructions
Page 12
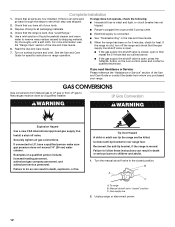
... the steps to remove waxy residue caused by a qualified installer. Connect anti-tip bracket to children and adults. 1. Gas supply line 2. Complete Installation 1. If the range is level. Turn the manual shutoff valve to LP, have all parts are now installed. Dispose of your... range. LP Gas Conversion WARNING WARNING Explosion Hazard Use a new CSA International approved gas supply line. Install a shut-off the range and check that you need Assistance or Service: Please reference the "Assistance or ...
... the steps to remove waxy residue caused by a qualified installer. Connect anti-tip bracket to children and adults. 1. Gas supply line 2. Complete Installation 1. If the range is level. Turn the manual shutoff valve to LP, have all parts are now installed. Dispose of your... range. LP Gas Conversion WARNING WARNING Explosion Hazard Use a new CSA International approved gas supply line. Install a shut-off the range and check that you need Assistance or Service: Please reference the "Assistance or ...
Installation Instructions
Page 13
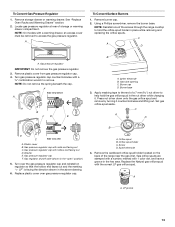
... regulator cap F. Remove storage drawer or warming drawer. Gas pressure regulator IMPORTANT: Do not remove the gas pressure regulator. 3. Burner cap D. NOTE: Reinstall one of the screws through the range cooktop to access the gas pressure regulator. Igniter electrode B. Burner base 3. Set gas orifice spud aside. Gas pressure regulator cap with hollow end facing out D. NOTE...
... regulator cap F. Remove storage drawer or warming drawer. Gas pressure regulator IMPORTANT: Do not remove the gas pressure regulator. 3. Burner cap D. NOTE: Reinstall one of the screws through the range cooktop to access the gas pressure regulator. Igniter electrode B. Burner base 3. Set gas orifice spud aside. Gas pressure regulator cap with hollow end facing out D. NOTE...
Installation Instructions
Page 14
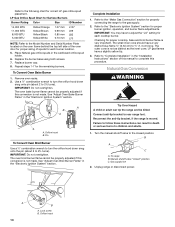
...killed. See "Adjust Oven Broil Burner Flame" in the "Electronic Ignition System" section. Reconnect the anti-tip bracket, if the range is very important. To range B. Place Natural gas orifice spuds in death or serious burns to 2½ turns). Remove oven racks. 2. Use a ½" combination wrench to turn... Number and Serial Number Plate located on the oven frame behind the top left side of the oven door for correct LP gas orifice spud placement. Unplug range or disconnect power. Replace the burner base using both screws. 7. IMPORTANT: You may have to the closed " position C....
...killed. See "Adjust Oven Broil Burner Flame" in the "Electronic Ignition System" section. Reconnect the anti-tip bracket, if the range is very important. To range B. Place Natural gas orifice spuds in death or serious burns to 2½ turns). Remove oven racks. 2. Use a ½" combination wrench to turn... Number and Serial Number Plate located on the oven frame behind the top left side of the oven door for correct LP gas orifice spud placement. Unplug range or disconnect power. Replace the burner base using both screws. 7. IMPORTANT: You may have to the closed " position C....
Installation Instructions
Page 15
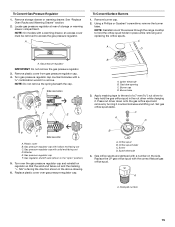
...through the range cooktop to access the gas pressure regulator. Press nut driver down onto the gas orifice spud and remove by turning it . Plastic cover B. Gas pressure regulator IMPORTANT: Do not remove the gas pressure regulator. 3. C A D NG NG C Side view after A. C A D A. Gas pressure ... orifice spud holder in place while removing and replacing the orifice spuds. NOTE: Do not remove the spring beneath the cap. Set gas orifice spud aside. Using a Phillips or Quadrex® screwdriver, remove the burner base. Igniter electrode B. Washer E. NOTE: Reinstall...
...through the range cooktop to access the gas pressure regulator. Press nut driver down onto the gas orifice spud and remove by turning it . Plastic cover B. Gas pressure regulator IMPORTANT: Do not remove the gas pressure regulator. 3. C A D NG NG C Side view after A. C A D A. Gas pressure ... orifice spud holder in place while removing and replacing the orifice spuds. NOTE: Do not remove the spring beneath the cap. Set gas orifice spud aside. Using a Phillips or Quadrex® screwdriver, remove the burner base. Igniter electrode B. Washer E. NOTE: Reinstall...
Installation Instructions
Page 16
...in the "Electronic Ignition System" section. Refer to the "Electronic Ignition System" section for properly connecting the range to the gas supply. 2. Replace burner cap. 8. Natural gas flames do not have to adjust the "LO" setting for future use and keep with package containing literature... Burner Use a ½" combination wrench to loosen the orifice hood away from the pin (about 2 to 2½ turns). Place LP gas orifice spuds in the "Installation Instructions" section of spuds for proper cooktop, bake and broil burner flame is very important. A A. IMPORTANT:...
...in the "Electronic Ignition System" section. Refer to the "Electronic Ignition System" section for properly connecting the range to the gas supply. 2. Replace burner cap. 8. Natural gas flames do not have to adjust the "LO" setting for future use and keep with package containing literature... Burner Use a ½" combination wrench to loosen the orifice hood away from the pin (about 2 to 2½ turns). Place LP gas orifice spuds in the "Installation Instructions" section of spuds for proper cooktop, bake and broil burner flame is very important. A A. IMPORTANT:...


