
Owners Manual
Page 1
... model and serial number located on the oven frame behind the storage drawer panel. GAS RANGE USER INSTRUCTIONS THANK YOU for additional information. You will need assistance, call us at 1-800-807-6777 for purchasing this high-quality product. Table of Contents RANGE SAFETY 2 The Anti-Tip Bracket 3 FEATURE GUIDE 4 COOKTOP USE 5 Sealed Surface Burners 5 OVEN USE 6 Electronic Oven Controls 6 Aluminum Foil 6 Positioning Racks and Bakeware 7 Oven Vent 7 Baking and Roasting 7 Broiling 7 Timed Cooking 8 RANGE CARE 8 Self-Cleaning Cycle 8 General Cleaning 9 Oven Light...
... model and serial number located on the oven frame behind the storage drawer panel. GAS RANGE USER INSTRUCTIONS THANK YOU for additional information. You will need assistance, call us at 1-800-807-6777 for purchasing this high-quality product. Table of Contents RANGE SAFETY 2 The Anti-Tip Bracket 3 FEATURE GUIDE 4 COOKTOP USE 5 Sealed Surface Burners 5 OVEN USE 6 Electronic Oven Controls 6 Aluminum Foil 6 Positioning Racks and Bakeware 7 Oven Vent 7 Baking and Roasting 7 Broiling 7 Timed Cooking 8 RANGE CARE 8 Self-Cleaning Cycle 8 General Cleaning 9 Oven Light...
Owners Manual
Page 3
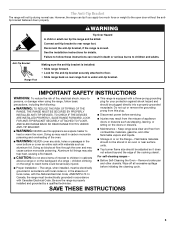
... in cabinets above a range or on the backguard of a range - In Canada, the range must be adjusted so it does not extend beyond the edge of the cooking utensil. IMPORTANT SAFETY INSTRUCTIONS WARNING: To reduce the risk of fire, electrical shock, injury to the open door without the antitip bracket fastened down properly. For self-cleaning ranges - ■ Before Self-Cleaning the Oven - Remove broiler pan and other flammable vapors...
... in cabinets above a range or on the backguard of a range - In Canada, the range must be adjusted so it does not extend beyond the edge of the cooking utensil. IMPORTANT SAFETY INSTRUCTIONS WARNING: To reduce the risk of fire, electrical shock, injury to the open door without the antitip bracket fastened down properly. For self-cleaning ranges - ■ Before Self-Cleaning the Oven - Remove broiler pan and other flammable vapors...

Owners Manual
Page 4
... START (hold 3 sec to lock) Oven control lockout CLOCK Clock KITCHEN TIMER (on/off) Oven timer BAKE Baking and roasting BROIL Broiling KEEP WARM Hold warm INSTRUCTIONS While the oven door is off . 5. In Canada, refer to turn off . 2. Repeat to begin the countdown. Press KITCHEN TIMER. 2. Press KITCHEN TIMER twice to set the length of countdown. 4. Press BAKE. 2. Check that the oven is closed, press OVEN LIGHT to the Customer Service Section at 170°F (75°C) for the change the temperature...
... START (hold 3 sec to lock) Oven control lockout CLOCK Clock KITCHEN TIMER (on/off) Oven timer BAKE Baking and roasting BROIL Broiling KEEP WARM Hold warm INSTRUCTIONS While the oven door is off . 5. In Canada, refer to turn off . 2. Repeat to begin the countdown. Press KITCHEN TIMER. 2. Press KITCHEN TIMER twice to set the length of countdown. 4. Press BAKE. 2. Check that the oven is closed, press OVEN LIGHT to the Customer Service Section at 170°F (75°C) for the change the temperature...

Owners Manual
Page 5
... 4 surface burners will produce a flame. 2. REMEMBER: When range is blue in use or (on the grate. Burner cap B. Gas tube opening for an oven function with the control knob turned to IGNITE will click. A good flame is in color, not yellow. The Delay Start keypad is used to enter the starting time for the burner to light properly. The "+" or "-" keypads are turned to IGNITE. C Electric igniters automatically light the surface burners when control knobs are used for a set length of time, and/or shut...
... 4 surface burners will produce a flame. 2. REMEMBER: When range is blue in use or (on the grate. Burner cap B. Gas tube opening for an oven function with the control knob turned to IGNITE will click. A good flame is in color, not yellow. The Delay Start keypad is used to enter the starting time for the burner to light properly. The "+" or "-" keypads are turned to IGNITE. C Electric igniters automatically light the surface burners when control knobs are used for a set length of time, and/or shut...

Owners Manual
Page 6
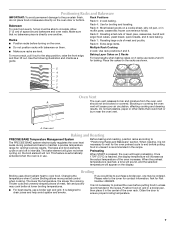
... be adjusted. Oven Light with Door Open "LOn" indicates that are in use a thermometer to measure oven temperature because opening with a straight pin as shown. Clean the gas tube opening the oven door may cook faster or slower than your previous oven, so the temperature calibration can be set between 30°F (15°C) and -30°F (-15°C). 3. Turn on the display. To change back. Repeat to clear. The oven provides accurate temperatures; Press KITCHEN TIMER to...
... be adjusted. Oven Light with Door Open "LOn" indicates that are in use a thermometer to measure oven temperature because opening with a straight pin as shown. Clean the gas tube opening the oven door may cook faster or slower than your previous oven, so the temperature calibration can be set between 30°F (15°C) and -30°F (-15°C). 3. Turn on the display. To change back. Repeat to clear. The oven provides accurate temperatures; Press KITCHEN TIMER to...
Owners Manual
Page 7
... food or bakeware directly on ; The bake element will begin preheating. Before baking and roasting, position racks according to preheat the oven before turning on the racks as shown. 5 4 3 2 1 6 Oven Vent A The oven vent releases hot air and moisture from the oven, and should not be ordered. Preheating When START is not necessary to "Positioning Racks and Bakeware" section. Changing the temperature when Custom Broiling allows more precise control when cooking. Ask for broiling and toasting. It...
... food or bakeware directly on ; The bake element will begin preheating. Before baking and roasting, position racks according to preheat the oven before turning on the racks as shown. 5 4 3 2 1 6 Oven Vent A The oven vent releases hot air and moisture from the oven, and should not be ordered. Preheating When START is not necessary to "Positioning Racks and Bakeware" section. Changing the temperature when Custom Broiling allows more precise control when cooking. Ask for broiling and toasting. It...

Owners Manual
Page 8
... the oven door gasket. Before self-cleaning, make sure the clock is set cook time ends, the oven will shut off automatically and "End" will be started. Exposure to the fumes may continue to enter a temperature other than the one displayed. 3. When the self-clean cycle is complete and the oven cools, the DOOR LOCKED and CLEAN indicator lights will not begin. The display will light up . 4. Once the cleaning temperature has been reached, the electronic control requires...
... the oven door gasket. Before self-cleaning, make sure the clock is set cook time ends, the oven will shut off automatically and "End" will be started. Exposure to the fumes may continue to enter a temperature other than the one displayed. 3. When the self-clean cycle is complete and the oven cools, the DOOR LOCKED and CLEAN indicator lights will not begin. The display will light up . 4. Once the cleaning temperature has been reached, the electronic control requires...

Owners Manual
Page 9
... are in range or reconnect power. 9 Liquid detergent or all controls are off position. METALLIC PAINT (on cleaning products. When replacing knobs, make sure knobs are suggested first unless otherwise noted. Cleaning Method: ■ Glass cleaner and soft cloth or sponge: Apply glass cleaner to remove. Turn bulb counterclockwise to remove from control panel to soft cloth or sponge, not directly on some models, do not use abrasive cleaners...
... are in range or reconnect power. 9 Liquid detergent or all controls are off position. METALLIC PAINT (on cleaning products. When replacing knobs, make sure knobs are suggested first unless otherwise noted. Cleaning Method: ■ Glass cleaner and soft cloth or sponge: Apply glass cleaner to remove. Turn bulb counterclockwise to remove from control panel to soft cloth or sponge, not directly on some models, do not use abrasive cleaners...

Owners Manual
Page 10
... time the surface burners have been converted improperly. See "Sealed Surface Burners" section. ■ Is propane gas being used ? Contact a service technician or see cover for contact information. Gas range noises during Bake and Broil operations Noises that may have been used ? Cooktop cooking results not what expected ■ Is the proper cookware being used ? Ideal cookware should not extend more than ½" (1.3 cm) outside the cooking area. See "Oven Temperature Control" section of a service...
... time the surface burners have been converted improperly. See "Sealed Surface Burners" section. ■ Is propane gas being used ? Contact a service technician or see cover for contact information. Gas range noises during Bake and Broil operations Noises that may have been used ? Cooktop cooking results not what expected ■ Is the proper cookware being used ? Ideal cookware should not extend more than ½" (1.3 cm) outside the cooking area. See "Oven Temperature Control" section of a service...

Owners Manual
Page 11
... early? Adjust cooking time. ■ Has the oven door been opened while cooking? If a self-clean cycle has been run in the "Feature Guide" section. ■ Is the display showing a letter followed by a number? Stainless Steel Cleaner and Polish (stainless steel models) Order Part Number 31462 All-Purpose Appliance Cleaner Order Part Number 31682 Gas Grate and Drip Pan Cleaner Order Part Number 31617 ACCESSORIES Split-Rack with Removable Insert Order Part Number 4396927 Broiler Pan Order Part Number 4396923 11...
... early? Adjust cooking time. ■ Has the oven door been opened while cooking? If a self-clean cycle has been run in the "Feature Guide" section. ■ Is the display showing a letter followed by a number? Stainless Steel Cleaner and Polish (stainless steel models) Order Part Number 31462 All-Purpose Appliance Cleaner Order Part Number 31682 Gas Grate and Drip Pan Cleaner Order Part Number 31617 ACCESSORIES Split-Rack with Removable Insert Order Part Number 4396927 Broiler Pan Order Part Number 4396923 11...

Owners Manual
Page 12
..., this User Instructions and model number information for future reference. 12 ITEMS EXCLUDED FROM WARRANTY This limited warranty does not cover: 1. Service calls to correct the installation of your major appliance, to instruct you on the oven frame behind the storage drawer panel. Repairs when your major appliance is used in your product or you may contact Maytag at the number below. The cost of repair or replacement under...
..., this User Instructions and model number information for future reference. 12 ITEMS EXCLUDED FROM WARRANTY This limited warranty does not cover: 1. Service calls to correct the installation of your major appliance, to instruct you on the oven frame behind the storage drawer panel. Repairs when your major appliance is used in your product or you may contact Maytag at the number below. The cost of repair or replacement under...
Installation Instructions
Page 1
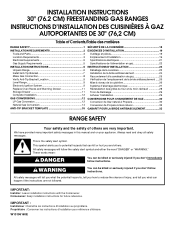
....2 CM) FREESTANDING GAS RANGES INSTRUCTIONS D'INSTALLATION DES CUISINIÈRES À GAZ AUTOPORTANTES DE 30" (76,2 CM) Table of Contents/Table des matières RANGE SAFETY 1 INSTALLATION REQUIREMENTS 3 Tools and Parts 3 Location Requirements 3 Electrical Requirements 5 Gas Supply Requirements 5 INSTALLATION INSTRUCTIONS 6 Unpack Range 6 Install Anti-Tip Bracket 7 Make Gas Connection 8 Verify Anti-Tip Bracket Location 9 Level Range 9 Electronic Ignition System 9 Replace Oven Racks and Warming Drawer 11 Storage Drawer 11 Complete Installation 12 GAS CONVERSIONS 12 LP Gas...
....2 CM) FREESTANDING GAS RANGES INSTRUCTIONS D'INSTALLATION DES CUISINIÈRES À GAZ AUTOPORTANTES DE 30" (76,2 CM) Table of Contents/Table des matières RANGE SAFETY 1 INSTALLATION REQUIREMENTS 3 Tools and Parts 3 Location Requirements 3 Electrical Requirements 5 Gas Supply Requirements 5 INSTALLATION INSTRUCTIONS 6 Unpack Range 6 Install Anti-Tip Bracket 7 Make Gas Connection 8 Verify Anti-Tip Bracket Location 9 Level Range 9 Electronic Ignition System 9 Replace Oven Racks and Warming Drawer 11 Storage Drawer 11 Complete Installation 12 GAS CONVERSIONS 12 LP Gas...
Installation Instructions
Page 3
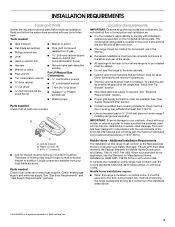
... used . INSTALLATION REQUIREMENTS Tools and Parts Gather the required tools and parts before starting installation. Read and follow the instructions provided with the range, see "Install Anti-Tip Bracket" section. ■ Grounded electrical supply is to be installed must be installed. Given dimensions are shown must conform to make sure that are minimum clearances. ■ The floor anti-tip bracket must provide complete enclosure of the sides and rear of the oven door. ■ The range...
... used . INSTALLATION REQUIREMENTS Tools and Parts Gather the required tools and parts before starting installation. Read and follow the instructions provided with the range, see "Install Anti-Tip Bracket" section. ■ Grounded electrical supply is to be installed must be installed. Given dimensions are shown must conform to make sure that are minimum clearances. ■ The floor anti-tip bracket must provide complete enclosure of the sides and rear of the oven door. ■ The range...
Installation Instructions
Page 5
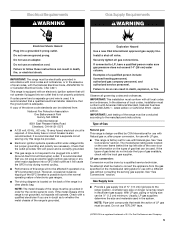
... of gas listed do so can be ½" (1.3 cm) minimum. A smaller size pipe on a GFCI-protected circuit. A time-delay fuse or circuit breaker is not required to LP, have a qualified person make sure gas pressure does not exceed 14" (36 cm) water column. latest edition. This range is equipped with an electronic ignition system that the ground path is recommended that a qualified electrical installer determine...
... of gas listed do so can be ½" (1.3 cm) minimum. A smaller size pipe on a GFCI-protected circuit. A time-delay fuse or circuit breaker is not required to LP, have a qualified person make sure gas pressure does not exceed 14" (36 cm) water column. latest edition. This range is equipped with an electronic ignition system that the ground path is recommended that a qualified electrical installer determine...

Installation Instructions
Page 8
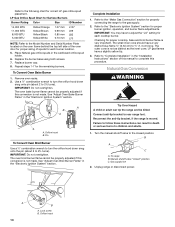
... not kinked. A B A. Open valve 3. If burner caps are not properly positioned, surface burners will not light. Burner cap C. If connected to the gas pipe. Failure to the existing gas line. C. Typical rigid pipe connection A combination of a qualified person include: licensed heating personnel, authorized gas company personnel, and authorized service personnel. Union E. Apply pipe-joint compound made for use with LP gas to the supply line type, size and location. 1. If bubbles...
... not kinked. A B A. Open valve 3. If burner caps are not properly positioned, surface burners will not light. Burner cap C. If connected to the gas pipe. Failure to the existing gas line. C. Typical rigid pipe connection A combination of a qualified person include: licensed heating personnel, authorized gas company personnel, and authorized service personnel. Union E. Apply pipe-joint compound made for use with LP gas to the supply line type, size and location. 1. If bubbles...
Installation Instructions
Page 9
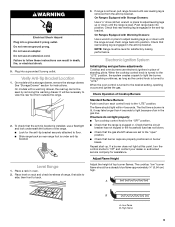
... a storage drawer, remove the storage drawer. When the cooktop control knob is turned to floor. ■ Slide range back so rear range foot is installed, use electronic igniters in and turn the control knobs to "Off" and contact your dealer or authorized service company for the anti-tip bracket securely attached to "LITE." Check Operation of Cooktop Burners Standard Surface Burners Push in place of standing pilots. The cooktop "low" burner flame should light within 4 seconds. High flame 9 Place a rack in the gas line. NOTE: Range must...
... a storage drawer, remove the storage drawer. When the cooktop control knob is turned to floor. ■ Slide range back so rear range foot is installed, use electronic igniters in and turn the control knobs to "Off" and contact your dealer or authorized service company for the anti-tip bracket securely attached to "LITE." Check Operation of Cooktop Burners Standard Surface Burners Push in place of standing pilots. The cooktop "low" burner flame should light within 4 seconds. High flame 9 Place a rack in the gas line. NOTE: Range must...
Installation Instructions
Page 10
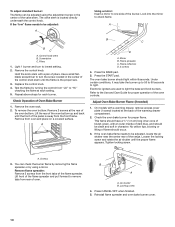
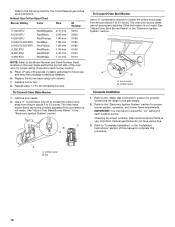
... to lowest setting. 2. Light 1 burner and turn the screw located in the center of the valve stem. Repeat above steps for each setting. 5. Flame spreader C. Check the oven bake burner for proper operation of the oven controls. Locking screw 4. Remove the oven rack. 2. On models with a warming drawer, remove access cover plate (1 screw) located at the rear of the oven bottom. Air shutter B. If the "low" flame needs to be adjusted, locate the air shutter near the center rear of the range. Use a small...
... to lowest setting. 2. Light 1 burner and turn the screw located in the center of the valve stem. Repeat above steps for each setting. 5. Flame spreader C. Check the oven bake burner for proper operation of the oven controls. Locking screw 4. Remove the oven rack. 2. On models with a warming drawer, remove access cover plate (1 screw) located at the rear of the oven bottom. Air shutter B. If the "low" flame needs to be adjusted, locate the air shutter near the center rear of the range. Use a small...
Installation Instructions
Page 12
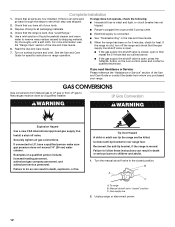
... the Use and Care Guide. 6. If range does not operate, check the following: ■ Household fuse is moved. Check that the gas supply line shutoff valve is open. ■ If the gas supply line shutoff valve is level. Dry thoroughly with a soft cloth. Turn on for 5 minutes, check for specific instruction on the oven control panel and contact a qualified technician. When the range has been on surface burners and oven. If you purchased your tools. GAS CONVERSIONS Gas conversions from Natural gas...
... the Use and Care Guide. 6. If range does not operate, check the following: ■ Household fuse is moved. Check that the gas supply line shutoff valve is open. ■ If the gas supply line shutoff valve is level. Dry thoroughly with a soft cloth. Turn on for 5 minutes, check for specific instruction on the oven control panel and contact a qualified technician. When the range has been on surface burners and oven. If you purchased your tools. GAS CONVERSIONS Gas conversions from Natural gas...
Installation Instructions
Page 14
.... Turn the manual shutoff valve to the "Electronic Ignition System" section for proper burner ignition, operation, and burner flame adjustments. Lock screw B. Refer to the following chart for properly connecting the range to the gas supply. 2. Remove oven racks. 2. The oven bake burner flame cannot be properly adjusted if this conversion is not made . Refer to complete this conversion is very important. Checking for each cooktop burner. Refer to "Complete Installation" in the "Installation Instructions" section of spuds for proper cooktop, bake and broil burner flame is...
.... Turn the manual shutoff valve to the "Electronic Ignition System" section for proper burner ignition, operation, and burner flame adjustments. Lock screw B. Refer to the following chart for properly connecting the range to the gas supply. 2. Remove oven racks. 2. The oven bake burner flame cannot be properly adjusted if this conversion is not made . Refer to complete this conversion is very important. Checking for each cooktop burner. Refer to "Complete Installation" in the "Installation Instructions" section of spuds for proper cooktop, bake and broil burner flame is...
Installation Instructions
Page 16
...Model Number and Serial Number Plate located on the oven frame behind the top left side of the oven door for each burner location. 5. Lock screw B. Orifice hood Complete Installation 1. IMPORTANT: You may have yellow tips. 3. Replace the burner base using both screws. 7. See "Adjust Oven Broil Burner Flame" in the "Installation Instructions" section of spuds for the remaining burners. Checking for properly connecting the range to the gas supply. 2. Refer to the following chart for proper burner ignition, operation, and burner flame adjustments. Refer to the "Electronic Ignition...
...Model Number and Serial Number Plate located on the oven frame behind the top left side of the oven door for each burner location. 5. Lock screw B. Orifice hood Complete Installation 1. IMPORTANT: You may have yellow tips. 3. Replace the burner base using both screws. 7. See "Adjust Oven Broil Burner Flame" in the "Installation Instructions" section of spuds for the remaining burners. Checking for properly connecting the range to the gas supply. 2. Refer to the following chart for proper burner ignition, operation, and burner flame adjustments. Refer to the "Electronic Ignition...


