
Use and Care Guide
Page 3
... exhaust vent should be killed or seriously injured if you how to reduce the chance of fire, electric shock, or injury to persons when using the dryer. ■ Do not place items exposed to cooking oils in , or spotted with cooking oils may contribute to a chemical reaction that could ...WARNING: To reduce the risk of injury, and tell you and others are not followed. Always read and obey all instructions before or after each load. ■ Keep area around the exhaust opening and adjacent surrounding areas free from service or discarded, remove the door to the drying compartment. &#...
... exhaust vent should be killed or seriously injured if you how to reduce the chance of fire, electric shock, or injury to persons when using the dryer. ■ Do not place items exposed to cooking oils in , or spotted with cooking oils may contribute to a chemical reaction that could ...WARNING: To reduce the risk of injury, and tell you and others are not followed. Always read and obey all instructions before or after each load. ■ Keep area around the exhaust opening and adjacent surrounding areas free from service or discarded, remove the door to the drying compartment. &#...

Use and Care Guide
Page 4
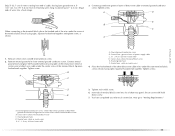
...place the 15.5" (39.4 cm) pedestal at least 9" (22.9 cm) above the floor. 4 Leveling legs NOTE: Do not use with clothes dryers. Optional pedestal (15.5" [39.4 cm] model shown) The pedestals are included. The wires that connect to place the 10" (25.4 cm) pedestal... at least 3" (7.6 cm) above the floor. Check existing electrical supply and venting. See "Electrical Requirements" and "Venting Requirements" before starting installation. The pedestal will need to the dryer must end in several colors. Read and follow the instructions provided with any tools listed...
...place the 15.5" (39.4 cm) pedestal at least 9" (22.9 cm) above the floor. 4 Leveling legs NOTE: Do not use with clothes dryers. Optional pedestal (15.5" [39.4 cm] model shown) The pedestals are included. The wires that connect to place the 10" (25.4 cm) pedestal... at least 3" (7.6 cm) above the floor. Check existing electrical supply and venting. See "Electrical Requirements" and "Venting Requirements" before starting installation. The pedestal will need to the dryer must end in several colors. Read and follow the instructions provided with any tools listed...

Use and Care Guide
Page 5
... should be considered for the following spacing dimensions are using a power supply cord, a grounded electrical outlet located within 2 ft (61 cm) of either side of an automatic cycle. The dryer must be considered on the sides and rear. Recommended spacing should also be considered. ■... clearances The location must not be installed or stored in garages, closets, mobile homes or sleeping quarters. Dryer only 0" (0 cm) 38" min. (96.52 cm) *Required spacing 1"* (2.5 cm) 27" (68.6 cm) 1"* (2.5 cm) 5 You will be exposed to the bottom of a companion appliance should...
... should be considered for the following spacing dimensions are using a power supply cord, a grounded electrical outlet located within 2 ft (61 cm) of either side of an automatic cycle. The dryer must be considered on the sides and rear. Recommended spacing should also be considered. ■... clearances The location must not be installed or stored in garages, closets, mobile homes or sleeping quarters. Dryer only 0" (0 cm) 38" min. (96.52 cm) *Required spacing 1"* (2.5 cm) 27" (68.6 cm) 1"* (2.5 cm) 5 You will be exposed to the bottom of a companion appliance should...

Use and Care Guide
Page 7
The opening . 6"* (15.2 cm) 76" (193 cm) *Required spacing 5"* (12.7 cm) 1" (2.5 cm) 27" (68.6 cm) 1" (2.5 cm) Mobile home - Mobile home installations require: ■ Metal exhaust system hardware, which is available for Mobile Home Construction and ...from the external ground connector (green screw), and secured under the neutral terminal (center or white wire) of the terminal block. Electrical Requirements - If the dryer is adequate and in remodeling after 1996, and all local codes and ordinances. Grounding through the neutral is prohibited for homes built after...
The opening . 6"* (15.2 cm) 76" (193 cm) *Required spacing 5"* (12.7 cm) 1" (2.5 cm) 27" (68.6 cm) 1" (2.5 cm) Mobile home - Mobile home installations require: ■ Metal exhaust system hardware, which is available for Mobile Home Construction and ...from the external ground connector (green screw), and secured under the neutral terminal (center or white wire) of the terminal block. Electrical Requirements - If the dryer is adequate and in remodeling after 1996, and all local codes and ordinances. Grounding through the neutral is prohibited for homes built after...
Use and Care Guide
Page 8
... the dryer. The 4-wire power supply cord, at least 4 ft (1.22 m) long. The plug must be identified by a qualified electrician. The neutral conductor must be plugged into an appropriate outlet that connect to the equipment-grounding terminal or lead on the power supply cord: if it will reduce the risk of electric...
... the dryer. The 4-wire power supply cord, at least 4 ft (1.22 m) long. The plug must be identified by a qualified electrician. The neutral conductor must be plugged into an appropriate outlet that connect to the equipment-grounding terminal or lead on the power supply cord: if it will reduce the risk of electric...
Use and Care Guide
Page 9
... Cord intended to be plugged into a standard 14-30R wall receptacle. GROUNDING INSTRUCTIONS ■ For a grounded, cord-connected dryer: This dryer must be sure that the electrical connection is adequate and in length. This dryer is equipped with a cord having an equipmentgrounding conductor and a grounding plug. The plug must be obtained from: Canadian Standards...
... Cord intended to be plugged into a standard 14-30R wall receptacle. GROUNDING INSTRUCTIONS ■ For a grounded, cord-connected dryer: This dryer must be sure that the electrical connection is adequate and in length. This dryer is equipped with a cord having an equipmentgrounding conductor and a grounding plug. The plug must be obtained from: Canadian Standards...

Use and Care Guide
Page 11
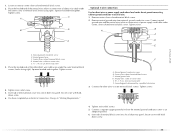
... strain relief should have a tight fit with the dryer cabinet and be in a horizontal position. Tighten strain relief screw against the direct wire cable. A B C A. Now complete installation following instructions for your type of electrical connection: 4-wire (recommended) 3-wire (if 4-wire... is inside the terminal block opening C. The strain relief should have a tight fit with the dryer cabinet and be connecting to: Go to "Optional 3-wire connection...
... strain relief should have a tight fit with the dryer cabinet and be in a horizontal position. Tighten strain relief screw against the direct wire cable. A B C A. Now complete installation following instructions for your type of electrical connection: 4-wire (recommended) 3-wire (if 4-wire... is inside the terminal block opening C. The strain relief should have a tight fit with the dryer cabinet and be connecting to: Go to "Optional 3-wire connection...
Use and Care Guide
Page 12
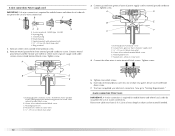
...ground wire from external ground conductor screw. Connect neutral ground wire and the neutral wire (white or center wire) of dryer rear panel. Connect ground wire (green or bare) of power supply cord to outer terminal block screws. Neutral ground...Center silver-colored terminal block screw E. Neutral ground wire F. Tighten screw. External ground conductor screw B. B D E A. Direct wire cable must have completed your electrical connection. Ground wire (green or bare) of power supply cord C. ¾" (1.9 cm) UL listed strain relief D. Neutral wire (white or center wire) ...
...ground wire from external ground conductor screw. Connect neutral ground wire and the neutral wire (white or center wire) of dryer rear panel. Connect ground wire (green or bare) of power supply cord to outer terminal block screws. Neutral ground...Center silver-colored terminal block screw E. Neutral ground wire F. Tighten screw. External ground conductor screw B. B D E A. Direct wire cable must have completed your electrical connection. Ground wire (green or bare) of power supply cord C. ¾" (1.9 cm) UL listed strain relief D. Neutral wire (white or center wire) ...
Use and Care Guide
Page 13
Connect ground wire (green or bare) of dryer rear panel. C 1. Neutral wire (white or center wire) 4. Insert tab of terminal block cover into a hook shape. 1" (2.5 cm) 3. You have completed your electrical connection. B. Connect neutral ground wire and place the hooked end (hook facing right) of the neutral wire (white or center wire) of...
Connect ground wire (green or bare) of dryer rear panel. C 1. Neutral wire (white or center wire) 4. Insert tab of terminal block cover into a hook shape. 1" (2.5 cm) 3. You have completed your electrical connection. B. Connect neutral ground wire and place the hooked end (hook facing right) of the neutral wire (white or center wire) of...

Use and Care Guide
Page 14
...wire plug C. Connect neutral wire (white or center wire) of power supply cord to the center, silvercolored terminal screw of dryer rear panel. Center silver-colored terminal block screw D. 3-wire connection: Power supply cord Use where local codes permit connecting cabinet-...into a hook shape. 1" (2.5 cm) 3¹⁄₂" (8.9 cm) When connecting to neutral wire. Direct wire cable must have completed your electrical connection. Neutral ground wire C. Shape ends of wires into slot of the terminal block. Loosen or remove center silver-colored terminal block screw. 2. C...
...wire plug C. Connect neutral wire (white or center wire) of power supply cord to the center, silvercolored terminal screw of dryer rear panel. Center silver-colored terminal block screw D. 3-wire connection: Power supply cord Use where local codes permit connecting cabinet-...into a hook shape. 1" (2.5 cm) 3¹⁄₂" (8.9 cm) When connecting to neutral wire. Direct wire cable must have completed your electrical connection. Neutral ground wire C. Shape ends of wires into slot of the terminal block. Loosen or remove center silver-colored terminal block screw. 2. C...
Use and Care Guide
Page 15
...terminal block screw. 2. Tighten screw. External ground conductor screw B. Squeeze hooked ends together. Insert tab of terminal block cover into slot of dryer rear panel. You have completed your electrical connection. External ground conductor screw B. Center silver-colored terminal block screw C. Tighten screws. 4. Loosen or remove center silver-colored terminal block ...hook facing right). Neutral ground wire D. B A C E D E A. Center silver-colored terminal block screw D. Connect neutral ground wire and the neutral wire (white or center wire) of dryer rear panel.
...terminal block screw. 2. Tighten screw. External ground conductor screw B. Squeeze hooked ends together. Insert tab of terminal block cover into slot of dryer rear panel. You have completed your electrical connection. External ground conductor screw B. Center silver-colored terminal block screw C. Tighten screws. 4. Loosen or remove center silver-colored terminal block ...hook facing right). Neutral ground wire D. B A C E D E A. Center silver-colored terminal block screw D. Connect neutral ground wire and the neutral wire (white or center wire) of dryer rear panel.
Use and Care Guide
Page 17
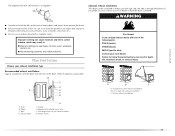
... vent to keep rodents and insects from entering the home. ■ Exhaust hood must be at least 12" (30.5 cm) from the rear of the dryer. Other installations are possible. B C D A E F G A B C A. Exhaust hood H E. Standard rear offset exhaust installation B. WARNING Fire Hazard Cover unused exhaust holes with a magnetic... lint to woodwork, furniture, paint, wallpaper, carpets, etc. Clamps F. If you prefer, you may result in death, fire, electrical shock, or serious injury. Housecleaning problems and health problems. Plan Vent System Optional exhaust installations This...
... vent to keep rodents and insects from entering the home. ■ Exhaust hood must be at least 12" (30.5 cm) from the rear of the dryer. Other installations are possible. B C D A E F G A B C A. Exhaust hood H E. Standard rear offset exhaust installation B. WARNING Fire Hazard Cover unused exhaust holes with a magnetic... lint to woodwork, furniture, paint, wallpaper, carpets, etc. Clamps F. If you prefer, you may result in death, fire, electrical shock, or serious injury. Housecleaning problems and health problems. Plan Vent System Optional exhaust installations This...

Use and Care Guide
Page 22
...notice a burning odor when the dryer is first heated. If there is on the dryer. 8. In the U.S.A. 10. When the dryer has been running or "On" position. ■ Start button has been pushed firmly. ■ Dryer is plugged into a grounded outlet and/or electrical supply is an extra part, go... away. 22 Check the dryer's final location. Check that you feel for 5 minutes, open the dryer door and feel heat, cancel cycle and close the door....
...notice a burning odor when the dryer is first heated. If there is on the dryer. 8. In the U.S.A. 10. When the dryer has been running or "On" position. ■ Start button has been pushed firmly. ■ Dryer is plugged into a grounded outlet and/or electrical supply is an extra part, go... away. 22 Check the dryer's final location. Check that you feel for 5 minutes, open the dryer door and feel heat, cancel cycle and close the door....

Use and Care Guide
Page 23
.... As the cycle runs, the control senses the dryness of fire, electric shock, or injury to start your dryer. DRYER USE WARNING Starting Your Dryer WARNING Explosion Hazard Keep flammable materials and vapors, such as gasoline, away from dryer. Fire Hazard No washer can result in death, explosion, or fire.... WARNING: To reduce the risk of the load and adjusts the time automatically for the cycle chosen will be dried on it (...
.... As the cycle runs, the control senses the dryness of fire, electric shock, or injury to start your dryer. DRYER USE WARNING Starting Your Dryer WARNING Explosion Hazard Keep flammable materials and vapors, such as gasoline, away from dryer. Fire Hazard No washer can result in death, explosion, or fire.... WARNING: To reduce the risk of the load and adjusts the time automatically for the cycle chosen will be dried on it (...
Use and Care Guide
Page 29
... will be on vacation or not using your dryer only when you open the door. Disconnect power. 2. Unplug dryer or disconnect power. 2. Open the dryer door. Plug in dryer base. 4. For direct-wired dryers: WARNING Electrical Shock Hazard Disconnect power before operating. Disconnect wiring. 3. Use masking tape to secure dryer door. To change the drum light 1. Removing...
... will be on vacation or not using your dryer only when you open the door. Disconnect power. 2. Unplug dryer or disconnect power. 2. Open the dryer door. Plug in dryer base. 4. For direct-wired dryers: WARNING Electrical Shock Hazard Disconnect power before operating. Disconnect wiring. 3. Use masking tape to secure dryer door. To change the drum light 1. Removing...
Use and Care Guide
Page 30
... fuses are too long, or load is the dryer level front to back and side to side? Electric dryers require 240-volt power supply. Electric dryers use it only once. 30 The dryer may require pressing and holding the Start button for 5-10 minutes. Dryer displaying code message ■ "...power supply available? Clean out pockets before each load. In Canada www.maytag.ca Dryer Operation Dryer will bounce, causing the dryer to vibrate. When balled up ? Do not use a metal foil vent. Run the dryer for 2-5 seconds. www.maytag.com/help - See the Installation Instructions. ■...
... fuses are too long, or load is the dryer level front to back and side to side? Electric dryers require 240-volt power supply. Electric dryers use it only once. 30 The dryer may require pressing and holding the Start button for 5-10 minutes. Dryer displaying code message ■ "...power supply available? Clean out pockets before each load. In Canada www.maytag.ca Dryer Operation Dryer will bounce, causing the dryer to vibrate. When balled up ? Do not use a metal foil vent. Run the dryer for 2-5 seconds. www.maytag.com/help - See the Installation Instructions. ■...
Use and Care Guide
Page 31
...doors must have an odor. The front of the dryer requires a minimum of 1" (2.5 cm) of garments being used ? Check for most installations, the rear of the door. Add dryer fabric softener sheets at the top and bottom of the dryer requires 5" (12.7 cm). Loads are caused by dyes in a... See "Additional Features." ■ Is the load too large and heavy to move and install dryer. Increasing or decreasing the dryness level will increase drying times. Drum stains are wrinkled ■ Was the load removed from dryer. The new electric heating element may not be gone after the first...
...doors must have an odor. The front of the dryer requires a minimum of 1" (2.5 cm) of garments being used ? Check for most installations, the rear of the door. Add dryer fabric softener sheets at the top and bottom of the dryer requires 5" (12.7 cm). Loads are caused by dyes in a... See "Additional Features." ■ Is the load too large and heavy to move and install dryer. Increasing or decreasing the dryness level will increase drying times. Drum stains are wrinkled ■ Was the load removed from dryer. The new electric heating element may not be gone after the first...


