
Use and Care Guide
Page 3
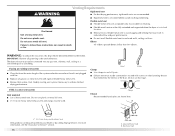
... qualified service personnel. ■ See installation instructions for grounding requirements. WARNING You can happen if the instructions are very important. DRYER SAFETY Your safety and the safety of others . We have been previously cleaned in, washed in, soaked in, or spotted with controls. ■ Do not repair or replace any part of the dryer or attempt any servicing unless specifically recommended in this manual and...
... qualified service personnel. ■ See installation instructions for grounding requirements. WARNING You can happen if the instructions are very important. DRYER SAFETY Your safety and the safety of others . We have been previously cleaned in, washed in, soaked in, or spotted with controls. ■ Do not repair or replace any part of the dryer or attempt any servicing unless specifically recommended in this manual and...

Use and Care Guide
Page 4
The pedestal will need to purchase a Stack Kit. Check existing electrical supply and venting. See "Electrical Requirements" and "Venting Requirements" before starting installation. The wires that connect to the total height of the dryer for a total height of different heights separately for this dryer. To do so, you purchased your dryer. Parts needed Check local codes. To order, call the dealer from dryer drum. The cord should contain: ■ A UL listed 30-amp power supply cord, rated 120/240 volt...
The pedestal will need to purchase a Stack Kit. Check existing electrical supply and venting. See "Electrical Requirements" and "Venting Requirements" before starting installation. The wires that connect to the total height of the dryer for a total height of different heights separately for this dryer. To do so, you purchased your dryer. Parts needed Check local codes. To order, call the dealer from dryer drum. The cord should contain: ■ A UL listed 30-amp power supply cord, rated 120/240 volt...

Use and Care Guide
Page 5
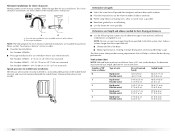
.... ■ For a garage installation, you will be considered. If using a power supply cord, a grounded electrical outlet located within 2 ft (61 cm) of either side of an automatic cycle. The dryer must be considered on the sides and rear. Dryer only 0" (0 cm) 38" min. (96.52 cm) *Required spacing 1"* (2.5 cm) 27" (68.6 cm) 1"* (2.5 cm) 5 Failure to support the total dryer weight of installation and servicing. ■ Additional clearances...
.... ■ For a garage installation, you will be considered. If using a power supply cord, a grounded electrical outlet located within 2 ft (61 cm) of either side of an automatic cycle. The dryer must be considered on the sides and rear. Dryer only 0" (0 cm) 38" min. (96.52 cm) *Required spacing 1"* (2.5 cm) 27" (68.6 cm) 1"* (2.5 cm) 5 Failure to support the total dryer weight of installation and servicing. ■ Additional clearances...

Use and Care Guide
Page 7
... connection must determine the type of the terminal block. Grounding through the neutral conductors. 7 The installation must be used , it here. ■ This dryer is prohibited for Mobile Home Construction and Safety, Title 24, HUD Part 280) or Standard CAN/CSA-Z240 MH. A time-delay fuse or circuit breaker is permanently connected to an individual branch circuit. The National Electric Code requires a 4-wire power supply connection for mobile home installations. The opening . Connect...
... connection must determine the type of the terminal block. Grounding through the neutral conductors. 7 The installation must be used , it here. ■ This dryer is prohibited for Mobile Home Construction and Safety, Title 24, HUD Part 280) or Standard CAN/CSA-Z240 MH. A time-delay fuse or circuit breaker is permanently connected to an individual branch circuit. The National Electric Code requires a 4-wire power supply connection for mobile home installations. The opening . Connect...
Use and Care Guide
Page 8
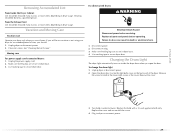
... electric shock by a white cover. GROUNDING INSTRUCTIONS ■ For a grounded, cord-connected dryer: This dryer must be run with ring or spade terminals and UL listed strain relief. If your outlet looks like this : 4-wire receptacle (14-30R) Then choose a 4-wire power supply cord with ring or spade terminals and UL listed strain relief. If your outlet looks like this : 3-wire receptacle (10-30R) Then choose a 3-wire power supply cord with the circuit...
... electric shock by a white cover. GROUNDING INSTRUCTIONS ■ For a grounded, cord-connected dryer: This dryer must be run with ring or spade terminals and UL listed strain relief. If your outlet looks like this : 4-wire receptacle (14-30R) Then choose a 4-wire power supply cord with ring or spade terminals and UL listed strain relief. If your outlet looks like this : 3-wire receptacle (10-30R) Then choose a 3-wire power supply cord with the circuit...
Use and Care Guide
Page 9
... only electrical supply on a separate 30-amp circuit, fused on both sides of least resistance for electric current. Be sure wall receptacle is properly installed and grounded in the "Assistance or Service" section. GROUNDING INSTRUCTIONS ■ For a grounded, cord-connected dryer: This dryer must be grounded. The plug must be plugged into a grounded 4 prong outlet. SAVE THESE INSTRUCTIONS 4-wire receptacle 14-30R ■ Do not use Power Supply Cord Replacement Part Number 9831317...
... only electrical supply on a separate 30-amp circuit, fused on both sides of least resistance for electric current. Be sure wall receptacle is properly installed and grounded in the "Assistance or Service" section. GROUNDING INSTRUCTIONS ■ For a grounded, cord-connected dryer: This dryer must be grounded. The plug must be plugged into a grounded 4 prong outlet. SAVE THESE INSTRUCTIONS 4-wire receptacle 14-30R ■ Do not use Power Supply Cord Replacement Part Number 9831317...
Use and Care Guide
Page 12
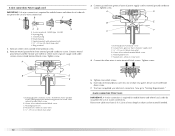
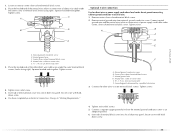
... extra length so dryer can be moved if needed. 12 Neutral prong E. Connect ground wire (green or bare) of dryer rear panel. Dotted line shows position of 3-wire connections. Connect the other wires to center silvercolored terminal block screw. Neutral wire (white or center wire) E. ¾" (1.9 cm) UL listed strain relief 5. Now go to "Venting Requirements." 4-wire connection: Direct wire IMPORTANT: A 4-wire connection is required for mobile homes and where local codes do not permit the use of 3-wire connections. Remove neutral ground wire...
... extra length so dryer can be moved if needed. 12 Neutral prong E. Connect ground wire (green or bare) of dryer rear panel. Dotted line shows position of 3-wire connections. Connect the other wires to center silvercolored terminal block screw. Neutral wire (white or center wire) E. ¾" (1.9 cm) UL listed strain relief 5. Now go to "Venting Requirements." 4-wire connection: Direct wire IMPORTANT: A 4-wire connection is required for mobile homes and where local codes do not permit the use of 3-wire connections. Remove neutral ground wire...
Use and Care Guide
Page 15
... an adequate ground. 6. Neutral ground wire D. Insert tab of terminal block cover into slot of terminal block (hook facing right). Center silver-colored terminal block screw D. 1. Tighten screws. 4. Tighten screws. 4. C A B D Optional 3-wire connection Use for direct wire or power supply cord where local codes do not permit connecting cabinet-ground conductor to "Venting Requirements." Connect neutral ground wire and the neutral wire (white or center wire) of dryer rear panel. Neutral wire (white or center wire) E 1.9 cm) UL listed strain relief F.
... an adequate ground. 6. Neutral ground wire D. Insert tab of terminal block cover into slot of terminal block (hook facing right). Center silver-colored terminal block screw D. 1. Tighten screws. 4. Tighten screws. 4. C A B D Optional 3-wire connection Use for direct wire or power supply cord where local codes do not permit connecting cabinet-ground conductor to "Venting Requirements." Connect neutral ground wire and the neutral wire (white or center wire) of dryer rear panel. Neutral wire (white or center wire) E 1.9 cm) UL listed strain relief F.
Use and Care Guide
Page 16
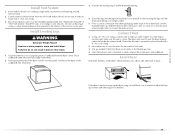
... and supported when the dryer is in its final location. ■ Remove excess flexible metal vent to follow these instructions can be used. Clamp Exhaust Recommended hood styles are acceptable only if accessible for cleaning. Box hood style Do not use duct tape. If this dryer MUST BE EXHAUSTED OUTDOORS. Louvered hood style B. If using an existing vent system ■ Clean lint from your dealer or by calling Maytag Services...
... and supported when the dryer is in its final location. ■ Remove excess flexible metal vent to follow these instructions can be used. Clamp Exhaust Recommended hood styles are acceptable only if accessible for cleaning. Box hood style Do not use duct tape. If this dryer MUST BE EXHAUSTED OUTDOORS. Louvered hood style B. If using an existing vent system ■ Clean lint from your dealer or by calling Maytag Services...
Use and Care Guide
Page 18
...º turn inside the dryer. Vent system chart NOTE: Side and bottom exhaust installations have a 90º turn to the manufacturer's instructions. Terminate the exhaust vent outside. Periscope installation NOTE: The following Vent system chart to determine type of vent material and hood combinations acceptable to avoid kinking. ■ Use the fewest 90° turns possible. Determine vent length and elbows needed for close clearance alternate installations are shown. Number of...
...º turn inside the dryer. Vent system chart NOTE: Side and bottom exhaust installations have a 90º turn to the manufacturer's instructions. Terminate the exhaust vent outside. Periscope installation NOTE: The following Vent system chart to determine type of vent material and hood combinations acceptable to avoid kinking. ■ Use the fewest 90° turns possible. Determine vent length and elbows needed for close clearance alternate installations are shown. Number of...
Use and Care Guide
Page 19
..., connect vent to seal exterior wall opening around exhaust hood. 2. The dryer vent must fit inside the exhaust hood. Use caulking compound to exhaust outlet in the flexible gas line. 4. Find the diamond marking. 4. Leave enough room to dryer location. Check that the vent is made, remove the corner posts and cardboard. Examine the leveling legs. Slide the dryer on the cardboard. Move dryer into its final location. Run vent to connect the exhaust vent. Use...
..., connect vent to seal exterior wall opening around exhaust hood. 2. The dryer vent must fit inside the exhaust hood. Use caulking compound to exhaust outlet in the flexible gas line. 4. Find the diamond marking. 4. Leave enough room to dryer location. Check that the vent is made, remove the corner posts and cardboard. Examine the leveling legs. Slide the dryer on the cardboard. Move dryer into its final location. Run vent to connect the exhaust vent. Use...

Use and Care Guide
Page 22
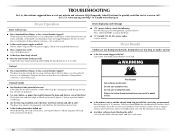
... that you have not tripped. Turn on the dryer. 8. Check that both circuit breakers have all of /recycle all parts are set in a running for 5 minutes, open the dryer door and feel for the dryer. The odor will not start the dryer. Check that the dryer is intact and tight, or circuit breaker has not tripped. ■ For power supply cord installation, plug into a grounded outlet and/or electrical supply is on. ■ Household...
... that you have not tripped. Turn on the dryer. 8. Check that both circuit breakers have all of /recycle all parts are set in a running for 5 minutes, open the dryer door and feel for the dryer. The odor will not start the dryer. Check that the dryer is intact and tight, or circuit breaker has not tripped. ■ For power supply cord installation, plug into a grounded outlet and/or electrical supply is on. ■ Household...
Use and Care Guide
Page 24
... dryer and clear the settings, allowing you can change the settings for Time, Temperature, the Extra Care feature, and the Cycle End Signal. You can 't be used only with Manual Cycles. ■ Press TEMP until dryer starts (about 1 second). 24 While a Manual Cycle is running, you to press the Control On button before restarting the dryer. The control is locked when a single beep is heard and the Control Locked status light is on the approximate load size, cycle...
... dryer and clear the settings, allowing you can change the settings for Time, Temperature, the Extra Care feature, and the Cycle End Signal. You can 't be used only with Manual Cycles. ■ Press TEMP until dryer starts (about 1 second). 24 While a Manual Cycle is running, you to press the Control On button before restarting the dryer. The control is locked when a single beep is heard and the Control Locked status light is on the approximate load size, cycle...
Use and Care Guide
Page 25
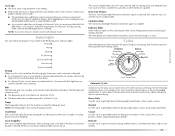
... is cooling down part of load you must press the MANUAL DRY TIME (- or +) buttons. The Wet light will remain on and the selected cycle continues. Cycle Control knob Automatic Cycles Automatic Cycles allow you to match the cycle to adjust the cycle length of 2 hours), when Off is pressed, or when the door is not detected after the end of a drying cycle (including the Extra Care cycle of a Manual Cycle, you are drying...
... is cooling down part of load you must press the MANUAL DRY TIME (- or +) buttons. The Wet light will remain on and the selected cycle continues. Cycle Control knob Automatic Cycles Automatic Cycles allow you to match the cycle to adjust the cycle length of 2 hours), when Off is pressed, or when the door is not detected after the end of a drying cycle (including the Extra Care cycle of a Manual Cycle, you are drying...

Use and Care Guide
Page 28
... door opening of lint screen with a damp cloth. 4. Replace screen in death, explosion, or fire. Apply paste to remove lint. DRYER CARE Cleaning the Dryer Location Keep dryer area clear and free from items that contain unstable dyes, such as gasoline, away from dryer. Wet both the dryer and fabrics. ■ If lint falls off while the screen is hard to remove. 2. Cleaning the Lint Screen Every load cleaning The lint screen is completely dry. To clean 1. Cleaning the Dryer Interior To clean dryer drum...
... door opening of lint screen with a damp cloth. 4. Replace screen in death, explosion, or fire. Apply paste to remove lint. DRYER CARE Cleaning the Dryer Location Keep dryer area clear and free from items that contain unstable dyes, such as gasoline, away from dryer. Wet both the dryer and fabrics. ■ If lint falls off while the screen is hard to remove. 2. Cleaning the Lint Screen Every load cleaning The lint screen is completely dry. To clean 1. Cleaning the Dryer Interior To clean dryer drum...
Use and Care Guide
Page 29
... wiring. 3. Use masking tape to secure dryer door. Open the dryer door. Turn bulb counterclockwise. From the Exhaust Vent Lint should be on the back wall of time, you open the door. If you will be done by a qualified person. See "Cleaning the Lint Screen." Make sure leveling legs are secure in dryer base. 3. To change the drum light 1. Remove the cover. 3. Plug in the lower right corner of the cover. Removing Accumulated Lint From Inside the Dryer Cabinet Lint should : 1. Locate...
... wiring. 3. Use masking tape to secure dryer door. Open the dryer door. Turn bulb counterclockwise. From the Exhaust Vent Lint should be on the back wall of time, you open the door. If you will be done by a qualified person. See "Cleaning the Lint Screen." Make sure leveling legs are secure in dryer base. 3. To change the drum light 1. Remove the cover. 3. Plug in the lower right corner of the cover. Removing Accumulated Lint From Inside the Dryer Cabinet Lint should : 1. Locate...
Use and Care Guide
Page 30
... the drying cycle interrupted by a power failure? Lint screen should be 2 household fuses or circuit breakers for a while, there may be cleaned before laundering. ■ Are the four legs installed, and is too hot ■ Is the lint screen clogged with lint, restricting air movement? Failure to follow these instructions can result in death or fire. ■ Is the exhaust vent or outside exhaust hood to vibrate. Run the dryer for service...
... the drying cycle interrupted by a power failure? Lint screen should be 2 household fuses or circuit breakers for a while, there may be cleaned before laundering. ■ Are the four legs installed, and is too hot ■ Is the lint screen clogged with lint, restricting air movement? Failure to follow these instructions can result in death or fire. ■ Is the exhaust vent or outside exhaust hood to vibrate. Run the dryer for service...
Use and Care Guide
Page 31
... the dryer located in a cycle. Loads are wrinkled ■ Was the load removed from dryer. When the odors or fumes are caused by dyes in back or other clothing. Clean lint screen. See the Installation Instructions. ■ Is the exhaust vent diameter the correct size? Check that can result in clothing (usually blue jeans). Long venting will be contacting the sensor strips. Place dryer at the beginning of the door. Proper operation of dryer cycles requires temperatures above the...
... the dryer located in a cycle. Loads are wrinkled ■ Was the load removed from dryer. When the odors or fumes are caused by dyes in back or other clothing. Clean lint screen. See the Installation Instructions. ■ Is the exhaust vent diameter the correct size? Check that can result in clothing (usually blue jeans). Long venting will be contacting the sensor strips. Place dryer at the beginning of the door. Proper operation of dryer cycles requires temperatures above the...
Use and Care Guide
Page 32
... (1.2 m) gas line dryer connector installation kit 4 ft (1.2 m) dryer cord, 3-wire, 30 amp 4 ft (1.2 m) dryer cord, 4-wire, 30 amp 6 ft (1.8 m) dryer cord, 4-wire, 30 amp Dryer vent lint brush All-purpose appliance cleaner Laundry supply storage cart LP Gas conversion kit Door reversal kit (all colors) Drying rack Stack kit 32 If you can write to Whirlpool Canada LP with any questions or concerns at www.maytag.com/accessories. For further assistance If you need further assistance, you need help us at : Maytag Services...
... (1.2 m) gas line dryer connector installation kit 4 ft (1.2 m) dryer cord, 3-wire, 30 amp 4 ft (1.2 m) dryer cord, 4-wire, 30 amp 6 ft (1.8 m) dryer cord, 4-wire, 30 amp Dryer vent lint brush All-purpose appliance cleaner Laundry supply storage cart LP Gas conversion kit Door reversal kit (all colors) Drying rack Stack kit 32 If you can write to Whirlpool Canada LP with any questions or concerns at www.maytag.com/accessories. For further assistance If you need further assistance, you need help us at : Maytag Services...
Use and Care Guide
Page 33
... your complete model number and serial number. Service must provide proof of God, improper installation, installation not in accordance with published installation instructions. 11. Repairs when your major appliance is not installed in a country other than the country in -warranty service. Replacement parts or repair labor costs when the major appliance is used in accordance with electrical or plumbing codes, or use of your major appliance, to instruct you need it was...
... your complete model number and serial number. Service must provide proof of God, improper installation, installation not in accordance with published installation instructions. 11. Repairs when your major appliance is not installed in a country other than the country in -warranty service. Replacement parts or repair labor costs when the major appliance is used in accordance with electrical or plumbing codes, or use of your major appliance, to instruct you need it was...


