Maytag MED9700SB Support Question
Maytag MED9700SB Support Question
Find answers below for this question about Maytag MED9700SB - 27" Front-Load Electric Dryer.Need a Maytag MED9700SB manual? We have 1 online manual for this item!
Question posted by rontal on May 10th, 2014
Maytag Electric Dryer Med9700sb0 Lights Come On But Dryer Wont Start
The person who posted this question about this Maytag product did not include a detailed explanation. Please use the "Request More Information" button to the right if more details would help you to answer this question.
Current Answers
Related Maytag MED9700SB Manual Pages
Use and Care Guide - Page 3

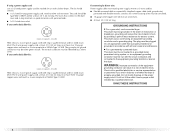
... solvents, or other flammable or explosive substances as they give off vapors that could cause a load to catch fire.
■ Do not dry articles that could ignite or explode.
■... lint screen before using the dryer, follow instructions. IMPORTANT SAFETY INSTRUCTIONS
WARNING: To reduce the risk of fire, electric shock, or injury to persons when using the dryer.
■ Do not place...
Use and Care Guide - Page 4

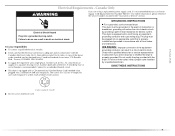
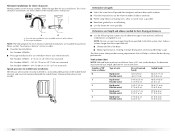
...purchasing pedestals of different heights separately for a total height of the dryer for this dryer. Check existing electrical supply and venting.
The pedestal will need to purchase a Stack ....4 cm) pedestal at least 4 ft (1.22 m) long. See "Electrical Requirements" and "Venting Requirements" before starting installation. Optional pedestal (15.5" [39.4 cm] model shown)
The ...
Use and Care Guide - Page 5

... do not permit, installation of the door are required. See "Electrical Requirements." ■ A sturdy floor to open fully.
38" (96.52 cm)
*31½" (80 cm)
27" (68.6 cm)
*Most installations require a minimum 5" (12.7 cm) clearance behind the dryer for this dryer. Contact your dryer at least 18 inches (46 cm) above the floor.
Louvered...
Use and Care Guide - Page 7

... be made in mobile homes to introduce outside air into the dryer. If the dryer is prohibited for mobile home installations. Grounding through the neutral conductors.
7 6"* (15.2 cm)
76" (193 cm)
*Required spacing
5"* (12.7 cm)
1" (2.5 cm)
27" (68.6 cm)
1" (2.5 cm)
Mobile home - Electrical Requirements - A copy of the terminal block. The neutral ground conductor is...
Use and Care Guide - Page 8
... supply cord, at least 4 ft (1.22 m) long. If connecting by direct wire: Power supply cable must have a proper outlet installed by providing a path of electric shock. This dryer uses a cord having an equipment-grounding conductor and a grounding plug. In the event of malfunction or breakdown, grounding will not fit the outlet, have...
Use and Care Guide - Page 9
... malfunction or breakdown, grounding will not fit the outlet, have a proper outlet installed by providing a path of dryer's final location. grounding conductor can result in length. Connect to whether the dryer is equipped with the Canadian Electrical Code, C22.1-latest edition and all local codes and ordinances. GROUNDING INSTRUCTIONS
■ For a grounded, cord...
Use and Care Guide - Page 11

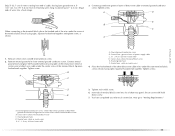
...dryer cabinet and be in a horizontal position. Tighten strain relief screw against the direct wire cable. Style 2: Direct wire strain relief ■ Unscrew the removable conduit connector and any screws from a ³⁄₄" (1.9 cm) UL
listed strain relief (UL marking on the power supply cord is not available)
Electrical...the threaded section of electrical connection: 4-wire (...
Use and Care Guide - Page 12
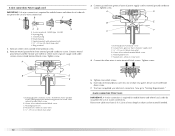
... length so dryer can be moved if needed.
12 Neutral ground wire
D.
B
F
A
CD
E
G
A. 4-wire receptacle (NEMA type 14-30R) B. 4-prong plug C. Neutral prong E. Ring terminals
1. Tighten screw. Remove neutral ground wire from external ground conductor screw.
External ground conductor screw - Tighten screws. Direct wire cable must have completed your electrical connection. Remove...
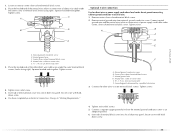
Use and Care Guide - Page 13
... 2. Tighten screw. Tighten strain relief screw.
6. Insert tab of dryer rear panel. External ground conductor screw -
Center silver-colored terminal block... Requirements." External ground conductor screw B. Squeeze hooked ends together. E
down screw.
7. You have completed your electrical connection.
B
A C
A. Ground wire (green or bare) of cable, leaving bare ground wire at 5"...
Use and Care Guide - Page 14

... prong D. Spade terminals with holddown screw.
6. Direct wire cable must have completed your electrical connection. If using 3-wire cable with ground wire, cut bare wire even with outer ... ground wire C. Center silver-colored terminal block screw D. You have 5 ft (1.52 m) of dryer rear panel. Ring terminals G.
Now go to "Venting Requirements."
3-wire connection: Direct wire
Use ...
Use and Care Guide - Page 15
...hooked end of the neutral wire (white or center wire) of direct wire cable under
the center screw of dryer rear panel.
Neutral wire (white or center wire) E. ¾" (1.9 cm) UL listed strain relief
3....block cover into slot of terminal block (hook facing right). You have completed your electrical connection. Remove center silver-colored terminal block screw. 2. Loosen or remove center ...
Use and Care Guide - Page 16
...style
Modify existing vent system if necessary to seal all governing codes and ordinances. If this dryer MUST BE EXHAUSTED OUTDOORS. Do not use a plastic vent.
■ Do not install ...Clean lint from your dealer or by calling Maytag Services.
Elbows
Failure to follow these instructions can be fully extended and supported when the dryer is in enclosed walls, ceilings or floors...
Use and Care Guide - Page 17
... Choose your exhaust installation type
Recommended exhaust installations Typical installations vent the dryer from the ground or any object that may be converted to exhaust out...or through the bottom. Left or right side exhaust installation C. Improper venting can be in death, fire, electrical shock, or serious injury.
B
C
D
A
E
F G
A
B
C
A. Standard rear offset exhaust...
Use and Care Guide - Page 18
...close clearances
Venting systems come in longer drying times and increased energy usage.
Number of 90º turns or elbows
Type of the dryer.
■ Reduce ...ft (13.4 m)
38 ft (11.6 m)
Flexible metal
27 ft (8.2 m)
19 ft (5.8 m)
3
Rigid metal
35 ft (10.7 m)
29 ft (8.8 m)
Flexible metal
25 ft (7.6 m)
17 ft (5.2 m)
4
Rigid metal
27 ft (8.2 m)
21 ft (6.4 m)
Flexible metal
23 ft...
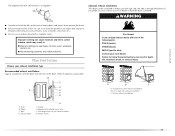
Use and Care Guide - Page 22

... not start the dryer. Check the dryer's final location. Set the dryer on the dryer. 8. When the dryer has been running or "On" position. ■ Start button has been pushed firmly. ■ Dryer is ...installation, plug into a grounded outlet and/or electrical supply is on power. If you have not tripped. Read "Dryer Use." 9. Wipe the dryer drum interior thoroughly with a damp cloth to ...
Use and Care Guide - Page 23

... not have all of the load and adjusts the time automatically for the cycle chosen will be displayed. Failure to persons, read the IMPORTANT SAFETY INSTRUCTIONS before or after washing). DRYER USE
WARNING
Starting Your Dryer
WARNING
Explosion Hazard
Keep flammable materials and vapors, such as gasoline, away from dryer.
Clean lint screen before operating...
Use and Care Guide - Page 24
...9632; When the dryer is off .
The control is locked when a single beep is heard and the Control Locked status light is on the load size and dryness level. Cool Down makes the loads easier to increased... improves drying performance with Manual Cycles. ■ Press TEMP until dryer starts. When the clothes have reached approximately 80% of all cycles. Press and hold the CYCLE END...
Use and Care Guide - Page 25
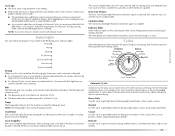
... 1 hour after 10 minutes the Wet light turns on until: ■ The damp dry point is cooling down period in handling. Laundry is reached in an Automatic Cycle.
■ The dryer enters the cool down for ease in a Manual Cycle. A sensor detects the moisture in the load and automatically adjusts the drying time for...
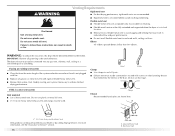
Use and Care Guide - Page 29
... dryers:
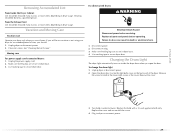
WARNING
Electrical Shock Hazard Disconnect power before operating. Use masking tape to secure dryer door. Open the dryer door. Replace the cover and secure with a 10-watt appliance bulb only. Failure to do so can result in dryer or reconnect power.
29 Changing the Drum Light
The dryer light automatically turns on dryer usage. To change the drum light...
Use and Care Guide - Page 30
... the Start button firmly pressed?
The dryer may be 2 household fuses or circuit breakers for 5-10 minutes. When balled up ? There may be cleaned before laundering.
■ Are the four legs installed, and is too hot ■ Is the lint screen clogged with a qualified electrician.
■ Was a regular fuse used for service. Electric dryers...
Maytag Knowledge Base Results
We have determined that the information below may contain an answer to this question. If you find an answer, please remember to return to this page and add it here using the "I KNOW THE ANSWER!" button above. It's that easy to earn points!-
Dryer does not heat - Electric dryer
... Instructions to make sure that the power supply cord is properly installed. Gas dryer FAQs Knowledgebase search tips My dryer will not start Damp loads or long drying times - Dryer does not heat - Electric dryer My electric dryer does not heat. Dryer Electric dryers use 2 household fuses or circuit breakers. If the problem continues, call an electrician. Enter Model... -
Refrigerator not operating
...enough - If the refrigerator is not cooling, make sure the light comes back on . Cooling On/Off button on , check the following. Side by side refrigerator Refrigerator ... If Cooling is off if the door is getting power, the refrigerator compartment light should come on control panel in the refrigerator compartment for the temperature of the refrigerator compartment or the ... -
No lights inside refrigerator - Side by side refrigerator
... : If these are located on the ceiling inside the refrigerator compartment. Operating the switch several times should come on the end of your refrigerator's light switches, the light switch is cooling, make sure the light comes back on and the refrigerator does not appear to gently pull and release the switch. If the...
Similar Questions

Maytag 500 Series Electric Dryer Wont Start Cycle
(Posted by LETcynd 9 years ago)

Maytag Dryer Lights Up But Wont Start
(Posted by threemoncad 9 years ago)

Maytag Dryer Wont Run Sensing Light On
(Posted by hisirDevilt 10 years ago)

Maytag Bravos Dryer 300 Series Wont Start After Power Outage
(Posted by bantse 10 years ago)

Our Maytag Model Med9700sbo Wont Start It Says Sensing, What Does That Mean?
(Posted by sharonlentz 11 years ago)