Owners Manual
Page 1
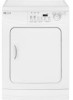
MD-24 Table of Contents Important Safety Instructions 1-2 Operating Instructions 3-4 Clean the Lint Filter Load the Dryer Properly Start/Pause Turn the Dryer Off Estimated Time Display Cycle Status Lights Using the Controls 5-7 Select Cycle Select Dryness Level Select Temperature Select Options Press Start/Pause Use & Care Guide Care & Cleaning 8 Control Panel Dryer Exterior Dryer Exhaust System Stainless Steel Special Laundry Tips Dryer Exhaust Tips 9 Troubleshooting 10 Service & Warranty 11 Guide d'utilisation et d'entretien 12 Guía de uso y cuidado 22 Form No. A/01/06 ...
MD-24 Table of Contents Important Safety Instructions 1-2 Operating Instructions 3-4 Clean the Lint Filter Load the Dryer Properly Start/Pause Turn the Dryer Off Estimated Time Display Cycle Status Lights Using the Controls 5-7 Select Cycle Select Dryness Level Select Temperature Select Options Press Start/Pause Use & Care Guide Care & Cleaning 8 Control Panel Dryer Exterior Dryer Exhaust System Stainless Steel Special Laundry Tips Dryer Exhaust Tips 9 Troubleshooting 10 Service & Warranty 11 Guide d'utilisation et d'entretien 12 Guía de uso y cuidado 22 Form No. A/01/06 ...
Owners Manual
Page 2
... the clothes dryer hot or interrupt the drying cycle until the items have questions, call 1-800-688-2080. For service information, see page 11. Always contact your dealer, distributor, service agent or manufacturer about problems or conditions you have run through the Cool Down cycle. Recognize Safety Symbols, Words and Labels WARNING WARNING - Hazards or unsafe practices which COULD result in hot water...
... the clothes dryer hot or interrupt the drying cycle until the items have questions, call 1-800-688-2080. For service information, see page 11. Always contact your dealer, distributor, service agent or manufacturer about problems or conditions you have run through the Cool Down cycle. Recognize Safety Symbols, Words and Labels WARNING WARNING - Hazards or unsafe practices which COULD result in hot water...

Owners Manual
Page 3
... dryer. Keep the area around the exhaust opening and surrounding areas free from service or discarded, remove the door to the weather. 7. Do not sit on a heat setting. Important Safety Instructions WARNING To reduce the risk of fire, explosion, electric shock, or personal injury when using the appliance. 2. b. Do not install or store this appliance. 14. Do not dry items that have been previously cleaned...
... dryer. Keep the area around the exhaust opening and surrounding areas free from service or discarded, remove the door to the weather. 7. Do not sit on a heat setting. Important Safety Instructions WARNING To reduce the risk of fire, explosion, electric shock, or personal injury when using the appliance. 2. b. Do not install or store this appliance. 14. Do not dry items that have been previously cleaned...
Owners Manual
Page 4
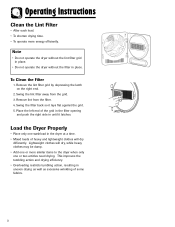
... Lint Filter • After each load. • To shorten drying time. • To operate more similar items to the dryer when only one or two articles need drying. Place the left end of heavy and lightweight clothes will dry, while heavy clothes may be damp. • Add one washload in the dryer at a time. • Mixed loads of the grid in the filter opening and push the right...
... Lint Filter • After each load. • To shorten drying time. • To operate more similar items to the dryer when only one or two articles need drying. Place the left end of heavy and lightweight clothes will dry, while heavy clothes may be damp. • Add one washload in the dryer at a time. • Mixed loads of the grid in the filter opening and push the right...

Owners Manual
Page 7
... moisture in the Normal/Auto Dry, Wrinkle Release or Damp Dry cycles, press the Temperature pad. Use the chart below as a guide: DRYER TEMPS LOAD TYPE Regular For sturdy cottons or those labeled Tumble Dry. STEP 3 Select Temperature To select the correct temperature, in the clothing at the end of larger or bulkier size may require the More Dry Setting to the desired temperature. Press the pad repeatedly to...
... moisture in the Normal/Auto Dry, Wrinkle Release or Damp Dry cycles, press the Temperature pad. Use the chart below as a guide: DRYER TEMPS LOAD TYPE Regular For sturdy cottons or those labeled Tumble Dry. STEP 3 Select Temperature To select the correct temperature, in the clothing at the end of larger or bulkier size may require the More Dry Setting to the desired temperature. Press the pad repeatedly to...
Owners Manual
Page 9
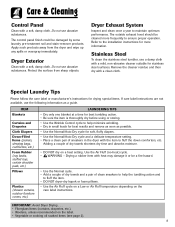
Dryer Exterior Clean with a clean cloth. Dryer Exhaust System Inspect and clean once a year to fluff the item. • DO NOT dryer-dry kapok or foam pillows. • Use the Air Fluff cycle on a Low or Air Fluff temperature depending on the care label instructions. Refer to the installation instructions for more frequently to ensure proper operation. Remove the cleaner residue and then dry with a soft, damp cloth. Special Laundry Tips Please follow...
Dryer Exterior Clean with a clean cloth. Dryer Exhaust System Inspect and clean once a year to fluff the item. • DO NOT dryer-dry kapok or foam pillows. • Use the Air Fluff cycle on a Low or Air Fluff temperature depending on the care label instructions. Refer to the installation instructions for more frequently to ensure proper operation. Remove the cleaner residue and then dry with a soft, damp cloth. Special Laundry Tips Please follow...

Owners Manual
Page 10
... vent. Never use and care guide. Do Keep duct runs as straight as possible. Be sure vent flap opens and closes freely. Don't Let a poor exhaust system cause slow drying. Do Let your new dryer. Dryer Exhaust Tips WARNING Plastic or nonmetal flexible duct presents a potential fire hazard. Do Use 4" diameter rigid metal duct. Do Read the installation instructions and the use lint-trapping screws. Tape all old ducts before installing your dryer exhaust the air...
... vent. Never use and care guide. Do Keep duct runs as straight as possible. Be sure vent flap opens and closes freely. Don't Let a poor exhaust system cause slow drying. Do Let your new dryer. Dryer Exhaust Tips WARNING Plastic or nonmetal flexible duct presents a potential fire hazard. Do Use 4" diameter rigid metal duct. Do Read the installation instructions and the use lint-trapping screws. Tape all old ducts before installing your dryer exhaust the air...
Owners Manual
Page 11
... overload. 1 wash load = 1 dryer load. • Sort heavy items from lightweight items. • Check the washer to tumble properly. This is normal as coins, nails, etc. Troubleshooting Doesn't Run Doesn't Heat Doesn't Dry Properly Is Noisy Dries Unevenly Has an Odor Dryer shuts off during the cycle. • Has a fuse blown or the circuit breaker tripped? • Select a heat setting, not air fluff. • Clean the lint filter and exhaust duct. • Dryer timer may have...
... overload. 1 wash load = 1 dryer load. • Sort heavy items from lightweight items. • Check the washer to tumble properly. This is normal as coins, nails, etc. Troubleshooting Doesn't Run Doesn't Heat Doesn't Dry Properly Is Noisy Dries Unevenly Has an Odor Dryer shuts off during the cycle. • Has a fuse blown or the circuit breaker tripped? • Select a heat setting, not air fluff. • Clean the lint filter and exhaust duct. • Dryer timer may have...
Owners Manual
Page 12
... INCIDENTAL OR CONSEQUENTIAL DAMAGES. What is Not Covered By These Warranties 1. Any repair, modification, alteration, or adjustment not authorized by the manufacturer. c. e. Correct installation errors. Instruct the user on owner's responsibilities for commercial or industrial use will be repaired or replaced free of consequential or incidental damages, so the above warranties only cover an appliance installed in remote locations. 8. c. CUSTOMER'S SOLE AND EXCLUSIVE REMEDY UNDER THIS...
... INCIDENTAL OR CONSEQUENTIAL DAMAGES. What is Not Covered By These Warranties 1. Any repair, modification, alteration, or adjustment not authorized by the manufacturer. c. e. Correct installation errors. Instruct the user on owner's responsibilities for commercial or industrial use will be repaired or replaced free of consequential or incidental damages, so the above warranties only cover an appliance installed in remote locations. 8. c. CUSTOMER'S SOLE AND EXCLUSIVE REMEDY UNDER THIS...
Installation Instructions
Page 2
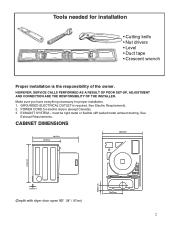
... with dryer door open 90o -3388".2/ 59"7c/ m97) cm) 2 See Electric Requirements. 2. See Exhaust Requirements. Tools needed for installation Printed in U.S.A.. • Impreso en los Estados Unidos • Stampato negli Stati Uniti (revised 06/23/04) 22001460 • Cutting knife • Nut drivers • Level • Duct tape • Crescent wrench Proper installation is required. GROUNDED ELECTRICAL OUTLET is the responsibility of the owner. HOWEVER, SERVICE...
... with dryer door open 90o -3388".2/ 59"7c/ m97) cm) 2 See Electric Requirements. 2. See Exhaust Requirements. Tools needed for installation Printed in U.S.A.. • Impreso en los Estados Unidos • Stampato negli Stati Uniti (revised 06/23/04) 22001460 • Cutting knife • Nut drivers • Level • Duct tape • Crescent wrench Proper installation is required. GROUNDED ELECTRICAL OUTLET is the responsibility of the owner. HOWEVER, SERVICE...

Installation Instructions
Page 3
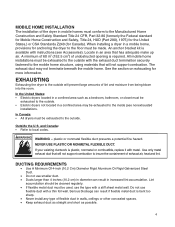
... Following Instructions Carefully Before Starting To Install The Dryer. It is 52"(132cm). • Closet door must be louvered or otherwise ventilated and must contain a minimum of 60 in2 (152.5 cm2) of open area equally distributed. A DRYER PRODUCES COMBUSTIBLE LINT. ALCOVE OR CLOSET INSTALLATION ! This dryer is located must not obstruct the flow of fire, this closet contains both a washer and a dryer, doors must be located to...
... Following Instructions Carefully Before Starting To Install The Dryer. It is 52"(132cm). • Closet door must be louvered or otherwise ventilated and must contain a minimum of 60 in2 (152.5 cm2) of open area equally distributed. A DRYER PRODUCES COMBUSTIBLE LINT. ALCOVE OR CLOSET INSTALLATION ! This dryer is located must not obstruct the flow of fire, this closet contains both a washer and a dryer, doors must be located to...
Installation Instructions
Page 4
...; Electric dryers located in diameter can result if flexible metal duct is required. and Canada: • Refer to the outside . DUCTING REQUIREMENTS • Use A Minimum Of 4-inch (10.2 Cm) Diameter Rigid Aluminum Or Rigid Galvanized Steel Duct. • Do not use flexible duct with a stiff sheet metal wall. An anchor bracket kit is plastic, nonmetal or combustible, replace it with instructions (see nonexhausted installations. NEVER USE PLASTIC...
...; Electric dryers located in diameter can result if flexible metal duct is required. and Canada: • Refer to the outside . DUCTING REQUIREMENTS • Use A Minimum Of 4-inch (10.2 Cm) Diameter Rigid Aluminum Or Rigid Galvanized Steel Duct. • Do not use flexible duct with a stiff sheet metal wall. An anchor bracket kit is plastic, nonmetal or combustible, replace it with instructions (see nonexhausted installations. NEVER USE PLASTIC...
Installation Instructions
Page 5
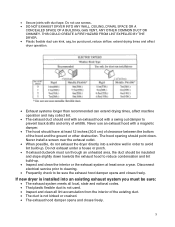
.... Never install a screen over the exhaust outlet. • When possible, do not exhaust the dryer directly into an existing exhaust system you must run through an unheated area, the duct should be punctured, reduce airflow, extend drying times and affect dryer operation. • Exhaust systems longer than recommended can kink, sag, be insulated and slope slightly down . Do not use an exhaust hood with duct tape. Never use screws...
.... Never install a screen over the exhaust outlet. • When possible, do not exhaust the dryer directly into an existing exhaust system you must run through an unheated area, the duct should be punctured, reduce airflow, extend drying times and affect dryer operation. • Exhaust systems longer than recommended can kink, sag, be insulated and slope slightly down . Do not use an exhaust hood with duct tape. Never use screws...
Installation Instructions
Page 6
... water column, or be empty and the lint filter clean. ELECTRICAL REQUIREMENTS NOTE: Wiring diagram is not exhausted to the dryer. If local codes prohibit the use of the ground strap, the dryer must be grounded in any exhaust system must not terminate directly behind the dryer. • Use a rectangular vent kit along with local codes. 6 AN ACCUMULATION OF DUST OR LINT IN ANY AREA OF THE HOME CREATES A FIRE HAZARD. A no heat setting...
... water column, or be empty and the lint filter clean. ELECTRICAL REQUIREMENTS NOTE: Wiring diagram is not exhausted to the dryer. If local codes prohibit the use of the ground strap, the dryer must be grounded in any exhaust system must not terminate directly behind the dryer. • Use a rectangular vent kit along with local codes. 6 AN ACCUMULATION OF DUST OR LINT IN ANY AREA OF THE HOME CREATES A FIRE HAZARD. A no heat setting...
Installation Instructions
Page 7
... separate) circuit serving only this appliance • All gas installations must be converted if it will not fit the outlet, have a proper outlet installed by means of a new power supply cord kit, marked for this appliance is NOT provided with clothes dryer, that is required. • Improper connection of local codes, with the national Fuel Code ANSI/Z2231 - ELECTRIC MODELS - The electric service requirements can result in Grounding Section. electric dryer must be...
... separate) circuit serving only this appliance • All gas installations must be converted if it will not fit the outlet, have a proper outlet installed by means of a new power supply cord kit, marked for this appliance is NOT provided with clothes dryer, that is required. • Improper connection of local codes, with the national Fuel Code ANSI/Z2231 - ELECTRIC MODELS - The electric service requirements can result in Grounding Section. electric dryer must be...
Installation Instructions
Page 8
... sides of the line is required. • All Canadian models are shipped with the power cord attached. Canada Only • A 120/240 volt, 60 Hz AC approved electrical service fused through neutral, only a 4 conductor power cord, rated and terminated as above, may be used. ELECTRIC MODELS - • If the dryer is to be installed in Canada to convert a dryer in a mobile home or an area where local codes do not...
... sides of the line is required. • All Canadian models are shipped with the power cord attached. Canada Only • A 120/240 volt, 60 Hz AC approved electrical service fused through neutral, only a 4 conductor power cord, rated and terminated as above, may be used. ELECTRIC MODELS - • If the dryer is to be installed in Canada to convert a dryer in a mobile home or an area where local codes do not...
Installation Instructions
Page 9
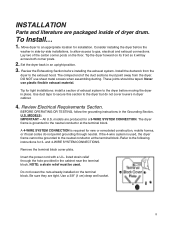
... terminal block cover plate. Do not loosen the nuts already installed on the floor. Review the Exhausting Section before the washer in dryer cabinet. 4. The crimped end of dryer drum. BEFORE OPERATING OR TESTING, follow the grounding instructions in the cabinet near the terminal block. NOTE: a strain relief must point away from the dryer to gas, electrical and exhaust connections. Consider installing the dryer before installing the exhaust system. DO NOT use plastic flexible exhaust material. Review Electrical Requirements...
... terminal block cover plate. Do not loosen the nuts already installed on the floor. Review the Exhausting Section before the washer in dryer cabinet. 4. The crimped end of dryer drum. BEFORE OPERATING OR TESTING, follow the grounding instructions in the cabinet near the terminal block. NOTE: a strain relief must point away from the dryer to gas, electrical and exhaust connections. Consider installing the dryer before installing the exhaust system. DO NOT use plastic flexible exhaust material. Review Electrical Requirements...
Installation Instructions
Page 10
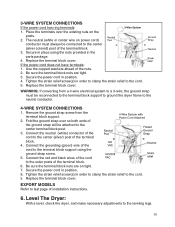
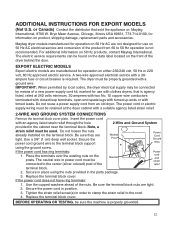
... last page of the terminal block. 4. Use the cupped washers ahead of the terminal block. 3. WARNING: If converting from the terminal block support. 2. Replace the terminal block cover. EXPORT MODELS Refer to the center terminal block post. 3. 3-WIRE SYSTEM CONNECTIONS If the power cord has ring terminals: 1. Secure the power cord in order to clamp the strain relief to the center (silver) post of installation instructions. 6. Remove the ground strap screw from a 4-wire electrical system to a 3-wire, the ground strap...
... last page of the terminal block. 4. Use the cupped washers ahead of the terminal block. 3. WARNING: If converting from the terminal block support. 2. Replace the terminal block cover. EXPORT MODELS Refer to the center terminal block post. 3. 3-WIRE SYSTEM CONNECTIONS If the power cord has ring terminals: 1. Secure the power cord in order to clamp the strain relief to the center (silver) post of installation instructions. 6. Remove the ground strap screw from a 4-wire electrical system to a 3-wire, the ground strap...
Installation Instructions
Page 11
... on gas models), exhaust and electrical connections are complete. 7. FINAL INSTALLATION CHECK LIST ❏q Dryer is plugged into electrical outlet and is properly grounded. ❏q Exhaust ductwork is hooked up to dryer and all joints taped. ❏q Plastic flexible duct is NOT used. ❏q Rigid or stiff walled flexible metal vent material was used. ❏q Dryer is level with all gas connections (on the floor. ❏q Start dryer to confirm dryer runs, heats and shuts off. ❏q Provide User Guide...
... on gas models), exhaust and electrical connections are complete. 7. FINAL INSTALLATION CHECK LIST ❏q Dryer is plugged into electrical outlet and is properly grounded. ❏q Exhaust ductwork is hooked up to dryer and all joints taped. ❏q Plastic flexible duct is NOT used. ❏q Rigid or stiff walled flexible metal vent material was used. ❏q Dryer is level with all gas connections (on the floor. ❏q Start dryer to confirm dryer runs, heats and shuts off. ❏q Provide User Guide...
Installation Instructions
Page 12
... connected by means of the dryer behind the door. Secure the power cord ground wire to 50 Hz operation is agency listed, rated at the dryer cabinet with a suitable agency listed strain relief. 2-WIRE AND GROUND SYSTEM CONNECTIONS Remove the terminal block cover plate. Secure in the cabinet near the terminal block. Tighten the strain relief screw(s) in position. 3. BEFORE OPERATING OR TESTING, be used. Maytag dryer models manufactured for operation on 50 Hz AC electrical service and conversion...
... connected by means of the dryer behind the door. Secure the power cord ground wire to 50 Hz operation is agency listed, rated at the dryer cabinet with a suitable agency listed strain relief. 2-WIRE AND GROUND SYSTEM CONNECTIONS Remove the terminal block cover plate. Secure in the cabinet near the terminal block. Tighten the strain relief screw(s) in position. 3. BEFORE OPERATING OR TESTING, be used. Maytag dryer models manufactured for operation on 50 Hz AC electrical service and conversion...


