Owners Manual
Page 3
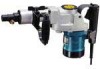
...you are caused by the manufacturer for appropriate conditions. Keep your application. Remove adjusting keys or wrenches before making any adjustments, changing accessories, or storing the tool. The correct tool will increase the risk of parts, and any way. Store idle tools out of ...breakage of electric shock. 7. Use safety equipment. Maintain tools with grounded surfaces such as pipes, radiators, ranges and refrigerators. Use only accessories that cannot be controlled with the switch is unstable and may result in . trician to loss of control. 16. Do not expose power...
...you are caused by the manufacturer for appropriate conditions. Keep your application. Remove adjusting keys or wrenches before making any adjustments, changing accessories, or storing the tool. The correct tool will increase the risk of parts, and any way. Store idle tools out of ...breakage of electric shock. 7. Use safety equipment. Maintain tools with grounded surfaces such as pipes, radiators, ranges and refrigerators. Use only accessories that cannot be controlled with the switch is unstable and may result in . trician to loss of control. 16. Do not expose power...

Owners Manual
Page 4
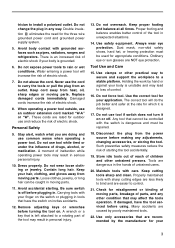
... injury. 24. It is secured in good condition. Be sure the bit is also highly recommended that may be sure to rotary hammer safety rules. Accessories that you can cause hearing loss. 3. Table 1: Minimum gage for extended periods. Prolonged exposure to follow Maintenance instructions may contact hidden wiring or its own...
... injury. 24. It is secured in good condition. Be sure the bit is also highly recommended that may be sure to rotary hammer safety rules. Accessories that you can cause hearing loss. 3. Table 1: Minimum gage for extended periods. Prolonged exposure to follow Maintenance instructions may contact hidden wiring or its own...
Owners Manual
Page 8
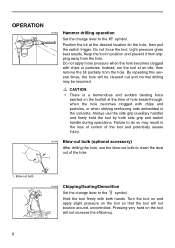
... the hole. Always use the blow-out bulb to clean the dust out of the tool and potentially severe injury. 002449 1 Blow-out bulb (optional accessory) After drilling the hole, use the side grip (auxiliary handle) and firmly hold the tool by both hands. Failure to do so may be resumed...
... the hole. Always use the blow-out bulb to clean the dust out of the tool and potentially severe injury. 002449 1 Blow-out bulb (optional accessory) After drilling the hole, use the side grip (auxiliary handle) and firmly hold the tool by both hands. Failure to do so may be resumed...
Owners Manual
Page 9
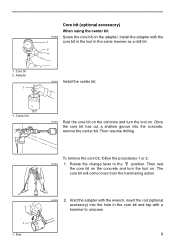
Rotate the change lever to unscrew. 9 Adapter 1 003209 1 Core bit (optional accessory) When using the center bit Screw the core bit on . Then rest the core bit on the concrete and turn the tool on. Rod 003215 2. ... 1 or 2. 003214 1. Install the adapter with the core bit in the tool in the core bit and tap with the wrench, insert the rod (optional accessory) into the concrete, remove the center bit. Center bit 003212 Rest the core bit on the concrete and turn the tool on the adapter. Then...
Rotate the change lever to unscrew. 9 Adapter 1 003209 1 Core bit (optional accessory) When using the center bit Screw the core bit on . Then rest the core bit on the concrete and turn the tool on. Rod 003215 2. ... 1 or 2. 003214 1. Install the adapter with the core bit in the tool in the core bit and tap with the wrench, insert the rod (optional accessory) into the concrete, remove the center bit. Center bit 003212 Rest the core bit on the concrete and turn the tool on the adapter. Then...
Owners Manual
Page 11
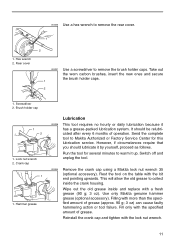
... screwdriver to warm it up. Brush holder cap 1 2 1. Switch off and unplug the tool. 003244 Remove the crank cap using a Makita lock nut wrench 35 (optional accessory). Wipe out the old grease inside the crank housing. Reinstall the crank cap and tighten with a fresh grease (90 g; 3 oz). ...Lock nut wrench 2. Run the tool for this lubrication service. Use only Makita genuine hammer grease (optional accessory). Crank cap 1 1. Send the complete tool to collect inside and replace with the lock nut wrench. 11 Fill only with the bit...
... screwdriver to warm it up. Brush holder cap 1 2 1. Switch off and unplug the tool. 003244 Remove the crank cap using a Makita lock nut wrench 35 (optional accessory). Wipe out the old grease inside the crank housing. Reinstall the crank cap and tighten with a fresh grease (90 g; 3 oz). ...Lock nut wrench 2. Run the tool for this lubrication service. Use only Makita genuine hammer grease (optional accessory). Crank cap 1 1. Send the complete tool to collect inside and replace with the lock nut wrench. 11 Fill only with the bit...
Owners Manual
Page 12
... shank to A-Taper adapter • Spline shank to persons. Only use accessory or attachment for more details regarding these accessories, ask your Makita tool specified in this manual. If you need any other accessories or attachments might present a risk of resin and is subject to breakage.... ACCESSORIES 12 CAUTION: • Do not tighten the crank cap excessively....
... shank to A-Taper adapter • Spline shank to persons. Only use accessory or attachment for more details regarding these accessories, ask your Makita tool specified in this manual. If you need any other accessories or attachments might present a risk of resin and is subject to breakage.... ACCESSORIES 12 CAUTION: • Do not tighten the crank cap excessively....