Makita XLC01ZB Support and Manuals
Get Help and Manuals for this Makita item
View All Support Options Below
Free Makita XLC01ZB manuals!
Problems with Makita XLC01ZB?
Ask a Question
Free Makita XLC01ZB manuals!
Problems with Makita XLC01ZB?
Ask a Question
Popular Makita XLC01ZB Manual Pages
XLC01 Instruction Manual - Page 2
...servicing. 2. Turn off all parts of body away from openings and moving parts.
9. Use extra care when cleaning on wet surfaces. Remove battery from appliance when not in areas where they may be followed, including the following:
READ ALL INSTRUCTIONS... it should always be present.
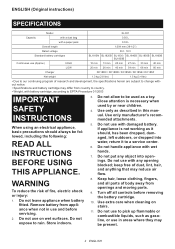
2 ENGLISH ENGLISH (Original instructions)
SPECIFICATIONS
Model
XLC01
Capacity
with a dust bag
0.50 L
with ...
XLC01 Instruction Manual - Page 3
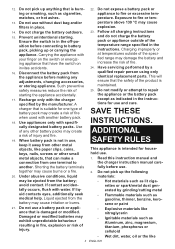
... repair person using only identical replacement parts. Disconnect the battery pack from the battery; Such preventive safety measures reduce the risk of the specified range may cause explosion.
14. A
23. Charging improperly or at temperatures outside of injury and fire.
19. Have servicing performed by the manufacturer. charger that is not in the instructions. Use...
XLC01 Instruction Manual - Page 4

... water or rain. Be careful not to the Dangerous Goods
volts
Legislation requirements. by Makita. Before using battery.
2.
It may cause fire, injury
objects such as cement
...safety instructions for tool. Please also observe possibly more detailed national regulations. read all instructions and cautionary markings on packaging and labeling
must be observed. Installing the ...
XLC01 Instruction Manual - Page 5

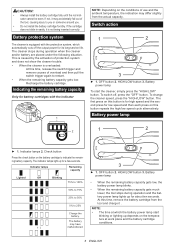
...a fully charged battery cartridge. Overcharging shortens the battery service life.
3. Charge the battery cartridge if you do not use genuine Makita batteries. Red indicator 2. Failure to hold the tool ...CAUTION: • Always switch off and
the battery cartridge is not locked completely.
5 ENGLISH To install the battery cartridge, align the tongue on the front of the button, it .
4. Let ...
XLC01 Instruction Manual - Page 6
... operation and the battery power lamp lights up for its long service life. HIGH/LOW button 3. The first press on this button...trigger again to you or someone around you. • Do not install the battery cartridge forcibly. HIGH/LOW button 3. This is caused ...accidentally fall out of protection system and does not show the cleaner trouble. • When the cleaner is for high speed and the...
XLC01 Instruction Manual - Page 7
...Front cover joint
NOTE: • The cleaner is constructed in place.
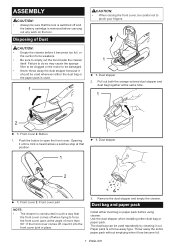
3. Use the dust stopper when installing either dust bag or paper pack before using cleaner. Dust stopper 2. Button
1. ASSEMBLY
CAUTION: • ...90°. Opening it until a click is a throw-away type. Dust bag and paper pack
Install either dust bag or paper pack. Failure to do so may cause the sponge filter to be ...
XLC01 Instruction Manual - Page 8
...3 2
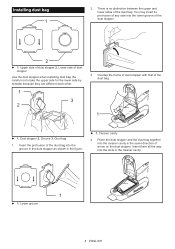
3. Upper side of the dust bag. Overlap the frame of dust stopper with that of dust stopper
Use the dust stopper when installing dust bag. Groove 3. Lower side of the dust bag.
1
► 1 . Place the dust stopper and the dust bag together ... of any side into the cleaner cavity in the figure.
► 1 . Dust stopper 2. Cleaner cavity
4. Installing dust bag
1
2. Dust bag
1.
XLC01 Instruction Manual - Page 9
... by mistake because they are different each other.
1
2
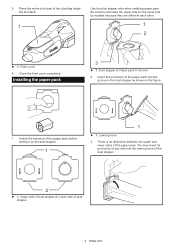
► 1 . Groove
2. Lower groove
3. Installing the paper pack
3
► 1 . Place the entire cloth part of dust stopper 2. Front cover 6. There is no distinction between the upper and lower sides of the dust... cover completely. Unfold the entrance of the paper pack before setting it on the dust stopper.
1
1
► 1 .
XLC01 Instruction Manual - Page 10
...the cleaner is an important component for maintaining the tool performance.
Cleaner cavity
5. Place the entire container part of arrow.
1
► 1 . Place the dust stopper and the paper pack together into the... slots in motor failure.
• Do not fold the cardboard at its opening when installing the paper pack.
• Never throw away the dust stopper because it needs to insert ...
XLC01 Instruction Manual - Page 11
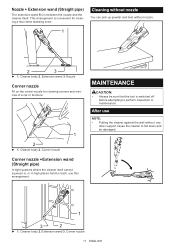
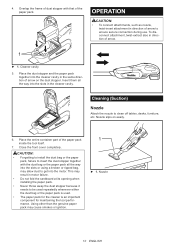
Cleaning without nozzle
You can pick up powder and dust without any
other support cause the cleaner to fall down and be sure that the tool is convenient for cleaning corners and crevices of a car or furniture.
1
2
► 1 . Cleaner ...
XLC01 Instruction Manual - Page 12
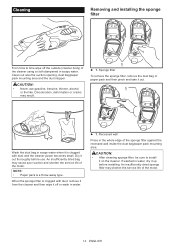
... clogged with dust, remove it from the cleaner and then wipe it out thoroughly before installing. Recessed wall
Press in the whole edge of the cleaner using a cloth dampened in ...suction and shorten the service life of the motor.
12 ENGLISH An insufficiently dried bag may result.
1
► 1 .
Cleaning
Removing and installing the sponge filter
From time to install
it is a throw...
XLC01 Instruction Manual - Page 13

...
Area to be included in the list may differ from country to repair cleaner by Makita Authorized or Factory Service Centers, always using Makita replacement parts. Is battery cartridge exhausted ? Dust down or wash the dust bag. Replace paper pack.
OPTIONAL ACCESSORIES
CAUTION: • These accessories or attachments are rec- United States of injury to persons.
Things...
XLC01 Parts Breakdown - Page 2

Model XLC01ZB Parts List
A = Standard Equipment 〇= Circuit Diagram
Item#
Part#
Description
001
456202-0
... SCREW 3X16 DUST BAG VALVE STAY COMPLETE PACKING INLET PIN 3 TORSION SPRING 4 NOZZLE ASSEMBLY ROLLER PIN 3 WIPER SASH NOZZLE PIPE SASH NOZZLE HOLDER PAPER FILTER SET (5PCS/SET)
Q'ty Unit
1 1 PC. 1 2 PC. 1 0 1 PC. 1 PC. 1 PC. 1 PC. 1 PC. 1 1 PC. 1 PC. 1 1 1 PC. 1 PC. 1 PC. 1 PC. 2...
XLC01ZB New Tool Flyers English - Page 1
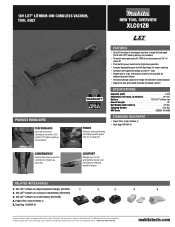
... handle provides increased comfort
SPECIFICATIONS
Capacity (pint 1 pint Continuous Use (max, in minutes 60 min. The Makita Teal Color is the trade dress of water lift
• Push button power selection for (high/low) operation • Accepts disposable paper or cloth dust bags for reduced operator fatigue
RELATED ACCESSORIES
1. 18V LXT® Lithium...
Makita XLC01ZB Reviews
We have not received any reviews for Makita yet.