
Owners Manual
Page 2
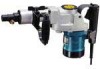
....) This plug will fit in the presence of flammable liquids, gases, or dust. SPECIFICATIONS Capacities Model Carbide-tipped bit Core bit Concrete Hume pipe No load speed (RPM) Blows per minute Overall length Net weight HR5000 50 mm (2") 150 mm (5-7/8") 255 mm (10") 260/min. 2,100 476 mm (18-3/4") 9.6 kg (21.1 lbs) •...
....) This plug will fit in the presence of flammable liquids, gases, or dust. SPECIFICATIONS Capacities Model Carbide-tipped bit Core bit Concrete Hume pipe No load speed (RPM) Blows per minute Overall length Net weight HR5000 50 mm (2") 150 mm (5-7/8") 255 mm (10") 260/min. 2,100 476 mm (18-3/4") 9.6 kg (21.1 lbs) •...

Owners Manual
Page 4
... Rating More Than 0 6 10 12 Not More Than 6 10 12 16 Volts 120 V Total length of the tool "live " wire will draw. Be sure the bit is in loss of this tool unsafely or incorrectly, you wear a dust mask and thickly padded gloves. 4. Table 1: Minimum gage for extended periods. Wear a hard...
... Rating More Than 0 6 10 12 Not More Than 6 10 12 16 Volts 120 V Total length of the tool "live " wire will draw. Be sure the bit is in loss of this tool unsafely or incorrectly, you wear a dust mask and thickly padded gloves. 4. Table 1: Minimum gage for extended periods. Wear a hard...
Owners Manual
Page 5
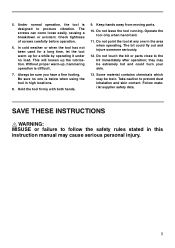
...fly out and injure someone seriously. 12. The screws can come loose easily, causing a breakdown or accident. The bit could burn your skin. 13. Do not touch the bit or parts close to prevent dust inhalation and skin contact. Follow material supplier safety data. 5. Check tightness of ... not point the tool at any one is designed to follow the safety rules stated in the area when operating. Take caution to the bit immediately after operation; Without proper warm-up the lubrication. Under normal operation, the tool is below when using the tool in high locations....
...fly out and injure someone seriously. 12. The screws can come loose easily, causing a breakdown or accident. The bit could burn your skin. 13. Do not touch the bit or parts close to prevent dust inhalation and skin contact. Follow material supplier safety data. 5. Check tightness of ... not point the tool at any one is designed to follow the safety rules stated in the area when operating. Take caution to the bit immediately after operation; Without proper warm-up the lubrication. Under normal operation, the tool is below when using the tool in high locations....

Owners Manual
Page 7
...can be installed on the tool securely. Tool retainer 37 27 19 19 A 003155 38.5 37 16ø CAUTION: • Never use A-type shank bits. Side handle 1 Side handle 003140 Raise the side handle. Screw the side grip on either side of the tool for downward drilling or chipping operations.... Never secure the side handle in reverse. Clamp nut 2. Then release it will go. To remove the bit, follow the installation procedure in other than the above four positions. 003148 Side grip The side grip is convenient for right or left , up ...
...can be installed on the tool securely. Tool retainer 37 27 19 19 A 003155 38.5 37 16ø CAUTION: • Never use A-type shank bits. Side handle 1 Side handle 003140 Raise the side handle. Screw the side grip on either side of the tool for downward drilling or chipping operations.... Never secure the side handle in reverse. Clamp nut 2. Then release it will go. To remove the bit, follow the installation procedure in other than the above four positions. 003148 Side grip The side grip is convenient for right or left , up ...
Owners Manual
Page 8
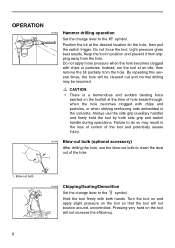
... the tool on and apply slight pressure on the tool so that the tool will not increase the efficiency. 8 Pressing very hard on the tool/bit at the time of hole break-through, when the hole becomes clogged with chips or particles. Keep the tool in the loss of control of... (optional accessory) After drilling the hole, use the side grip (auxiliary handle) and firmly hold the tool by both hands. Position the bit at an idle, then remove the bit partially from the hole. Light pressure gives best results. Failure to do so may be resumed. Blow-out bulb 003208 Chipping/Scaling...
... the tool on and apply slight pressure on the tool so that the tool will not increase the efficiency. 8 Pressing very hard on the tool/bit at the time of hole break-through, when the hole becomes clogged with chips or particles. Keep the tool in the loss of control of... (optional accessory) After drilling the hole, use the side grip (auxiliary handle) and firmly hold the tool by both hands. Position the bit at an idle, then remove the bit partially from the hole. Light pressure gives best results. Failure to do so may be resumed. Blow-out bulb 003208 Chipping/Scaling...
Owners Manual
Page 9
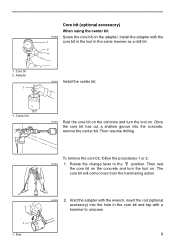
... the concrete and turn the tool on. 1. Install the adapter with a hammer to the position. Core bit 2. To remove the core bit, follow the procedures 1 or 2. 003214 1. Center bit 003212 Rest the core bit on the concrete and turn the tool on the adapter. Rotate the change lever to unscrew. 9 Rod 003215 2. The core...
... the concrete and turn the tool on. 1. Install the adapter with a hammer to the position. Core bit 2. To remove the core bit, follow the procedures 1 or 2. 003214 1. Center bit 003212 Rest the core bit on the concrete and turn the tool on the adapter. Rotate the change lever to unscrew. 9 Rod 003215 2. The core...
Owners Manual
Page 10
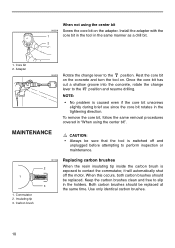
... No problem is exposed to contact the commutator, it will automatically shut off and unplugged before attempting to the position. To remove the core bit, follow the same removal procedures covered in the holders. When this occurs, both carbon brushes should be sure that the tool is switched off... the motor. 003216 1 When not using the center bit". Commutator 2. Carbon brush 001146 Replacing carbon brushes 2 When the resin insulating tip inside the carbon brush is caused even if the core...
... No problem is exposed to contact the commutator, it will automatically shut off and unplugged before attempting to the position. To remove the core bit, follow the same removal procedures covered in the holders. When this occurs, both carbon brushes should be sure that the tool is switched off... the motor. 003216 1 When not using the center bit". Commutator 2. Carbon brush 001146 Replacing carbon brushes 2 When the resin insulating tip inside the carbon brush is caused even if the core...
Owners Manual
Page 11
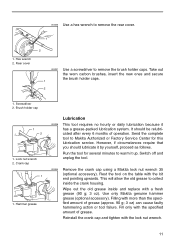
... hourly or daily lubrication because it by yourself, proceed as follows. Send the complete tool to Makita Authorized or Factory Service Center for several minutes to collect inside and replace with the bit end pointing upwards. Rest the tool on the table with a fresh grease (90 g; 3 oz... (approx. 90 g; 3 oz) can cause faulty hammering action or tool failure. Switch off and unplug the tool. 003244 Remove the crank cap using a Makita lock nut wrench 35 (optional accessory). Hex wrench 2. Rear cover 2 003231 Use a screwdriver to remove the rear cover. 1 1. 003225 Use a hex ...
... hourly or daily lubrication because it by yourself, proceed as follows. Send the complete tool to Makita Authorized or Factory Service Center for several minutes to collect inside and replace with the bit end pointing upwards. Rest the tool on the table with a fresh grease (90 g; 3 oz... (approx. 90 g; 3 oz) can cause faulty hammering action or tool failure. Switch off and unplug the tool. 003244 Remove the crank cap using a Makita lock nut wrench 35 (optional accessory). Hex wrench 2. Rear cover 2 003231 Use a screwdriver to remove the rear cover. 1 1. 003225 Use a hex ...
Owners Manual
Page 12
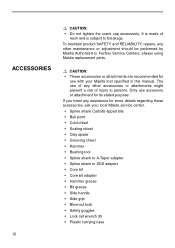
CAUTION: • These accessories or attachments are recommended for use with your local Makita service center. • Spline shank Carbide-tipped bits • Bull point • Cold chisel • Scaling chisel • Clay spade • Grooving chisel • Rammer • ... excessively. To maintain product SAFETY and RELIABILITY, repairs, any other maintenance or adjustment should be performed by Makita Authorized or Factory Service Centers, always using Makita replacement parts. It is made of injury to breakage. The use accessory or attachment for more details regarding...
CAUTION: • These accessories or attachments are recommended for use with your local Makita service center. • Spline shank Carbide-tipped bits • Bull point • Cold chisel • Scaling chisel • Clay spade • Grooving chisel • Rammer • ... excessively. To maintain product SAFETY and RELIABILITY, repairs, any other maintenance or adjustment should be performed by Makita Authorized or Factory Service Centers, always using Makita replacement parts. It is made of injury to breakage. The use accessory or attachment for more details regarding...


