
Owners Manual
Page 1
... MAY ACCESS OUR ONLINE HELP AT HTTP://WWW.FUNAI-CORP.COM OR CALL 1-800-605-8610 WHILE WITH YOUR PRODUCT. INSTRUCCIONES EN ESPAÑOL INCLUIDAS. NEED HELP FAST? Editing Function Setup Others Español READ YOUR QUICK GUIDE AND/OR OWNER'S MANUAL FIRST FOR QUICK TIPS THAT MAKE USING YOUR MAGNAVOX PRODUCT MORE ENJOYABLE. Introduction Connections Basic Setup Recording Playback Owner's Manual ZC320MW8 DIGITAL VIDEO DISC RECORDER THANK YOU FOR CHOOSING MAGNAVOX. DVD RECORDER © 2007...
... MAY ACCESS OUR ONLINE HELP AT HTTP://WWW.FUNAI-CORP.COM OR CALL 1-800-605-8610 WHILE WITH YOUR PRODUCT. INSTRUCCIONES EN ESPAÑOL INCLUIDAS. NEED HELP FAST? Editing Function Setup Others Español READ YOUR QUICK GUIDE AND/OR OWNER'S MANUAL FIRST FOR QUICK TIPS THAT MAKE USING YOUR MAGNAVOX PRODUCT MORE ENJOYABLE. Introduction Connections Basic Setup Recording Playback Owner's Manual ZC320MW8 DIGITAL VIDEO DISC RECORDER THANK YOU FOR CHOOSING MAGNAVOX. DVD RECORDER © 2007...
Owners Manual
Page 2
... perform "Make Edits DVD-RW DVD-R Compatible" before making a recording. Use [K / L] to exit. Use [K / L] to connect, then press [OK]. General Setting Playback Display Video Recording Clock Reset All Progressive Scan TV Aspect Video InpVuidteo Input E1 (Rear) E2 (Front) K K OK DISC SETUP K MENU I REC REC MODE TIMER RAPID PLAY DISPLAY SOURCE Use [K / L] to select the input jack type to select "Video Input", then press [OK]. DVD+RW/DVD-RW can play back the following discs / files. S-video cable VIDEO VIDEO OUT IN IN L L Y DIGITAL AUDIO PB / CB OUT OUTPUT PCM...
... perform "Make Edits DVD-RW DVD-R Compatible" before making a recording. Use [K / L] to exit. Use [K / L] to connect, then press [OK]. General Setting Playback Display Video Recording Clock Reset All Progressive Scan TV Aspect Video InpVuidteo Input E1 (Rear) E2 (Front) K K OK DISC SETUP K MENU I REC REC MODE TIMER RAPID PLAY DISPLAY SOURCE Use [K / L] to select the input jack type to select "Video Input", then press [OK]. DVD+RW/DVD-RW can play back the following discs / files. S-video cable VIDEO VIDEO OUT IN IN L L Y DIGITAL AUDIO PB / CB OUT OUTPUT PCM...

Owners Manual
Page 3
... [STANDBY-ON y]. Then select the desired channel to which your preference, then press [OK]. PLAY E B D STOP PAUSE C F RETURN TITLE 5 K OK DISC MENU K SETUP 2 I REC REC MODE TIMER 3 4 RAPID PLAY DISPLAY SOURCE 4Press [REC I] to start and end time. To set language. This is a simple way to set a timer programming. Before recording, make sure • Connect the external tuner to either E1 or E2 and set , and use [K / L] to select the contents to suit your external tuner is connected. Timer Programming Date MON JAN...
... [STANDBY-ON y]. Then select the desired channel to which your preference, then press [OK]. PLAY E B D STOP PAUSE C F RETURN TITLE 5 K OK DISC MENU K SETUP 2 I REC REC MODE TIMER 3 4 RAPID PLAY DISPLAY SOURCE 4Press [REC I] to start and end time. To set language. This is a simple way to set a timer programming. Before recording, make sure • Connect the external tuner to either E1 or E2 and set , and use [K / L] to select the contents to suit your external tuner is connected. Timer Programming Date MON JAN...
Owners Manual
Page 5
... adult, and serious damage to qualified service personnel under the following the operating instructions. When replacement parts are not sure of the type of the appliance should follow the manufacturer's instructions and should never be followed. 5. Heat - Follow Instructions - Water and Moisture- Quick stops, excessive force, and uneven surfaces may fall into the product. Power Cord Protection - Lightning - An outside antenna system, extreme...
... adult, and serious damage to qualified service personnel under the following the operating instructions. When replacement parts are not sure of the type of the appliance should follow the manufacturer's instructions and should never be followed. 5. Heat - Follow Instructions - Water and Moisture- Quick stops, excessive force, and uneven surfaces may fall into the product. Power Cord Protection - Lightning - An outside antenna system, extreme...
Owners Manual
Page 7
..., copied, transmitted, disseminated, transcribed, downloaded or stored in any storage medium, in any form or for higher video resolution or extended recording time on each DVD. Cleaning the cabinet • Use a soft cloth slightly moistened with stereo sound on all DVD-video players." Wipe the disc from Dolby Laboratories. Consult your dealer or an Authorized Service Center for analog records. It will play back on recordable DVD discs. Recording Playback Editing Function Setup...
..., copied, transmitted, disseminated, transcribed, downloaded or stored in any storage medium, in any form or for higher video resolution or extended recording time on each DVD. Cleaning the cabinet • Use a soft cloth slightly moistened with stereo sound on all DVD-video players." Wipe the disc from Dolby Laboratories. Consult your dealer or an Authorized Service Center for analog records. It will play back on recordable DVD discs. Recording Playback Editing Function Setup...

Owners Manual
Page 8
... Used in this Owner's Manual 7 FUNCTIONAL OVERVIEW 8 Front Panel 8 Rear Panel 9 Remote Control 10 Connections CONNECTION TO AN EXTERNAL TUNER 12 SETTINGS FOR THE VIDEO INPUT 13 CONNECTION TO A TV 14 CONNECTION TO AN AUDIO SYSTEM 15 Basic Setup GUIDE TO ON-SCREEN DISPLAYS AND MENUS . . . . 16 On-Screen Display / Menu 16 Main Menu 17 INITIAL SETTING 18 SETTING THE CLOCK 19 Clock Setting 19 Recording INFORMATION ON DVD RECORDING 20 BEFORE RECORDING 21 Make Recording Compatible 21 Setting for Auto Chapter 21 BASIC RECORDING & ONE-TOUCH TIMER RECORDING 22 TIMER RECORDING 24...
... Used in this Owner's Manual 7 FUNCTIONAL OVERVIEW 8 Front Panel 8 Rear Panel 9 Remote Control 10 Connections CONNECTION TO AN EXTERNAL TUNER 12 SETTINGS FOR THE VIDEO INPUT 13 CONNECTION TO A TV 14 CONNECTION TO AN AUDIO SYSTEM 15 Basic Setup GUIDE TO ON-SCREEN DISPLAYS AND MENUS . . . . 16 On-Screen Display / Menu 16 Main Menu 17 INITIAL SETTING 18 SETTING THE CLOCK 19 Clock Setting 19 Recording INFORMATION ON DVD RECORDING 20 BEFORE RECORDING 21 Make Recording Compatible 21 Setting for Auto Chapter 21 BASIC RECORDING & ONE-TOUCH TIMER RECORDING 22 TIMER RECORDING 24...

Owners Manual
Page 9
... . One-touch timer recording (OTR): You can be output even when the power of the symbols listed above under the function heading, the operation is off. Playing back MP3 files: You can divide a title into 2 or more. Setting pictures for thumbnails: You can change pictures for playing back discs on a regular DVD player: Recorded discs can easily set / clear chapter marks on CD-RW/-R. For Playback only Description refers to DVD-video Description refers...
... . One-touch timer recording (OTR): You can be output even when the power of the symbols listed above under the function heading, the operation is off. Playing back MP3 files: You can divide a title into 2 or more. Setting pictures for thumbnails: You can change pictures for playing back discs on a regular DVD player: Recorded discs can easily set / clear chapter marks on CD-RW/-R. For Playback only Description refers to DVD-video Description refers...
Owners Manual
Page 10
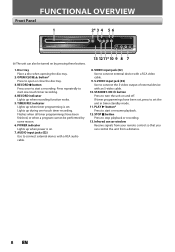
... with a RCA audio cable. 8. STOP C button Press to open or close the disc tray. 3. RECORD indicator Lights up when timer programming is on. 7. VIDEO input jack (E2) Use to connect external device with a RCA video cable. 9. Press repeatedly to set . TIMER REC indicator Lights up when recording function works. 5. Flashes when all timer programmings have been set, press to start one -touch timer recording. FUNCTIONAL OVERVIEW Front Panel 1 2* 3 4 5 6 DVD RECORDER (*) The unit can control the unit from a distance. 8 EN Disc tray Place a disc when opening the disc tray...
... with a RCA audio cable. 8. STOP C button Press to open or close the disc tray. 3. RECORD indicator Lights up when timer programming is on. 7. VIDEO input jack (E2) Use to connect external device with a RCA video cable. 9. Press repeatedly to set . TIMER REC indicator Lights up when recording function works. 5. Flashes when all timer programmings have been set, press to start one -touch timer recording. FUNCTIONAL OVERVIEW Front Panel 1 2* 3 4 5 6 DVD RECORDER (*) The unit can control the unit from a distance. 8 EN Disc tray Place a disc when opening the disc tray...
Owners Manual
Page 16
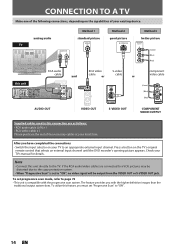
... the connections • Switch the input selector on the TV's original remote control that selects an external input channel until the DVD recorder's opening picture appears. To set progressive scan mode, refer to page 72 • This unit is set "Progressive Scan" to "ON". 14 EN Press a button on your existing device. Method 1 Method 2 Method 3 analog audio standard picture good picture better picture TV AUDIO IN R L VIDEO IN S-VIDEO IN COMPONENT VIDEO IN Y PB/CB PR/CR (Green) (Blue) (Red) this unit VIDEO VIDEO...
... the connections • Switch the input selector on the TV's original remote control that selects an external input channel until the DVD recorder's opening picture appears. To set progressive scan mode, refer to page 72 • This unit is set "Progressive Scan" to "ON". 14 EN Press a button on your existing device. Method 1 Method 2 Method 3 analog audio standard picture good picture better picture TV AUDIO IN R L VIDEO IN S-VIDEO IN COMPONENT VIDEO IN Y PB/CB PR/CR (Green) (Blue) (Red) this unit VIDEO VIDEO...
Owners Manual
Page 17
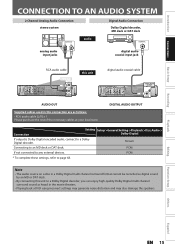
... >Playback >Disc Audio > Dolby Digital If output is Dolby Digital encoded audio, connect to an MD deck or DAT deck. Introduction Connections Basic Setup Recording CONNECTION TO AN AUDIO SYSTEM 2 Channel Analog Audio Connection stereo system Digital Audio Connection Dolby Digital decoder, MD deck or DAT deck analog audio input jacks AUDIO IN R L audio COAXIAL digital audio coaxial input jack RCA audio cable VIDEO OUT this unit VIDEO VIDEO OUT IN IN L L R R AUDIO IN S-VIDEO AUDIO OUT (E1) L R AUDIO OUT AUDIO OUT Supplied cables used in the movie theaters. • Playing...
... >Playback >Disc Audio > Dolby Digital If output is Dolby Digital encoded audio, connect to an MD deck or DAT deck. Introduction Connections Basic Setup Recording CONNECTION TO AN AUDIO SYSTEM 2 Channel Analog Audio Connection stereo system Digital Audio Connection Dolby Digital decoder, MD deck or DAT deck analog audio input jacks AUDIO IN R L audio COAXIAL digital audio coaxial input jack RCA audio cable VIDEO OUT this unit VIDEO VIDEO OUT IN IN L L R R AUDIO IN S-VIDEO AUDIO OUT (E1) L R AUDIO OUT AUDIO OUT Supplied cables used in the movie theaters. • Playing...
Owners Manual
Page 19
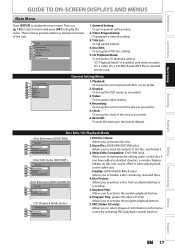
... Play: (audio CD/video CD only) Allows you to finalize a disc containing recorded titles. 4. Playback Editing Function Setup Others Español EN 17 Then use [K / L] to select a menu and press [OK] to the factory default. Setup 1 General Setting 2 Timer Programming 3 Title List 4 Disc Edit 5 CD Playback Mode 1. Recording: To set up the CD playback setting. • "CD Playback Mode" is available only when an audio CD, a video CD, a CD-RW/-R with MP3 files is inserted into the unit. 1 General Setting 2 Playback 3 Display 4 Video Recording 5 Clock 26 Reset...
... Play: (audio CD/video CD only) Allows you to finalize a disc containing recorded titles. 4. Playback Editing Function Setup Others Español EN 17 Then use [K / L] to select a menu and press [OK] to the factory default. Setup 1 General Setting 2 Timer Programming 3 Title List 4 Disc Edit 5 CD Playback Mode 1. Recording: To set up the CD playback setting. • "CD Playback Mode" is available only when an audio CD, a video CD, a CD-RW/-R with MP3 files is inserted into the unit. 1 General Setting 2 Playback 3 Display 4 Video Recording 5 Clock 26 Reset...
Owners Manual
Page 28
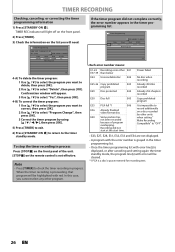
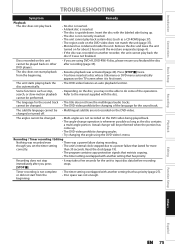
...]. 2 Use [K / L] to select "Program Change", then press [OK]. 3 Correct the timer program by other units when setting " Make Recording Compatible" to check the timer recording in the timer programming list. When the timer recording is a disc's space reserved for recording test. 26 EN Recording did not complete correctly, the error number appears in progress. TIMER REC indicator will need. In this case, you will light off on the front panel. 2) Press [TIMER]. 3) Check the information on the remote control is impossible to record...
...]. 2 Use [K / L] to select "Program Change", then press [OK]. 3 Correct the timer program by other units when setting " Make Recording Compatible" to check the timer recording in the timer programming list. When the timer recording is a disc's space reserved for recording test. 26 EN Recording did not complete correctly, the error number appears in progress. TIMER REC indicator will need. In this case, you will light off on the front panel. 2) Press [TIMER]. 3) Check the information on the remote control is impossible to record...
Owners Manual
Page 29
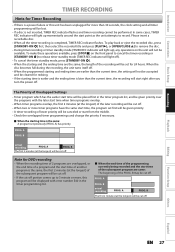
.... To play back or eject the recorded disc, press [STANDBY-ON y] first, then select the recorded title and press [PLAY B], or [OPEN/CLOSE A] to remove the disc. • During timer recording or timer standby mode (TIMER REC indicator will light up momentarily around the start point as the unit attempts to 3 minute or more, this unit has been unplugged for more than the current time, the recording will start right after you turn the power off...
.... To play back or eject the recorded disc, press [STANDBY-ON y] first, then select the recorded title and press [PLAY B], or [OPEN/CLOSE A] to remove the disc. • During timer recording or timer standby mode (TIMER REC indicator will light up momentarily around the start point as the unit attempts to 3 minute or more, this unit has been unplugged for more than the current time, the recording will start right after you turn the power off...
Owners Manual
Page 30
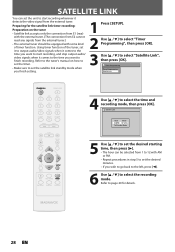
... want to select the recording mode. Timer Programming Timer Programming Satellite Link STANDBY-ON y OPEN/CLOSE A .@/: ABC DEF 1 2 3 GHI JKL MNO 4 5 6 PQRS 7 TUV WXYZ 8 9 CLEAR SPACE 0 CM SKIP PREV H NEXT G PLAY E B STOP C RETURN K D PAUSE F TITLE K K OK DISC SETUP K MENU I REC REC MODE TIMER RAPID PLAY DISPLAY SOURCE 4 Use [K / L] to 12 with some kind of the tuner, set it to output audio/video signals when it detects the video signal from 1 to select the time and recording mode, then press [OK]. Using timer function of timer function. Refer...
... want to select the recording mode. Timer Programming Timer Programming Satellite Link STANDBY-ON y OPEN/CLOSE A .@/: ABC DEF 1 2 3 GHI JKL MNO 4 5 6 PQRS 7 TUV WXYZ 8 9 CLEAR SPACE 0 CM SKIP PREV H NEXT G PLAY E B STOP C RETURN K D PAUSE F TITLE K K OK DISC SETUP K MENU I REC REC MODE TIMER RAPID PLAY DISPLAY SOURCE 4 Use [K / L] to 12 with some kind of the tuner, set it to output audio/video signals when it detects the video signal from 1 to select the time and recording mode, then press [OK]. Using timer function of timer function. Refer...
Owners Manual
Page 39
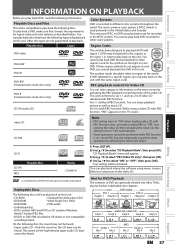
...2) Use [K / L] to select "CD Playback Mode", then press [OK]. DVD-video title 1 title 2 chapter 1 chapter 2 chapter 1 chapter 2 chapter 3 track 1 audio CD, video CD track 2 track 3 track 4 track 5 folder 1 file 1 file 2 MP3 file 3 folder 2 file 4 file 5 Editing Function Setup Others Español EN 37 Introduction Connections Basic Setup Recording Playback INFORMATION ON PLAYBACK Before you cannot play back the DVD in this unit. • CD-ROM • Compact Disc-Interactive (CD-I) • DVD-RAM • Video Single Disc (VSD) • DVD-ROM • DVD-audio...
...2) Use [K / L] to select "CD Playback Mode", then press [OK]. DVD-video title 1 title 2 chapter 1 chapter 2 chapter 1 chapter 2 chapter 3 track 1 audio CD, video CD track 2 track 3 track 4 track 5 folder 1 file 1 file 2 MP3 file 3 folder 2 file 4 file 5 Editing Function Setup Others Español EN 37 Introduction Connections Basic Setup Recording Playback INFORMATION ON PLAYBACK Before you cannot play back the DVD in this unit. • CD-ROM • Compact Disc-Interactive (CD-I) • DVD-RAM • Video Single Disc (VSD) • DVD-ROM • DVD-audio...

Owners Manual
Page 67
... time before the screen saver starts. 10minutes 15minutes 30miniutes ON Set to the progressive scan mode (set to "ON") OFF or to the interlace scan mode (set and the default setting. OFF Auto Set the type of sound signal which is not currently available is the default) Playback Parental Lock Pages 66-69 Disc Audio Dynamic Range Control PCM Dolby Digital Disc Menu Language Audio Language Subtitle Language Angle Icon Still Mode Display Page 70 OSD Language Screen Saver General Setting Video Progressive Scan Pages 71-72 Contents OFF Set the parental...
... time before the screen saver starts. 10minutes 15minutes 30miniutes ON Set to the progressive scan mode (set to "ON") OFF or to the interlace scan mode (set and the default setting. OFF Auto Set the type of sound signal which is not currently available is the default) Playback Parental Lock Pages 66-69 Disc Audio Dynamic Range Control PCM Dolby Digital Disc Menu Language Audio Language Subtitle Language Angle Icon Still Mode Display Page 70 OSD Language Screen Saver General Setting Video Progressive Scan Pages 71-72 Contents OFF Set the parental...

Owners Manual
Page 74
...connect wPirtohgcreosmspivoTenVSencAtasnvpiedceto cable. Recording Select Video Clock ON ReNsOeTt EAl:l OFF If there is no picture or picture is compatible with the higher definition images than 3 seconds during DVD playback. • When selecting "No" or not pressing any buttons on the top and bottom of what you with the progressive scan system. General Setting Playback Display Video Recording Clock Reset All Progressive Scan TV Aspect TV Aspect Video Input 4:3 Letter Box 4:3 Pan & Scan 16:9 Wide 2) Use [{ / B] to select a setting, then press [OK]. General Setting...
...connect wPirtohgcreosmspivoTenVSencAtasnvpiedceto cable. Recording Select Video Clock ON ReNsOeTt EAl:l OFF If there is no picture or picture is compatible with the higher definition images than 3 seconds during DVD playback. • When selecting "No" or not pressing any buttons on the top and bottom of what you with the progressive scan system. General Setting Playback Display Video Recording Clock Reset All Progressive Scan TV Aspect TV Aspect Video Input 4:3 Letter Box 4:3 Pan & Scan 16:9 Wide 2) Use [{ / B] to select a setting, then press [OK]. General Setting...
Owners Manual
Page 76
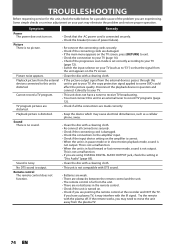
... problem and restore proper operation. Sound There is noisy. Playback picture from the external devices connected to record TV programs (page 12). • Check if all connections securely. • Check if the connecting cord is not output. No DTS sound is distorted. If you may interfere with the IR signal. If the remote works, you have a tuner to receive TV broadcasting. • You must connect this unit to an external tuner to this unit is output...
... problem and restore proper operation. Sound There is noisy. Playback picture from the external devices connected to record TV programs (page 12). • Check if all connections securely. • Check if the connecting cord is not output. No DTS sound is distorted. If you may interfere with the IR signal. If the remote works, you have a tuner to receive TV broadcasting. • You must connect this unit to an external tuner to this unit is output...
Owners Manual
Page 77
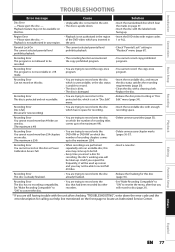
... not finalized. Discs recorded on this unit cannot be played back on another setting that has priority (page 27). • Disc space was a power failure during recording. Some functions such as the disc contains a multi-angle portion. than 30 seconds. Refer to input disc data before recording stops. Reset the clock (page 19). • The program contains copy protection signals that restricts copying. • The timer setting overlapped with the disc. Remove the disc and leave the unit turned...
... not finalized. Discs recorded on this unit cannot be played back on another setting that has priority (page 27). • Disc space was a power failure during recording. Some functions such as the disc contains a multi-angle portion. than 30 seconds. Refer to input disc data before recording stops. Reset the clock (page 19). • The program contains copy protection signals that restricts copying. • The timer setting overlapped with the disc. Remove the disc and leave the unit turned...
Owners Manual
Page 79
... current selected parental level prohibits playback. • Check "Parental Lock" setting in the unit. • The disc is not authorized in +VR mode. • You are trying to record on the front page to rewrite the menu, after that you are trying to record onto the disc which the number of recording titles comes up . Recording Error This disc is set in "Disc Edit" menu. • Release the disc protect setting in the unit. • Insert the DVD-video with region codes...
... current selected parental level prohibits playback. • Check "Parental Lock" setting in the unit. • The disc is not authorized in +VR mode. • You are trying to record on the front page to rewrite the menu, after that you are trying to record onto the disc which the number of recording titles comes up . Recording Error This disc is set in "Disc Edit" menu. • Release the disc protect setting in the unit. • Insert the DVD-video with region codes...


