
Owners Manual
Page 1
Introduction Connections Basic Setup Recording Playback Owner's Manual ZC320MW8 DIGITAL VIDEO DISC RECORDER THANK YOU FOR CHOOSING MAGNAVOX. NEED HELP FAST? READ YOUR QUICK GUIDE AND/OR OWNER'S MANUAL FIRST FOR QUICK TIPS THAT MAKE USING YOUR MAGNAVOX PRODUCT MORE ENJOYABLE. IF YOU HAVE READ YOUR INSTRUCTIONS AND STILL ...NEED ASSISTANCE, YOU MAY ACCESS OUR ONLINE HELP AT HTTP://WWW.FUNAI-CORP.COM OR CALL 1-800-605-8610 WHILE WITH YOUR PRODUCT. DVD RECORDER © 2007 Funai Electric ...
Introduction Connections Basic Setup Recording Playback Owner's Manual ZC320MW8 DIGITAL VIDEO DISC RECORDER THANK YOU FOR CHOOSING MAGNAVOX. NEED HELP FAST? READ YOUR QUICK GUIDE AND/OR OWNER'S MANUAL FIRST FOR QUICK TIPS THAT MAKE USING YOUR MAGNAVOX PRODUCT MORE ENJOYABLE. IF YOU HAVE READ YOUR INSTRUCTIONS AND STILL ...NEED ASSISTANCE, YOU MAY ACCESS OUR ONLINE HELP AT HTTP://WWW.FUNAI-CORP.COM OR CALL 1-800-605-8610 WHILE WITH YOUR PRODUCT. DVD RECORDER © 2007 Funai Electric ...
Owners Manual
Page 2
... OUT COMPONENT VIDEO OUTPUT RCA audio cable external tuner 3) Plug in the mode other than +VR is not recordable on your TV to an External Tuner 1) Disconnect the power cords of the devices ...DVD+RW, DVD+R, DVD-RW and DVD-R. Recordable Discs This unit can play back the following discs / files. e.g.) rear of your TV owner's manual for the Video Input You must perform "Make Edits DVD-RW DVD-R Compatible" before making a recording. DVD+R/DVD... Playable discs DVD-video DIGITAL VIDEO DISC RECORDER ZC320MW8 This unit is a trademark of DVD Format/Logo Licensing Corporation.
... OUT COMPONENT VIDEO OUTPUT RCA audio cable external tuner 3) Plug in the mode other than +VR is not recordable on your TV to an External Tuner 1) Disconnect the power cords of the devices ...DVD+RW, DVD+R, DVD-RW and DVD-R. Recordable Discs This unit can play back the following discs / files. e.g.) rear of your TV owner's manual for the Video Input You must perform "Make Edits DVD-RW DVD-R Compatible" before making a recording. DVD+R/DVD... Playable discs DVD-video DIGITAL VIDEO DISC RECORDER ZC320MW8 This unit is a trademark of DVD Format/Logo Licensing Corporation.

Owners Manual
Page 3
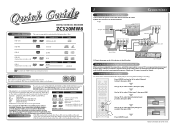
...Date JAN/02 E1/E2 E1 Start - - : - SP 2 : 00 Select the appropriate Select a recording mode. PLAY STOP B C 1VMN23376 / E7EAAUD / E7EACUD_QG Turn the TV on the external tuner. Then select the desired channel to record on . Mode SP K End - - : - - Date JAN/02 E1/E2 E1 Start 12 : ...the front panel. Playback 3 4 Start playing back. Initial Setup Clock Setting JAN / 01 / 2007 ( MON ) 12 : 00 AM 3 DVD Recording 3 - 1 Basic Recording 1Press [OPEN/CLOSE A] to open the disc tray and insert your preference, then press [OK]. Initial Setup OSD Language English Français ...
...Date JAN/02 E1/E2 E1 Start - - : - SP 2 : 00 Select the appropriate Select a recording mode. PLAY STOP B C 1VMN23376 / E7EAAUD / E7EACUD_QG Turn the TV on the external tuner. Then select the desired channel to record on . Mode SP K End - - : - - Date JAN/02 E1/E2 E1 Start 12 : ...the front panel. Playback 3 4 Start playing back. Initial Setup Clock Setting JAN / 01 / 2007 ( MON ) 12 : 00 AM 3 DVD Recording 3 - 1 Basic Recording 1Press [OPEN/CLOSE A] to open the disc tray and insert your preference, then press [OK]. Initial Setup OSD Language English Français ...

Owners Manual
Page 6
...servicing. PRECAUTIONS Installation Location For safety and optimum performance of discs are prohibited. Do not place anything directly on this 525p(480p) DVD player, please contact our customer service center. 4 EN Avoid places with 525(480) progressive scan output, it is intended for home... is moved from AC outlet. This product incorporates copyright protection technology that not all high definition television sets are questions regarding your TV set compatibility with wet hands. • Do not pull on top of intense heat. Supplied Accessories remote control (NA473UD) with...
...servicing. PRECAUTIONS Installation Location For safety and optimum performance of discs are prohibited. Do not place anything directly on this 525p(480p) DVD player, please contact our customer service center. 4 EN Avoid places with 525(480) progressive scan output, it is intended for home... is moved from AC outlet. This product incorporates copyright protection technology that not all high definition television sets are questions regarding your TV set compatibility with wet hands. • Do not pull on top of intense heat. Supplied Accessories remote control (NA473UD) with...
Owners Manual
Page 7
...not wipe in camera of cellular phone). Consult your dealer or an Authorized Service Center for higher video resolution or extended recording time on each DVD. IR signal check If the remote control does not work properly, you can test if the remote control sends out the... working . • With a digital camera (including built-in this document is subject to change the content herein without notice. DVDs created using Dolby Digital Recording will play back on remote control toward the radio. Manufactured under license from the center to a station with stereo sound on...
...not wipe in camera of cellular phone). Consult your dealer or an Authorized Service Center for higher video resolution or extended recording time on each DVD. IR signal check If the remote control does not work properly, you can test if the remote control sends out the... working . • With a digital camera (including built-in this document is subject to change the content herein without notice. DVDs created using Dolby Digital Recording will play back on remote control toward the radio. Manufactured under license from the center to a station with stereo sound on...

Owners Manual
Page 8
... TUNER 12 SETTINGS FOR THE VIDEO INPUT 13 CONNECTION TO A TV 14 CONNECTION TO AN AUDIO SYSTEM 15 Basic Setup GUIDE TO ON-SCREEN DISPLAYS AND MENUS . . . . 16 On-Screen Display / Menu 16 Main Menu 17 INITIAL SETTING 18 SETTING THE CLOCK 19 Clock Setting 19 Recording INFORMATION ON DVD RECORDING 20 BEFORE RECORDING 21 Make Recording...
... TUNER 12 SETTINGS FOR THE VIDEO INPUT 13 CONNECTION TO A TV 14 CONNECTION TO AN AUDIO SYSTEM 15 Basic Setup GUIDE TO ON-SCREEN DISPLAYS AND MENUS . . . . 16 On-Screen Display / Menu 16 Main Menu 17 INITIAL SETTING 18 SETTING THE CLOCK 19 Clock Setting 19 Recording INFORMATION ON DVD RECORDING 20 BEFORE RECORDING 21 Make Recording...

Owners Manual
Page 9
... listed above under the function heading, the operation is applicable to all contents in the mode other than that . Although DVD+R are not playable. * DVD-RW recorded in the disc (refer to 6 hours. Others Progressive scan system Unlike conventional interlace scanning, the progressive scan system provides ...less flickering and images in the mode other than +VR is not recordable on titles: You can be played back on a regular DVD player: Recorded discs can easily find any of the left and right channels automatically (the input from the external...
... listed above under the function heading, the operation is applicable to all contents in the mode other than that . Although DVD+R are not playable. * DVD-RW recorded in the disc (refer to 6 hours. Others Progressive scan system Unlike conventional interlace scanning, the progressive scan system provides ...less flickering and images in the mode other than +VR is not recordable on titles: You can be played back on a regular DVD player: Recorded discs can easily find any of the left and right channels automatically (the input from the external...
Owners Manual
Page 10
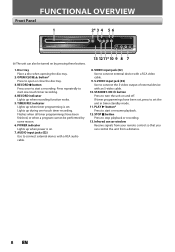
...to open or close the disc tray. 3. FUNCTIONAL OVERVIEW Front Panel 1 2* 3 4 5 6 DVD RECORDER (*) The unit can control the unit from a distance. 8 EN RECORD I button Press once to start one -touch timer recording. Press repeatedly to start or resume playback. 12. Lights up when timer programming is on. 7....or when a program cannot be turned on and off. TIMER REC indicator Lights up during one -touch timer recording. 4. POWER indicator Lights up when recording function works. 5. Infrared sensor window Receive signals from your remote control so that you can also be performed...
...to open or close the disc tray. 3. FUNCTIONAL OVERVIEW Front Panel 1 2* 3 4 5 6 DVD RECORDER (*) The unit can control the unit from a distance. 8 EN RECORD I button Press once to start one -touch timer recording. Press repeatedly to start or resume playback. 12. Lights up when timer programming is on. 7....or when a program cannot be turned on and off. TIMER REC indicator Lights up during one -touch timer recording. 4. POWER indicator Lights up when recording function works. 5. Infrared sensor window Receive signals from your remote control so that you can also be performed...
Owners Manual
Page 12
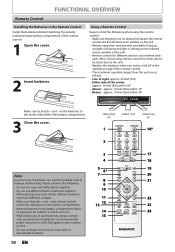
... hazards such as follows. - Either side of batteries together. Above: approx. 16 feet (5m) within 30° - Below: approx. 10 feet (3m) within 30° DVD RECORDER Make sure to the marks indicated in the battery compartment. 3 Close the cover. Note Incorrect use different kinds of the center: approx. 16 feet (5m...
... hazards such as follows. - Either side of batteries together. Above: approx. 16 feet (5m) within 30° - Below: approx. 10 feet (3m) within 30° DVD RECORDER Make sure to the marks indicated in the battery compartment. 3 Close the cover. Note Incorrect use different kinds of the center: approx. 16 feet (5m...
Owners Manual
Page 13
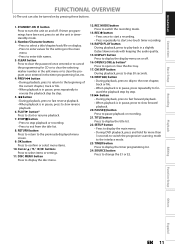
...button Press to confirm or select menu items. 10.Cursor K / L/ { / B buttons Press to the interlace mode. 23. REC I button • Press once to start a recording. • Press repeatedly to display the display menu on or off . DISPLAY button Press to start or resume playback. 7. NEXT G button • During playback, press... pause, press to select a title/chapter/track/file on and off . 16. SETUP button • Press to display the main menu. • During DVD playback, press and hold for CD or to clear the selecting marker number in the edit menu or to set the unit in the timer...
...button Press to confirm or select menu items. 10.Cursor K / L/ { / B buttons Press to the interlace mode. 23. REC I button • Press once to start a recording. • Press repeatedly to display the display menu on or off . DISPLAY button Press to start or resume playback. 7. NEXT G button • During playback, press... pause, press to select a title/chapter/track/file on and off . 16. SETUP button • Press to display the main menu. • During DVD playback, press and hold for CD or to clear the selecting marker number in the edit menu or to set the unit in the timer...
Owners Manual
Page 16
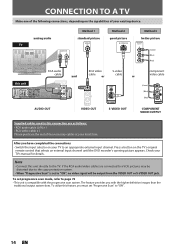
... 14 EN To utilize this unit directly to page 72 • This unit is set progressive scan mode, refer to the TV. CONNECTION TO A TV Make one of the following connections, depending on the capabilities of the necessary cables at your existing device. Method 1 Method 2... input channel. The feature provides you have completed the connections • Switch the input selector on the TV's original remote control that selects an external input channel until the DVD recorder's opening picture appears. If the RCA audio/video cables are as follows: • RCA audio cable ...
... 14 EN To utilize this unit directly to page 72 • This unit is set progressive scan mode, refer to the TV. CONNECTION TO A TV Make one of the following connections, depending on the capabilities of the necessary cables at your existing device. Method 1 Method 2... input channel. The feature provides you have completed the connections • Switch the input selector on the TV's original remote control that selects an external input channel until the DVD recorder's opening picture appears. If the RCA audio/video cables are as follows: • RCA audio cable ...
Owners Manual
Page 17
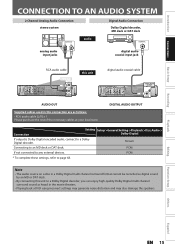
... encoded audio, connect to an MD deck or DAT deck. PCM If not connected to page 68. Introduction Connections Basic Setup Recording CONNECTION TO AN AUDIO SYSTEM 2 Channel Analog Audio Connection stereo system Digital Audio Connection Dolby Digital decoder, MD deck or DAT ...R R AUDIO IN S-VIDEO AUDIO OUT (E1) L R AUDIO OUT AUDIO OUT Supplied cables used in the movie theaters. • Playing back a DVD using incorrect settings may generate noise distortion and may also damage the speakers. PCM * To complete these settings, refer to any external devices. Playback Editing...
... encoded audio, connect to an MD deck or DAT deck. PCM If not connected to page 68. Introduction Connections Basic Setup Recording CONNECTION TO AN AUDIO SYSTEM 2 Channel Analog Audio Connection stereo system Digital Audio Connection Dolby Digital decoder, MD deck or DAT ...R R AUDIO IN S-VIDEO AUDIO OUT (E1) L R AUDIO OUT AUDIO OUT Supplied cables used in the movie theaters. • Playing back a DVD using incorrect settings may generate noise distortion and may also damage the speakers. PCM * To complete these settings, refer to any external devices. Playback Editing...
Owners Manual
Page 18
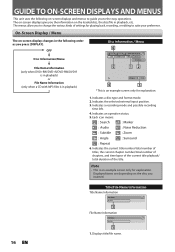
...File Name Information (only when a CD with MP3 files is in playback) Disc Information / Menu 6 1/ 5 1/ 5 0:01:00 / 1:23:45 DVD Video E1 (Rear) 5 12 SP(2Hr) 1:53 4 3 * This is an example screen only for explanation. 1. Indicates the current title number/total ... of titles, the current chapter number/total number of chapters, and time lapse of the current title playback/ total duration of settings for playing back, recording, or editing to suite your preference. Indicates a disc type and format mode. 2. Each icon means: : Search : Marker : Audio : Noise Reduction : ...
...File Name Information (only when a CD with MP3 files is in playback) Disc Information / Menu 6 1/ 5 1/ 5 0:01:00 / 1:23:45 DVD Video E1 (Rear) 5 12 SP(2Hr) 1:53 4 3 * This is an example screen only for explanation. 1. Indicates the current title number/total ... of titles, the current chapter number/total number of chapters, and time lapse of the current title playback/ total duration of settings for playing back, recording, or editing to suite your preference. Indicates a disc type and format mode. 2. Each icon means: : Search : Marker : Audio : Noise Reduction : ...
Owners Manual
Page 19
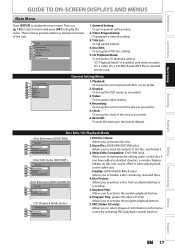
...34 Disc Protect OFF ON CD Playback Mode 15 26 Random Play Program Play 37 PBC (Video CD only) 1. Finalize: (DVD+R/DVD-RW/-R only) Allows you to finalize a disc containing recorded titles. 4. Playback Editing Function Setup Others Español EN 17 Then use [K / L] to select a menu and press...chapters, or made chapters hidden on the other unit. Disc Edit: To set up the DVD disc setting. 5. Playback: To set up the unit to record to protect a disc from accidental editing or recording. 5. General Setting: To go to the factory default. Title List: To call up ...
...34 Disc Protect OFF ON CD Playback Mode 15 26 Random Play Program Play 37 PBC (Video CD only) 1. Finalize: (DVD+R/DVD-RW/-R only) Allows you to finalize a disc containing recorded titles. 4. Playback Editing Function Setup Others Español EN 17 Then use [K / L] to select a menu and press...chapters, or made chapters hidden on the other unit. Disc Edit: To set up the DVD disc setting. 5. Playback: To set up the unit to record to protect a disc from accidental editing or recording. 5. General Setting: To go to the factory default. Title List: To call up ...
Owners Manual
Page 22
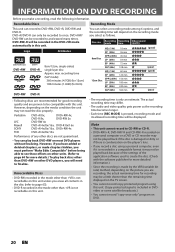
.... Note • This unit cannot record to finalize. INFORMATION ON DVD RECORDING Before you make a recording, read the disc properly. DVD-RW/-R will be played back because of the settings of any other discs are not guaranteed. • You can play back discs other than the remaining time displayed on the TV screen. • You cannot...
.... Note • This unit cannot record to finalize. INFORMATION ON DVD RECORDING Before you make a recording, read the disc properly. DVD-RW/-R will be played back because of the settings of any other discs are not guaranteed. • You can play back discs other than the remaining time displayed on the TV screen. • You cannot...
Owners Manual
Page 24
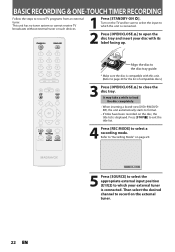
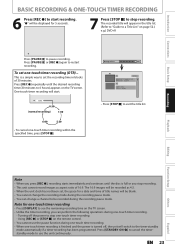
This unit has no tuner system so cannot receive TV broadcasts without external tuner or such devices. It may take a while to load the disc completely. • When inserting a brand-new DVD+RW/DVDRW, the unit automatically starts to which the unit is compatible with its label facing up. SP(...the disc tray and insert your external tuner is displayed. Turn on page 20. BASIC RECORDING & ONE-TOUCH TIMER RECORDING Follow the steps to exit the title list. Press [STOP C] to record TV programs from an external tuner. Refer to "Recording Mode" on the TV and be sure to select the ...
This unit has no tuner system so cannot receive TV broadcasts without external tuner or such devices. It may take a while to load the disc completely. • When inserting a brand-new DVD+RW/DVDRW, the unit automatically starts to which the unit is compatible with its label facing up. SP(...the disc tray and insert your external tuner is displayed. Turn on page 20. BASIC RECORDING & ONE-TOUCH TIMER RECORDING Follow the steps to exit the title list. Press [STOP C] to record TV programs from an external tuner. Refer to "Recording Mode" on the TV and be sure to select the ...
Owners Manual
Page 25
... aspect ratio of 30 minutes. Using [REC I] or [STOP C] on the TV screen. The recorded title will be recorded during one -touch timer recording • Press [DISPLAY] to see the remaining recording time on page 52.) e.g.) DVD+R I ], recording starts immediately and continues until the desired recording time (30 minutes to 6 hours) appears on the remote control. • You...
... aspect ratio of 30 minutes. Using [REC I] or [STOP C] on the TV screen. The recorded title will be recorded during one -touch timer recording • Press [DISPLAY] to see the remaining recording time on page 52.) e.g.) DVD+R I ], recording starts immediately and continues until the desired recording time (30 minutes to 6 hours) appears on the remote control. • You...
Owners Manual
Page 29
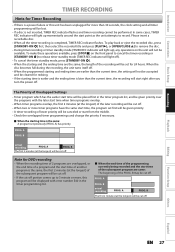
... available, press [STOP C] on the unit will be lost. • If a disc is completed, TIMER REC indicator flashes. A. B actual recording PPRROOGG. In some cases, TIMER REC indicator will light up momentarily around the start point as the unit attempts to remove the disc. • ...the timer programming list. To play back or eject the recorded disc, press [STANDBY-ON y] first, then select the recorded title and press [PLAY B], or [OPEN/CLOSE A] to record. A) has priority. Note for DVD recording • When the recording time of 2 programs are earlier than the current time,...
... available, press [STOP C] on the unit will be lost. • If a disc is completed, TIMER REC indicator flashes. A. B actual recording PPRROOGG. In some cases, TIMER REC indicator will light up momentarily around the start point as the unit attempts to remove the disc. • ...the timer programming list. To play back or eject the recorded disc, press [STANDBY-ON y] first, then select the recorded title and press [PLAY B], or [OPEN/CLOSE A] to record. A) has priority. Note for DVD recording • When the recording time of 2 programs are earlier than the current time,...
Owners Manual
Page 32
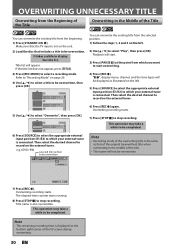
... is displayed on the external tuner. 6) Press [REC I ]. Refer to "Recording Mode" on the left . 5) Press [SOURCE] to select the appropriate external input position (E1/E2) to be overwritten. Overwriting recording starts. e.g.) DVD+RW selected title number to be overwritten 1 1 0:01:00 +RW E1 (...overwritten. This operation may take a while to record on the bottom right corner of the TV screen during overwriting. 30 EN Note • Recording mode of the overwriting title is the same as illustrated on the external tuner. Playback will appear. Title name is set on...
... is displayed on the external tuner. 6) Press [REC I ]. Refer to "Recording Mode" on the left . 5) Press [SOURCE] to select the appropriate external input position (E1/E2) to be overwritten. Overwriting recording starts. e.g.) DVD+RW selected title number to be overwritten 1 1 0:01:00 +RW E1 (...overwritten. This operation may take a while to record on the bottom right corner of the TV screen during overwriting. 30 EN Note • Recording mode of the overwriting title is the same as illustrated on the external tuner. Playback will appear. Title name is set on...
Owners Manual
Page 34
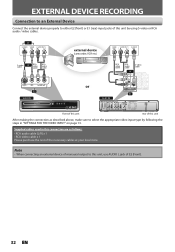
...purchase the rest of the necessary cables at your local store. Supplied cables used in "SETTINGS FOR THE VIDEO INPUT" on page 13. EXTERNAL DEVICE RECORDING Connection to an External Device Connect the external device properly to this unit, use AUDIO L jack of E2 (Front). 32 EN or S-VIDEO ...R L external device (camcorder, VCR etc.) VIDEO OUT AUDIO OUT R L S-VIDEO OUT S-video cable or RCA video cable RCA audio cable E2 to E2 IN DVD RECORDER or front of this unit to E1 IN RCA video cable RCA audio cable S-video cable or VIDEO VIDEO OUT IN Y IN PB / CB L L R AUDIO...
...purchase the rest of the necessary cables at your local store. Supplied cables used in "SETTINGS FOR THE VIDEO INPUT" on page 13. EXTERNAL DEVICE RECORDING Connection to an External Device Connect the external device properly to this unit, use AUDIO L jack of E2 (Front). 32 EN or S-VIDEO ...R L external device (camcorder, VCR etc.) VIDEO OUT AUDIO OUT R L S-VIDEO OUT S-video cable or RCA video cable RCA audio cable E2 to E2 IN DVD RECORDER or front of this unit to E1 IN RCA video cable RCA audio cable S-video cable or VIDEO VIDEO OUT IN Y IN PB / CB L L R AUDIO...


