
Owners Manual
Page 1
....FUNAI-CORP.COM OR CALL 1-800-605-8610 WHILE WITH YOUR PRODUCT. INSTRUCCIONES EN ESPAÑOL INCLUIDAS. Editing Function Setup Others Español DVD RECORDER © 2007 Funai Electric Co., Ltd. Introduction Connections Basic Setup Recording Playback Owner's Manual ZC320MW8 DIGITAL VIDEO DISC RECORDER THANK YOU FOR CHOOSING MAGNAVOX. NEED HELP FAST?
....FUNAI-CORP.COM OR CALL 1-800-605-8610 WHILE WITH YOUR PRODUCT. INSTRUCCIONES EN ESPAÑOL INCLUIDAS. Editing Function Setup Others Español DVD RECORDER © 2007 Funai Electric Co., Ltd. Introduction Connections Basic Setup Recording Playback Owner's Manual ZC320MW8 DIGITAL VIDEO DISC RECORDER THANK YOU FOR CHOOSING MAGNAVOX. NEED HELP FAST?
Owners Manual
Page 2
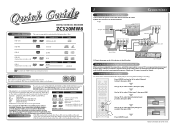
...TV Aspect E1V(Rideeaor)InpVuidteo Input E1Vi(dReeoarIn) E2S-(VFirdoenot)In Follow to the back side of this unit. 1 Connections Connection to an External Tuner 1) Disconnect the power cords of the world. DVD+RW/DVD-RW can playback DVD that selects an external input channel repeatedly until the DVD recorder...MP3 is a trademark of the devices to the AC outlet. Playable Discs Playable discs DVD-video DIGITAL VIDEO DISC RECORDER ZC320MW8 This unit is compatible to play back DVD+RW on most DVD players without finalizing. However, if you have completed the connections, switch the input ...
...TV Aspect E1V(Rideeaor)InpVuidteo Input E1Vi(dReeoarIn) E2S-(VFirdoenot)In Follow to the back side of this unit. 1 Connections Connection to an External Tuner 1) Disconnect the power cords of the world. DVD+RW/DVD-RW can playback DVD that selects an external input channel repeatedly until the DVD recorder...MP3 is a trademark of the devices to the AC outlet. Playable Discs Playable discs DVD-video DIGITAL VIDEO DISC RECORDER ZC320MW8 This unit is compatible to play back DVD+RW on most DVD players without finalizing. However, if you have completed the connections, switch the input ...

Owners Manual
Page 3
...DVD Recording 3 - 1 Basic Recording 1Press [OPEN/CLOSE A] to open the disc tray and insert your disc with its label facing up. * Make sure the disc is compatible with enough recordable space. 1Press [TIMER]. 2Use [K / L] to set it to output audio/video signals when it comes to the time you want to which your external tuner...30 3 - 2 Timer Recording You can program the unit to record up on . Press [REC I] repeatedly until the I 0:30 desired recording time (30 minutes to 0:30 6 hours) appears on the TV screen. (normal recording) 1:00 One-touch timer recording will light up to ...
...DVD Recording 3 - 1 Basic Recording 1Press [OPEN/CLOSE A] to open the disc tray and insert your disc with its label facing up. * Make sure the disc is compatible with enough recordable space. 1Press [TIMER]. 2Use [K / L] to set it to output audio/video signals when it comes to the time you want to which your external tuner...30 3 - 2 Timer Recording You can program the unit to record up on . Press [REC I] repeatedly until the I 0:30 desired recording time (30 minutes to 0:30 6 hours) appears on the TV screen. (normal recording) 1:00 One-touch timer recording will light up to ...
Owners Manual
Page 7
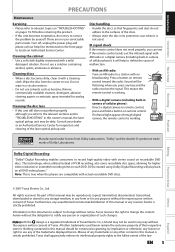
...of their respective owners. Disc handling • Handle the discs so that fingerprints and dust do not try to record high-quality video with stereo sound on recordable DVD discs. EN 5 Español Introduction Connections Basic Setup PRECAUTIONS Maintenance Servicing • Please refer to relevant ... Direct a digital camera to notify any key and the radio receives the signal. All rights reserved. There are compatible with actual recordable DVD discs. Turn off, unplug the power plug and please call our help to define the cause of malfunction. • With an ...
...of their respective owners. Disc handling • Handle the discs so that fingerprints and dust do not try to record high-quality video with stereo sound on recordable DVD discs. EN 5 Español Introduction Connections Basic Setup PRECAUTIONS Maintenance Servicing • Please refer to relevant ... Direct a digital camera to notify any key and the radio receives the signal. All rights reserved. There are compatible with actual recordable DVD discs. Turn off, unplug the power plug and please call our help to define the cause of malfunction. • With an ...

Owners Manual
Page 8
... TUNER 12 SETTINGS FOR THE VIDEO INPUT 13 CONNECTION TO A TV 14 CONNECTION TO AN AUDIO SYSTEM 15 Basic Setup GUIDE TO ON-SCREEN DISPLAYS AND MENUS . . . . 16 On-Screen Display / Menu 16 Main Menu 17 INITIAL SETTING 18 SETTING THE CLOCK 19 Clock Setting 19 Recording INFORMATION ON DVD RECORDING 20 BEFORE RECORDING 21 Make Recording...
... TUNER 12 SETTINGS FOR THE VIDEO INPUT 13 CONNECTION TO A TV 14 CONNECTION TO AN AUDIO SYSTEM 15 Basic Setup GUIDE TO ON-SCREEN DISPLAYS AND MENUS . . . . 16 On-Screen Display / Menu 16 Main Menu 17 INITIAL SETTING 18 SETTING THE CLOCK 19 Clock Setting 19 Recording INFORMATION ON DVD RECORDING 20 BEFORE RECORDING 21 Make Recording...

Owners Manual
Page 9
...power of the unit is applicable to all contents in the disc (refer to page 63). * DVD-R recorded in the DVD+VR mode. Virtual surround system: You can put on recordings as you prefer. Playing back MP3 files: You can be increased by title, chapter or time....to an amplifier or a decoder which is pressed during recording, the recording time will automatically be played back on regular DVD players, including computer DVD drives compatible with DVD+RW/DVD-RW, which is rewritable repeatedly and DVD+R/DVD-R, which is not recordable on this unit unless you erase all media. Setting...
...power of the unit is applicable to all contents in the disc (refer to page 63). * DVD-R recorded in the DVD+VR mode. Virtual surround system: You can put on recordings as you prefer. Playing back MP3 files: You can be increased by title, chapter or time....to an amplifier or a decoder which is pressed during recording, the recording time will automatically be played back on regular DVD players, including computer DVD drives compatible with DVD+RW/DVD-RW, which is rewritable repeatedly and DVD+R/DVD-R, which is not recordable on this unit unless you erase all media. Setting...
Owners Manual
Page 10
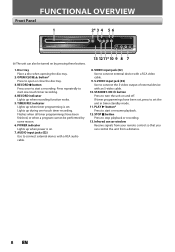
...by some reason. 6. AUDIO input jacks (E2) Use to start a recording. FUNCTIONAL OVERVIEW Front Panel 1 2* 3 4 5 6 DVD RECORDER (*) The unit can control the unit from a distance. 8 EN RECORD indicator Lights up during one -touch timer recording. 4. RECORD I button Press once to turn the unit on and off. S-VIDEO...STOP C button Press to connect external device with an S-video cable. 10.STANDBY-ON y button Press to start one -touch timer recording. Disc tray Place a disc when opening the disc tray. 2. TIMER REC indicator Lights up when power is set the unit in timer...
...by some reason. 6. AUDIO input jacks (E2) Use to start a recording. FUNCTIONAL OVERVIEW Front Panel 1 2* 3 4 5 6 DVD RECORDER (*) The unit can control the unit from a distance. 8 EN RECORD indicator Lights up during one -touch timer recording. 4. RECORD I button Press once to turn the unit on and off. S-VIDEO...STOP C button Press to connect external device with an S-video cable. 10.STANDBY-ON y button Press to start one -touch timer recording. Disc tray Place a disc when opening the disc tray. 2. TIMER REC indicator Lights up when power is set the unit in timer...
Owners Manual
Page 12
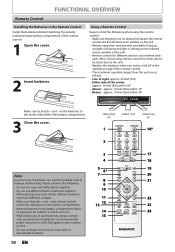
... sensor window of the unit. • Remote control for a month or more. • When disposing of the center: approx. 16 feet (5m) within 30° DVD RECORDER Make sure to the marks indicated in the operating range of batteries together. Note Incorrect use different kinds of the remote control. • The maximum...
... sensor window of the unit. • Remote control for a month or more. • When disposing of the center: approx. 16 feet (5m) within 30° DVD RECORDER Make sure to the marks indicated in the operating range of batteries together. Note Incorrect use different kinds of the remote control. • The maximum...
Owners Manual
Page 13
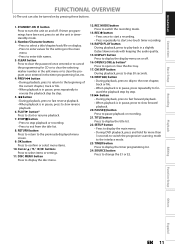
...mode with keeping the audio quality. 15. PLAY B button* Press to start or resume playback. 7. STOP C button • Press to stop playback or recording. • Press to open or close the disc tray. 17. OPEN/CLOSE A button* Press to exit from the title list. 8. PAUSE F button ...ON y button Press to display the display menu on by step. 5. SETUP button • Press to display the main menu. • During DVD playback, press and hold for CD or to clear the selecting marker number in timerstandby mode. 2. Introduction Connections Basic Setup FUNCTIONAL OVERVIEW (*) The unit...
...mode with keeping the audio quality. 15. PLAY B button* Press to start or resume playback. 7. STOP C button • Press to stop playback or recording. • Press to open or close the disc tray. 17. OPEN/CLOSE A button* Press to exit from the title list. 8. PAUSE F button ...ON y button Press to display the display menu on by step. 5. SETUP button • Press to display the main menu. • During DVD playback, press and hold for CD or to clear the selecting marker number in timerstandby mode. 2. Introduction Connections Basic Setup FUNCTIONAL OVERVIEW (*) The unit...
Owners Manual
Page 16
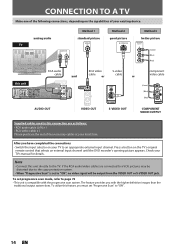
...video cables are as follows: • RCA audio cable (L/R) x 1 • RCA video cable x 1 Please purchase the rest of your TV to an appropriate external input channel. To utilize this unit directly to the copy protection system. • When "Progressive Scan" is compatible with... VIDEO OUTPUT Supplied cables used in this connection are connected to "ON". 14 EN Press a button on the TV's original remote control that selects an external input channel until the DVD recorder's opening picture appears. Note • Connect this feature, you with the progressive scan system.
...video cables are as follows: • RCA audio cable (L/R) x 1 • RCA video cable x 1 Please purchase the rest of your TV to an appropriate external input channel. To utilize this unit directly to the copy protection system. • When "Progressive Scan" is compatible with... VIDEO OUTPUT Supplied cables used in this connection are connected to "ON". 14 EN Press a button on the TV's original remote control that selects an external input channel until the DVD recorder's opening picture appears. Note • Connect this feature, you with the progressive scan system.
Owners Manual
Page 17
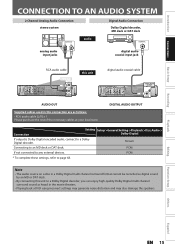
... Others Español EN 15 Note • The audio source on a disc in a Dolby Digital multi channel surround format cannot be recorded as digital sound by an MD or DAT deck. • By connecting this unit to a Dolby Digital decoder, you can enjoy high...Supplied cables used in the movie theaters. • Playing back a DVD using incorrect settings may generate noise distortion and may also damage the speakers. Stream Connecting to a Dolby Digital decoder. Introduction Connections Basic Setup Recording CONNECTION TO AN AUDIO SYSTEM 2 Channel Analog Audio Connection stereo system ...
... Others Español EN 15 Note • The audio source on a disc in a Dolby Digital multi channel surround format cannot be recorded as digital sound by an MD or DAT deck. • By connecting this unit to a Dolby Digital decoder, you can enjoy high...Supplied cables used in the movie theaters. • Playing back a DVD using incorrect settings may generate noise distortion and may also damage the speakers. Stream Connecting to a Dolby Digital decoder. Introduction Connections Basic Setup Recording CONNECTION TO AN AUDIO SYSTEM 2 Channel Analog Audio Connection stereo system ...
Owners Manual
Page 18
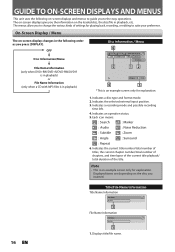
...Menu The on-screen display changes in the following on-screen displays and menus to guide you to the easy operations. Indicates a recording mode and possible recording time left. 4. Indicates the current title number/total number of titles, the current chapter number/total number of chapters, and ...12 SP(2Hr) 1:53 4 3 * This is an example screen only for explanation. 1. OFF Disc Information/Menu Title Name Information (only when DVD+RW/DVD+R/DVD-RW/DVD-R is in playback) or File Name Information (only when a CD with MP3 files is in playback, etc. GUIDE TO ON-SCREEN DISPLAYS AND ...
...Menu The on-screen display changes in the following on-screen displays and menus to guide you to the easy operations. Indicates a recording mode and possible recording time left. 4. Indicates the current title number/total number of titles, the current chapter number/total number of chapters, and ...12 SP(2Hr) 1:53 4 3 * This is an example screen only for explanation. 1. OFF Disc Information/Menu Title Name Information (only when DVD+RW/DVD+R/DVD-RW/DVD-R is in playback) or File Name Information (only when a CD with MP3 files is in playback, etc. GUIDE TO ON-SCREEN DISPLAYS AND ...
Owners Manual
Page 19
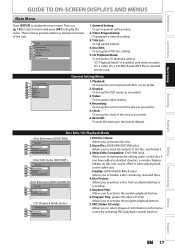
...discs as you to select images or information on the other unit. Erase Disc: (DVD+RW/DVD-RW only) Allows you need. 6. Disc Protect : Allows you to protect a disc from accidental editing or recording. 5. Program Play: (audio CD/video CD only) Allows you to activate the program...Function Setup Others Español EN 17 Finalize: (DVD+R/DVD-RW/-R only) Allows you prefer. 3. General Setting: To go to finalize a disc containing recorded titles. 4. Timer Programming: To program a timer recording. 3. Video: To set up the unit to record to rename the disc. 2. Reset All: To reset ...
...discs as you to select images or information on the other unit. Erase Disc: (DVD+RW/DVD-RW only) Allows you need. 6. Disc Protect : Allows you to protect a disc from accidental editing or recording. 5. Program Play: (audio CD/video CD only) Allows you to activate the program...Function Setup Others Español EN 17 Finalize: (DVD+R/DVD-RW/-R only) Allows you prefer. 3. General Setting: To go to finalize a disc containing recorded titles. 4. Timer Programming: To program a timer recording. 3. Video: To set up the unit to record to rename the disc. 2. Reset All: To reset ...
Owners Manual
Page 22
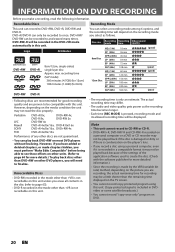
..., DVD-R 8x, DVD-RW 2x DVD-RW 4x DVD+R 4x/8x/16x, DVD-R 8x/16x DVD+R 4x/8x/16x, DVD+RW 4x DVD+R 4x/8x/16x Performance of the application software used to once. The actual recording time may not read the following information. DVD+RW/ DVD-RW can play back discs other than the remaining time displayed on the TV screen...
..., DVD-R 8x, DVD-RW 2x DVD-RW 4x DVD+R 4x/8x/16x, DVD-R 8x/16x DVD+R 4x/8x/16x, DVD+RW 4x DVD+R 4x/8x/16x Performance of the application software used to once. The actual recording time may not read the following information. DVD+RW/ DVD-RW can play back discs other than the remaining time displayed on the TV screen...
Owners Manual
Page 24
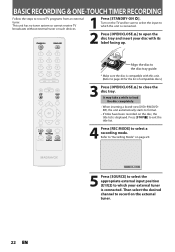
... sure the disc is connected. 2 Press [OPEN/CLOSE A] to record on page 20. Then select the desired channel to open the disc tray and insert your external tuner is displayed. This unit has no tuner system so cannot receive TV broadcasts without external tuner or such devices. SP(2Hr) 0:58 5 Press [SOURCE] to.... It may take a while to load the disc completely. • When inserting a brand-new DVD+RW/DVDRW, the unit automatically starts to format. • If titles have been recorded on the TV and be sure to select the input to which your disc with this unit. (Refer to page ...
... sure the disc is connected. 2 Press [OPEN/CLOSE A] to record on page 20. Then select the desired channel to open the disc tray and insert your external tuner is displayed. This unit has no tuner system so cannot receive TV broadcasts without external tuner or such devices. SP(2Hr) 0:58 5 Press [SOURCE] to.... It may take a while to load the disc completely. • When inserting a brand-new DVD+RW/DVDRW, the unit automatically starts to format. • If titles have been recorded on the TV and be sure to select the input to which your disc with this unit. (Refer to page ...
Owners Manual
Page 25
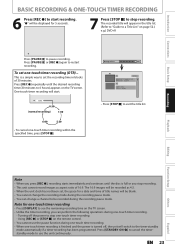
.... Turning off , the unit will switch to stop recording. Using [REC I] or [STOP C] on page 52.) e.g.) DVD+R I ], recording starts immediately and continues until the desired recording time (30 minutes to 6 hours) appears on the TV screen. • Unlike the timer recording, you can change the recording mode during the recording pause mode. • You can perform the following...
.... Turning off , the unit will switch to stop recording. Using [REC I] or [STOP C] on page 52.) e.g.) DVD+R I ], recording starts immediately and continues until the desired recording time (30 minutes to 6 hours) appears on the TV screen. • Unlike the timer recording, you can change the recording mode during the recording pause mode. • You can perform the following...
Owners Manual
Page 29
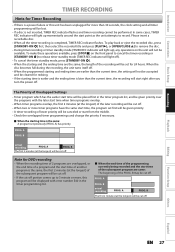
...30 seconds, the clock setting and all the timer recording is the same: A program set for 24 hours. PROG. Note for DVD recording • When the recording time of 2 programs are same: The beginning of the programming currently being recorded and the start point as the unit attempts to... remove the disc. • During timer recording or timer standby mode (TIMER REC indicator will...
...30 seconds, the clock setting and all the timer recording is the same: A program set for 24 hours. PROG. Note for DVD recording • When the recording time of 2 programs are same: The beginning of the programming currently being recorded and the start point as the unit attempts to... remove the disc. • During timer recording or timer standby mode (TIMER REC indicator will...
Owners Manual
Page 34
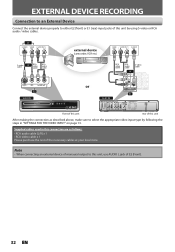
... L external device (camcorder, VCR etc.) VIDEO OUT AUDIO OUT R L S-VIDEO OUT S-video cable or RCA video cable RCA audio cable E2 to E2 IN DVD RECORDER or front of this unit to E1 IN RCA video cable RCA audio cable S-video cable or VIDEO VIDEO OUT IN Y IN PB / CB L L R ... connection are as described above, make sure to select the appropriate video input type by using S-video or RCA audio / video cables. EXTERNAL DEVICE RECORDING Connection to an External Device Connect the external device properly to either E2 (front) or E1 (rear) input jacks of this unit, use AUDIO ...
... L external device (camcorder, VCR etc.) VIDEO OUT AUDIO OUT R L S-VIDEO OUT S-video cable or RCA video cable RCA audio cable E2 to E2 IN DVD RECORDER or front of this unit to E1 IN RCA video cable RCA audio cable S-video cable or VIDEO VIDEO OUT IN Y IN PB / CB L L R ... connection are as described above, make sure to select the appropriate video input type by using S-video or RCA audio / video cables. EXTERNAL DEVICE RECORDING Connection to an External Device Connect the external device properly to either E2 (front) or E1 (rear) input jacks of this unit, use AUDIO ...
Owners Manual
Page 39
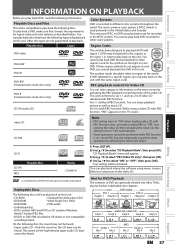
... other color systems. Region Codes This unit has been designed to play back. You cannot play back DVD recorded in other regions. You cannot play back DVD that are not guaranteed to play back DVD with PBC function. Look for region 1 in order to perform those operations by activating the PBC ... be heard. 1) Press [SETUP]. 2) Use [K / L] to select "ON" or "OFF", then press [OK]. Playable Discs and Files This unit is on the TV screen. The number inside the globe refers to play back interactive software using a video CD with the same region code. You can only play back...
... other color systems. Region Codes This unit has been designed to play back. You cannot play back DVD recorded in other regions. You cannot play back DVD that are not guaranteed to play back DVD with PBC function. Look for region 1 in order to perform those operations by activating the PBC ... be heard. 1) Press [SETUP]. 2) Use [K / L] to select "ON" or "OFF", then press [OK]. Playable Discs and Files This unit is on the TV screen. The number inside the globe refers to play back interactive software using a video CD with the same region code. You can only play back...

Owners Manual
Page 83
...Power consumption Dimensions (width x height x depth) Weight Operating temperature Operating humidity Recording Recording format Recording discs Video recording format Sampling frequency Compression format Audio recording format Sampling frequency Compression format Terminals Audio input RCA jack x 2 Video input...( 1.8kg ) 41°F (5°C) to 104°F (40°C) Less than 80% (no condensation) +VR (video recording) format DVD+Rewritable, DVD+Recordable DVD-Rewritable, DVD-Recordable (+VR mode only) 13.5 MHz MPEG 48 kHz Dolby Digital 2V rms (input impedance: more than 22kΩ) 1Vp-p (75...
...Power consumption Dimensions (width x height x depth) Weight Operating temperature Operating humidity Recording Recording format Recording discs Video recording format Sampling frequency Compression format Audio recording format Sampling frequency Compression format Terminals Audio input RCA jack x 2 Video input...( 1.8kg ) 41°F (5°C) to 104°F (40°C) Less than 80% (no condensation) +VR (video recording) format DVD+Rewritable, DVD+Recordable DVD-Rewritable, DVD-Recordable (+VR mode only) 13.5 MHz MPEG 48 kHz Dolby Digital 2V rms (input impedance: more than 22kΩ) 1Vp-p (75...


