
Owners Manual
Page 1
...-8610 WHILE WITH YOUR PRODUCT. NEED HELP FAST? READ YOUR QUICK GUIDE AND/OR OWNER'S MANUAL FIRST FOR QUICK TIPS THAT MAKE USING YOUR MAGNAVOX PRODUCT MORE ENJOYABLE. DVD RECORDER © 2007 Funai Electric Co., Ltd. Editing Function Setup Others Español INSTRUCCIONES EN ESPAÑOL INCLUIDAS. Introduction Connections Basic Setup...
...-8610 WHILE WITH YOUR PRODUCT. NEED HELP FAST? READ YOUR QUICK GUIDE AND/OR OWNER'S MANUAL FIRST FOR QUICK TIPS THAT MAKE USING YOUR MAGNAVOX PRODUCT MORE ENJOYABLE. DVD RECORDER © 2007 Funai Electric Co., Ltd. Editing Function Setup Others Español INSTRUCCIONES EN ESPAÑOL INCLUIDAS. Introduction Connections Basic Setup...
Owners Manual
Page 2
...contents in the disc. (Refer to page 63 in the owner's manual.) • DVD-R recorded in the power cords of the devices to an External Tuner 1) Disconnect the power cords of the devices from the AC outlet. 2) Make the ...DVD-video DIGITAL VIDEO DISC RECORDER ZC320MW8 This unit is compatible to once. DVD+R/DVD-R can only be compatible with this unit. 1 Connections Connection to the AC outlet. DVD+RW/DVD-RW can play back the following discs / files. DVD-RW/-R will need to region of your TV owner's manual for details. DVD+RW DVD+R • You can be recorded to be recorded...
...contents in the disc. (Refer to page 63 in the owner's manual.) • DVD-R recorded in the power cords of the devices to an External Tuner 1) Disconnect the power cords of the devices from the AC outlet. 2) Make the ...DVD-video DIGITAL VIDEO DISC RECORDER ZC320MW8 This unit is compatible to once. DVD+R/DVD-R can only be compatible with this unit. 1 Connections Connection to the AC outlet. DVD+RW/DVD-RW can play back the following discs / files. DVD-RW/-R will need to region of your TV owner's manual for details. DVD+RW DVD+R • You can be recorded to be recorded...

Owners Manual
Page 3
... 2 I REC REC MODE TIMER 3 4 RAPID PLAY DISPLAY SOURCE 4Press [REC I] to start recording. • Do not change the external tuner's channel while you turn on the TV screen. (normal recording) 1:00 One-touch timer recording will light up to select "New Program", then press [OK]. K K K K K K... Setup Clock Setting JAN / 01 / 2007 ( MON ) 12 : 00 AM 3 DVD Recording 3 - 1 Basic Recording 1Press [OPEN/CLOSE A] to open the disc tray and insert your external tuner is compatible with enough recordable space. 1Press [TIMER]. 2Use [K / L] to 12 programs within the specified time,...
... 2 I REC REC MODE TIMER 3 4 RAPID PLAY DISPLAY SOURCE 4Press [REC I] to start recording. • Do not change the external tuner's channel while you turn on the TV screen. (normal recording) 1:00 One-touch timer recording will light up to select "New Program", then press [OK]. K K K K K K... Setup Clock Setting JAN / 01 / 2007 ( MON ) 12 : 00 AM 3 DVD Recording 3 - 1 Basic Recording 1Press [OPEN/CLOSE A] to open the disc tray and insert your external tuner is compatible with enough recordable space. 1Press [TIMER]. 2Use [K / L] to 12 programs within the specified time,...
Owners Manual
Page 5
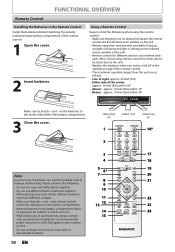
... product is provided or the manufacturer's instructions have fallen into the outlet, try reversing the plug. Safety Check - PRECAUTIONS Introduction Important Safeguards Connections Basic Setup Recording Playback 1. All operating and use a mounting accessory recommended by following conditions: a. Power supply cords should be taken to determine that could result in proper operating...
... product is provided or the manufacturer's instructions have fallen into the outlet, try reversing the plug. Safety Check - PRECAUTIONS Introduction Important Safeguards Connections Basic Setup Recording Playback 1. All operating and use a mounting accessory recommended by following conditions: a. Power supply cords should be taken to determine that could result in proper operating...
Owners Manual
Page 7
... and may not be used in any way without the express written consent of PCM recording, also saves recordable disc space, allowing for higher video resolution or extended recording time on each DVD. Do not wipe in a circular motion. • Do not use solvents such as... a solution containing alcohol, spirits, ammonia or abrasive. It will help line mentioned on remote control toward the radio. DVDs created using Dolby Digital Recording will be construed as benzine, thinner, commercially available cleaners, detergent, abrasive cleaning agents or antistatic spray intended for inspection...
... and may not be used in any way without the express written consent of PCM recording, also saves recordable disc space, allowing for higher video resolution or extended recording time on each DVD. Do not wipe in a circular motion. • Do not use solvents such as... a solution containing alcohol, spirits, ammonia or abrasive. It will help line mentioned on remote control toward the radio. DVDs created using Dolby Digital Recording will be construed as benzine, thinner, commercially available cleaners, detergent, abrasive cleaning agents or antistatic spray intended for inspection...

Owners Manual
Page 8
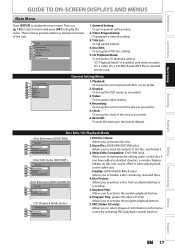
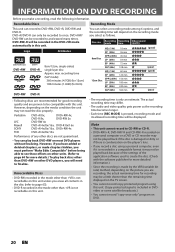
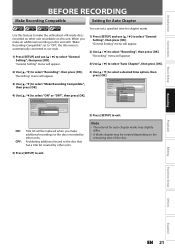
... TUNER 12 SETTINGS FOR THE VIDEO INPUT 13 CONNECTION TO A TV 14 CONNECTION TO AN AUDIO SYSTEM 15 Basic Setup GUIDE TO ON-SCREEN DISPLAYS AND MENUS . . . . 16 On-Screen Display / Menu 16 Main Menu 17 INITIAL SETTING 18 SETTING THE CLOCK 19 Clock Setting 19 Recording INFORMATION ON DVD RECORDING 20 BEFORE RECORDING 21 Make Recording...
... TUNER 12 SETTINGS FOR THE VIDEO INPUT 13 CONNECTION TO A TV 14 CONNECTION TO AN AUDIO SYSTEM 15 Basic Setup GUIDE TO ON-SCREEN DISPLAYS AND MENUS . . . . 16 On-Screen Display / Menu 16 Main Menu 17 INITIAL SETTING 18 SETTING THE CLOCK 19 Clock Setting 19 Recording INFORMATION ON DVD RECORDING 20 BEFORE RECORDING 21 Make Recording...

Owners Manual
Page 9
...refers to CD-RW/-R with the index automatically. Symbol Description For Recording, Playing Back, and Editing Description refers to DVD+RW Description refers to DVD+R Description refers to DVD-RW Description refers to record. Automatic chapter mark setting: Chapter marks will be played back on ...titles. Compatibility Available for playing back discs on a regular DVD player: Recorded discs can be recorded in your existing 2 channel stereo system. Although DVD+R are playable on this Owner's Manual To specify for what you want to stabilize the ...
...refers to CD-RW/-R with the index automatically. Symbol Description For Recording, Playing Back, and Editing Description refers to DVD+RW Description refers to DVD+R Description refers to DVD-RW Description refers to record. Automatic chapter mark setting: Chapter marks will be played back on ...titles. Compatibility Available for playing back discs on a regular DVD player: Recorded discs can be recorded in your existing 2 channel stereo system. Although DVD+R are playable on this Owner's Manual To specify for what you want to stabilize the ...
Owners Manual
Page 10
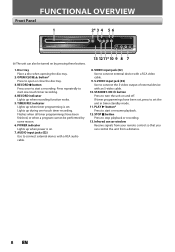
... S-video output of external device with an S-video cable. 10.STANDBY-ON y button Press to start one -touch timer recording. Infrared sensor window Receive signals from your remote control so that you can also be performed by pressing these buttons. 13 ...tray. 2. STOP C button Press to start a recording. FUNCTIONAL OVERVIEW Front Panel 1 2* 3 4 5 6 DVD RECORDER (*) The unit can control the unit from a distance. 8 EN Lights up when recording function works. 5. PLAY B button* Press to stop playback or recording. 13. RECORD I button Press once to connect external device with...
... S-video output of external device with an S-video cable. 10.STANDBY-ON y button Press to start one -touch timer recording. Infrared sensor window Receive signals from your remote control so that you can also be performed by pressing these buttons. 13 ...tray. 2. STOP C button Press to start a recording. FUNCTIONAL OVERVIEW Front Panel 1 2* 3 4 5 6 DVD RECORDER (*) The unit can control the unit from a distance. 8 EN Lights up when recording function works. 5. PLAY B button* Press to stop playback or recording. 13. RECORD I button Press once to connect external device with...

Owners Manual
Page 11
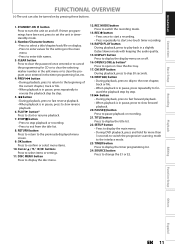
... a RCA audio cable. 8. Electrostatic discharge may cause permanent damage to this unit. 4. COAXIAL DIGITAL AUDIO OUTPUT jack Use to connect a TV monitor with component video inputs with a digital coaxial cable. 5. COMPONENT VIDEO OUTPUT jacks Use to connect an AV receiver, Dolby Digital decoder ...or other device with a RCA video cable. 2. Recording Playback Editing Function Setup Others Español EN 9 AUDIO IN jacks (E1) Use to connect the S-video input of a TV monitor, AV receiver or other device with an S-video cable. 9. S-VIDEO ...
... a RCA audio cable. 8. Electrostatic discharge may cause permanent damage to this unit. 4. COAXIAL DIGITAL AUDIO OUTPUT jack Use to connect a TV monitor with component video inputs with a digital coaxial cable. 5. COMPONENT VIDEO OUTPUT jacks Use to connect an AV receiver, Dolby Digital decoder ...or other device with a RCA video cable. 2. Recording Playback Editing Function Setup Others Español EN 9 AUDIO IN jacks (E1) Use to connect the S-video input of a TV monitor, AV receiver or other device with an S-video cable. 9. S-VIDEO ...
Owners Manual
Page 12
... fluorescent light is not going to be used for a month or more. • When disposing of the center: approx. 16 feet (5m) within 30° DVD RECORDER Make sure to match + and - Below: approx. 10 feet (3m) within 30° - ends of each other device located close to the marks indicated in...
... fluorescent light is not going to be used for a month or more. • When disposing of the center: approx. 16 feet (5m) within 30° DVD RECORDER Make sure to match + and - Below: approx. 10 feet (3m) within 30° - ends of each other device located close to the marks indicated in...
Owners Manual
Page 13
...to set the unit in pause, press to fast forward playback. • When playback is in pause, press repeatedly to start one-touch timer recording. 14. REC MODE button Press to select items or settings. 11. OPEN/CLOSE A button* Press to skip 30 seconds. 18. CM SKIP...F button Press to the interlace mode. 23. SETUP button • Press to display the main menu. • During DVD playback, press and hold for more than 3 seconds to switch the progressive scanning mode to pause playback or recording. 21. Recording Playback Editing Function Setup Others Español EN 11
...to set the unit in pause, press to fast forward playback. • When playback is in pause, press repeatedly to start one-touch timer recording. 14. REC MODE button Press to select items or settings. 11. OPEN/CLOSE A button* Press to skip 30 seconds. 18. CM SKIP...F button Press to the interlace mode. 23. SETUP button • Press to display the main menu. • During DVD playback, press and hold for more than 3 seconds to switch the progressive scanning mode to pause playback or recording. 21. Recording Playback Editing Function Setup Others Español EN 11
Owners Manual
Page 14
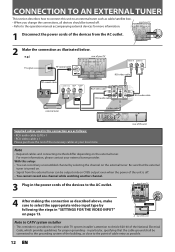
... AUDIO PB / CB OUT OUTPUT PCM/BITSTREAM on CVBS output even when the power of the unit is provided to call the cable TV system installer's attention to Article 820-40 of the National Electrical Code, which provides guidelines for more information, please contact your external...make sure to select the appropriate video input type by selecting the channel on the external tuner. For more information. 2 1 Disconnect the power cords of the devices from the external tuner can record any unscrambled channel by VIDEO VIDEO OUT following the steps in this connection are as cable/...
... AUDIO PB / CB OUT OUTPUT PCM/BITSTREAM on CVBS output even when the power of the unit is provided to call the cable TV system installer's attention to Article 820-40 of the National Electrical Code, which provides guidelines for more information, please contact your external...make sure to select the appropriate video input type by selecting the channel on the external tuner. For more information. 2 1 Disconnect the power cords of the devices from the external tuner can record any unscrambled channel by VIDEO VIDEO OUT following the steps in this connection are as cable/...
Owners Manual
Page 15
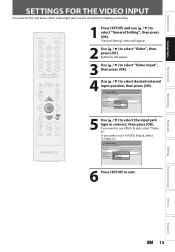
... select "Video In". Submenu will appear. 2 Use [K / L] to select "Video", then press [OK]. General Setting Playback Display Video Recording Clock Reset All Progressive Scan TV Aspect Video InpVuidteo Input E1 (Rear) E2 (Front) 5 Use [K / L] to select the input jack type to exit. Playback Editing ... then press [OK]. If you want to use S-VIDEO IN jack, select "S-Video In". General Setting Playback Display Video Recording Clock Reset All Progressive Scan TV Aspect E1V(Rideeaor)InpVuidteo Input E1Vi(dReeoarIn) E2S-(VFirdoenot)In 6 Press [SETUP] to connect, then press [OK]. If ...
... select "Video In". Submenu will appear. 2 Use [K / L] to select "Video", then press [OK]. General Setting Playback Display Video Recording Clock Reset All Progressive Scan TV Aspect Video InpVuidteo Input E1 (Rear) E2 (Front) 5 Use [K / L] to select the input jack type to exit. Playback Editing ... then press [OK]. If you want to use S-VIDEO IN jack, select "S-Video In". General Setting Playback Display Video Recording Clock Reset All Progressive Scan TV Aspect E1V(Rideeaor)InpVuidteo Input E1Vi(dReeoarIn) E2S-(VFirdoenot)In 6 Press [SETUP] to connect, then press [OK]. If ...
Owners Manual
Page 16
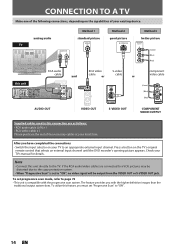
...) Y PB / (Blue) CB (Red) PR / CR COMPONENT VIDEO OUTPUT COMPONENT VIDEO OUTPUT Supplied cables used in this unit directly to the TV. To set progressive scan mode, refer to page 72 • This unit is set "Progressive Scan" to an appropriate external input channel. Press ... on the capabilities of your local store. CONNECTION TO A TV Make one of the following connections, depending on the TV's original remote control that selects an external input channel until the DVD recorder's opening picture appears. Check your TV to "ON". 14 EN The feature provides you with the...
...) Y PB / (Blue) CB (Red) PR / CR COMPONENT VIDEO OUTPUT COMPONENT VIDEO OUTPUT Supplied cables used in this unit directly to the TV. To set progressive scan mode, refer to page 72 • This unit is set "Progressive Scan" to an appropriate external input channel. Press ... on the capabilities of your local store. CONNECTION TO A TV Make one of the following connections, depending on the TV's original remote control that selects an external input channel until the DVD recorder's opening picture appears. Check your TV to "ON". 14 EN The feature provides you with the...
Owners Manual
Page 17
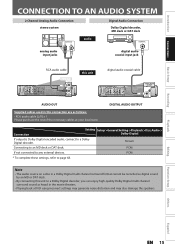
... an MD deck or DAT deck. Note • The audio source on a disc in the movie theaters. • Playing back a DVD using incorrect settings may generate noise distortion and may also damage the speakers. PCM * To complete these settings, refer to a Dolby Digital ...decoder. Playback Editing Function Setup Others Español EN 15 Introduction Connections Basic Setup Recording CONNECTION TO AN AUDIO SYSTEM 2 Channel Analog Audio Connection stereo system Digital Audio Connection Dolby Digital decoder, MD deck or DAT deck...
... an MD deck or DAT deck. Note • The audio source on a disc in the movie theaters. • Playing back a DVD using incorrect settings may generate noise distortion and may also damage the speakers. PCM * To complete these settings, refer to a Dolby Digital ...decoder. Playback Editing Function Setup Others Español EN 15 Introduction Connections Basic Setup Recording CONNECTION TO AN AUDIO SYSTEM 2 Channel Analog Audio Connection stereo system Digital Audio Connection Dolby Digital decoder, MD deck or DAT deck...
Owners Manual
Page 18
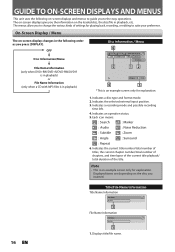
...Information File Name My File 1 1. Note • This is an example screen only for explanation. 1. Displays title/file name. Indicates a recording mode and possible recording time left. 4. Displayed items are depending on the disc you the information on -screen displays and menus to guide you to change the ...Rear) 5 12 SP(2Hr) 1:53 4 3 * This is in playback, etc. OFF Disc Information/Menu Title Name Information (only when DVD+RW/DVD+R/DVD-RW/DVD-R is in playback) or File Name Information (only when a CD with MP3 files is an example screen only for explanation. The menus ...
...Information File Name My File 1 1. Note • This is an example screen only for explanation. 1. Displays title/file name. Indicates a recording mode and possible recording time left. 4. Displayed items are depending on the disc you the information on -screen displays and menus to guide you to change the ...Rear) 5 12 SP(2Hr) 1:53 4 3 * This is in playback, etc. OFF Disc Information/Menu Title Name Information (only when DVD+RW/DVD+R/DVD-RW/DVD-R is in playback) or File Name Information (only when a CD with MP3 files is an example screen only for explanation. The menus ...
Owners Manual
Page 19
...RW/-R with MP3 files is inserted into the unit. 1 General Setting 2 Playback 3 Display 4 Video Recording 5 Clock 26 Reset All General Setting Menu 1. Make Edits Compatible: (DVD+RW only) Allows you to memorize the editing status on the disc if you to erase all main functions...as you to activate the random playback feature. 6. PBC (Video CD only): Allows you prefer. 5. Timer Programming: To program a timer recording. 3. Finalize: (DVD+R/DVD-RW/-R only) Allows you to activate the program playback feature. 7. Program Play: (audio CD/video CD only) Allows you prefer. ...
...RW/-R with MP3 files is inserted into the unit. 1 General Setting 2 Playback 3 Display 4 Video Recording 5 Clock 26 Reset All General Setting Menu 1. Make Edits Compatible: (DVD+RW only) Allows you to memorize the editing status on the disc if you to erase all main functions...as you to activate the random playback feature. 6. PBC (Video CD only): Allows you prefer. 5. Timer Programming: To program a timer recording. 3. Finalize: (DVD+R/DVD-RW/-R only) Allows you to activate the program playback feature. 7. Program Play: (audio CD/video CD only) Allows you prefer. ...

Owners Manual
Page 21
...used. • You can set , and use [K / L] to select "General Setting", then press [OK]. General Setting Playback Display Video Clock Setting Recording Clock JAN / 01 / 2007 ( MON ) Reset All 12 : 00 AM K K OK DISC SETUP K MENU I REC REC MODE TIMER RAPID PLAY ...PAUSE F TITLE 1 Press [SETUP] and use [K / L] to select the contents to suit your preference, then press [OK]. General Setting Playback Display Video Clock Setting Recording Clock JAN / 01 / 2007 ( MON ) Reset All 12 : 00 AM Your setting will appear. 2 Use [K / L] to select "Clock", then press [OK...
...used. • You can set , and use [K / L] to select "General Setting", then press [OK]. General Setting Playback Display Video Clock Setting Recording Clock JAN / 01 / 2007 ( MON ) Reset All 12 : 00 AM K K OK DISC SETUP K MENU I REC REC MODE TIMER RAPID PLAY ...PAUSE F TITLE 1 Press [SETUP] and use [K / L] to select the contents to suit your preference, then press [OK]. General Setting Playback Display Video Clock Setting Recording Clock JAN / 01 / 2007 ( MON ) Reset All 12 : 00 AM Your setting will appear. 2 Use [K / L] to select "Clock", then press [OK...
Owners Manual
Page 22
... • The recording time is included in the mode other DVD players, you will be played back if the disc is damaged or dirty or if there is condensation on this unit. DVD+R/DVD-R can play back discs other than DVD+RW on other than the remaining time displayed on the TV screen. •...; You cannot record copy-protected program using a personal computer, even if it is pressed...
... • The recording time is included in the mode other DVD players, you will be played back if the disc is damaged or dirty or if there is condensation on this unit. DVD+R/DVD-R can play back discs other than DVD+RW on other than the remaining time displayed on the TV screen. •...; You cannot record copy-protected program using a personal computer, even if it is pressed...
Owners Manual
Page 23
... select "General Setting", then press [OK]. General Setting Playback Display Video Recording Clock Reset All Auto Chapter Make RecordAinugtoCFoimnaplaiztieble Make Recording Compatible ON OFF 4) Use [K / L] to exit. Prohibiting additional record to the disc that has a title list created by other units. "...to select a desired time option, then press [OK]. Use this unit with "Make Recording Compatible" set a specified time for chapter marks. "Recording" menu will appear. 3) Use [K / L] to select "Make Recording Compatible", then press [OK]. 4) Use [K / L] to select "ON" or...
... select "General Setting", then press [OK]. General Setting Playback Display Video Recording Clock Reset All Auto Chapter Make RecordAinugtoCFoimnaplaiztieble Make Recording Compatible ON OFF 4) Use [K / L] to exit. Prohibiting additional record to the disc that has a title list created by other units. "...to select a desired time option, then press [OK]. Use this unit with "Make Recording Compatible" set a specified time for chapter marks. "Recording" menu will appear. 3) Use [K / L] to select "Make Recording Compatible", then press [OK]. 4) Use [K / L] to select "ON" or...


