
Owners Manual
Page 2
... [OK]. This unit can record to an External Tuner 1) Disconnect the power cords of your TV owner's manual for the Video Input You must perform "Make Edits DVD-RW DVD-R Compatible" before making a recording. Use [K / L] to connect, then press [OK]. Recordable Discs This unit can playback DVD that selects an external input channel repeatedly until the DVD recorder's opening picture appears. However...
... [OK]. This unit can record to an External Tuner 1) Disconnect the power cords of your TV owner's manual for the Video Input You must perform "Make Edits DVD-RW DVD-R Compatible" before making a recording. Use [K / L] to connect, then press [OK]. Recordable Discs This unit can playback DVD that selects an external input channel repeatedly until the DVD recorder's opening picture appears. However...

Owners Manual
Page 3
...press [OK]. TIMER REC indicator will start recording. • Do not change the external tuner's channel while you turn on the external tuner. SP 2 : 00 Select the appropriate Select a recording mode. Daily or weekly program recordings are recording. external input position (E1/ E2) to which your...Turn the TV on the front panel. OK DISC MENU SETUP Use [{ / B] to select an item to set the recording time in the owner's manual for the first time. Initial Setup Clock Setting JAN / 01 / 2007 ( MON ) 12 : 00 AM 3 DVD Recording 3 - 1 Basic Recording 1Press [...
...press [OK]. TIMER REC indicator will start recording. • Do not change the external tuner's channel while you turn on the external tuner. SP 2 : 00 Select the appropriate Select a recording mode. Daily or weekly program recordings are recording. external input position (E1/ E2) to which your...Turn the TV on the front panel. OK DISC MENU SETUP Use [{ / B] to select an item to set the recording time in the owner's manual for the first time. Initial Setup Clock Setting JAN / 01 / 2007 ( MON ) 12 : 00 AM 3 DVD Recording 3 - 1 Basic Recording 1Press [...

Owners Manual
Page 8
... EXTERNAL TUNER 12 SETTINGS FOR THE VIDEO INPUT 13 CONNECTION TO A TV 14 CONNECTION TO AN AUDIO SYSTEM 15 Basic Setup GUIDE TO ON-SCREEN DISPLAYS AND MENUS . . . . 16 On-Screen Display / Menu 16 Main Menu 17 INITIAL SETTING 18 SETTING THE CLOCK 19 Clock Setting 19 Recording INFORMATION ON DVD RECORDING 20 BEFORE RECORDING 21 Make Recording...
... EXTERNAL TUNER 12 SETTINGS FOR THE VIDEO INPUT 13 CONNECTION TO A TV 14 CONNECTION TO AN AUDIO SYSTEM 15 Basic Setup GUIDE TO ON-SCREEN DISPLAYS AND MENUS . . . . 16 On-Screen Display / Menu 16 Main Menu 17 INITIAL SETTING 18 SETTING THE CLOCK 19 Clock Setting 19 Recording INFORMATION ON DVD RECORDING 20 BEFORE RECORDING 21 Make Recording...

Owners Manual
Page 9
... chapters. Left channel stereo recording: This unit can record the sound of the left and right channels automatically (the input from playing back some chapters without finalization in most cases, it is recommended to finalize in order to page 63). * DVD-R recorded in the mode other than... +VR is available for recording once. Line through your convenience. The...
... chapters. Left channel stereo recording: This unit can record the sound of the left and right channels automatically (the input from playing back some chapters without finalization in most cases, it is recommended to finalize in order to page 63). * DVD-R recorded in the mode other than... +VR is available for recording once. Line through your convenience. The...
Owners Manual
Page 10
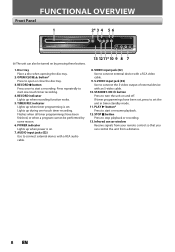
...Flashes when all timer programmings have been set, press to set . AUDIO input jacks (E2) Use to start one -touch timer recording. STOP C button Press to open or close the disc tray. 3. FUNCTIONAL OVERVIEW Front Panel 1 2* 3 4 5 6 DVD RECORDER (*) The unit can control the unit from your remote control so that... PLAY B button* Press to turn the unit on by some reason. 6. TIMER REC indicator Lights up during one -touch timer recording. 4. S-VIDEO input jack (E2) Use to connect the S-video output of external device with an S-video cable. 10.STANDBY-ON y button Press to start...
...Flashes when all timer programmings have been set, press to set . AUDIO input jacks (E2) Use to start one -touch timer recording. STOP C button Press to open or close the disc tray. 3. FUNCTIONAL OVERVIEW Front Panel 1 2* 3 4 5 6 DVD RECORDER (*) The unit can control the unit from your remote control so that... PLAY B button* Press to turn the unit on by some reason. 6. TIMER REC indicator Lights up during one -touch timer recording. 4. S-VIDEO input jack (E2) Use to connect the S-video output of external device with an S-video cable. 10.STANDBY-ON y button Press to start...

Owners Manual
Page 11
...VIDEO AUDIO OUT COMPONENT VIDEO OUTPUT COAXIAL S-VIDEO 9 87 6 54 1. COAXIAL DIGITAL AUDIO OUTPUT jack Use to connect a TV monitor, AV receiver or other device with a coaxial digital input jack with a RCA audio cable. 8. AUDIO OUT jacks Use to connect an AV receiver, Dolby Digital decoder or other.... 7. VIDEO IN jack (E1) Use to connect a TV monitor, AV receiver or other device with a RCA video cable. 2. S-VIDEO OUT jack Use to connect the S-video output of the jacks on the rear panel. Recording Playback Editing Function Setup Others Español EN 9 VIDEO...
...VIDEO AUDIO OUT COMPONENT VIDEO OUTPUT COAXIAL S-VIDEO 9 87 6 54 1. COAXIAL DIGITAL AUDIO OUTPUT jack Use to connect a TV monitor, AV receiver or other device with a coaxial digital input jack with a RCA audio cable. 8. AUDIO OUT jacks Use to connect an AV receiver, Dolby Digital decoder or other.... 7. VIDEO IN jack (E1) Use to connect a TV monitor, AV receiver or other device with a RCA video cable. 2. S-VIDEO OUT jack Use to connect the S-video output of the jacks on the rear panel. Recording Playback Editing Function Setup Others Español EN 9 VIDEO...
Owners Manual
Page 14
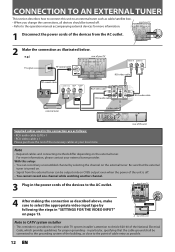
...power of the unit is provided to call the cable TV system installer's attention to Article 820-40 of the devices from the external tuner can record any unscrambled channel by VIDEO VIDEO OUT following the steps in "SETTINGS FOR THE VIDEO INPUT"IN IN L L Y DIGITAL AUDIO PB / ...CB OUT OUTPUT PCM/BITSTREAM on the external tuner. rear of your TV 4 After making the connection as illustrated ...
...power of the unit is provided to call the cable TV system installer's attention to Article 820-40 of the devices from the external tuner can record any unscrambled channel by VIDEO VIDEO OUT following the steps in "SETTINGS FOR THE VIDEO INPUT"IN IN L L Y DIGITAL AUDIO PB / ...CB OUT OUTPUT PCM/BITSTREAM on the external tuner. rear of your TV 4 After making the connection as illustrated ...
Owners Manual
Page 15
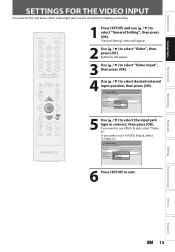
... / L] to connect, then press [OK]. General Setting Playback Display Video Recording Clock Reset All Progressive Scan TV Aspect E1V(Rideeaor)InpVuidteo Input E1Vi(dReeoarIn) E2S-(VFirdoenot)In 6 Press [SETUP] to select desired external input position, then press [OK]. If you want to use S-VIDEO IN jack,...VIDEO IN jack, select "Video In". General Setting Playback Display Video Recording Clock Reset All Progressive Scan TV Aspect Video InpVuidteo Input E1 (Rear) E2 (Front) 5 Use [K / L] to select the input jack type to select "General Setting", then press [OK]. Playback Editing...
... / L] to connect, then press [OK]. General Setting Playback Display Video Recording Clock Reset All Progressive Scan TV Aspect E1V(Rideeaor)InpVuidteo Input E1Vi(dReeoarIn) E2S-(VFirdoenot)In 6 Press [SETUP] to select desired external input position, then press [OK]. If you want to use S-VIDEO IN jack,...VIDEO IN jack, select "Video In". General Setting Playback Display Video Recording Clock Reset All Progressive Scan TV Aspect Video InpVuidteo Input E1 (Rear) E2 (Front) 5 Use [K / L] to select the input jack type to select "General Setting", then press [OK]. Playback Editing...
Owners Manual
Page 16
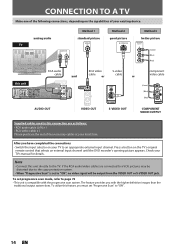
... one of the following connections, depending on the capabilities of the necessary cables at your TV to an appropriate external input channel. Press a button on your local store. The feature provides you with the progressive scan system. Note • Connect this... To set progressive scan mode, refer to page 72 • This unit is set "Progressive Scan" to the TV. To utilize this feature, you have completed the connections • Switch the input selector on the TV's original remote control that selects an external input channel until the DVD recorder's opening picture appears.
... one of the following connections, depending on the capabilities of the necessary cables at your TV to an appropriate external input channel. Press a button on your local store. The feature provides you with the progressive scan system. Note • Connect this... To set progressive scan mode, refer to page 72 • This unit is set "Progressive Scan" to the TV. To utilize this feature, you have completed the connections • Switch the input selector on the TV's original remote control that selects an external input channel until the DVD recorder's opening picture appears.
Owners Manual
Page 17
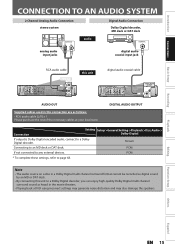
... these settings, refer to a Dolby Digital decoder. Note • The audio source on a disc in the movie theaters. • Playing back a DVD using incorrect settings may generate noise distortion and may also damage the speakers. Playback Editing Function Setup Others Español EN 15 digital audio... audio coaxial input jack RCA audio cable VIDEO OUT this unit VIDEO VIDEO OUT IN IN L L R R AUDIO IN S-VIDEO AUDIO OUT (E1) L R AUDIO OUT AUDIO OUT Supplied cables used in this connection are as heard in a Dolby Digital multi channel surround format cannot be recorded as digital...
... these settings, refer to a Dolby Digital decoder. Note • The audio source on a disc in the movie theaters. • Playing back a DVD using incorrect settings may generate noise distortion and may also damage the speakers. Playback Editing Function Setup Others Español EN 15 digital audio... audio coaxial input jack RCA audio cable VIDEO OUT this unit VIDEO VIDEO OUT IN IN L L R R AUDIO IN S-VIDEO AUDIO OUT (E1) L R AUDIO OUT AUDIO OUT Supplied cables used in this connection are as heard in a Dolby Digital multi channel surround format cannot be recorded as digital...
Owners Manual
Page 18
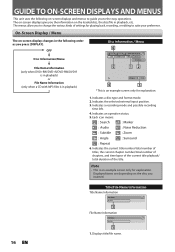
...Title Name My Title 1 File Name Information File Name My File 1 1. OFF Disc Information/Menu Title Name Information (only when DVD+RW/DVD+R/DVD-RW/DVD-R is in playback) or File Name Information (only when a CD with MP3 files is in playback) Disc Information / Menu ...45 DVD Video E1 (Rear) 5 12 SP(2Hr) 1:53 4 3 * This is an example screen only for explanation. Note • This is an example screen only for playing back, recording, or editing to suite your preference. Indicates the selected external input position. 3. Indicates a recording mode and possible recording time ...
...Title Name My Title 1 File Name Information File Name My File 1 1. OFF Disc Information/Menu Title Name Information (only when DVD+RW/DVD+R/DVD-RW/DVD-R is in playback) or File Name Information (only when a CD with MP3 files is in playback) Disc Information / Menu ...45 DVD Video E1 (Rear) 5 12 SP(2Hr) 1:53 4 3 * This is an example screen only for explanation. Note • This is an example screen only for playing back, recording, or editing to suite your preference. Indicates the selected external input position. 3. Indicates a recording mode and possible recording time ...
Owners Manual
Page 20
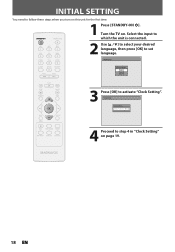
...D PAUSE F TITLE 3 Press [OK] to set language. INITIAL SETTING You need to follow these steps when you turn on page 19. 18 EN Select the input to which the unit is connected. 2 Use [K / L] to select your desired language, then press [OK] to activate "Clock Setting". Initial Setup K ...MODE TIMER RAPID PLAY DISPLAY SOURCE Clock Setting -- : -- -- 4 Proceed to step 4 in "Clock Setting" on this unit for the first time. Turn the TV on. STANDBY-ON y OPEN/CLOSE A .@/: ABC DEF 1 2 3 GHI JKL MNO 4 5 6 PQRS 7 TUV WXYZ 8 9 CLEAR SPACE 0 CM SKIP PREV H NEXT G ...
...D PAUSE F TITLE 3 Press [OK] to set language. INITIAL SETTING You need to follow these steps when you turn on page 19. 18 EN Select the input to which the unit is connected. 2 Use [K / L] to select your desired language, then press [OK] to activate "Clock Setting". Initial Setup K ...MODE TIMER RAPID PLAY DISPLAY SOURCE Clock Setting -- : -- -- 4 Proceed to step 4 in "Clock Setting" on this unit for the first time. Turn the TV on. STANDBY-ON y OPEN/CLOSE A .@/: ABC DEF 1 2 3 GHI JKL MNO 4 5 6 PQRS 7 TUV WXYZ 8 9 CLEAR SPACE 0 CM SKIP PREV H NEXT G ...
Owners Manual
Page 24
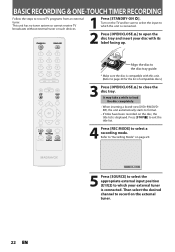
.... • If titles have been recorded on the TV and be sure to select the input to which your disc with this unit. (Refer to page 20 for the list of compatible discs.) PLAY E B STOP C RETURN K D PAUSE F TITLE K K OK DISC SETUP 3 Press [OPEN/CLOSE A] to record TV programs from an external tuner. K MENU I REC REC MODE...
.... • If titles have been recorded on the TV and be sure to select the input to which your disc with this unit. (Refer to page 20 for the list of compatible discs.) PLAY E B STOP C RETURN K D PAUSE F TITLE K K OK DISC SETUP 3 Press [OPEN/CLOSE A] to record TV programs from an external tuner. K MENU I REC REC MODE...
Owners Manual
Page 26
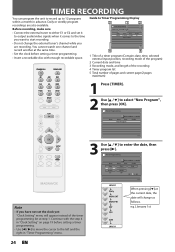
...K K K K K K K K OK DISC SETUP MENU I REC REC MODE TIMER RAPID PLAY DISPLAY SOURCE Note • If you are also available. Before recording, make sure • Connect the external tuner to either E1 or E2 and set the clock yet: "Clock Setting" menu will change the external...New Program E1/E2 E1 1/1 4 5 1 Title of a timer program (Contains date, time, selected external input position, recording mode of the program) 2 Current date and time 3 Recording mode, and length of the recording 4 Timer program list 5 Total number of the timer programming list at step 1. Mode SP SP 2 : 00...
...K K K K K K K K OK DISC SETUP MENU I REC REC MODE TIMER RAPID PLAY DISPLAY SOURCE Note • If you are also available. Before recording, make sure • Connect the external tuner to either E1 or E2 and set the clock yet: "Clock Setting" menu will change the external...New Program E1/E2 E1 1/1 4 5 1 Title of a timer program (Contains date, time, selected external input position, recording mode of the program) 2 Current date and time 3 Recording mode, and length of the recording 4 Timer program list 5 Total number of the timer programming list at step 1. Mode SP SP 2 : 00...
Owners Manual
Page 27
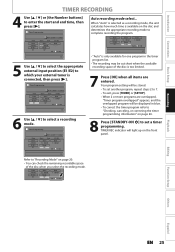
... will be stored. • To set a timer programming. Mode SP SP 2 : 00 1/1 5 Use [K / L] to select the appropriate external input position (E1/E2) to select a recording mode. Timer Programming Date Date JAN/02 E1/E2 E1 MON JAN/01 11:00AM Start End E1/E2 NewSPtraorgt ram End 12... End 12 : 00AM 1 : 00AM Mode SP SP 1 : 00 1/1 6 Use [K / L] to which your external tuner is only available for one program in the timer program list. • The recording may be displayed in blue. • To correct the timer program refer to "Checking, canceling, or correcting the timer...
... will be stored. • To set a timer programming. Mode SP SP 2 : 00 1/1 5 Use [K / L] to select the appropriate external input position (E1/E2) to select a recording mode. Timer Programming Date Date JAN/02 E1/E2 E1 MON JAN/01 11:00AM Start End E1/E2 NewSPtraorgt ram End 12... End 12 : 00AM 1 : 00AM Mode SP SP 1 : 00 1/1 6 Use [K / L] to which your external tuner is only available for one program in the timer program list. • The recording may be displayed in blue. • To correct the timer program refer to "Checking, canceling, or correcting the timer...
Owners Manual
Page 31
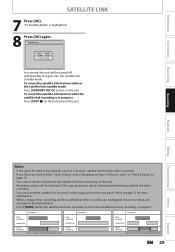
Introduction Connections SATELLITE LINK 7 Press [OK]. To cancel the satellite link function while the satellite link recording is in progress: Press [STOP C] on the front panel of external input breaks up over 5 seconds, satellite link function will be canceled. • If you have not set ...at the longest) will be turned off automatically as illustrated below. • Press [TIMER] during satellite link timer recording. • You can record the satellite link by using S-video input jacks on page 19. • You cannot set the clock, "Clock Setting" menu will appear at step 3....
Introduction Connections SATELLITE LINK 7 Press [OK]. To cancel the satellite link function while the satellite link recording is in progress: Press [STOP C] on the front panel of external input breaks up over 5 seconds, satellite link function will be canceled. • If you have not set ...at the longest) will be turned off automatically as illustrated below. • Press [TIMER] during satellite link timer recording. • You can record the satellite link by using S-video input jacks on page 19. • You cannot set the clock, "Clock Setting" menu will appear at step 3....
Owners Manual
Page 32
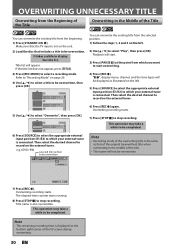
...to be displayed as that the TV input is displayed on the unit. 2) Load the disc that includes a title to "Recording Mode" on the external tuner. Note • The remaining recording time is set on the bottom right corner of the TV screen during overwriting. 30 EN ... desired channel to record on the left . 5) Press [SOURCE] to select the appropriate external input position (E1/E2) to select "Overwrite", then press [OK]. Title name is connected. It takes a while to stop recording. Title list will start overwriting. 4) Press [REC I ] again. e.g.) DVD+RW selected title ...
...to be displayed as that the TV input is displayed on the unit. 2) Load the disc that includes a title to "Recording Mode" on the external tuner. Note • The remaining recording time is set on the bottom right corner of the TV screen during overwriting. 30 EN ... desired channel to record on the left . 5) Press [SOURCE] to select the appropriate external input position (E1/E2) to select "Overwrite", then press [OK]. Title name is connected. It takes a while to stop recording. Title list will start overwriting. 4) Press [REC I ] again. e.g.) DVD+RW selected title ...
Owners Manual
Page 34
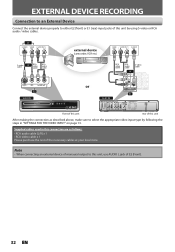
... external device (camcorder, VCR etc.) VIDEO OUT AUDIO OUT R L S-VIDEO OUT S-video cable or RCA video cable RCA audio cable E2 to E2 IN DVD RECORDER or front of this unit to E1 IN RCA video cable RCA audio cable S-video cable or VIDEO VIDEO OUT IN Y IN PB / CB L L...connection are as described above, make sure to select the appropriate video input type by using S-video or RCA audio / video cables. Supplied cables used in "SETTINGS FOR THE VIDEO INPUT" on page 13. EXTERNAL DEVICE RECORDING Connection to an External Device Connect the external device properly to either...
... external device (camcorder, VCR etc.) VIDEO OUT AUDIO OUT R L S-VIDEO OUT S-video cable or RCA video cable RCA audio cable E2 to E2 IN DVD RECORDER or front of this unit to E1 IN RCA video cable RCA audio cable S-video cable or VIDEO VIDEO OUT IN Y IN PB / CB L L...connection are as described above, make sure to select the appropriate video input type by using S-video or RCA audio / video cables. Supplied cables used in "SETTINGS FOR THE VIDEO INPUT" on page 13. EXTERNAL DEVICE RECORDING Connection to an External Device Connect the external device properly to either...

Owners Manual
Page 35
... E B STOP C RETURN K D PAUSE F TITLE K K OK DISC SETUP K MENU I ] on the unit to start recording. 7 Start playback on the external device to record from an external device, refer to be sure to select the input of the TV to which the unit is connected. 2 Press [OPEN/CLOSE A] to load the disc. 4 Select the... input of the unit which the external device is connected. (E2 or E1) &#...
... E B STOP C RETURN K D PAUSE F TITLE K K OK DISC SETUP K MENU I ] on the unit to start recording. 7 Start playback on the external device to record from an external device, refer to be sure to select the input of the TV to which the unit is connected. 2 Press [OPEN/CLOSE A] to load the disc. 4 Select the... input of the unit which the external device is connected. (E2 or E1) &#...

Owners Manual
Page 40
... temporarily. • Refer to open the disc tray and insert your disc with PBC function, a menu may start playback. Turn on the TV and be sure to select the input to which the unit is compatible with this unit. (Refer to page 37 for the list of compatible discs.) 3 Press [OPEN/CLOSE... A] to start playback automatically. • You can select images or information on page 43. Note • Some discs may appear. If you are playing back a DVD-video...
... temporarily. • Refer to open the disc tray and insert your disc with PBC function, a menu may start playback. Turn on the TV and be sure to select the input to which the unit is compatible with this unit. (Refer to page 37 for the list of compatible discs.) 3 Press [OPEN/CLOSE... A] to start playback automatically. • You can select images or information on page 43. Note • Some discs may appear. If you are playing back a DVD-video...
