

User manual, English
Page 4
... as radiators, heat registers, stoves, or other similar surface. Never push objects of the product should follow the manufacturer's instructions and should not be fatal. 17. Cleaning - Article 810 of the National Electrical Code, ANSI/NFPA 70, provides information with care. Battery usage CAUTION - Unplug this product from the product. 14...
... as radiators, heat registers, stoves, or other similar surface. Never push objects of the product should follow the manufacturer's instructions and should not be fatal. 17. Cleaning - Article 810 of the National Electrical Code, ANSI/NFPA 70, provides information with care. Battery usage CAUTION - Unplug this product from the product. 14...

User manual, English
Page 5
... Safety Information 3-4 Contents 5 Introduction 6 Getting Started Playable Discs 7 General Information 8 Hookups 9-17 Recording from External Devices (DVD 17 Initial Setup 18-19 Basic Play and Recording Quick Videotape Playback 20 Quick Disc Playback 21 Quick Disc Recording 22 Controls Remote Control 23-24 Display Panel (VCR 25 Front Panel 26 Rear Panel 27 Advanced Installation TV Channel...
... Safety Information 3-4 Contents 5 Introduction 6 Getting Started Playable Discs 7 General Information 8 Hookups 9-17 Recording from External Devices (DVD 17 Initial Setup 18-19 Basic Play and Recording Quick Videotape Playback 20 Quick Disc Playback 21 Quick Disc Recording 22 Controls Remote Control 23-24 Display Panel (VCR 25 Front Panel 26 Rear Panel 27 Advanced Installation TV Channel...
User manual, English
Page 9
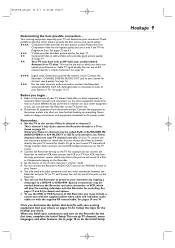
...... Or, go to your memories by copying a videotape to a DVD+R or DVD+RW. For example, do the Initial Setup. G You can use the Recorder to a TV.Your VCR may distort the picture and sound of a Disc or Videocassette playing on the Recorder. Follow the steps for details. Your existing equipment, especially your TV...ohm. See pages 17 and 44 for the best sound quality. G To use it only if the TV has Progressive Scan. Once you see and hear the Recorder on pages 10-16. Go to page 18 to do not connect the Recorder to another VCR, then connect the VCR to preserve your lowest...
...... Or, go to your memories by copying a videotape to a DVD+R or DVD+RW. For example, do the Initial Setup. G You can use the Recorder to a TV.Your VCR may distort the picture and sound of a Disc or Videocassette playing on the Recorder. Follow the steps for details. Your existing equipment, especially your TV...ohm. See pages 17 and 44 for the best sound quality. G To use it only if the TV has Progressive Scan. Once you see and hear the Recorder on pages 10-16. Go to page 18 to do not connect the Recorder to another VCR, then connect the VCR to preserve your lowest...

User manual, English
Page 17
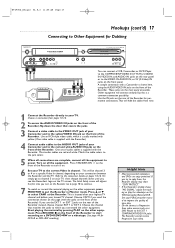
... to the yellow VIDEO IN jack on the front of the Recorder to turn on the rear of the Recorder. E9490UD_EN.qx3 04.9.21 11:53 AM Page 17 Hookups (cont'd) 17 Connecting to Other Equipment for Dubbing You can connect a VCR, Camcorder, or DVD Player to the COMPONENT VIDEO IN (Y PB PR), S-VIDEO IN, VIDEO...
... to the yellow VIDEO IN jack on the front of the Recorder to turn on the rear of the Recorder. E9490UD_EN.qx3 04.9.21 11:53 AM Page 17 Hookups (cont'd) 17 Connecting to Other Equipment for Dubbing You can connect a VCR, Camcorder, or DVD Player to the COMPONENT VIDEO IN (Y PB PR), S-VIDEO IN, VIDEO...
User manual, English
Page 22
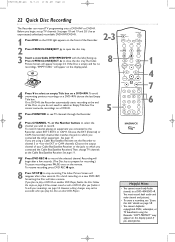
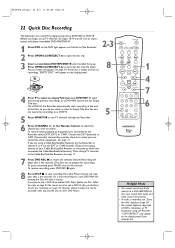
... box.You cannot overwrite recordings on a DVD+R. 5 Press MONITOR to stop recording.The Index Picture Screen will appear on other equipment. See page 17. You must record both audio and video (sound and picture). • To erase a recording, see page 54. Use an unprotected, unfinalized, recordable DVD+RW/DVD+R. 1 Press DVD so the DVD light appears on a DVD+RW, choose the last...
... box.You cannot overwrite recordings on a DVD+R. 5 Press MONITOR to stop recording.The Index Picture Screen will appear on other equipment. See page 17. You must record both audio and video (sound and picture). • To erase a recording, see page 54. Use an unprotected, unfinalized, recordable DVD+RW/DVD+R. 1 Press DVD so the DVD light appears on a DVD+RW, choose the last...
User manual, English
Page 26
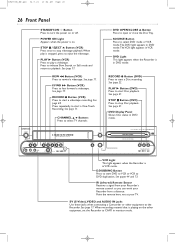
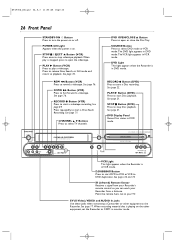
... can work your TV. F.FWD D Button (VCR) Press to start a One-Touch Recording. The VCR light appears in DVD mode. See page 21. STOP C / EJECT A Button (VCR) Press once to stop Disc playback. RECORD I Button (DVD) Press to the Recorder. VCR Light This light appears when the Recorder is in VCR mode. PLAY B Button (VCR) Press to select TV channels. CHANNEL K L Buttons...
... can work your TV. F.FWD D Button (VCR) Press to start a One-Touch Recording. The VCR light appears in DVD mode. See page 21. STOP C / EJECT A Button (VCR) Press once to stop Disc playback. RECORD I Button (DVD) Press to the Recorder. VCR Light This light appears when the Recorder is in VCR mode. PLAY B Button (VCR) Press to select TV channels. CHANNEL K L Buttons...

User manual, English
Page 27
... IN jacks / Left (white) and Right (red) Connect audio cables here and to the Recorder. AC Power Cord Connect to a standard AC outlet to supply power to the AUDIO OUT jacks of a camcorder, another VCR, another TV, etc. Rear Panel 27 EXT1 DIGITAL COMPONENT AUDIO AUDIO OUT VIDEO IN IN Y... page 13. See page 16. See pages 12-15. Helpful Hints • Use the same EXT (external) number for both DVD and VCR modes. See page 17. See page 17. These jacks supply audio for a second connection to the ANTENNA IN jack on other equipment. AUDIO IN Jacks / Left (white) and Right (red...
... IN jacks / Left (white) and Right (red) Connect audio cables here and to the Recorder. AC Power Cord Connect to a standard AC outlet to supply power to the AUDIO OUT jacks of a camcorder, another VCR, another TV, etc. Rear Panel 27 EXT1 DIGITAL COMPONENT AUDIO AUDIO OUT VIDEO IN IN Y... page 13. See page 16. See pages 12-15. Helpful Hints • Use the same EXT (external) number for both DVD and VCR modes. See page 17. See page 17. These jacks supply audio for a second connection to the ANTENNA IN jack on other equipment. AUDIO IN Jacks / Left (white) and Right (red...
User manual, English
Page 60
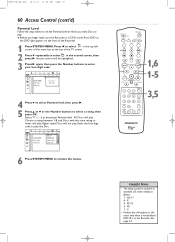
.... 1,6 1-5 3,5 Helpful Hints • The rating numbers compare to standard U.S. Access control will appear in this menu only when a non-finalized DVD+R is in the Recorder. Higher rated Discs will play . See page 55. Press s to select in the top left corner of the menu bar at which you begin..., make sure the Recorder is in DVD mode. NC-17 6 - movie ratings as follows: 7 - E9490UD_EN.qx3 04.9.21 10:54 AM Page 60 60 Access Control (cont'd) Parental Level Follow the...
.... 1,6 1-5 3,5 Helpful Hints • The rating numbers compare to standard U.S. Access control will appear in this menu only when a non-finalized DVD+R is in the Recorder. Higher rated Discs will play . See page 55. Press s to select in the top left corner of the menu bar at which you begin..., make sure the Recorder is in DVD mode. NC-17 6 - movie ratings as follows: 7 - E9490UD_EN.qx3 04.9.21 10:54 AM Page 60 60 Access Control (cont'd) Parental Level Follow the...
User manual, English
Page 74
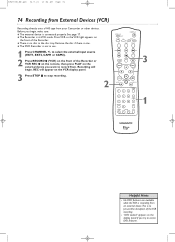
..., CAM1 or CAM2). 2 Press RECORD I (VCR) on the front of the Recorder. to access DVD features. REC will begin , make sure: G The external device is no disc in VCR mode. Press VCR so the VCR light appears on the front of the Recorder or VCR REC I on the remote, then...10:54 AM Page 74 74 Recording from External Devices (VCR) Recording directly onto a VHS tape from . G There is connected properly. G The DVD Recorder is one. Before you want to stop recording. 2 1 Helpful Hints • No DVD features are available while the VCR is recording from an external device.This is...
..., CAM1 or CAM2). 2 Press RECORD I (VCR) on the front of the Recorder. to access DVD features. REC will begin , make sure: G The external device is no disc in VCR mode. Press VCR so the VCR light appears on the front of the Recorder or VCR REC I on the remote, then...10:54 AM Page 74 74 Recording from External Devices (VCR) Recording directly onto a VHS tape from . G There is connected properly. G The DVD Recorder is one. Before you want to stop recording. 2 1 Helpful Hints • No DVD features are available while the VCR is recording from an external device.This is...
User manual, English
Page 84
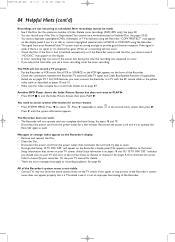
The VCR will not occur. • Check the Disc. Details are on pages 9-17. The Recorder does not work. • The Recorder will appear on your connection. See pages 18 and 19. • Disconnect the power cord from the power outlet, then reconnect the... • During Initial Setup, "IS TV ON? Press s to operate the Recorder again as scheduled. in VCR mode. Reconnect the power cord and try to dub or record copyrighted material onto a DVD+R or DVD+RW using the Recorder. All of the Recorder's system menu does not appear properly, this is not visible. • Certain ...
The VCR will not occur. • Check the Disc. Details are on pages 9-17. The Recorder does not work. • The Recorder will appear on your connection. See pages 18 and 19. • Disconnect the power cord from the power outlet, then reconnect the... • During Initial Setup, "IS TV ON? Press s to operate the Recorder again as scheduled. in VCR mode. Reconnect the power cord and try to dub or record copyrighted material onto a DVD+R or DVD+RW using the Recorder. All of the Recorder's system menu does not appear properly, this is not visible. • Certain ...

User manual, English
Page 86
...; • VHF 2-13 UHF 14-69 CATV 1-125 VIDEO FORMAT Digital Compression MPEG2 for DVD MPEG1 for MPEG2, Dolby Digital Coaxial 75 ohms Coaxial 75 ohms Standard (IEC type) NOTE: Designs and specifications are subject to 80% 17.1" (W) x 3.9" (H) x 10.3" (D) (435mm x 100mm x 262mm) 11.0 lbs. (5.0 kg)...3 hours M4 4 hours M6 6 hours TV STANDARD Scan Frequency Number of lines Playback Recording Internal tuner PAL/SECAM 50Hz 625 • • - E9490UD_EN.qx3 04.9.21 10:55 AM Page 86 86 Specifications VCR Video Heads Antenna VHF Output Signal DVD Color System Wow and Flutter Four heads -
...; • VHF 2-13 UHF 14-69 CATV 1-125 VIDEO FORMAT Digital Compression MPEG2 for DVD MPEG1 for MPEG2, Dolby Digital Coaxial 75 ohms Coaxial 75 ohms Standard (IEC type) NOTE: Designs and specifications are subject to 80% 17.1" (W) x 3.9" (H) x 10.3" (D) (435mm x 100mm x 262mm) 11.0 lbs. (5.0 kg)...3 hours M4 4 hours M6 6 hours TV STANDARD Scan Frequency Number of lines Playback Recording Internal tuner PAL/SECAM 50Hz 625 • • - E9490UD_EN.qx3 04.9.21 10:55 AM Page 86 86 Specifications VCR Video Heads Antenna VHF Output Signal DVD Color System Wow and Flutter Four heads -
User manual, English
Page 88
... settings . . . . .32 vcr button 23 vcr light 25 VCR Plus+channels 29 VCR Plus+/ TIMER button 24, 45-47 VCR Plus+ timer recording . .46 vcr status display 68 vcr rec I button . . . . .22, 24, 43 dvd recorder features menu . . .62 editing 53-54 erase disc 53 erase this title 50 erasing timer recordings . . . . .47 error ..., 54 glossary 79-80 helpful hints 81-84 hidden chapter 54 hi-fi stereo sound 77, 82 home videotape duplication . .17 hookups 9-17 index picture screen 34 index search 76 information boxes 35 initial setup 18-19 insert chapter marker 54 installation 28-31 "IS...
... settings . . . . .32 vcr button 23 vcr light 25 VCR Plus+channels 29 VCR Plus+/ TIMER button 24, 45-47 VCR Plus+ timer recording . .46 vcr status display 68 vcr rec I button . . . . .22, 24, 43 dvd recorder features menu . . .62 editing 53-54 erase disc 53 erase this title 50 erasing timer recordings . . . . .47 error ..., 54 glossary 79-80 helpful hints 81-84 hidden chapter 54 hi-fi stereo sound 77, 82 home videotape duplication . .17 hookups 9-17 index picture screen 34 index search 76 information boxes 35 initial setup 18-19 insert chapter marker 54 installation 28-31 "IS...

User manual, English (US)
Page 4
... the manufacturer or having one way.This is connected to replace your product dealer or local power company. Ventilation - The openings should not be fatal. 17. Grounding or Polarization - If the plug still fails to fit, contact your electrician to the product, be sure the service technician uses replacement parts specified...
... the manufacturer or having one way.This is connected to replace your product dealer or local power company. Ventilation - The openings should not be fatal. 17. Grounding or Polarization - If the plug still fails to fit, contact your electrician to the product, be sure the service technician uses replacement parts specified...
User manual, English (US)
Page 5
...Started Playable Discs 7 General Information 8 Hookups 9-17 Initial Setup 18-19 Basic Play and Recording Quick Videotape Playback 20 Quick Disc Playback 21 Quick Disc Recording 22 Controls Remote Control 23-24 Display Panel (VCR 25 Front Panel 26 Rear Panel 27 Advanced ...Language Settings 66 Night Mode, Remote Control Used 67 VCR Displays VCR Status Displays 68 VCR Recording Options Videotape Recording 69 Record One Channel/Watch Another (VCR 70 One-Touch Recording (VCR 71 Rerecording (Tape Duplication 72 DVD to Videotape Duplication 73 Tape Playback Features Tape Counter ...
...Started Playable Discs 7 General Information 8 Hookups 9-17 Initial Setup 18-19 Basic Play and Recording Quick Videotape Playback 20 Quick Disc Playback 21 Quick Disc Recording 22 Controls Remote Control 23-24 Display Panel (VCR 25 Front Panel 26 Rear Panel 27 Advanced ...Language Settings 66 Night Mode, Remote Control Used 67 VCR Displays VCR Status Displays 68 VCR Recording Options Videotape Recording 69 Record One Channel/Watch Another (VCR 70 One-Touch Recording (VCR 71 Rerecording (Tape Duplication 72 DVD to Videotape Duplication 73 Tape Playback Features Tape Counter ...
User manual, English (US)
Page 9
... TV channel zero (0). Digital audio connections provide the clearest sound. Remember... ● Set the TV to the power outlet. See pages 17 and 44 for recording. See page 13. ★★ Composite Video (a yellow Video jack) provides good picture quality. Never make or change channels down until.../red AUDIO OUT L/R (left/right) jacks to the power outlets only after you can use the DVD or VCR features of your TV, will play the existing videotape into the Recorder for details and options. ● To use an RF coaxial cable for the best sound quality. See ...
... TV channel zero (0). Digital audio connections provide the clearest sound. Remember... ● Set the TV to the power outlet. See pages 17 and 44 for recording. See page 13. ★★ Composite Video (a yellow Video jack) provides good picture quality. Never make or change channels down until.../red AUDIO OUT L/R (left/right) jacks to the power outlets only after you can use the DVD or VCR features of your TV, will play the existing videotape into the Recorder for details and options. ● To use an RF coaxial cable for the best sound quality. See ...
User manual, English (US)
Page 17
... permanent connections.That will appear the first time you see the Recorder's logo on the TV screen. E9490UD_EN.qx3 04.8.3 11:55 AM Page 17 Hookups (cont'd) 17 Connecting to Other Equipment for Dubbing You can connect a VCR, Camcorder, or DVD Player to the COMPONENT VIDEO IN (Y PB PR), S-VIDEO IN, VIDEO IN, and AUDIO...
... permanent connections.That will appear the first time you see the Recorder's logo on the TV screen. E9490UD_EN.qx3 04.8.3 11:55 AM Page 17 Hookups (cont'd) 17 Connecting to Other Equipment for Dubbing You can connect a VCR, Camcorder, or DVD Player to the COMPONENT VIDEO IN (Y PB PR), S-VIDEO IN, VIDEO IN, and AUDIO...
User manual, English (US)
Page 22
... you connected to select an empty Title box on a DVD+RW. On a brief recording on equipment you wish to record the selected channel. See page 17. However, editing changes may appear on another DVD Player, finalize the Disc. If the Disc is empty and has no recordings,"EMPTY DISC" will appear. LABEL 4 POWER ON/OFF 4 Press...
... you connected to select an empty Title box on a DVD+RW. On a brief recording on equipment you wish to record the selected channel. See page 17. However, editing changes may appear on another DVD Player, finalize the Disc. If the Disc is empty and has no recordings,"EMPTY DISC" will appear. LABEL 4 POWER ON/OFF 4 Press...
User manual, English (US)
Page 26
.... See page 17. REW E Button (VCR) Press to select TV channels. Press repeatedly to start a videotape recording. CHANNEL K L Buttons Press to rewind a videotape. SV (S-Video),VIDEO and AUDIO In jacks Use these jacks when connecting a Camcorder or other equipment, set the Recorder to stop videotape playback.When play a videotape. See page 69. DVD OPEN/CLOSE...
.... See page 17. REW E Button (VCR) Press to select TV channels. Press repeatedly to start a videotape recording. CHANNEL K L Buttons Press to rewind a videotape. SV (S-Video),VIDEO and AUDIO In jacks Use these jacks when connecting a Camcorder or other equipment, set the Recorder to stop videotape playback.When play a videotape. See page 69. DVD OPEN/CLOSE...

User manual, English (US)
Page 27
.... AUDIO IN Jacks / Left (white) and Right (red) Connect audio cables coming from an optional Camcorder,VCR, or DVD Player here. See page 12. See page 17. These jacks supply audio for both DVD and VCR modes. For example, if you want to the Component Video Out jacks of optional video equipment (for each... to the Audio In jacks of a TV or Stereo. AUDIO OUT Jacks / Left (white) and Right (red) Connect audio cables here and to the Recorder. Use these jacks to copy a videotape or watch material that is playing on your antenna or Cable TV signal here. AUDIO OUT Jacks / Left (white...
.... AUDIO IN Jacks / Left (white) and Right (red) Connect audio cables coming from an optional Camcorder,VCR, or DVD Player here. See page 12. See page 17. These jacks supply audio for both DVD and VCR modes. For example, if you want to the Component Video Out jacks of optional video equipment (for each... to the Audio In jacks of a TV or Stereo. AUDIO OUT Jacks / Left (white) and Right (red) Connect audio cables here and to the Recorder. Use these jacks to copy a videotape or watch material that is playing on your antenna or Cable TV signal here. AUDIO OUT Jacks / Left (white...
User manual, English (US)
Page 60
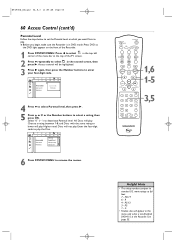
...Change code s 6 Press SYSTEM MENU to remove the menus. 1,6 1-5 3,5 Helpful Hints • The rating numbers compare to standard U.S. NC-17 6 - Access control will appear in this menu only when a non-finalized DVD+R is in the second screen, then press B. W X YZ a ~ 1 2 1en off no off s Access control Auto resume Finalize ... Access Control (cont'd) Parental Level Follow the steps below to set the Parental Level at the top of the Recorder. 1 Press SYSTEM MENU. Press DVD so the DVD light appears on the front of the TV screen. 2 Press L repeatedly to deactivate Parental level.
...Change code s 6 Press SYSTEM MENU to remove the menus. 1,6 1-5 3,5 Helpful Hints • The rating numbers compare to standard U.S. NC-17 6 - Access control will appear in this menu only when a non-finalized DVD+R is in the second screen, then press B. W X YZ a ~ 1 2 1en off no off s Access control Auto resume Finalize ... Access Control (cont'd) Parental Level Follow the steps below to set the Parental Level at the top of the Recorder. 1 Press SYSTEM MENU. Press DVD so the DVD light appears on the front of the TV screen. 2 Press L repeatedly to deactivate Parental level.


