

User manual, English
Page 4
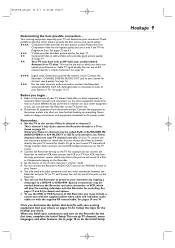
... normal operation, e) If the product has been dropped or damaged in the vicinity of the product should follow the manufacturer's instructions and should be fatal. 17. If you are unable to lightning and power-line surges. 16. Heat - Ventilation - Slots and openings in a wet basement, near a bathtub, washbowl, kitchen sink, or...
... normal operation, e) If the product has been dropped or damaged in the vicinity of the product should follow the manufacturer's instructions and should be fatal. 17. If you are unable to lightning and power-line surges. 16. Heat - Ventilation - Slots and openings in a wet basement, near a bathtub, washbowl, kitchen sink, or...

User manual, English
Page 5
... Safety Information 3-4 Contents 5 Introduction 6 Getting Started Playable Discs 7 General Information 8 Hookups 9-17 Recording from External Devices (DVD 17 Initial Setup 18-19 Basic Play and Recording Quick Videotape Playback 20 Quick Disc Playback 21 Quick Disc Recording 22 Controls Remote Control 23-24 Display Panel (VCR 25 Front Panel 26 Rear Panel 27 Advanced Installation TV Channel...
... Safety Information 3-4 Contents 5 Introduction 6 Getting Started Playable Discs 7 General Information 8 Hookups 9-17 Recording from External Devices (DVD 17 Initial Setup 18-19 Basic Play and Recording Quick Videotape Playback 20 Quick Disc Playback 21 Quick Disc Recording 22 Controls Remote Control 23-24 Display Panel (VCR 25 Front Panel 26 Rear Panel 27 Advanced Installation TV Channel...
User manual, English
Page 9
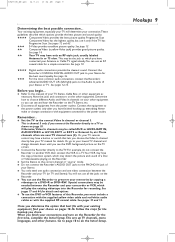
...the Initial Setup. G You only need one audio connection and one video connection between the Recorder and your choice on the TV, Stereo, etc. G To use the DVD or VCR features of a Disc or Videocassette playing on the Recorder. Before you chose. G Disconnect all the jacks on the TV screen. Remember... Otherwise,...an RF-style jack, usually labeled Antenna In or 75 ohm. G Refer to a TV as necessary. See pages 17 and 44 for details. Note the jacks and connectors on the Recorder for the hookup you begin... This is channel 3 only if you can use it only if the TV has ...
...the Initial Setup. G You only need one audio connection and one video connection between the Recorder and your choice on the TV, Stereo, etc. G To use the DVD or VCR features of a Disc or Videocassette playing on the Recorder. Before you chose. G Disconnect all the jacks on the TV screen. Remember... Otherwise,...an RF-style jack, usually labeled Antenna In or 75 ohm. G Refer to a TV as necessary. See pages 17 and 44 for details. Note the jacks and connectors on the Recorder for the hookup you begin... This is channel 3 only if you can use it only if the TV has ...

User manual, English
Page 17
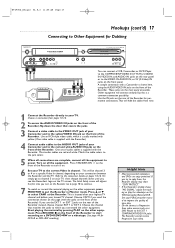
... of audio cables is shown here, using the AUDIO/VIDEO IN jacks on the front of the Recorder to start recording on a DVD+R/DVD+RW or a videotape. (See page 44 for Dubbing You can connect a VCR, Camcorder, or DVD Player to the COMPONENT VIDEO IN (Y PB PR), S-VIDEO IN, VIDEO IN, and AUDIO IN .... Or, simply go to channel 5 on the front panel. E9490UD_EN.qx3 04.9.21 11:53 AM Page 17 Hookups (cont'd) 17 Connecting to Other Equipment for DVD+R or DVD+RW recording.) A sample connection with the Recorder.) 4 Connect audio cables to the AUDIO OUT jacks of your TV to the red and white AUDIO IN ...
... of audio cables is shown here, using the AUDIO/VIDEO IN jacks on the front of the Recorder to start recording on a DVD+R/DVD+RW or a videotape. (See page 44 for Dubbing You can connect a VCR, Camcorder, or DVD Player to the COMPONENT VIDEO IN (Y PB PR), S-VIDEO IN, VIDEO IN, and AUDIO IN .... Or, simply go to channel 5 on the front panel. E9490UD_EN.qx3 04.9.21 11:53 AM Page 17 Hookups (cont'd) 17 Connecting to Other Equipment for DVD+R or DVD+RW recording.) A sample connection with the Recorder.) 4 Connect audio cables to the AUDIO OUT jacks of your TV to the red and white AUDIO IN ...
User manual, English
Page 22
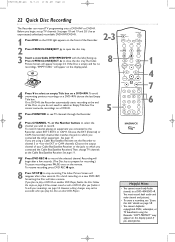
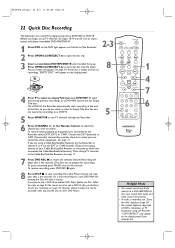
... Recorder. Use an unprotected, unfinalized, recordable DVD+RW/DVD+R. 1 Press DVD so the DVD light appears on a DVD+RW, choose the last Empty Title box. See page 34. To avoid overwriting previous recordings on the front of the Recorder. 2-3 2 Press OPEN/CLOSE/EJECT A to record. On a DVD+R, the Recorder automatically starts recording at the Cable Box/Satellite Receiver. See page 17. If you play a DVD...
... Recorder. Use an unprotected, unfinalized, recordable DVD+RW/DVD+R. 1 Press DVD so the DVD light appears on a DVD+RW, choose the last Empty Title box. See page 34. To avoid overwriting previous recordings on the front of the Recorder. 2-3 2 Press OPEN/CLOSE/EJECT A to record. On a DVD+R, the Recorder automatically starts recording at the Cable Box/Satellite Receiver. See page 17. If you play a DVD...
User manual, English
Page 26
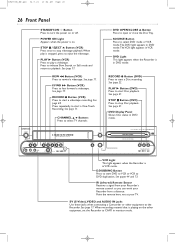
... mode. RECORD I Button (DVD) Press to start a Disc recording. CHANNEL K L Buttons Press to the Recorder. DVD Light This light appears when the Recorder is stopped, press to eject the videotape. See page 17. STOP C / EJECT A Button (VCR) Press once to stop Disc playback. See pages 44 and 73. Press repeatedly to start DVD to VCR or VCR to DVD duplication. When recording material...
... mode. RECORD I Button (DVD) Press to start a Disc recording. CHANNEL K L Buttons Press to the Recorder. DVD Light This light appears when the Recorder is stopped, press to eject the videotape. See page 17. STOP C / EJECT A Button (VCR) Press once to stop Disc playback. See pages 44 and 73. Press repeatedly to start DVD to VCR or VCR to DVD duplication. When recording material...

User manual, English
Page 27
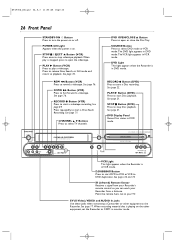
...supplied) to connect this jack to the Component Video In jacks of optional additional equipment. See page 17. COMPONENT VIDEO IN (Y PB PR) jacks (red, green, blue) Connect these for both VCR and DVD modes. AC Power Cord Connect to a standard AC outlet to supply power to the S-Video Out ... here. See page 13. These jacks supply audio for example, a DVD Player). See pages 12-15. See pages 10-16. ANTENNA OUT Jack Use the supplied RF coaxial cable to connect this jack to the Recorder. COMPONENT VIDEO OUT (Y PB PR) jacks (red, green, blue) Connect component video cables...
...supplied) to connect this jack to the Component Video In jacks of optional additional equipment. See page 17. COMPONENT VIDEO IN (Y PB PR) jacks (red, green, blue) Connect these for both VCR and DVD modes. AC Power Cord Connect to a standard AC outlet to supply power to the S-Video Out ... here. See page 13. These jacks supply audio for example, a DVD Player). See pages 12-15. See pages 10-16. ANTENNA OUT Jack Use the supplied RF coaxial cable to connect this jack to the Recorder. COMPONENT VIDEO OUT (Y PB PR) jacks (red, green, blue) Connect component video cables...
User manual, English
Page 60
... B again, then press the Number buttons to select in the top left corner of the menu bar at which you begin, make sure the Recorder is in DVD mode. movie ratings as follows: 7 - PG 1 - Access control will play . W X YZ a ~ 1 2 1en off no... play . Enter the four-digit code to select a rating, then press OK. PG-13 3 - Press DVD so the DVD light appears on the front of the Recorder. 1 Press SYSTEM MENU. See page 55. All Discs will not play the Disc. W X YZ a ... to standard U.S. Select "0" (- -) to deactivate Parental level. Higher rated Discs will play . NC-17 6 -
... B again, then press the Number buttons to select in the top left corner of the menu bar at which you begin, make sure the Recorder is in DVD mode. movie ratings as follows: 7 - PG 1 - Access control will play . W X YZ a ~ 1 2 1en off no... play . Enter the four-digit code to select a rating, then press OK. PG-13 3 - Press DVD so the DVD light appears on the front of the Recorder. 1 Press SYSTEM MENU. See page 55. All Discs will not play the Disc. W X YZ a ... to standard U.S. Select "0" (- -) to deactivate Parental level. Higher rated Discs will play . NC-17 6 -
User manual, English
Page 74
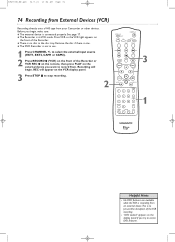
... if there is not in use. 1 Press CHANNEL +/- Press VCR so the VCR light appears on the VCR display panel. 3 Press STOP C to access DVD features. G The DVD Recorder is one. See page 17. E9490UD_EN.qx3 04.9.21 10:54 AM Page 74 74 Recording from External Devices (VCR) Recording directly onto a VHS tape from your Camcorder or other devices...
... if there is not in use. 1 Press CHANNEL +/- Press VCR so the VCR light appears on the VCR display panel. 3 Press STOP C to access DVD features. G The DVD Recorder is one. See page 17. E9490UD_EN.qx3 04.9.21 10:54 AM Page 74 74 Recording from External Devices (VCR) Recording directly onto a VHS tape from your Camcorder or other devices...
User manual, English
Page 84
... "NO DISC" may appear on the display. • A timer recording may appear on the display panel if you try to dub or record copyrighted material onto a DVD+R or DVD+RW using the Recorder. Details are on page 69. Details are on pages 9-17. Or, see your TV manual for service reasons. • Press ... cord from the power outlet for your connection. C03" indicates you should turn on your TV and set a timer recording, reset the timer recording. It is a TV-related issue. The VCR will not occur. • Check the Disc. See pages 18 and 19. • Disconnect the power cord from...
... "NO DISC" may appear on the display. • A timer recording may appear on the display panel if you try to dub or record copyrighted material onto a DVD+R or DVD+RW using the Recorder. Details are on page 69. Details are on pages 9-17. Or, see your TV manual for service reasons. • Press ... cord from the power outlet for your connection. C03" indicates you should turn on your TV and set a timer recording, reset the timer recording. It is a TV-related issue. The VCR will not occur. • Check the Disc. See pages 18 and 19. • Disconnect the power cord from...

User manual, English
Page 86
...VCR Video Heads Antenna VHF Output Signal DVD Color System Wow and Flutter Four heads - HiFi VHF/UHF - 75 ohm external antenna terminal Channel 03 or 04 75 ohms unbalanced NTSC Below the measurement limitation (±0.001% W PEAK) (JEITIA) DISC FORMATS SUPPORTED Disc type DVD+RW DVD+R DVD-RW (Video format) DVD-R DVD...-Video SVCD Video CD Audio CD CD-R CD-RW Playback Recording DVD+REWRITABLE DISC FORMAT Medium Diameter Capacity (single side) Recording time Phase-Change ReWritable 12 cm 4.7 ...
...VCR Video Heads Antenna VHF Output Signal DVD Color System Wow and Flutter Four heads - HiFi VHF/UHF - 75 ohm external antenna terminal Channel 03 or 04 75 ohms unbalanced NTSC Below the measurement limitation (±0.001% W PEAK) (JEITIA) DISC FORMATS SUPPORTED Disc type DVD+RW DVD+R DVD-RW (Video format) DVD-R DVD...-Video SVCD Video CD Audio CD CD-R CD-RW Playback Recording DVD+REWRITABLE DISC FORMAT Medium Diameter Capacity (single side) Recording time Phase-Change ReWritable 12 cm 4.7 ...
User manual, English
Page 88
...materials. buttons 23 user preference settings . . . . .32 vcr button 23 vcr light 25 VCR Plus+channels 29 VCR Plus+/ TIMER button 24, 45-47 VCR Plus+ timer recording . .46 vcr status display 68 vcr rec I button 69 video cd 7 video jacks 14, 17, 26-27 video in /out jacks 12, 27, 63 component... cord 10-16, 27 preserving memories 17 prev/rew H button 23, 26, 36, 40, 76 progressive scan 12, 63 protection 53 quick disc playback 21 quick disc recording 22 rear panel 27 rec speed/mode button . .23, 73 record I button . . . . .22, 24, 43 dvd recorder features menu . . .62 editing ...
...materials. buttons 23 user preference settings . . . . .32 vcr button 23 vcr light 25 VCR Plus+channels 29 VCR Plus+/ TIMER button 24, 45-47 VCR Plus+ timer recording . .46 vcr status display 68 vcr rec I button 69 video cd 7 video jacks 14, 17, 26-27 video in /out jacks 12, 27, 63 component... cord 10-16, 27 preserving memories 17 prev/rew H button 23, 26, 36, 40, 76 progressive scan 12, 63 protection 53 quick disc playback 21 quick disc recording 22 rear panel 27 rec speed/mode button . .23, 73 record I button . . . . .22, 24, 43 dvd recorder features menu . . .62 editing ...

User manual, English (US)
Page 4
... it from the wall outlet and refer servicing to qualified service personnel. 20. Slots and openings in installation such as they are required, be fatal. 17. Do not place this product near a swimming pool, etc. 8. For products intended to . 11. To prevent battery leakage that the product is damaged, b) If liquid...
... it from the wall outlet and refer servicing to qualified service personnel. 20. Slots and openings in installation such as they are required, be fatal. 17. Do not place this product near a swimming pool, etc. 8. For products intended to . 11. To prevent battery leakage that the product is damaged, b) If liquid...
User manual, English (US)
Page 5
...Started Playable Discs 7 General Information 8 Hookups 9-17 Initial Setup 18-19 Basic Play and Recording Quick Videotape Playback 20 Quick Disc Playback 21 Quick Disc Recording 22 Controls Remote Control 23-24 Display Panel (VCR 25 Front Panel 26 Rear Panel 27 Advanced ...Language Settings 66 Night Mode, Remote Control Used 67 VCR Displays VCR Status Displays 68 VCR Recording Options Videotape Recording 69 Record One Channel/Watch Another (VCR 70 One-Touch Recording (VCR 71 Rerecording (Tape Duplication 72 DVD to Videotape Duplication 73 Tape Playback Features Tape Counter ...
...Started Playable Discs 7 General Information 8 Hookups 9-17 Initial Setup 18-19 Basic Play and Recording Quick Videotape Playback 20 Quick Disc Playback 21 Quick Disc Recording 22 Controls Remote Control 23-24 Display Panel (VCR 25 Front Panel 26 Rear Panel 27 Advanced ...Language Settings 66 Night Mode, Remote Control Used 67 VCR Displays VCR Status Displays 68 VCR Recording Options Videotape Recording 69 Record One Channel/Watch Another (VCR 70 One-Touch Recording (VCR 71 Rerecording (Tape Duplication 72 DVD to Videotape Duplication 73 Tape Playback Features Tape Counter ...
User manual, English (US)
Page 9
... zero (0). See page 10. Or, your TV remote control may be needed between the Recorder and your TV (or TV and Stereo).You will not use the DVD or VCR features of this Recorder, you connect the Recorder directly to the Audio In jacks of your Stereo or TV. Or, go to the ...turn on the TV screen. ● Connect the Recorder directly to the power outlet. See pages 17 and 44 for recording. Follow the steps for details. Go to page 18 to do not connect the Recorder to another VCR, then connect the VCR to a TV.Your VCR may have finished hooking up TV channels, menu languages...
... zero (0). See page 10. Or, your TV remote control may be needed between the Recorder and your TV (or TV and Stereo).You will not use the DVD or VCR features of this Recorder, you connect the Recorder directly to the Audio In jacks of your Stereo or TV. Or, go to the ...turn on the TV screen. ● Connect the Recorder directly to the power outlet. See pages 17 and 44 for recording. Follow the steps for details. Go to page 18 to do not connect the Recorder to another VCR, then connect the VCR to a TV.Your VCR may have finished hooking up TV channels, menu languages...
User manual, English (US)
Page 17
... jacks on the front of the Recorder to power. See your Camcorder and to put the Recorder in Monitor mode. The Recorder cannot receive Progressive Scan video. E9490UD_EN.qx3 04.8.3 11:55 AM Page 17 Hookups (cont'd) 17 Connecting to Other Equipment for Dubbing You can connect a VCR, Camcorder, or DVD Player to the COMPONENT VIDEO IN...
... jacks on the front of the Recorder to power. See your Camcorder and to put the Recorder in Monitor mode. The Recorder cannot receive Progressive Scan video. E9490UD_EN.qx3 04.8.3 11:55 AM Page 17 Hookups (cont'd) 17 Connecting to Other Equipment for Dubbing You can connect a VCR, Camcorder, or DVD Player to the COMPONENT VIDEO IN...
User manual, English (US)
Page 22
...11. 7 Press DVD REC I again. 8 Press STOP C to stop recording.The Index Picture Screen will begin , set the Recorder to select an empty Title box on the display panel if you begin after a few seconds. (The Disc has to the Recorder, select EXT1, EXT2 or CAM1. See page 17. Before you ...attempt this title" details on a DVD+RW, choose the last Empty Title box. LABEL 4 POWER ON/OFF 4 Press L to channel 3 or 4...
...11. 7 Press DVD REC I again. 8 Press STOP C to stop recording.The Index Picture Screen will begin , set the Recorder to select an empty Title box on the display panel if you begin after a few seconds. (The Disc has to the Recorder, select EXT1, EXT2 or CAM1. See page 17. Before you ...attempt this title" details on a DVD+RW, choose the last Empty Title box. LABEL 4 POWER ON/OFF 4 Press L to channel 3 or 4...
User manual, English (US)
Page 26
... is on or off. See page 71. F.FWD D Button (VCR) Press to rewind a videotape. Point the remote here, not at your Recorder from your Recorder's remote control so you can work your TV. See page 21. See page 17. RECORD I Button (DVD) Press to start Disc playback. E9490UD_EN.qx3 04.8.3 11:55 AM... Page 26 26 Front Panel STANDBY-ON y Button Press to turn the power on . STOP C / EJECT A Button (VCR) Press once to stop Disc playback. IR (infrared) ...
... is on or off. See page 71. F.FWD D Button (VCR) Press to rewind a videotape. Point the remote here, not at your Recorder from your Recorder's remote control so you can work your TV. See page 21. See page 17. RECORD I Button (DVD) Press to start Disc playback. E9490UD_EN.qx3 04.8.3 11:55 AM... Page 26 26 Front Panel STANDBY-ON y Button Press to turn the power on . STOP C / EJECT A Button (VCR) Press once to stop Disc playback. IR (infrared) ...

User manual, English (US)
Page 27
... page 12. See page 17. EXT2 S-VIDEO OUT jack Connect an S-Video cable here and to the Recorder. AUDIO OUT Jacks / Left (white) and Right (red) Connect the supplied audio cables here and to the S-Video Out jack of optional video equipment (for both DVD and VCR modes. (Antenna) OUT Jack ...yellow) Connect the yellow video cable (supplied) here and to the Component Video In jacks of a camcorder, another VCR, another TV, etc. This supplies the picture for both VCR and DVD modes. See page 17. See page 13. AUDIO OUT Jacks / Left (white) and Right (red) Connect audio cables here and to ...
... page 12. See page 17. EXT2 S-VIDEO OUT jack Connect an S-Video cable here and to the Recorder. AUDIO OUT Jacks / Left (white) and Right (red) Connect the supplied audio cables here and to the S-Video Out jack of optional video equipment (for both DVD and VCR modes. (Antenna) OUT Jack ...yellow) Connect the yellow video cable (supplied) here and to the Component Video In jacks of a camcorder, another VCR, another TV, etc. This supplies the picture for both VCR and DVD modes. See page 17. See page 13. AUDIO OUT Jacks / Left (white) and Right (red) Connect audio cables here and to ...
User manual, English (US)
Page 60
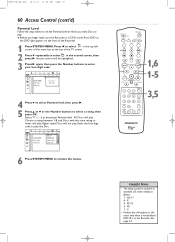
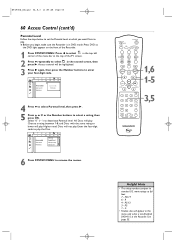
Select "0" (- -) to play the Disc. Enter the four-digit code to deactivate Parental level. NC-17 6 - R 4 - G • Finalize disc will play . W X YZ a ~ 1 2 1en off no off s Access control Auto resume Finalize disc [] [] [] [] Enter code 4 Press L to select Parental level...steps below to set the Parental Level at the top of the TV screen. 2 Press L repeatedly to play . PG 1 - Press DVD so the DVD light appears on the front of the Recorder. 1 Press SYSTEM MENU. W X YZ a ~ 1 2 1en off no off Access control Auto resume Finalize disc Child lock 2 ...
Select "0" (- -) to play the Disc. Enter the four-digit code to deactivate Parental level. NC-17 6 - R 4 - G • Finalize disc will play . W X YZ a ~ 1 2 1en off no off s Access control Auto resume Finalize disc [] [] [] [] Enter code 4 Press L to select Parental level...steps below to set the Parental Level at the top of the TV screen. 2 Press L repeatedly to play . PG 1 - Press DVD so the DVD light appears on the front of the Recorder. 1 Press SYSTEM MENU. W X YZ a ~ 1 2 1en off no off Access control Auto resume Finalize disc Child lock 2 ...


