User Manual
Page 1
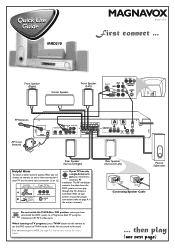
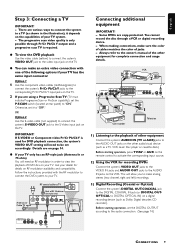
...owner's manual for proper connection (refer to page 9 in order for more details. When listening to TV programs, press TV/AV button on the remote to set the DVD system to TV/AV mode in the owner's manual.) P-SCAN Do not switch the P-SCAN to 'ON' position, unless ... Helpful Hints To obtain a better picture quality effect, you will need an ANTENNA IN accessory RF modulator. then play through the TV's Antenna connector. MRD210 MAGNAVOX Printed in the owner's manual for the sound to be heard. For connecting to a VCR, see next page) Rear Speaker (Surround Left) Passive Subwoofer...
...owner's manual for proper connection (refer to page 9 in order for more details. When listening to TV programs, press TV/AV button on the remote to set the DVD system to TV/AV mode in the owner's manual.) P-SCAN Do not switch the P-SCAN to 'ON' position, unless ... Helpful Hints To obtain a better picture quality effect, you will need an ANTENNA IN accessory RF modulator. then play through the TV's Antenna connector. MRD210 MAGNAVOX Printed in the owner's manual for the sound to be heard. For connecting to a VCR, see next page) Rear Speaker (Surround Left) Passive Subwoofer...
User Manual
Page 2
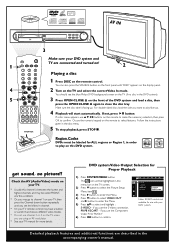
... PR PB Y / SCART Note: SCART control not available for Proper Playback 1) Press SYSTEM MENU button. You should see the Video In channel. * Or, your TV remote control may go to play on this channel is facing up . 4 Playback will be labeled for more details. Make sure the disc label is between... Menu. 4) Press 4 button to select 'VIDEO OUT' and 2 button to enter the Menu. 5) Press 34 to close the disc tray. Or, use 3 4 1 2 buttons on the remote to make the necessary selection, then press OK to play face up . if you want to channel 1 on your TV, then press the Channel down...
... PR PB Y / SCART Note: SCART control not available for Proper Playback 1) Press SYSTEM MENU button. You should see the Video In channel. * Or, your TV remote control may go to play on this channel is facing up . 4 Playback will be labeled for more details. Make sure the disc label is between... Menu. 4) Press 4 button to select 'VIDEO OUT' and 2 button to enter the Menu. 5) Press 34 to close the disc tray. Or, use 3 4 1 2 buttons on the remote to make the necessary selection, then press OK to play face up . if you want to channel 1 on your TV, then press the Channel down...
User Manual
Page 8
...equipment 2) Using the VCR for recording DVDs 3) Digital Recording (Coaxial or Optical) Functional Overview Front and Rear panels 10 Remote control 11 Preparations Inserting batteries into the remote control 12 Switching on the system 12 Setting up the surround sound system 12-13 Placing the speakers Changing the volume level... Volume control 23 Selecting the surround sound mode 23 Selecting the digital sound effect 23 Dimming the display screen 23 Using the remote to operate your Philips television 23 Specifications 24 Troubleshooting 25 Glossary 26 Limited Warranty 27 6 CONTENTS
...equipment 2) Using the VCR for recording DVDs 3) Digital Recording (Coaxial or Optical) Functional Overview Front and Rear panels 10 Remote control 11 Preparations Inserting batteries into the remote control 12 Switching on the system 12 Setting up the surround sound system 12-13 Placing the speakers Changing the volume level... Volume control 23 Selecting the surround sound mode 23 Selecting the digital sound effect 23 Dimming the display screen 23 Using the remote to operate your Philips television 23 Specifications 24 Troubleshooting 25 Glossary 26 Limited Warranty 27 6 CONTENTS
User Manual
Page 9
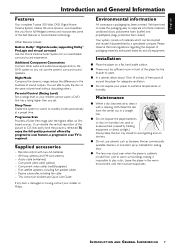
.... INTRODUCTION AND GENERAL INFORMATION 7 It can double the vertical resolution of the picture to standby mode automatically at the same volume level without disturbing others. Remote control with the highest effect on film based sources. G In a cabinet, allows about 10cm (4 inches) of the player for a movie-theater surround sound experience. Maintenance...
.... INTRODUCTION AND GENERAL INFORMATION 7 It can double the vertical resolution of the picture to standby mode automatically at the same volume level without disturbing others. Remote control with the highest effect on film based sources. G In a cabinet, allows about 10cm (4 inches) of the player for a movie-theater surround sound experience. Maintenance...
User Manual
Page 11
... according to the S-Video input jack on the TV. IMPORTANT! RF coaxial cable to "OFF." Before starting operation, press TV/AV or AUX on the remote control to the AUDIO IN jacks on page 14. Details are using a Progressive Scan TV (TV must indicate Progressive Scan or ProScan capability), set accordingly...
... according to the S-Video input jack on the TV. IMPORTANT! RF coaxial cable to "OFF." Before starting operation, press TV/AV or AUX on the remote control to the AUDIO IN jacks on page 14. Details are using a Progressive Scan TV (TV must indicate Progressive Scan or ProScan capability), set accordingly...

User Manual
Page 13
...TV VOL +/- - to standby mode. to adjust the center speaker's level. Then select the desired function (É, S , T for remote control: - to optimize the dynamics of the source select keys on a disc. @ SUBW +/- - FUNCTIONAL OVERVIEW 11 to select multichannel ... or Dolby ProLogic) or stereo sound effect. 9 SOUND - to select the desired source (TV/AV, DISC, TUNER or AUX.) 3 DISC MENU (disc mode only) - English Remote Control 1 ¡ 2 ) 3 ( 4 5 * 6 & 7 ^ 8 % 9 $ 0 # ! @ Notes for example). 1 MUTE - to the previous/next chapter/track. -...
...TV VOL +/- - to standby mode. to adjust the center speaker's level. Then select the desired function (É, S , T for remote control: - to optimize the dynamics of the source select keys on a disc. @ SUBW +/- - FUNCTIONAL OVERVIEW 11 to select multichannel ... or Dolby ProLogic) or stereo sound effect. 9 SOUND - to select the desired source (TV/AV, DISC, TUNER or AUX.) 3 DISC MENU (disc mode only) - English Remote Control 1 ¡ 2 ) 3 ( 4 5 * 6 & 7 ^ 8 % 9 $ 0 # ! @ Notes for example). 1 MUTE - to the previous/next chapter/track. -...
User Manual
Page 14
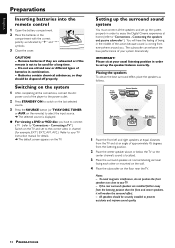
... by "+" and "-" symbols. 3 Close the cover. Notes: - All speakers should be disposed off properly. English Preparations Inserting batteries into the remote control 1 Open the battery compartment. 2 Place the batteries in combination. - To avoid magnetic interference, do not position the front speakers too close...Place the surround speakers at normal listening ear level facing each other or mounted on the wall. 4 Place the subwoofer on the remote) to prevent accidents and improve sound quality. 12 PREPARATIONS Setting up the surround sound system You must connect all the connections, ...
... by "+" and "-" symbols. 3 Close the cover. Notes: - All speakers should be disposed off properly. English Preparations Inserting batteries into the remote control 1 Open the battery compartment. 2 Place the batteries in combination. - To avoid magnetic interference, do not position the front speakers too close...Place the surround speakers at normal listening ear level facing each other or mounted on the wall. 4 Place the subwoofer on the remote) to prevent accidents and improve sound quality. 12 PREPARATIONS Setting up the surround sound system You must connect all the connections, ...
User Manual
Page 15
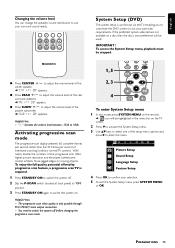
To access the System Setup menu, playback must be used. to switch the system on the remote. ➜ icon will be stopped. 1, 5 G Press CENTER +/- To enjoy the full quality potential offered by progressive scan feature, a progressive scan TV is required. 1 Press STANDBY ...
To access the System Setup menu, playback must be used. to switch the system on the remote. ➜ icon will be stopped. 1, 5 G Press CENTER +/- To enjoy the full quality potential offered by progressive scan feature, a progressive scan TV is required. 1 Press STANDBY ...
User Manual
Page 17
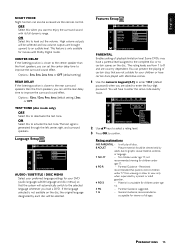
... a parent or adult guardian. 4 PG13 - should be softened and low volume outputs are country dependent. PREPARATIONS 15 High volume outputs will be accessed via the remote control. Options : 5ms, 3ms, 2ms, 1ms or OFF (default setting.) REAR DELAY If the listening position is unsuitable for movies with Dolby Digital mode. Material...
... a parent or adult guardian. 4 PG13 - should be softened and low volume outputs are country dependent. PREPARATIONS 15 High volume outputs will be accessed via the remote control. Options : 5ms, 3ms, 2ms, 1ms or OFF (default setting.) REAR DELAY If the listening position is unsuitable for movies with Dolby Digital mode. Material...
User Manual
Page 18
... first time, key in '1234' (default password.) Then enter your Parental Control password. 16 PREPARATIONS The rating level feature does not work for on the remote will restore all the items in the middle, there are not encoded with a lower or equal level will be played. DEFAULTS RESET Pressing 2 on screen...
... first time, key in '1234' (default password.) Then enter your Parental Control password. 16 PREPARATIONS The rating level feature does not work for on the remote will restore all the items in the middle, there are not encoded with a lower or equal level will be played. DEFAULTS RESET Pressing 2 on screen...
User Manual
Page 19
...objects other regions. To stop playback G Press Ç. If the REPEAT TRACK mode is 32 - To go directly to play on the remote when playing an VCD with regional restrictions. DISC OPERATIONS 17 DVD discs and players are playing. - Maximum 12 characters display - Maximum nested..., pressÉÅ. If you want to malfunction. - G To resume playback, pressÉÅ again. English IMPORTANT! - Do not push on the remote.) 2 Press OPEN•CLOSE 0 button to open the disc tray and load a disc, then press OPEN•CLOSE 0 again to skip backward or forward...
...objects other regions. To stop playback G Press Ç. If the REPEAT TRACK mode is 32 - To go directly to play on the remote when playing an VCD with regional restrictions. DISC OPERATIONS 17 DVD discs and players are playing. - Maximum 12 characters display - Maximum nested..., pressÉÅ. If you want to malfunction. - G To resume playback, pressÉÅ again. English IMPORTANT! - Do not push on the remote.) 2 Press OPEN•CLOSE 0 button to open the disc tray and load a disc, then press OPEN•CLOSE 0 again to skip backward or forward...
User Manual
Page 20
...stop playback, press Ç once. 6 To cancel the program, press Ç again in a track/chapter repeatedly. 1 Press REPEAT A-B on the remote at your chosen end point. ➜ The passage will appear if 99 tracks have to select menu. The resume option may not be stored. Helpful... 1 Stop playback, then press SYSTEM MENU. ➜ The menu bar will cancel the resume option. - Helpful Hint: - Switching on the remote to resume playback from the point at your chosen starting point. 2 Press REPEAT A-B again at which it stopped. Helpful Hints: - English Continue ...
...stop playback, press Ç once. 6 To cancel the program, press Ç again in a track/chapter repeatedly. 1 Press REPEAT A-B on the remote at your chosen end point. ➜ The passage will appear if 99 tracks have to select menu. The resume option may not be stored. Helpful... 1 Stop playback, then press SYSTEM MENU. ➜ The menu bar will cancel the resume option. - Helpful Hint: - Switching on the remote to resume playback from the point at your chosen starting point. 2 Press REPEAT A-B again at which it stopped. Helpful Hints: - English Continue ...
User Manual
Page 21
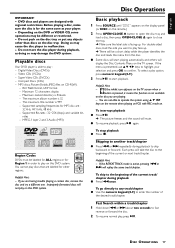
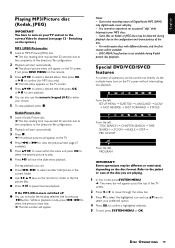
... OK to select the desired picture to turn on the disc format. Refer to select your MP3 discs. - If not, press DISC MENU on the remote. 3 Press 341 2 to select a desired album, then press OK orÉÅ to confirm (for MP3 disc only). ➜ The title menu appears on Kodak.... If the MP3-CD menu is switched off G You can ; For multi-session discs with different formats, only the first session will appear on the remote to pause/resume playback. From the left, SETUP MENU ™ SUBTITLE ™ LANGUAGE ™ SLOW ™ FAST REVERSE ™ FAST FORWARD ™ STATUS From the...
... OK to select the desired picture to turn on the disc format. Refer to select your MP3 discs. - If not, press DISC MENU on the remote. 3 Press 341 2 to select a desired album, then press OK orÉÅ to confirm (for MP3 disc only). ➜ The title menu appears on Kodak.... If the MP3-CD menu is switched off G You can ; For multi-session discs with different formats, only the first session will appear on the remote to pause/resume playback. From the left, SETUP MENU ™ SUBTITLE ™ LANGUAGE ™ SLOW ™ FAST REVERSE ™ FAST FORWARD ™ STATUS From the...

User Manual
Page 23
Checking the contents of DVD 1 Press DISC MENU on the remote. ➜ If the current title has a menu, the menu will start playback automatically. Helpful Hints: - Selecting a title or disc might differ depending on certain DVD ...
Checking the contents of DVD 1 Press DISC MENU on the remote. ➜ If the current title has a menu, the menu will start playback automatically. Helpful Hints: - Selecting a title or disc might differ depending on certain DVD ...
User Manual
Page 24
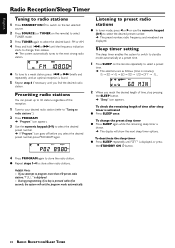
...; "Sleep" icon appears. Sleep timer setting The sleep timer enables the system to switch to standby mode automatically at a preset time. 1 Press SLEEP on the remote) to select TUNER mode. 3 Press TUNER again to select the desired band : FM or AM. 4 Press and hold S or T until the frequency indication starts to.... English Radio Reception/Sleep Timer Tuning to radio stations 1 Press STANDBY ON y to switch on the last selected source. 2 Press SOURCE (or TUNER on the remote repeatedly to select a preset time. ➜ The selections are displayed. G To tune to store other radio stations.
...; "Sleep" icon appears. Sleep timer setting The sleep timer enables the system to switch to standby mode automatically at a preset time. 1 Press SLEEP on the remote) to select TUNER mode. 3 Press TUNER again to select the desired band : FM or AM. 4 Press and hold S or T until the frequency indication starts to.... English Radio Reception/Sleep Timer Tuning to radio stations 1 Press STANDBY ON y to switch on the last selected source. 2 Press SOURCE (or TUNER on the remote repeatedly to select a preset time. ➜ The selections are displayed. G To tune to store other radio stations.
User Manual
Page 25
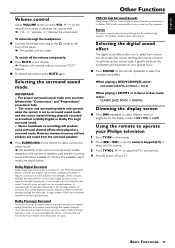
...to adjust the TV's volume level. 4 Press y to select the TV's channel. 3 Press TV VOL +/- G Press SURROUND on the remote to select surround or stereo mode. ➜ The availability of the various surround sound modes depends on the number of your TV. Selecting the ...explosions and low frequency effects you have followed the "Connections" and "Preparations" procedures fully. - Using the remote to operate your Philips television 1 Press TV/AV on the remote repeatedly to optimize certain musical styles. English Volume control Adjust VOLUME button (or press VOL +/- Selecting the ...
...to adjust the TV's volume level. 4 Press y to select the TV's channel. 3 Press TV VOL +/- G Press SURROUND on the remote to select surround or stereo mode. ➜ The availability of the various surround sound modes depends on the number of your TV. Selecting the ...explosions and low frequency effects you have followed the "Connections" and "Preparations" procedures fully. - Using the remote to operate your Philips television 1 Press TV/AV on the remote repeatedly to optimize certain musical styles. English Volume control Adjust VOLUME button (or press VOL +/- Selecting the ...
User Manual
Page 26
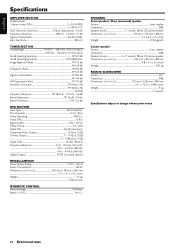
... Power Supply Rating 120 V / 60 Hz Power Consumption 160 W Dimensions (w x h x d 435 mm x 78 mm x 360 mm ...17.1 x 3.1 x 14.2 (inch) Weight ...7.1 kg ...15.62 pounds IR REMOTE CONTROL Effective Range 8 Meter Battery (1.5V) ...AA x 2 SPEAKERS Front speakers / Rear (surround) speaker System ...2-way satellite Impedance ...8 Ω Speaker drivers 3" woofer, 18mm CD dome tweeter...
... Power Supply Rating 120 V / 60 Hz Power Consumption 160 W Dimensions (w x h x d 435 mm x 78 mm x 360 mm ...17.1 x 3.1 x 14.2 (inch) Weight ...7.1 kg ...15.62 pounds IR REMOTE CONTROL Effective Range 8 Meter Battery (1.5V) ...AA x 2 SPEAKERS Front speakers / Rear (surround) speaker System ...2-way satellite Impedance ...8 Ω Speaker drivers 3" woofer, 18mm CD dome tweeter...
User Manual
Page 27
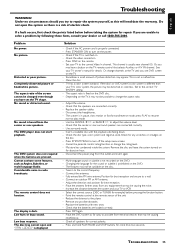
.... - No sound or distorted sound. Press STANDBY ON to a wall. - Check the video connection. - Or, change channels at the remote sensor of picture distortion may have set the TV shape. Clean the disc. - The system is displayed. Cancel the parental control rating function ... SYSTEM MENU to change the rating level. - Distorted or poor picture. Adjust the volume. - The features may not be available on the remote. - The DVD system does not respond when the buttons are connected correctly. - Multi-language sound or subtitle is dark. Select the correct ...
.... - No sound or distorted sound. Press STANDBY ON to a wall. - Check the video connection. - Or, change channels at the remote sensor of picture distortion may have set the TV shape. Clean the disc. - The system is displayed. Cancel the parental control rating function ... SYSTEM MENU to change the rating level. - Distorted or poor picture. Adjust the volume. - The features may not be available on the remote. - The DVD system does not respond when the buttons are connected correctly. - Multi-language sound or subtitle is dark. Select the correct ...

Product Spec Sheet
Page 1
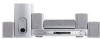
MRD210 Digital Home Cinema Package Progressive Scan • 300 Watts Total System Power • Progressive Scan • DVD, CD, CD-R, CD-RW and MP3-CD playback ... guide included • AM / FM Digital tuning with 40 presets • DVD Parental control with child lock • Full Function remote control • Easy to set-up, color coded connections Complete Model # MRD210/37 Available: Now Master carton dimensions (lxwxh): 23.1" L x 14.0" W x 21.2" H Weight (lbs): 46.3 40 ft Container Qty: 504 Country...
MRD210 Digital Home Cinema Package Progressive Scan • 300 Watts Total System Power • Progressive Scan • DVD, CD, CD-R, CD-RW and MP3-CD playback ... guide included • AM / FM Digital tuning with 40 presets • DVD Parental control with child lock • Full Function remote control • Easy to set-up, color coded connections Complete Model # MRD210/37 Available: Now Master carton dimensions (lxwxh): 23.1" L x 14.0" W x 21.2" H Weight (lbs): 46.3 40 ft Container Qty: 504 Country...


