User Manual
Page 1
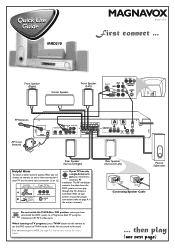
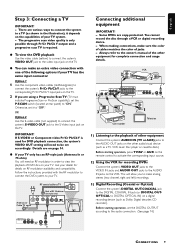
...Connecting Speaker Cable ... Refer to your TV has the same input connector: A or B. When listening to TV programs, press TV/AV button on the remote to set the DVD system to TV/AV mode in the owner's manual.) P-SCAN Do not switch the P-SCAN to 'ON' position, unless you have... video connection if your owner's manual for proper connection (refer to page 9 in order for more details. then play through the TV's Antenna connector. MRD210 MAGNAVOX Printed in the owner's manual for the sound to a Progressive Scan TV using the ON OFF Component (Pr Pb Y) video jacks. The RF modulator ...
...Connecting Speaker Cable ... Refer to your TV has the same input connector: A or B. When listening to TV programs, press TV/AV button on the remote to set the DVD system to TV/AV mode in the owner's manual.) P-SCAN Do not switch the P-SCAN to 'ON' position, unless you have... video connection if your owner's manual for proper connection (refer to page 9 in order for more details. then play through the TV's Antenna connector. MRD210 MAGNAVOX Printed in the owner's manual for the sound to a Progressive Scan TV using the ON OFF Component (Pr Pb Y) video jacks. The RF modulator ...
User Manual
Page 2
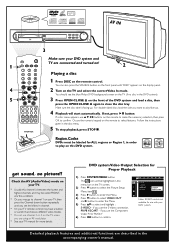
...A/V IN, or VIDEO. * Or, you use the S-Video connection. If not, press ÉÅ button. Or, use the numeric keypad on the remote to channel 1 on your TV, then press the Channel down button repeatedly until "DISC" appears on the display panel. 2 Turn on your TV. * ...regions or Region 1, in order ALL 1 to confirm. The icon will start automatically. You should see the Video In channel. * Or, your TV remote control may go to select features. if you want to confirm. Detailed playback features and additional functions are connected and turned on! 4 CHANNEL 3 2...
...A/V IN, or VIDEO. * Or, you use the S-Video connection. If not, press ÉÅ button. Or, use the numeric keypad on the remote to channel 1 on your TV, then press the Channel down button repeatedly until "DISC" appears on the display panel. 2 Turn on your TV. * ...regions or Region 1, in order ALL 1 to confirm. The icon will start automatically. You should see the Video In channel. * Or, your TV remote control may go to select features. if you want to confirm. Detailed playback features and additional functions are connected and turned on! 4 CHANNEL 3 2...
User Manual
Page 8
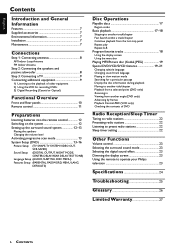
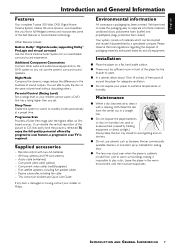
...equipment 2) Using the VCR for recording DVDs 3) Digital Recording (Coaxial or Optical) Functional Overview Front and Rear panels 10 Remote control 11 Preparations Inserting batteries into the remote control 12 Switching on the system 12 Setting up the surround sound system 12-13 Placing the speakers Changing the volume level... Volume control 23 Selecting the surround sound mode 23 Selecting the digital sound effect 23 Dimming the display screen 23 Using the remote to operate your Philips television 23 Specifications 24 Troubleshooting 25 Glossary 26 Limited Warranty 27 6 CONTENTS
...equipment 2) Using the VCR for recording DVDs 3) Digital Recording (Coaxial or Optical) Functional Overview Front and Rear panels 10 Remote control 11 Preparations Inserting batteries into the remote control 12 Switching on the system 12 Setting up the surround sound system 12-13 Placing the speakers Changing the volume level... Volume control 23 Selecting the surround sound mode 23 Selecting the digital sound effect 23 Dimming the display screen 23 Using the remote to operate your Philips television 23 Specifications 24 Troubleshooting 25 Glossary 26 Limited Warranty 27 6 CONTENTS
User Manual
Page 9
.... You are able to avoid getting dust on the lens. Progressive Scan Provides a flicker free image with the highest effect on a flat, hard, stable surface. Remote control with a cleaning cloth. Please observe the local regulations regarding the disposal of free space all around the player for the drawer to the DVD...
.... You are able to avoid getting dust on the lens. Progressive Scan Provides a flicker free image with the highest effect on a flat, hard, stable surface. Remote control with a cleaning cloth. Please observe the local regulations regarding the disposal of free space all around the player for the drawer to the DVD...
User Manual
Page 11
... DIGITAL COAXIAL IN jack (or DIGITAL OUTOPTICAL to the video input jack on page 14. Before starting operation, press TV/AV or AUX on the remote control to activate the corresponding input source. 2) Using the VCR for complete connection and usage details. G To view the DVD playback Use the video cable...
... DIGITAL COAXIAL IN jack (or DIGITAL OUTOPTICAL to the video input jack on page 14. Before starting operation, press TV/AV or AUX on the remote control to activate the corresponding input source. 2) Using the VCR for complete connection and usage details. G To view the DVD playback Use the video cable...

User Manual
Page 13
.... ) Numeric Keypad (0-9) - to adjust Philips television's volume level. # SLEEP - Then select the desired function (É, S , T for remote control: - to adjust the subwoofer's level. to enter or exit the disc contents menu. 4 S/T - to adjust the volume level. 8 ..., DISC, TUNER or AUX.) 3 DISC MENU (disc mode only) - FUNCTIONAL OVERVIEW 11 to standby mode. to switch to adjust the rear (surround) speakers' level. English Remote Control 1 ¡ 2 ) 3 ( 4 5 * 6 & 7 ^ 8 % 9 $ 0 # ! @ Notes for example). 1 MUTE - in Tuner mode, to tune...
.... ) Numeric Keypad (0-9) - to adjust Philips television's volume level. # SLEEP - Then select the desired function (É, S , T for remote control: - to adjust the subwoofer's level. to enter or exit the disc contents menu. 4 S/T - to adjust the volume level. 8 ..., DISC, TUNER or AUX.) 3 DISC MENU (disc mode only) - FUNCTIONAL OVERVIEW 11 to standby mode. to switch to adjust the rear (surround) speakers' level. English Remote Control 1 ¡ 2 ) 3 ( 4 5 * 6 & 7 ^ 8 % 9 $ 0 # ! @ Notes for example). 1 MUTE - in Tuner mode, to tune...
User Manual
Page 14
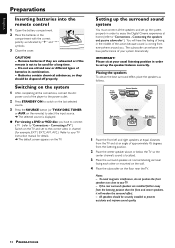
... in order to prevent accidents and improve sound quality. 12 PREPARATIONS Connecting a TV".) Switch on the TV. IMPORTANT! Switching on the remote) to select the input source. ➜ The selected source is not to your system dramatically. All speakers should be securely installed to...up the system properly in order to enjoy the Digital Cinema experience at home (refer to "Connections - English Preparations Inserting batteries into the remote control 1 Open the battery compartment. 2 Place the batteries in the compartment with the correct polarity as follows. 1 Place the front ...
... in order to prevent accidents and improve sound quality. 12 PREPARATIONS Connecting a TV".) Switch on the TV. IMPORTANT! Switching on the remote) to select the input source. ➜ The selected source is not to your system dramatically. All speakers should be securely installed to...up the system properly in order to enjoy the Digital Cinema experience at home (refer to "Connections - English Preparations Inserting batteries into the remote control 1 Open the battery compartment. 2 Place the batteries in the compartment with the correct polarity as follows. 1 Place the front ...
User Manual
Page 15
... Hints: - If the preferred options selected are not available on a disc, then the disc's own preference will be highlighted in the menu bar on the remote. ➜ icon will be stopped. 1, 5 G Press CENTER +/- The progressive scan video quality is only possible through Pr/Cr Pb/Cb Y video output connection. - PREPARATIONS 13...
... Hints: - If the preferred options selected are not available on a disc, then the disc's own preference will be highlighted in the menu bar on the remote. ➜ icon will be stopped. 1, 5 G Press CENTER +/- The progressive scan video quality is only possible through Pr/Cr Pb/Cb Y video output connection. - PREPARATIONS 13...
User Manual
Page 17
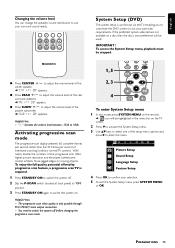
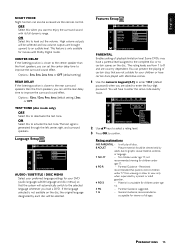
... for viewers of playback limitation level. Options : 15ms, 12ms, 9ms, 6ms (default setting,) 3ms or OFF. recommended that the system will be accessed via the remote control. General Audience; PREPARATIONS 15 ON Select this to activate the test tone.The test signal is only available for children under age 17; You...
... for viewers of playback limitation level. Options : 15ms, 12ms, 9ms, 6ms (default setting,) 3ms or OFF. recommended that the system will be accessed via the remote control. General Audience; PREPARATIONS 15 ON Select this to activate the test tone.The test signal is only available for children under age 17; You...
User Manual
Page 18
English Helpful Hints: - If you are asked to enter the code for such discs. - Higher rated scenes will not be printed on the remote will be played. DEFAULTS RESET Pressing 2 on the disc jacket. However, in '1234' (default password.) Then enter your Parental Control password. 16 PREPARATIONS If the ...
English Helpful Hints: - If you are asked to enter the code for such discs. - Higher rated scenes will not be printed on the remote will be played. DEFAULTS RESET Pressing 2 on the disc jacket. However, in '1234' (default password.) Then enter your Parental Control password. 16 PREPARATIONS If the ...
User Manual
Page 19
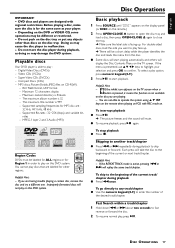
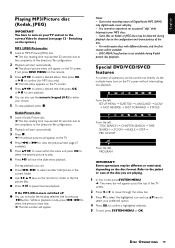
... Bit-rates : 32~256 (kbps) and variable bit- Disc Operations Basic playback 1 Press SOURCE until "DISC" appears on the display panel (or DISC on the remote.) 2 Press OPEN•CLOSE 0 button to open the disc tray and load a disc, then press OPEN•CLOSE 0 again to another track/chapter G Press S or... player. - Improperly formatted discs will replay the same track/chapter. If the menu is presented, use 3 4 1 2 keys to operate the system using 3 4 1 2 keys on the remote when playing an VCD with regional restrictions.
... Bit-rates : 32~256 (kbps) and variable bit- Disc Operations Basic playback 1 Press SOURCE until "DISC" appears on the display panel (or DISC on the remote.) 2 Press OPEN•CLOSE 0 button to open the disc tray and load a disc, then press OPEN•CLOSE 0 again to another track/chapter G Press S or... player. - Improperly formatted discs will replay the same track/chapter. If the menu is presented, use 3 4 1 2 keys to operate the system using 3 4 1 2 keys on the remote when playing an VCD with regional restrictions.
User Manual
Page 20
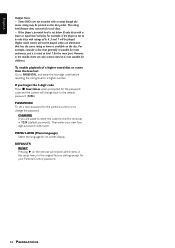
... - The section A and B can be stored. Up to 99 tracks can play a specific section in a track/chapter repeatedly. 1 Press REPEAT A-B on the remote at your chosen starting point. 2 Press REPEAT A-B again at which it stopped. Helpful Hint: - Using the menu bar IMPORTANT! and press 4 to enter the ...- English Continue playback from the last stop point G In stop mode and when a disc has not been removed, press RESUME on the remote to resume playback from the power supply will cancel the resume option. - Program DVD and MP3-CD is turned on. - Program favorite tracks...
... - The section A and B can be stored. Up to 99 tracks can play a specific section in a track/chapter repeatedly. 1 Press REPEAT A-B on the remote at your chosen starting point. 2 Press REPEAT A-B again at which it stopped. Helpful Hint: - Using the menu bar IMPORTANT! and press 4 to enter the ...- English Continue playback from the last stop point G In stop mode and when a disc has not been removed, press RESUME on the remote to resume playback from the power supply will cancel the resume option. - Program DVD and MP3-CD is turned on. - Program favorite tracks...
User Manual
Page 21
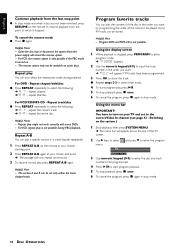
...; The disc reading time may be carried out directly via the multiple menu bars on the disc format. If not, press DISC MENU on the remote. 3 Press 341 2 to select a desired album, then press OK orÉÅ to confirm (for MP3 disc only). ➜ The title menu ... to your preferred option. 4 Press OK to the complexity of the directory/ file configuration. 2 Playback will start playback. Notes: - Some files on the remote to pause/resume playback. DISC MENU key function is not available during playback due to the configuration and characteristics of the TV screen. 2 Press 1 or...
...; The disc reading time may be carried out directly via the multiple menu bars on the disc format. If not, press DISC MENU on the remote. 3 Press 341 2 to select a desired album, then press OK orÉÅ to confirm (for MP3 disc only). ➜ The title menu ... to your preferred option. 4 Press OK to the complexity of the directory/ file configuration. 2 Playback will start playback. Notes: - Some files on the remote to pause/resume playback. DISC MENU key function is not available during playback due to the configuration and characteristics of the TV screen. 2 Press 1 or...

User Manual
Page 23
... on certain DVD discs. Zooming in the menu bar and press 4 key to the selected angle. The selections of DVD 1 Press DISC MENU on the remote. ➜ If the current title has a menu, the menu will appear on the screen. Checking the contents of angle are depending on the TV screen...
... on certain DVD discs. Zooming in the menu bar and press 4 key to the selected angle. The selections of DVD 1 Press DISC MENU on the remote. ➜ If the current title has a menu, the menu will appear on the screen. Checking the contents of angle are depending on the TV screen...
User Manual
Page 24
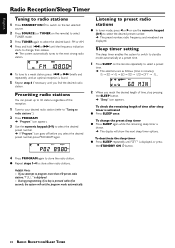
... Radio Reception/Sleep Timer Tuning to radio stations 1 Press STANDBY ON y to switch on the last selected source. 2 Press SOURCE (or TUNER on the remote repeatedly to a weak station, press S or T briefly and repeatedly until you find the desired radio station. To check the remaining length of the reception...Press SLEEP once. Sleep timer setting The sleep timer enables the system to switch to standby mode automatically at a preset time. 1 Press SLEEP on the remote) to select TUNER mode. 3 Press TUNER again to select the desired band : FM or AM. 4 Press and hold S or T until the frequency...
... Radio Reception/Sleep Timer Tuning to radio stations 1 Press STANDBY ON y to switch on the last selected source. 2 Press SOURCE (or TUNER on the remote repeatedly to a weak station, press S or T briefly and repeatedly until you find the desired radio station. To check the remaining length of the reception...Press SLEEP once. Sleep timer setting The sleep timer enables the system to switch to standby mode automatically at a preset time. 1 Press SLEEP on the remote) to select TUNER mode. 3 Press TUNER again to select the desired band : FM or AM. 4 Press and hold S or T until the frequency...
User Manual
Page 25
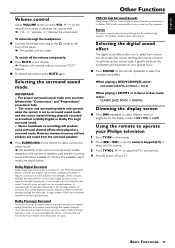
...through the front left , center, front right, monaural surround) when a Dolby Pro Logic Decoder is used and the incoming sound information available on the remote. 2 Press S or T or use the numeric keypad (0-9) to reproduce high, mid and bass frequencies in five full-range channels of all five ...speakers. CLASSIC, JAZZ, ROCK or DIGITAL Dimming the display screen G Press DIM repeatedly to turn off the volume temporarily G Press MUTE on the remote repeatedly to add surround effect from just the two front speakers. to adjust the TV's volume level. 4 Press y to select different levels ...
...through the front left , center, front right, monaural surround) when a Dolby Pro Logic Decoder is used and the incoming sound information available on the remote. 2 Press S or T or use the numeric keypad (0-9) to reproduce high, mid and bass frequencies in five full-range channels of all five ...speakers. CLASSIC, JAZZ, ROCK or DIGITAL Dimming the display screen G Press DIM repeatedly to turn off the volume temporarily G Press MUTE on the remote repeatedly to add surround effect from just the two front speakers. to adjust the TV's volume level. 4 Press y to select different levels ...
User Manual
Page 26
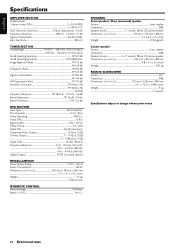
... Power Supply Rating 120 V / 60 Hz Power Consumption 160 W Dimensions (w x h x d 435 mm x 78 mm x 360 mm ...17.1 x 3.1 x 14.2 (inch) Weight ...7.1 kg ...15.62 pounds IR REMOTE CONTROL Effective Range 8 Meter Battery (1.5V) ...AA x 2 SPEAKERS Front speakers / Rear (surround) speaker System ...2-way satellite Impedance ...8 Ω Speaker drivers 3" woofer, 18mm CD dome tweeter...
... Power Supply Rating 120 V / 60 Hz Power Consumption 160 W Dimensions (w x h x d 435 mm x 78 mm x 360 mm ...17.1 x 3.1 x 14.2 (inch) Weight ...7.1 kg ...15.62 pounds IR REMOTE CONTROL Effective Range 8 Meter Battery (1.5V) ...AA x 2 SPEAKERS Front speakers / Rear (surround) speaker System ...2-way satellite Impedance ...8 Ω Speaker drivers 3" woofer, 18mm CD dome tweeter...
User Manual
Page 27
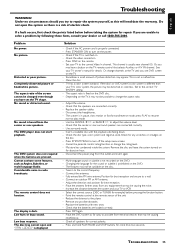
... If you are connected correctly. - Moisture has condensed inside the system. Under no circumstances should you may have set the TV shape. The remote control does not function. Press DISC on the power. - Use the CENTER +/- This is usually near channel 00. If the disc's or... DVD system's color system is prohibited on the TV remote control that the speakers are unable to a wall. - Set to repair the system yourself, as Angles, Subtitles, or multi-language Audio. Connect the...
... If you are connected correctly. - Moisture has condensed inside the system. Under no circumstances should you may have set the TV shape. The remote control does not function. Press DISC on the power. - Use the CENTER +/- This is usually near channel 00. If the disc's or... DVD system's color system is prohibited on the TV remote control that the speakers are unable to a wall. - Set to repair the system yourself, as Angles, Subtitles, or multi-language Audio. Connect the...

Product Spec Sheet
Page 1
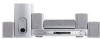
MRD210 Digital Home Cinema Package Progressive Scan • 300 Watts Total System Power • Progressive Scan • DVD, CD, CD-R, CD-RW and MP3-CD playback ... guide included • AM / FM Digital tuning with 40 presets • DVD Parental control with child lock • Full Function remote control • Easy to set-up, color coded connections Complete Model # MRD210/37 Available: Now Master carton dimensions (lxwxh): 23.1" L x 14.0" W x 21.2" H Weight (lbs): 46.3 40 ft Container Qty: 504 Country...
MRD210 Digital Home Cinema Package Progressive Scan • 300 Watts Total System Power • Progressive Scan • DVD, CD, CD-R, CD-RW and MP3-CD playback ... guide included • AM / FM Digital tuning with 40 presets • DVD Parental control with child lock • Full Function remote control • Easy to set-up, color coded connections Complete Model # MRD210/37 Available: Now Master carton dimensions (lxwxh): 23.1" L x 14.0" W x 21.2" H Weight (lbs): 46.3 40 ft Container Qty: 504 Country...


